Integrate with third-party channels to bring the chat experience everywhere your customers are, including email and a variety of social media channels.
This guide will walk you through the setup process, feature compatibility, and channel variable usage for third-party channels in Ada.
This feature may not be included with your organization’s subscription package. For more information, see Ada’s Pricing page, or contact your Ada team.
Social channels have the following constraints:
Social channels enable the following scenarios:
Learn about the features and blocks available for Social channels, and how to configure channel-specific experiences.
The following table lists the social media channels you can use with Ada, as well as the features and blocks each one is compatible with.
In some cases, features might be partially supported or work differently in some channels. In those cases, click the 🗒 icon for more information.
For more information on how some channels may work differently from others, please click each expander below.
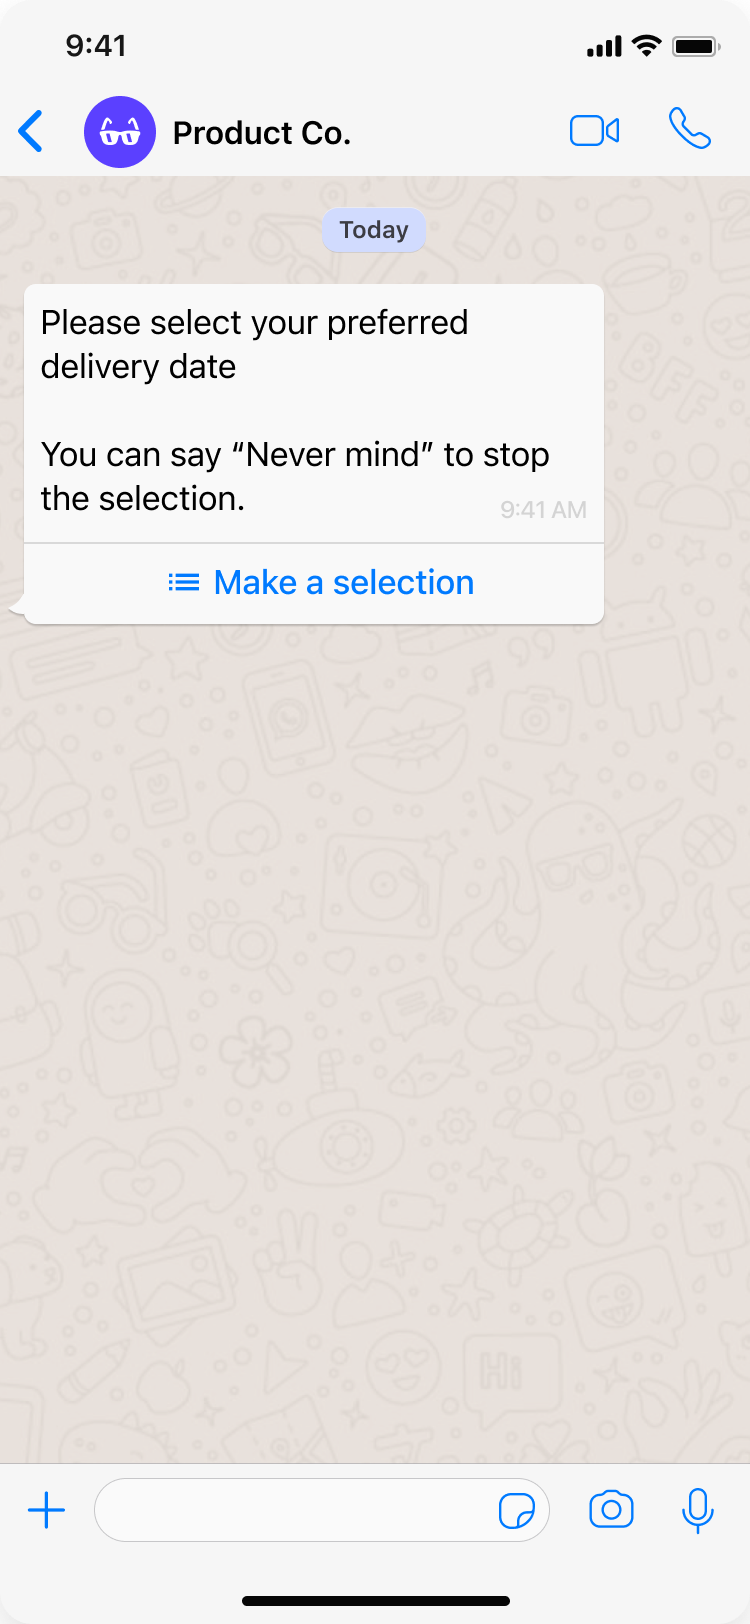
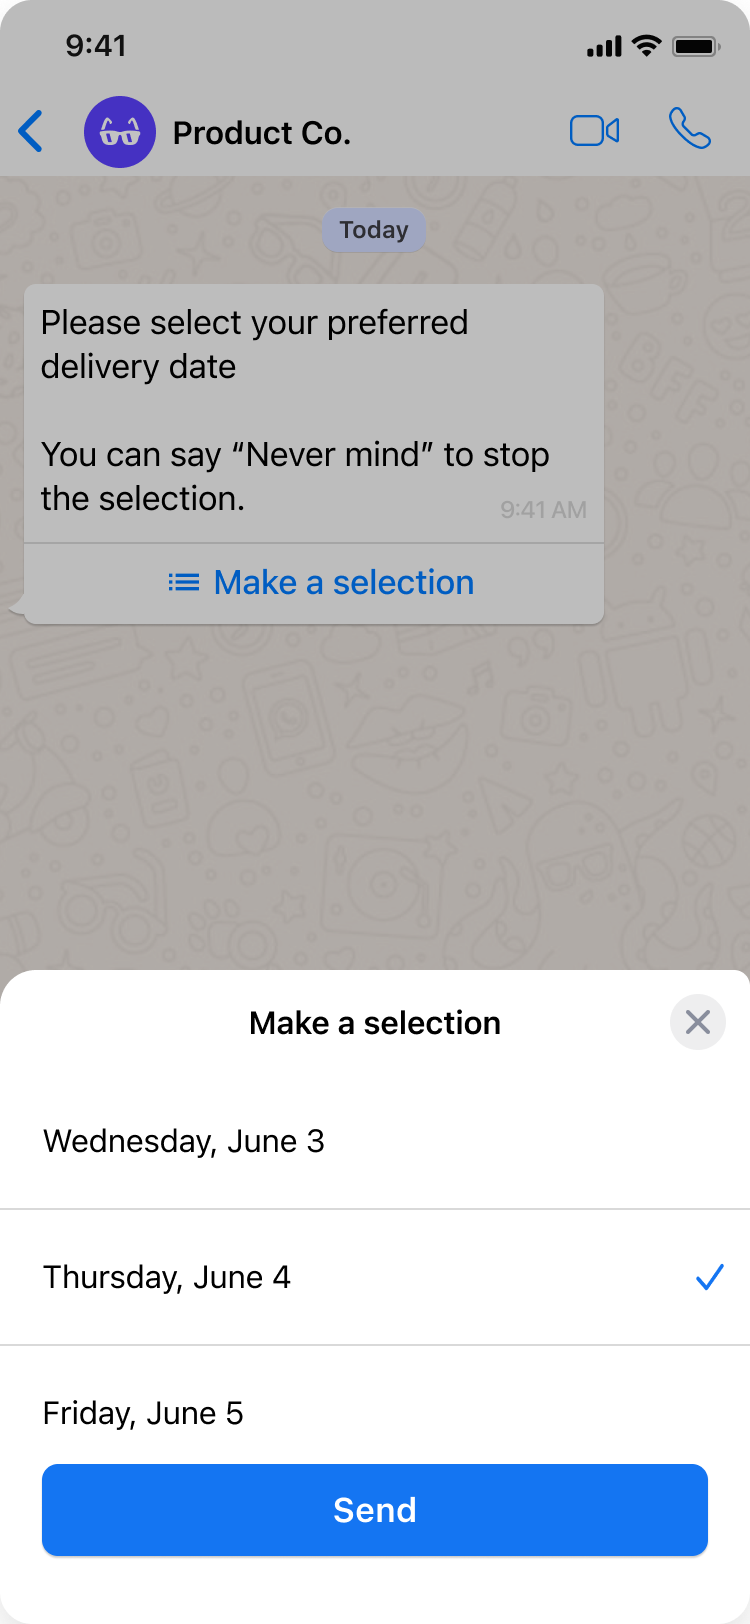
List options: Customers can see a Make a selection button, which they can tap to choose an option from a pop-up menu, as long as they meet the following criteria:
There are a maximum of 10 list options
Each option’s button label contains 24 or fewer characters
The block is configured to only accept a single selection, rather than multi-select
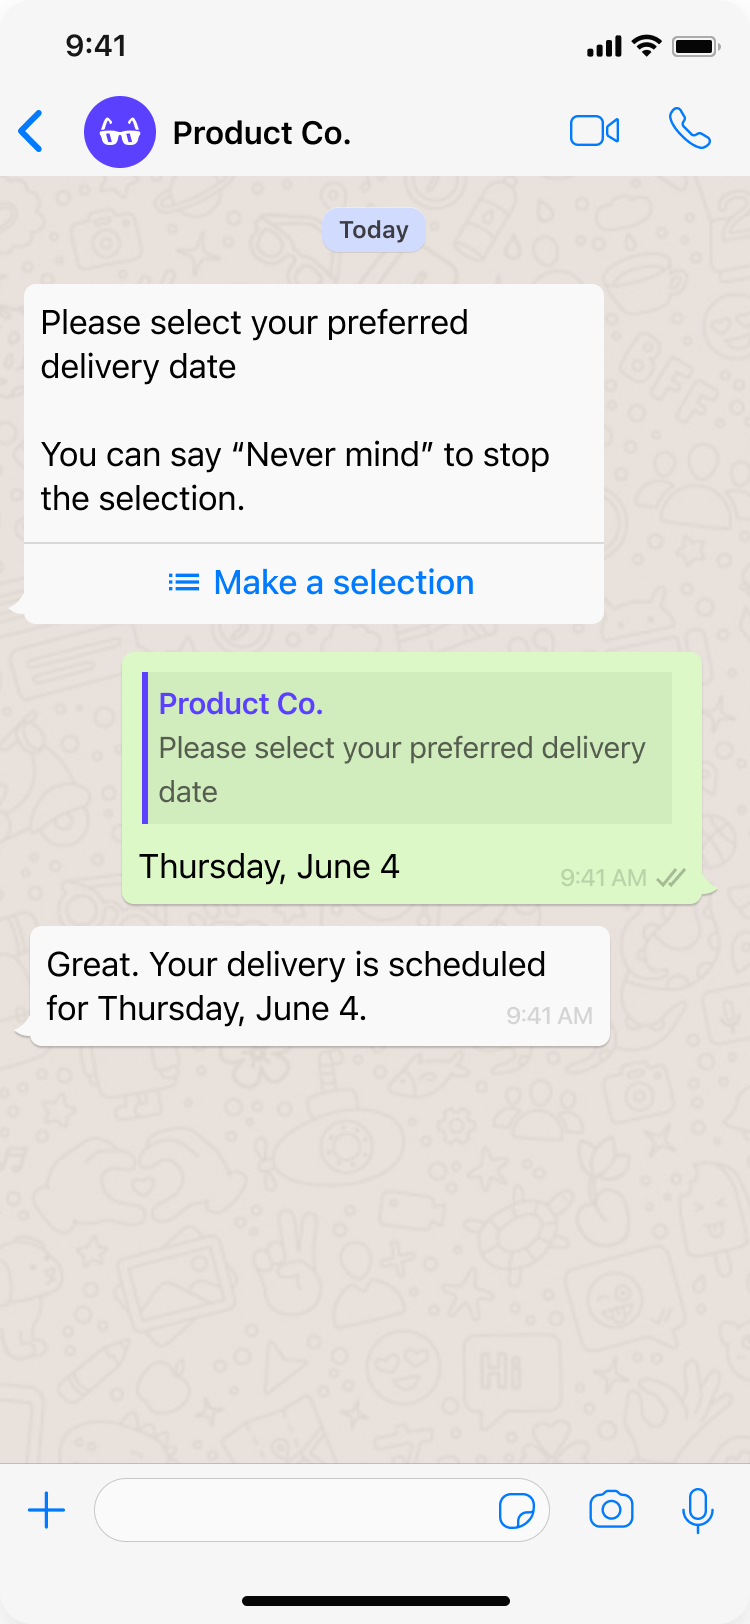
Unlike in web chat, after the customer makes a selection, the Make a selection button is still visible.
Additionally, it’s not possible to customize the “Make a selection” button text.
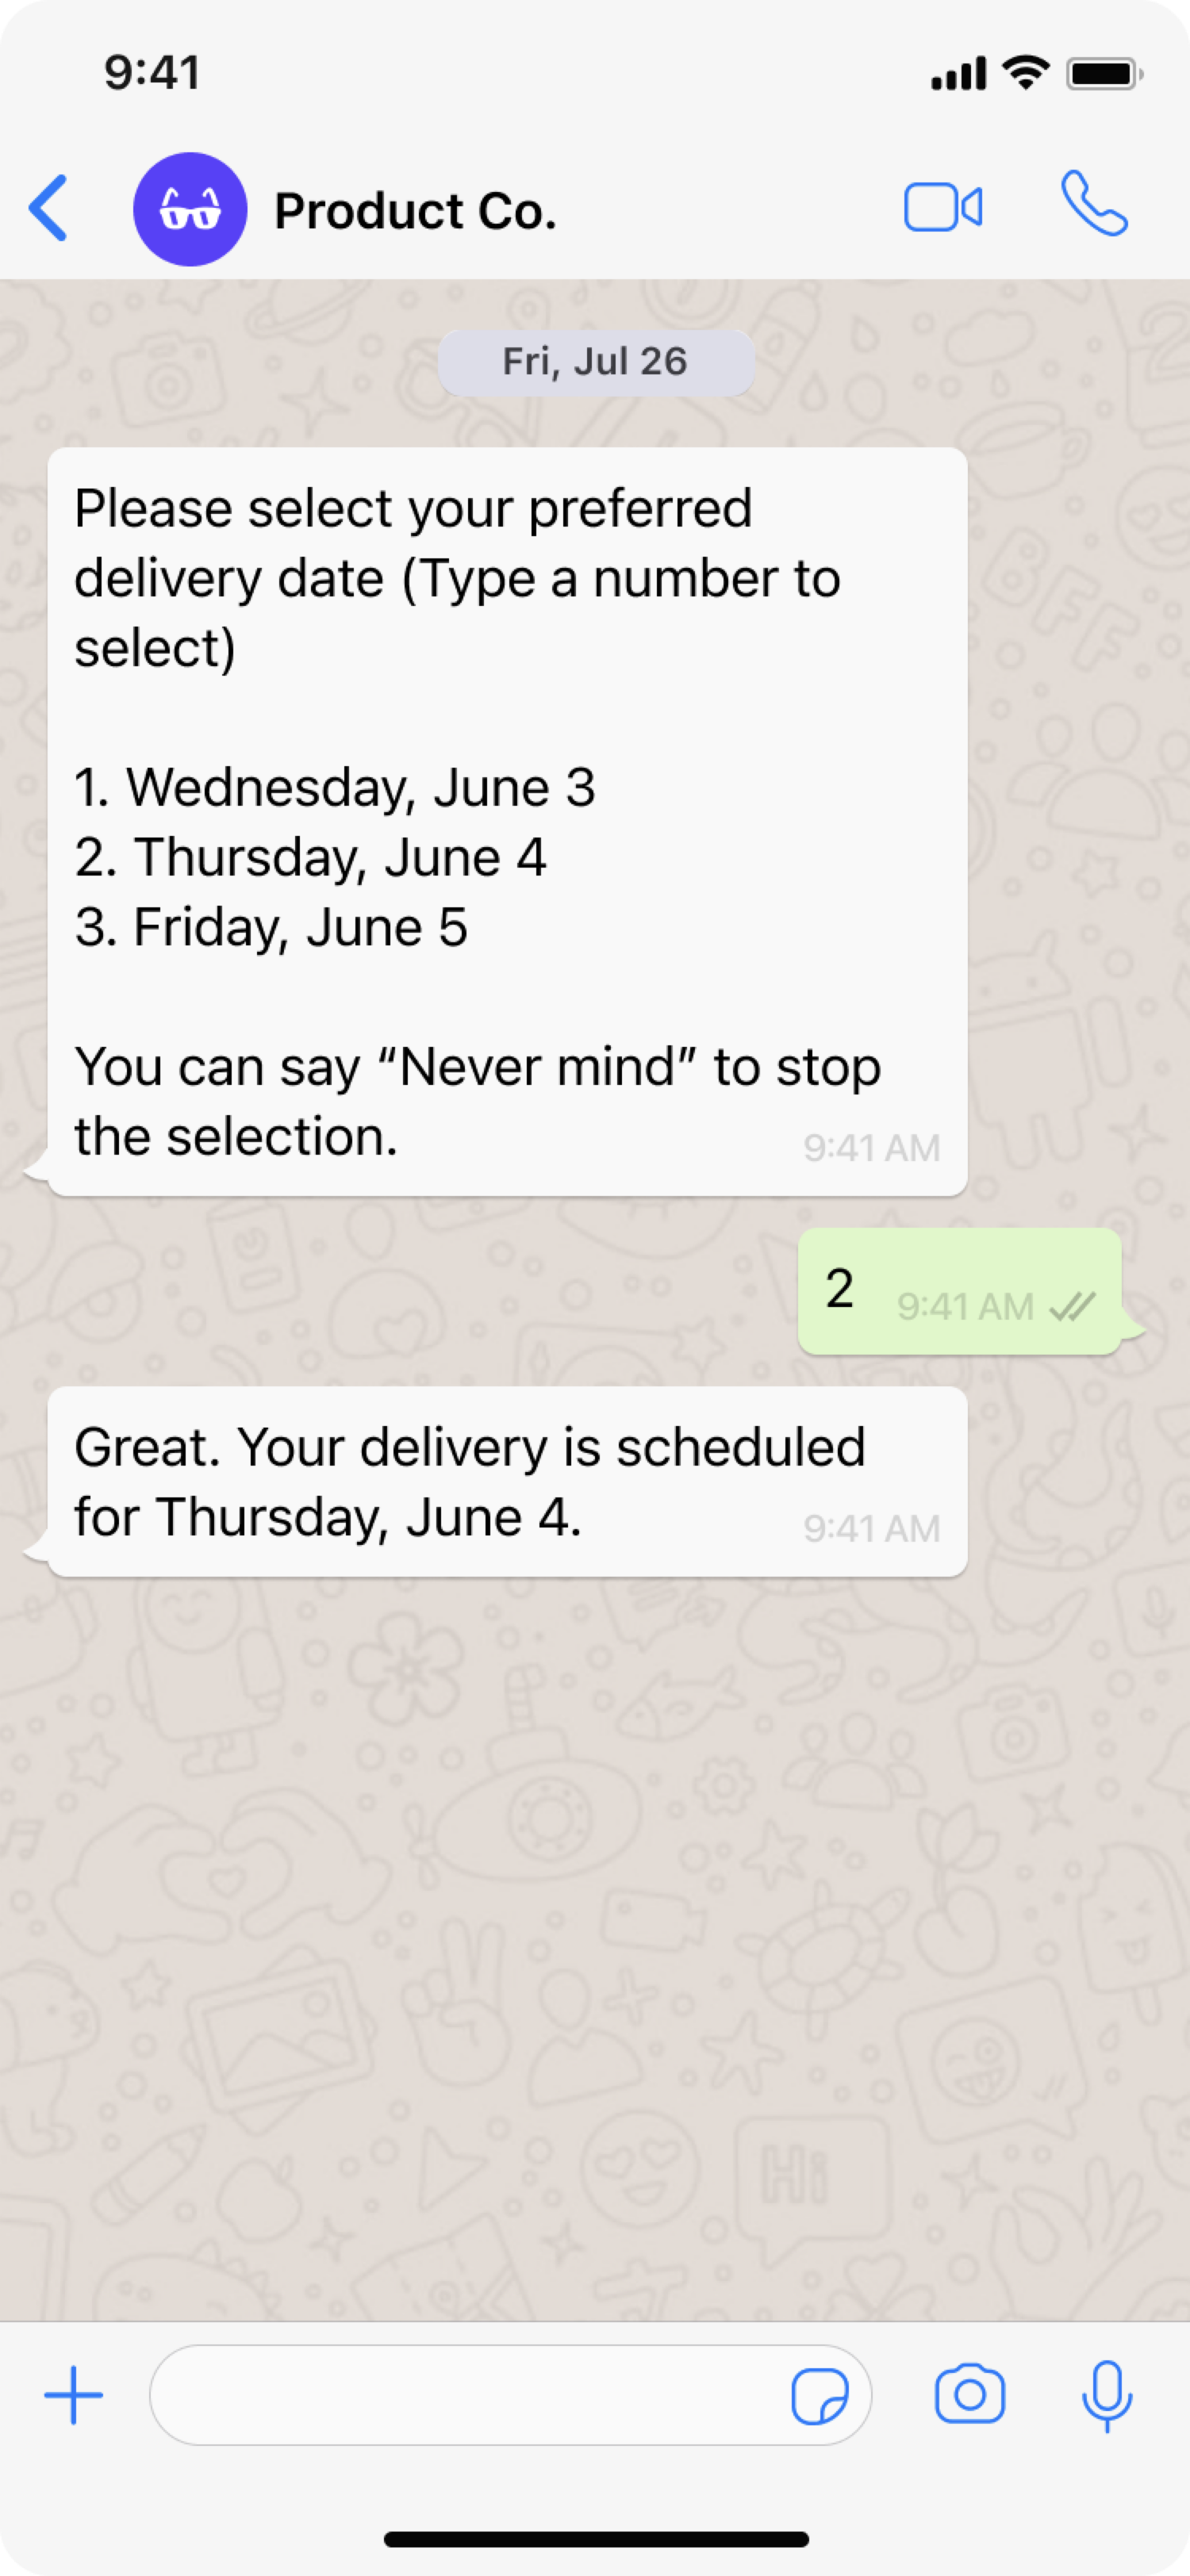
If the list options don’t meet the above criteria, instead of being able to use the pop-up menu, customers see options as a numbered list and can type a number to select the corresponding option.
Some List Option blocks might meet the above criteria, and some might not, so you may see both selection methods.

There are several blocks and features that work differently from Ada’s default chat in Sunshine Conversations Web Messenger. For additional information, see Understand how Ada features work in Sunshine Conversations Web Messenger.
Greetings: Sunshine Conversations Web Messenger does not support Ada’s Greeting. On social channels, the user must always send the first message, and the AI Agent responds using its reasoning engine—not the configured Greeting flow.
If the user types something like hello, the AI Agent may generate a natural greeting response, but this does not trigger the Greeting or any Greeting steps the customer has configured.
Capture: Sunshine Conversations Web Messenger doesn’t support the “Required” toggle. If a dialog flow contains a Capture block, the customer must provide the requested information to advance through the dialog flow. If they don’t, they exit the dialog flow.
List options: Instead of being able to select an option, customers see options as a numbered list and can type a number to select the corresponding option.
Satisfaction Survey: Sunshine Conversations Web Messenger doesn’t support Ada’s Satisfaction Survey block. However, you can use Zendesk Messaging’s survey feature, which asks customers about their experience once the agent marks the conversation as Solved. For more information, see About CSAT ratings in messaging at Zendesk Messaging’s documentation.
Apps: Ada apps are supported on Sunshine Conversations web messenger with the exception of the Fetch Chat Metadata block. To get conversation data, you can use a Request block to request data from Sunshine Conversations’ API. For more information, see Conversations at Sunshine Conversations’ API documentation.
For further information on the features that Sunshine Conversations Web Messenger supports, see Web Messenger at Sunshine Conversations’ documentation.
There are several blocks and features that work differently from Ada’s default chat when using Zendesk’s SDKs to deploy your AI Agent on mobile.
Greetings: Unlike in other channels, customers start the conversations when interacting with the AI Agent through Zendesk SDKs, customers start the conversations. Customers only see the greeting if they write a greeting like “hello.” Otherwise, if a customer starts a conversation with a question like “how do I return an item,” the AI Agent directly their question.
Optionally, when configuring the web widget, you can add text that appears next to the launcher button. For more information, see Configuring the widget launcher at Zendesk’s documentation.
Capture: Zendesk SDKs don’t support the “Required” toggle. If an dialog flow contains a Capture block, the customer must provide the requested information to advance through the dialog flow. If they don’t, they exit the dialog flow.
Additionally, when the AI Agent captures data in sensitive variables, that data isn’t masked in the chat UI.
List options: Instead of being able to select an option, customers see options as a numbered list and can type a number to select the corresponding option.
Zendesk SDKs don’t support the “Response Required” toggle. If a dialog flow contains a List Option block, the customer can skip it without exiting the dialog flow. This can cause problems in some dialog flows, so check your Handoff or Greeting dialog to confirm that customers can’t skip List Option blocks.
Satisfaction Survey: Zendesk SDKs don’t support Ada’s Satisfaction Survey block. However, you can use Zendesk Messaging’s survey feature, which asks customers about their experience once the agent marks the conversation as Solved. For more information, see About CSAT ratings in messaging at Zendesk Messaging’s documentation.
Metavariables: You can’t set metavariables using Zendesk SDKs. If your dialog flows require access to metadata, you can contact your Ada team for assistance, or use an HTTP Request block to request data from Sunshine Conversations’ API. For more information, see Sunshine Conversations’ API documentation.
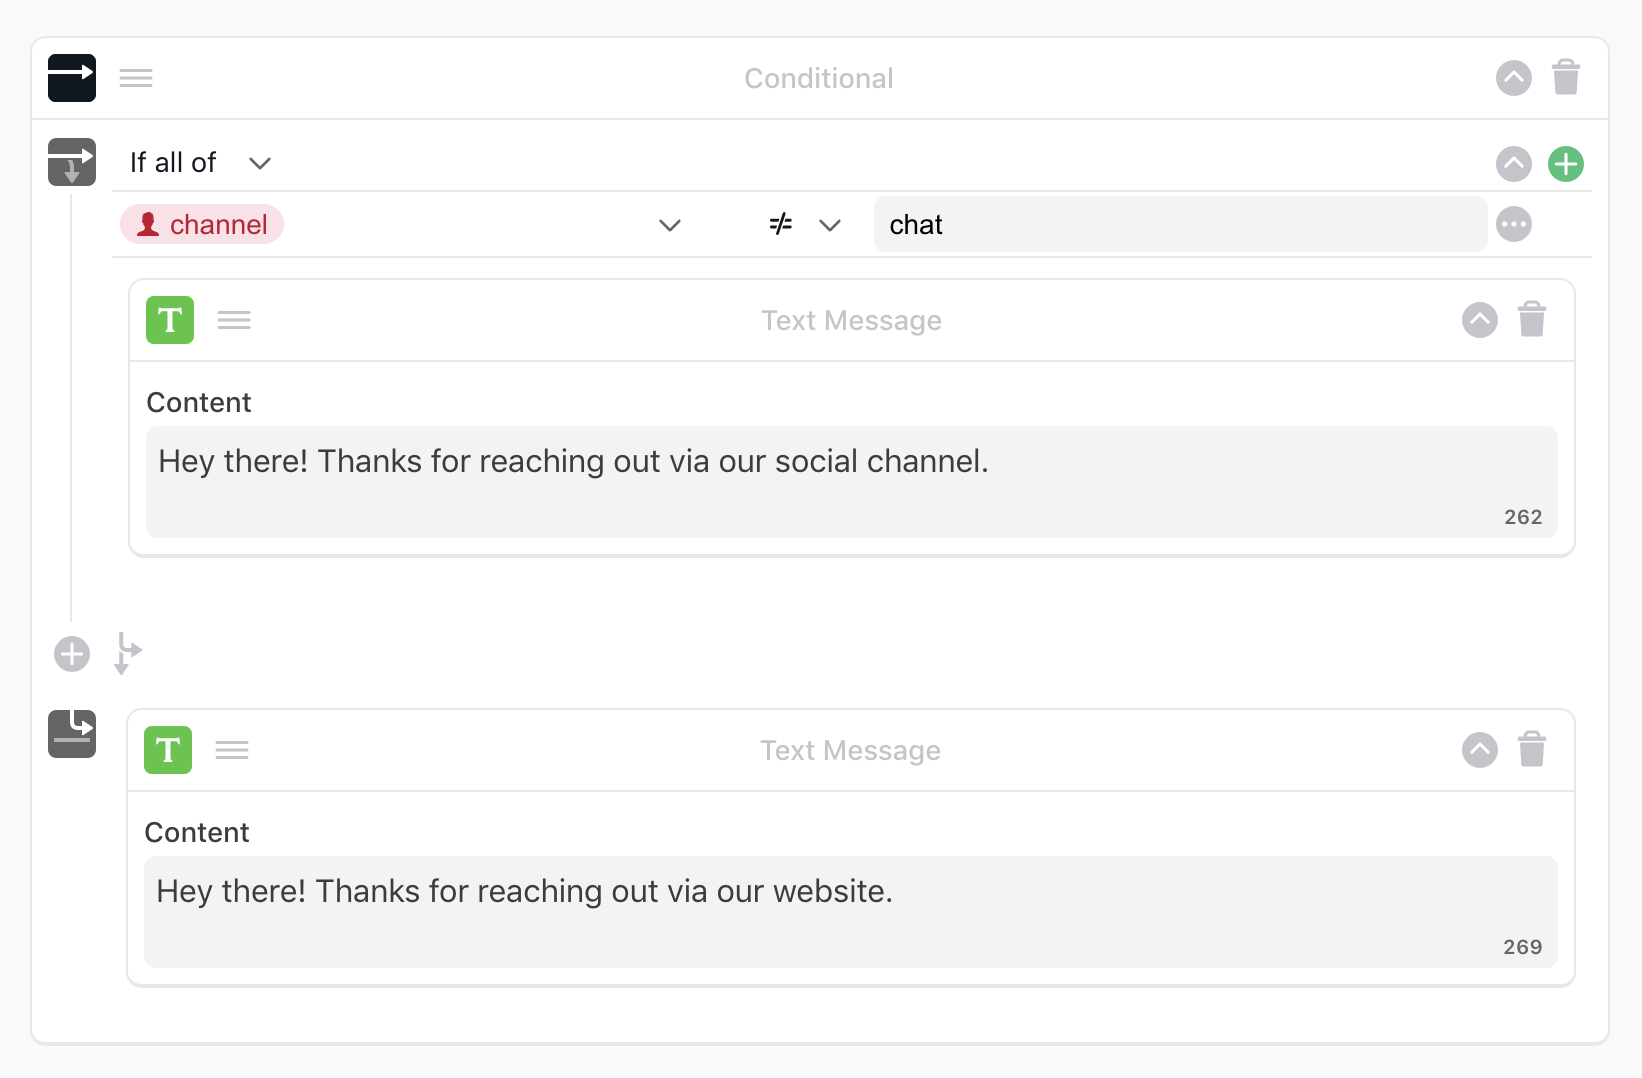
Channel variables allow you to create different chat experiences across
varying channels. To do so, add a conditional block with the
sunshine_end_user_channel variable and set the input to one of the
following:
Here is an example of how to personalize the experience by channel:
Control whether your AI Agent sends presence messages to end users during Social channel conversations. Presence messages are system notifications such as “connected to live agent” or “agent has left the chat” that appear when agents join or leave a conversation.
By default, presence messages are sent to end users on Sunshine Conversations and Twilio channels. In high-volume scenarios with frequent agent reassignments, these messages can create a noisy experience for end users. Disabling them delivers a cleaner conversation without operational notifications.
To disable presence messages:
When the toggle is enabled, the Agent does not send presence messages on Sunshine Conversations and Twilio channels. Agent routing and Handoff behavior are not affected.
Set up Social channels in a few steps. For detailed instructions, see Implementation & usage.
Set up your Social channels using the configuration method that supports your channels and Handoff requirements.
Configure Social channels to connect your AI Agent with social messaging platforms.
Set up Social channels using one of the following configuration methods.
To set up channels with one of the following Handoff methods, contact your Customer Success Manager:
Salesforce Live Chat
Zendesk Email Ticketing
To set up channels with a handoff to Zendesk Messaging, you will need a Sunshine Conversations license. If you do not have a Sunshine Conversations license, your Ada team can help you get set up with one.
Additionally, you will need to configure Sunshine Conversations in Ada, along with the Messaging integration. For setup help, see Configure and use Sunshine Conversations.
Supported channels currently include:
Facebook Messenger
Twitter DM
Instagram Direct
Twilio SMS
See Connect Zendesk social channels to multiple AI Agents using Sunshine Conversations for help setting up channels with Ada.
There are four methods to hand off conversations to human support in third-party channels. Depending on the Handoff methods you use, you may be able to continue a live agent conversation within the channel, or you may have to move the conversation to email:
Handoff to Zendesk Messaging: Customers are directly connected to a live agent within the third-party channel.
Handoff to Salesforce Live Chat: Customers are directly connected to a live agent within the third-party channel.
Handoff to Zendesk Email Ticketing: Customers are asked for their email address and receive support from an agent via email.
Handoff to Email: Customers are asked for their email address and receive support from an agent via email.
Some social media channels give customers the option to send files like images, audio, video, and other attachments, but your AI Agent can’t understand them. You can edit how your AI Agent responds when customers try to upload these files.
Your unsupported message response contains default content. You can edit that content directly, or you can edit it by adding or removing blocks.
To edit the unsupported media response:
On the Ada dashboard, go to Config > CHANNELS > Social. Then, under Handling media messages, click Unsupported Messages.
Edit the blocks in the response content. You can:
Depending on the way your AI Agent is configured, the blocks available to you may vary. You can click one of the expanders below to learn more about any one of the blocks:
The Text block delivers simple text messages to your customers. Each Text block appears as a single chat bubble, and can contain up to 320 characters.
You can add emojis and line breaks to give your Text blocks some personality and formatting 😎


Any time you serve up content using the Text block, no matter which of
Ada’s supported languages you’re writing in, you have the option to
polish it with AI. You can click the Improve button
to
automatically run your content through GPT and replace it with a
rephrased version with improved tone. Even after improving your content
automatically, you can always go back and edit it yourself until you’re
happy with it.

You can also use the Text block to create variations of the same message so you can keep your content fresh. Your AI Agent will randomly select a variation to send to your customer, and you can either write your own variations or generate them with AI.
Using variations with content that is likely to show up repeatedly in a single conversation. For example, adding different versions of “hi” or “hello” in the Greeting will give your AI Agent more personality and prevent the conversation from feeling robotic.
If your shuffled message contains essential information, make sure that information is in every variation — otherwise, only random customers will get the important message!

To start creating content variations for your AI Agent to shuffle between,
start typing a message into your block. If you want, you can use the Improve button
to refine
your initial message.
Then, you can use the Create variations button to use GPT to rephrase your content into 3-5 variations for your AI Agent to randomly serve to customers - in any of Ada’s supported languages. All of these automatically generated variations are editable and removable, so you can further refine the variations you get from the AI. You can also click Add manually to write additional variations yourself.

With Link blocks, you can add links to your chat, so you can direct customers to websites like in-depth support articles, or give them the opportunity to communicate with your organization’s support team directly.
Configure the Link block using the table below as a guide:


You can use the Capture block to prompt customers for information, like their names, and save it as a variable to use in other blocks. For example, you can ask them their name, save it in a variable, and later use their name in other blocks. For each variable you want to populate with a value from a customer, use a separate Capture block.
Configure the Capture block using the table below as a guide:
With the Set Variable block, you can automatically define variables in your response that you can use in other blocks, without your customers ever knowing it’s happening behind the scenes.
You can’t select metavariables, which your AI Agent sets automatically, or variables that contain list responses.
If this variable already has a value assigned to it at this point in the conversation, this block will overwrite the old value. If you created a new variable, follow these steps to finish creating it:
Basic: Save a static text value that you add manually into the variable.
Variable: Save the content of another existing variable into this variable. For example, you can save the value of an existing metavariable into this variable.
For security reasons, you can’t save a variable with the value of an authentication variable.
True/False: Save either a positive or negative response in the variable.
Null: Clear any previously set values from the variable.

If the block contains more than five variables, it will be collapsed by default the next time you view the response, so you can scroll through the response’s content more easily. To expand the block and view all of the variables, click the arrow icon next to the trash can icon in the upper-right corner of the block.
With Conditional blocks, you can target specific content to different customers depending on variables associated with them.
You can’t use variables from your Actions when you’re setting conditions. This is because you can’t control when your customer might trigger an Action, so you can’t depend on your AI Agent having that information when it needs to use it.
The Conditional block uses logic to decide whether it should serve content to customers. Sometimes this is called “if-then-else” logic. Here’s how it works in Ada:
If statement: Set up the criteria your AI Agent uses to decide whether to serve the customer with a piece of content.
Then action: Set up the action your AI Agent takes if the customer meets the criteria.
Else action: Set up the action your AI Agent takes if none of the above if statements apply. If you don’t set up an Else action, the AI Agent effectively doesn’t have any instructions, and doesn’t perform any of the actions in your Conditional block.
To start using the Conditional block in your response, add the Conditional block and follow these instructions:
Example:
account_type variable’s value is equal to “gold”; the country variable’s value is equal to “Canada”).account_type variable’s value is equal to “silver”; the account_type variable’s value is equal to “gold”).Word, your AI Agent wouldn’t accept word, WORD, or wOrd as matches.You can’t drag and drop Conditional blocks into a Conditional block, because they’re designed to contain other blocks instead of being contained. If you need more complex logic in your AI Agent, contact your Ada team for assistance.
Comparison operators are logic statements that tell the Conditional block to match customer information that’s captured in the variable you’re using. The available operators vary based on the variable type you’re using:
You can use the Request block to make an API call. You can save all or part of the response as a variable so you can serve the content in text blocks, or use the response to populate a list of options in the List Option block.
Currently, you can only make GET requests with the Request block.
Example:

The easiest way to save a particular attribute is to click a blue tag with a ”+” icon in the response body to automatically save that attribute as a variable. You can select or create a variable to save that value in, and the Data Key field automatically populates, as below.
For more complex use cases, you may have to type in a data key yourself, so you can target a particular attribute or array in the response. For more information, see Use data keys to target a portion of an API response.
Data keys are a way to tell your AI Agent to target a portion of the API request so you can save it as a variable. There is a variety of ways to do this, depending on your end goal. If you need any assistance, don’t hesitate to contact your Ada team.
Before targeting data in your API response, you should know that there are some limitations to how Ada processes the data they contain:
Ada uses different types of notation to target different parts of the response:
Target the entire API response
To save the entire API response in a variable, use the
ada_response_string data key.
Target a specific attribute or array
To target a specific attribute or array, enter its name exactly as it appears in the API.
Here’s a portion of a response from the above Studio Ghibli API, which contains information about Princess Mononoke:
To save the movie title as a variable, use the data key title.
Note that the key has to exactly match what’s in the API response, so
the data key Title wouldn’t work.
If the API request returns an array, you can save the whole array as a variable as well. For example, here’s a heavily truncated response from the Star Wars API, which contains a list of the Star Wars movies:
In this case, you could use the results data key to save an array
containing information about all of the movies in your variable.
You can use dot or bracket notation to target either arrays or attributes nested in other arrays or attributes.
Any of these notations would get your AI Agent to look for an attribute calledparent and save either an array or attribute within it called child:parent.child
parent[child]
"parent"["child"]
'parent'['child']), the data key won’t
work.If you’re looking for something nested inside an array, you can target a particular instance based on its order in the API response. Note that this numbering starts at 0, not at 1, and that these numbers must be in brackets.
For example, with this notation, your AI Agent would look for the first item in the array calledparent, find the array within it called child, and save the second item within the child array:parent[0].child[1]
[parent][0][child][1]
["parent"][0]["child"][1]
This method assumes that responses in the API will always be in the same order. Remember to test your API request with a variety of scenarios to ensure your data key correctly selects the attribute you’re looking for. If you find that the order of items in your API response varies between calls, contact your Ada team to find a solution.
Here’s another example from the Star Wars API, this time with a list of species that appear in the movies:
“Human” is the first item in the list of Star Wars species in the
results array, so if you want to target a piece of information that
pertains to human characters, we’ll start the data key with
results[0]. From there, we can start targeting more specific
information:
To target the name attribute of the species, use the data key
results[0].name.
To target the entire array of Star Wars films in which humans
appear, use the data key results[0].films.
To target only the fourth Star Wars film in which humans appear,
use the data key results[0].films[3].
The List Option block lets your AI Agent offer customers a list of selectable items. Your AI Agent saves the item the customer selects as a variable that you can use in other blocks (e.g., in a Conditional block). You can create the list of options manually, or populate the list with saved variables.
Use a data key to save the required portion of the API response as a variable. That portion of the API response is what you’ll use to dynamically generate your list.
Variables are limited to 100,000 characters. Particularly when you’re saving all or part of an API response as a variable, take care that you don’t exceed this limit. If you do, you may start seeing errors, because your AI Agent might not be able to correctly parse your variable content.
Other than the variable text limit, the only limitation on how many options can be in your list is that every message Ada serves must be under 10KB. Messages virtually never reach this size.
In the text field at the top of the block, enter a message prompting the customer to make a selection. It could be as simple as “Pick an option,” but should also include specific instructions when necessary. This bubble will appear right before the list of options.
Under Options Source, choose how you want to populate the list items. Then, depending on your choice, configure how you want the list items to appear under Option Setup.
Click Manual to use a static list of options. You can type these out yourself, or use variables.
By default, when a customer makes a selection, your AI Agent saves the text they selected as the variable value. Optionally, you can define custom values for each option for your AI Agent to save, instead of the text that appears to customers. When configuring manual list options, you have the option of managing those items separately:
Label: The text that customers see
Value: The text that your AI Agent saves when the customer makes a selection
If you choose to make custom labels and not separate values, your AI Agent will save the label text upon customer selection instead.
Under Label, enter the labels you want customers to see. You can type out text, use variables, or use a combination of the two.
To add an option to the list, click Add Option. To delete an option, hover your cursor to the right of an option row and click the Delete button that appears.
In some cases, you may need to save the customer’s selection in the dashboard differently from how it appears to them. To do this, toggle on the Assign different values from label option. Then, in the Value column that appears, enter the values you want to save in your variables.
Different values can be useful in use cases like multilingual AI Agents that have manual translations. You may want to use translated variables so customers see the options in their languages, but behind the scenes, you may want the saved variable to be in English for all customers.
Note that if your AI Agent uses automatically generated text, values are always stored in English in the back end, regardless of the language that customers see.
In the List Option block, beside Data Source, enter the variable you saved the API response portion in.
Beside Label Key Template, enter one or more attributes that appear in the variable to appear in the list options.
To include an attribute, put it in curly braces: {{item_name}}.
You can include multiple attributes, and have additional text in
the items too: {{item_name}}, ordered on {{order_date}}.
Select the Multiple Select check box to allow customers to select more than one option.
Under Error fallback, you can click to edit the AI Agent’s response if an error occurs.
Under Save Response as Variables/a Variable, create or select a variable to save customers’ responses in, so you can use them later. For more information about the types of variables you can save responses in, see Understand variable types.
If you turned on Multiple Select, you must save the response in a List type variable.
Under Capture Settings, choose whether you want to allow customers to advance through the response without making a selection.
Turn on the Response Required toggle to ensure that customers provide a response before being able to advance through the response.
If they don’t, and they click Never mind instead, your AI Agent will stop going through the blocks in your response and prompt the customer to ask about something else.
If the Response Required toggle is off, customers will see a Skip button that they can use to move on to the next block in your fallback.
If you turned on the Response Required toggle, a Show Cancel Button toggle appears. Turn this toggle on to show customers a Cancel button. If a customer clicks it, your AI Agent will stop going through the blocks in your response and prompt the customer to ask about something else.
A completed List Option block looks like this:

When creating a target variable for your options list, the variable type you choose depends on whether you allow the customer to select only one item from the options list or multiple items. If you have multiple select enabled, you must save the response in a List variable.
Text – A Text target variable can be used with any type of option variable.
Number – To use a Number target variable, all option variables in the list must be number variables.
Yes or No – The Yes or No target variable can only be used when the option variables in the list are also yes or no variables.
List – If you allow customers to select more than one item from the options list, you must save their selections as a List variable. Items collected in a List variable are separated by semicolons.
Once collected using the multiple select functionality, List variables can be used as you would any other variable. Here are a few examples:
Added to a block to relay the information back to the user, with each item separated by semicolons (e.g. “The items your shipment was missing are: lipstick; mascara; blush.”)
In a Conditional block
Example: When asking a customer to indicate items missing from an order, assume you have separate sets of instructions for customers missing one item versus those who are missing multiple items. You can use the Conditional block to serve one set of instructions if the list length equals one item, and the second set of instructions if the list length equals two or more items.
In some cases, you may either serve customers with sensitive data, or give them the chance to make changes to their account, orders, bookings, etc. In these cases, you should authorize customers by asking them to sign in to their account.
Sign-in confirms the customer is the person they claim to be, which should happen before your AI Agent shares any sensitive data. Sign-in generates an authentication token that you can use to call APIs that require an OAuth token in order to return account-specific information to the customer. After authentication, you can securely provide customers with a more detailed and personalized experience, by sharing information (such as balances, due dates, credits, etc.) or making changes to their account.
Before you can use Sign-In and Sign-Out blocks in your response, you have to configure your authentication methods. For more information, see Authenticate your AI Agent’s API calls using tokens.
After you have set up at least one authentication method in your settings, you can put Sign In/Out blocks in your response.
If the customer has already signed in from another response or prior to opening the AI Agent, the Sign In button will appear, but the customer won’t need to enter their credentials again.
On the Ada dashboard, go to Config > CHANNELS > Messaging > Social Channels and open the Unsupported Messages response. Drag the Sign In block into your response.
In the Sign In block, fill in the following fields:
The Sign Out block signs out the customer from the authentication provider wherever you add it to your response. If you don’t add a Sign Out block to your AI Agent, the customer remains signed in until the authorization token expires.
The Sign Out block only signs the customer out from the AI Agent. It does not log the customer out of their web experience.
With the Fetch Chat Metadata block, you can add the chat transcript and/or customer information from a conversation, and save that information as variables. This can be very useful when you’re setting up handoffs, so you can pass along additional information to the human agent.
Under Select Variables for Inputs, beside Chatter Token, click inside the field and add the red chatter_token metavariable.
Under Save Response as Variables, click the Select Optional Variables drop-down menu, then select any optional variables you’d like to capture:
For each optional variable you selected, click the Choose a Variable drop-down menu, then select an existing variable, or create a new one, to capture the information.
Under Fallback Answer, you can click to edit the AI Agent’s response if an error occurs.
You can use the Email block to hand customers off via email. In any of the fields you configure for the email, you can include variables so you can pass relevant information on to human agents.
In the Select Variables for Inputs section, complete the mandatory variable fields:
Click the Select Optional Inputs drop-down menu, then select any optional variable fields you’d like to add:
Content Type: Enter the MIME type you want to use in your email:
text/plain.text/html.Under Fallback Answer, you can click to edit the AI Agent’s response if an error occurs.
The Scheduled block allows you to set days of the week and time ranges for your AI Agent to deliver different responses.
For example, your AI Agent can offer to hand customers off to a human agent when agents are scheduled to be available, or offer to send an email request when agents aren’t available.

If required, click Add a new rule to add additional days and times.
For example, if your regular hours are 9 a.m. to 5 p.m., but on December 10 your hours are 9 a.m. to 1 p.m., create an exception for December 10 from 1 p.m. to 5 p.m., during which you can set handoffs to be unavailable.
If required, click Add a new exception to add additional exceptions.

Drag and drop blocks into both the Yes and No fields, and add content to them as required.
You can configure your AI Agent to hand customers off using Salesforce.
You can configure your AI Agent to hand customers off using Zendesk. You have some options for how to configure your handoffs:
At the bottom of the screen, click Save. Your AI Agent saves your changes.
Your AI Agent saves a history of all edits you’ve made to your response over the last 30 days. You can view previous versions and revert your changes to any of these saved versions.
To view or revert to a previous version:
Explore additional Social channel and integration options.