Bring Your Own Domain
Overview
Bring Your Own Domain (BYOD) lets your AI Agent send and receive email from your own support email addresses. A single AI Agent can be configured with multiple email addresses — across the same domain (for example, support@company.com, billing@company.com) or across different domains (for example, support@company.de, help@brand.co.uk).
Each inbox is configured independently. By using the email_recipient_address variable, you can be set inbox-level availability rules on any entity (Knowledge, Playbooks, Handoffs, etc.) and filter conversations in Conversation View and Analytics.
You configure a BYOD address in Config > CHANNELS > Email > Configuration on the Ada dashboard. After configuration, set up email forwarding from each BYOD address to your AI Agent’s Ada email address so inquiries reach the AI Agent.
Use cases
Bring Your Own Domain helps you maintain brand consistency, route inquiries correctly, and consolidate operations across multiple support inboxes.
- Respond from your existing support address: Let your AI Agent send replies from your established support email (for example,
help@company.com) instead of a generic Ada address. - Maintain brand recognition: Keep your domain visible in all customer communications so end users recognize and trust the sender.
- Support multiple regions, brands, or departments on one AI Agent: Configure regional inboxes (
support@company.fr,support@company.ch), brand-specific inboxes (help@brand-a.com,help@brand-b.com), or departmental inboxes (billing@company.com,tax@company.com) on a single AI Agent. Configuration, Knowledge, Actions, and Playbooks are shared across all channels. - Route by recipient address: Use the
email_recipient_addressmeta variable in Playbooks, Actions, and Handoffs to branch logic based on which inbox the end user wrote to.
Capabilities & configuration
Bring Your Own Domain supports the following configuration options.
- Custom email addresses: Use any email address on your domain.
- Multiple addresses per AI Agent: Add as many BYOD addresses as you need. Each address is configured independently and represented as a separate email channel.
- Multiple domains: Add addresses on different domains to the same AI Agent. Each new domain requires its own DNS verification.
- Per-channel settings: Sender name (appearance), email templates, launch controls, and reply-all behavior are configurable independently per email channel.
- Global settings: Blocked senders apply across all email channels on the AI Agent.
- DNS verification: Verify domain ownership using three CNAME records and one TXT record per domain.
Per-channel and global settings
The following table summarizes which settings are configurable per email channel and which apply globally to all email channels on the AI Agent.
Quick start
Get your first email address configured in a few steps. To add additional addresses afterward, repeat the same flow for each one.
Implementation & usage
Configure each email address on your AI Agent as its own email channel.
Configure a domain
You can use an address from your own email domain. To do so, get your IT team to go into your domain provider configuration settings to add three CNAME records and one TXT record.
To configure a domain:
-
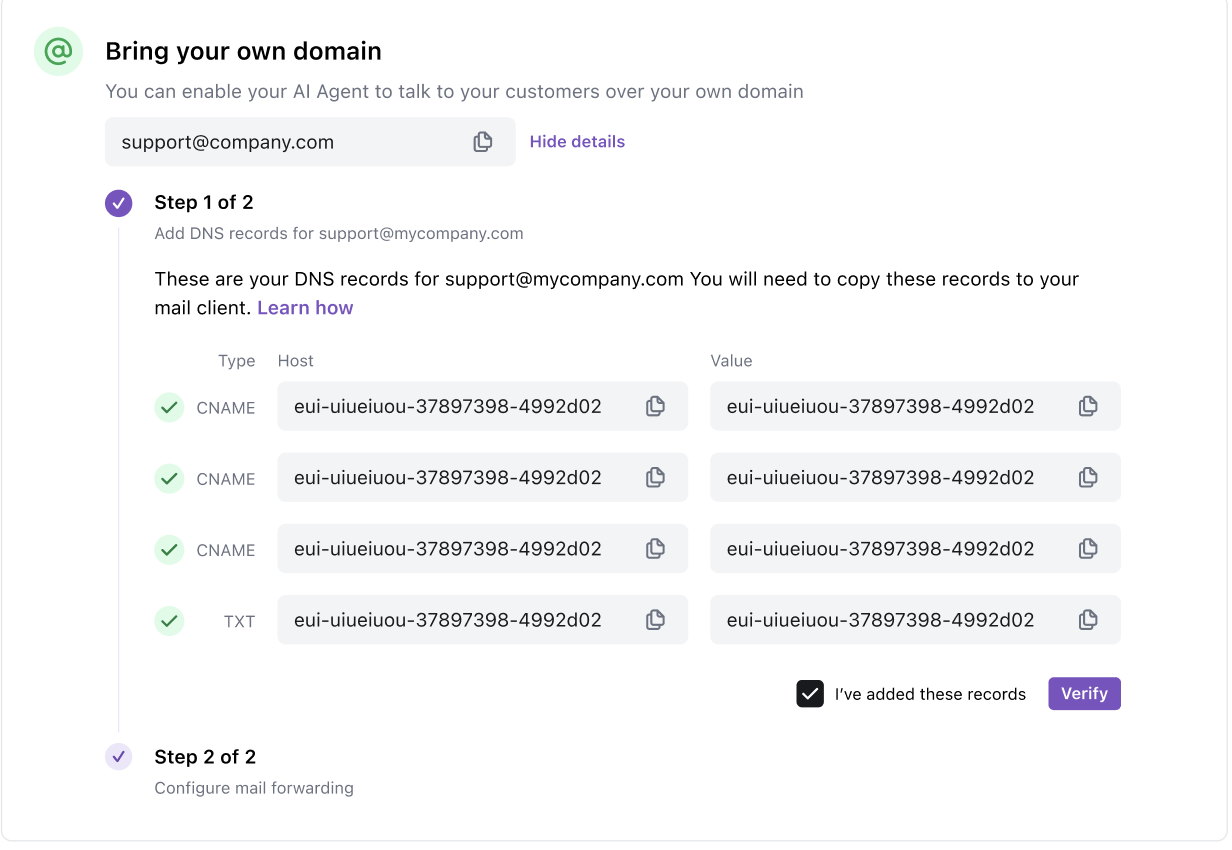
On the Ada dashboard, go to Config > CHANNELS > Email, then click the Configuration tab.
-
Under Bring your own domain, enter the email address that uses your own domain (for example,
help@company.com), then click Next. The CNAME and TXT records you need to activate the email address appear. -
Coordinate with your IT team to get those records added to your domain. After they’ve been added, select the I’ve added these records check box, then click Verify. As soon as Ada receives verification status confirmation, your AI Agent displays the verified status on the dashboard, and you can proceed to set up email forwarding.
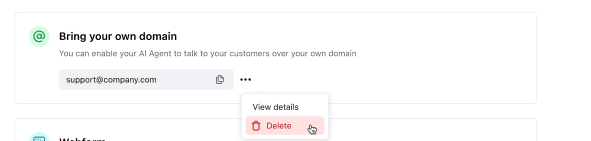
To make changes to a domain before completing the full BYOD setup, select the Trash icon next to the support email address to restart the Bring Your Own Domain configuration flow.
Add multiple email channels
To support multiple regions, brands, or departments on the same AI Agent, add additional email addresses as separate email channels.
To add another email channel:
- On the Ada dashboard, go to Config > CHANNELS > Email, then click the Configuration tab.
- In the email channels list, click Add inbox.
- Enter the new email address and click Next.
- Add the displayed CNAME and TXT records to the relevant domain. If the address is on a domain you’ve already verified, the existing records are reused — no new DNS changes are required. If the address is on a new domain, follow the DNS setup as described above.
- Select the I’ve added these records check box and click Verify.
- Set up email forwarding from the new address to the AI Agent’s Ada email address.
Each address you add appears in the email channels list and is independently configurable. The AI Agent will reply from whichever address the end user originally contacted.
Manage email channels
The email channels list shows every configured address on the AI Agent, along with its verification status and launch state.
- Edit a channel: Click the channel name to open per-channel settings (sender name, templates, launch controls, reply-all).
- Rename a channel: Use the … menu next to the channel and select Rename. The display name updates immediately; the email address itself does not change.
- Delete a channel: Use the … menu and select Delete. The first inbox you configured cannot be deleted — as long as Email is activated, at least one inbox (and its Ada-provisioned address) remains.
Configure Zendesk SMTP Connector per domain
If your AI Agent uses the Zendesk SMTP Connector for handoffs, credentials are scoped to the BYOD domain — not to individual inboxes.
- Inboxes that share a domain share the same SMTP configuration. Adding
support@network.comandbilling@network.comto one AI Agent only requires one SMTP setup. - Each new BYOD domain requires its own SMTP setup. Adding
support@company.comto an AI Agent that already hassupport@network.comrequires a fresh SMTP configuration for the company domain. - Configuration is surfaced from each inbox’s Channel Settings page. When you open SMTP settings on an inbox whose domain is already configured, the existing credentials auto-fill. When you open SMTP settings on an inbox with a new domain, the configuration is empty.
To configure SMTP Connector for a new domain:
- On the Ada dashboard, go to Config > CHANNELS > Email, then select an inbox on the new domain.
- Scroll to the bottom of the email customization page and find the Zendesk SMTP Connector section.
- Click Configure to open the SMTP Connector modal pre-scoped to the inbox’s BYOD domain.
- Follow the modal prompts to exchange credentials between Ada and Zendesk for that domain.
Zendesk SMTP Connector credentials are scoped per BYOD domain. If you have inboxes on different BYOD domains, configure SMTP separately for each domain. Inboxes on a domain without a configured SMTP entry fall back to the AI Agent’s default Zendesk SMTP routing — which only works for the default email channel address.
See Zendesk SMTP Connector for full setup steps.
Reply-from behavior
When the AI Agent replies to an end user, it always sends from the same address the end user originally contacted. This applies to:
- AI Agent responses
- Email Handoffs to human agents
- Replies from human agents (when SMTP is configured)
For example, if an end user writes to support@company.fr, the AI Agent and any subsequent human-agent replies all go out from support@company.fr — never from a different inbox on the same AI Agent.
Filter by email channel
Use the Channel filter in Conversation View and Analytics to find email conversations.
- All email conversations: Select the Email channel.
- Specific inboxes or addresses: Use the Variable filter, select
email_recipient_address, and choose the address you want to review.
Route by recipient address
The email_recipient_address meta variable contains the original email address the end user wrote to. It is available at the start of every email conversation. Use it in Playbooks, Actions, and Handoffs to branch routing logic based on the inbox.
For example, route conversations on billing@company.com to a billing-specific Playbook, or send Handoffs from tax@company.com to a different human-agent queue.
For the full list of email-related meta variables, see Using Variables.
Handling changes to a domain
If you have active traffic over a configured email address, follow these steps closely.
To change a domain:
- Turn off email forwarding for the email address you’d like to remove from your BYOD configuration to prevent the AI Agent from continuing to respond to inquiries sent to this address.
- In the email channels list, select the … next to the email address. Then select Delete from the drop-down.
- Follow the BYOD flow from the beginning to enter the new domain you’d like the AI Agent to respond on behalf of.
If you are bringing a net new domain, new DNS records will be generated for you. You will need to update the DNS records in your domain configuration settings to permit the AI Agent to respond to inquiries on behalf of this new domain.
If you are re-using the same domain, or using a different alias on the same domain, the initial DNS records will reappear and you won’t need to re-add them to your domain configuration settings.
- Proceed to set up email forwarding.
Related features
Explore additional Email configuration options.
- Implementation method: Choose how to receive emails (BYO domain, forwarding, or API).
- Email deployment: Set up email forwarding to your AI Agent.
- Email configuration: Activate and configure your Email channel.
- Email handoffs: Configure how your AI Agent escalates conversations to human agents.
- Using Variables: Reference the
email_recipient_addressmeta variable in your AI Agent.