Implementation method
Overview
After activating email in your AI Agent, setting up Handoffs, and testing your email setup to ensure it’s working properly, you can implement email so your AI Agent can start addressing your customer inquiries.
A single AI Agent can be configured with multiple email addresses, each represented as a separate email channel. Any address you configure on your AI Agent should be different from the support email addresses used by your human agent team, to avoid forwarding in-flight human-team conversations back to the AI Agent.
Use cases
Implementation methods support different email automation scenarios.
- Direct customer emails: Forward emails sent directly to your support address to your AI Agent for immediate response.
- Contact form submissions: Use the Email API to route form submissions from Zendesk or Salesforce to your AI Agent.
- Ticket backlog processing: Send existing support tickets to your AI Agent via Email API for automated resolution.
- Hybrid automation: Combine Direct Email and Email API to maximize your AI Agent’s coverage across all inquiry sources.
Capabilities & configuration
Email implementation supports two main methods that can be used independently or together.
- Direct email: Forward emails from your support address to your AI Agent as soon as customers send them. Supports custom forwarding rules and spam filtering.
- Email API: Send inquiries programmatically from contact forms, ticket backlogs, or other systems. Supports passing metadata to create metavariables for AI Agent configuration.
Quick start
Get started with email implementation in a few steps. For detailed instructions, see Implementation & usage.
Configure your Bring Your Own Domain email address.
Set up email forwarding to your AI Agent’s Ada email address.
Implementation & usage
Configure your email implementation using one or both methods below.
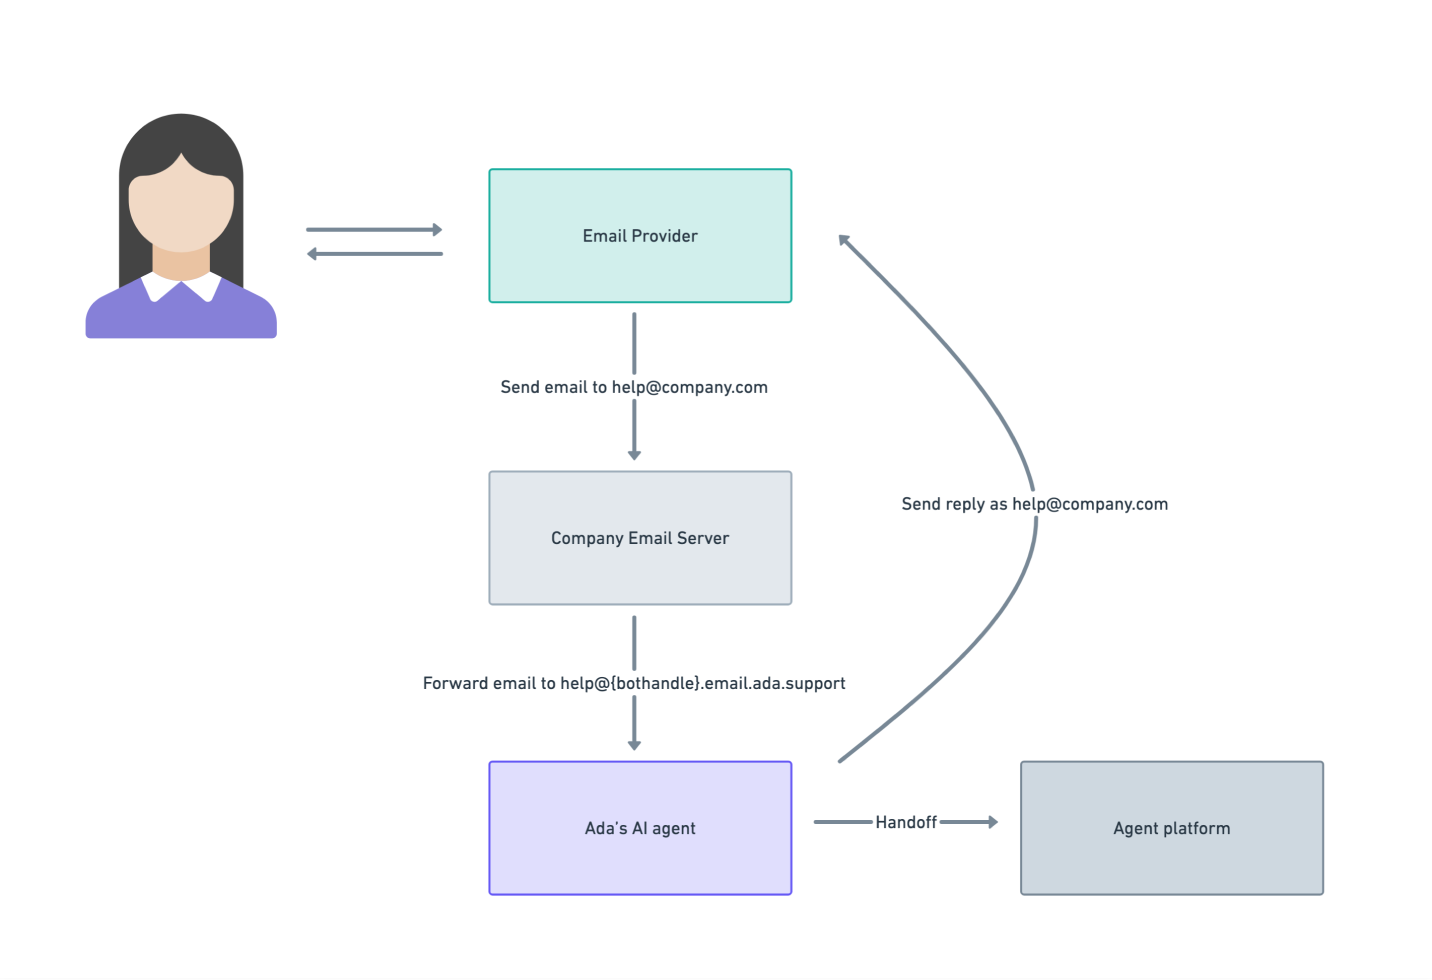
Direct email
With this method of implementation, customers will send inquiries to your support email, inquiries will be forwarded to your AI Agent, and your AI Agent will respond from your support email address.
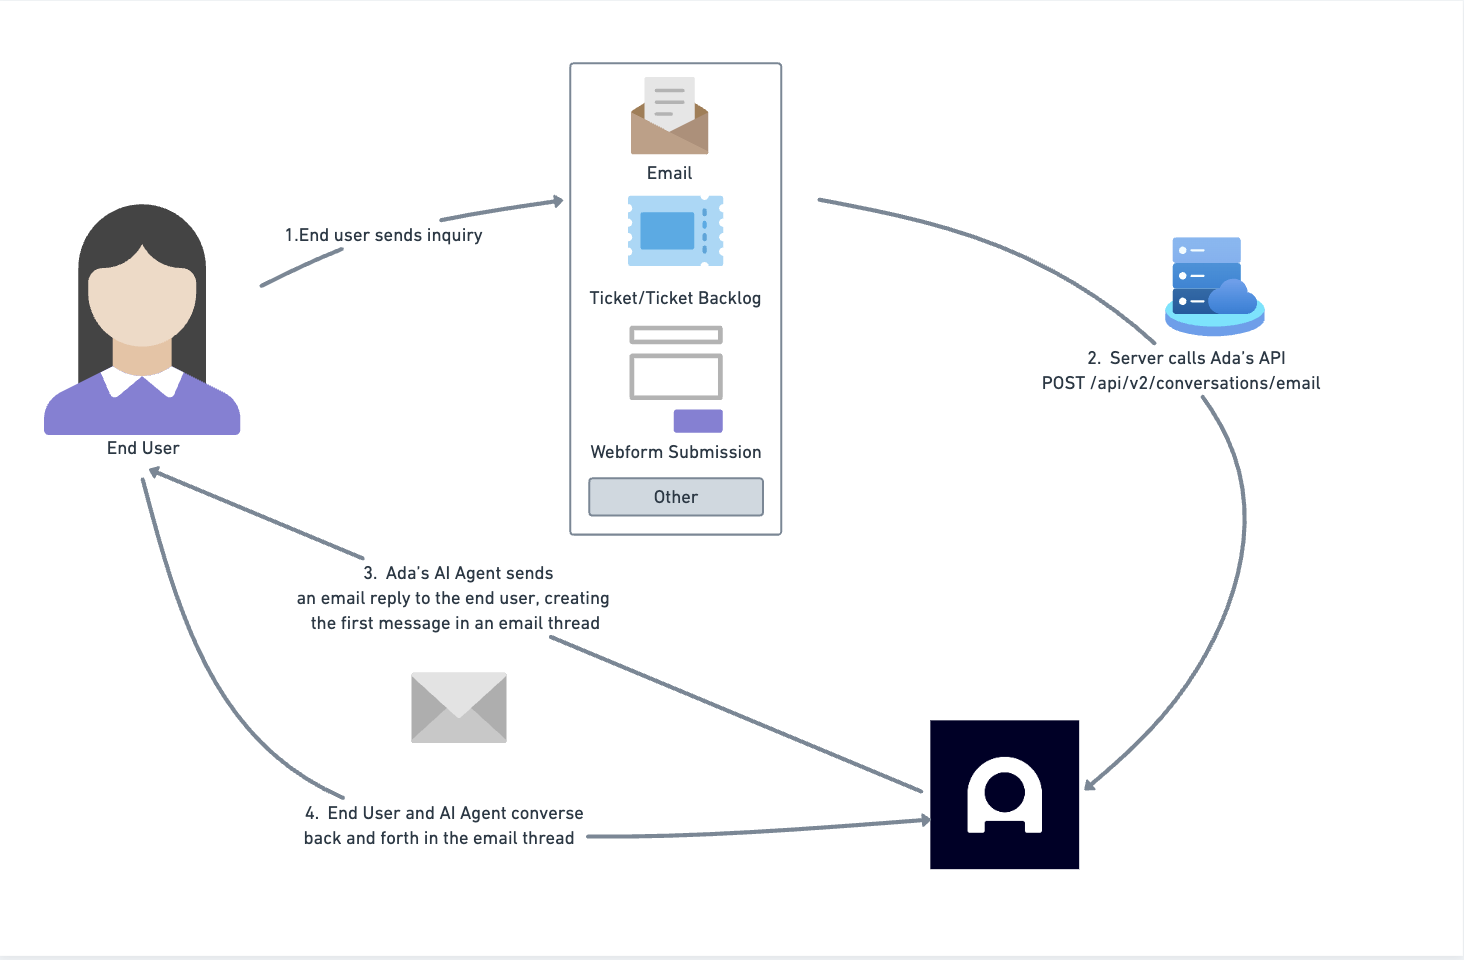
Email API
The Email API allows you to send support inquiries from sources like ticket backlogs, or contact form submissions to Ada for automation. Upon receiving these inquiries, your AI Agent will reply to end users directly in their inbox to continue the conversation and drive resolution autonomously.
Review the benefits and Considerations of the Email API below to determine if this is the right method of email implementation for you.
Zendesk web form email verification: Zendesk requires email verification for anonymous help center requests. If you use Zendesk web forms with the Email API, end users will see a prompt — “Request not yet submitted. Please check your email to verify and submit your request.” — and must verify their email before the ticket reaches the active queue. Your AI Agent will not receive the submission until verification is complete. See Zendesk’s announcement for details.
Getting started with the Email API
The Email API is an implementation of Ada’s Conversations API for the native Email channel. To use it, you’ll need either a form provider (such as Zendesk) or your own system that can make a POST API call when an email inquiry should be sent to Ada for automation. This call sends the form submission or email content to your AI Agent through the dedicated Email endpoint.
-
Make sure you have an Email API key in the Ada Dashboard.
-
Choose the email address you want the AI Agent to use when replying to end users for this implementation.
- If you haven’t already, configure the address in the Bring your own domain section of the Email configuration page. You can configure multiple addresses on the same AI Agent — pick the one that matches this Email API integration.
-
Set up your API call with the required fields:
- Endpoint URL: Make POST calls to this endpoint, replacing
{bothandle}with your AI Agent’s handle.https://{bothandle}.ada.support/api/v2/conversations/emailYour AI Agent handle can be found in the upper left corner of your dashboard, above the left navigation bar. - Authentication key: The key you generated in the Ada Dashboard.
- Payload for the call: The payload for the call is the email content or form submission that should be sent to Ada for email automation. For example:
For details, review this section.
- Endpoint URL: Make POST calls to this endpoint, replacing
-
Set up the required automations to route inquiries to Ada (e.g., Webhook, Triggers in Zendesk).
-
Test your flow.
-
When you’re ready to route live inquiries to Ada via Email API, set up forwarding for your Bring your own domain email address. This ensures end-user replies to the AI Agent are correctly routed to the AI Agent for conversation continuity.
Response codes
You may receive the following responses after your call is sent. To troubleshoot errors, first review the returned response.
Examples
That’s all you need to know to get started. Next, explore these sample workflows. Each one outlines the key steps for its respective integration. Use these examples as a guide to assist with your setup.
Example: Set up Zendesk ticket forms
You can configure a Zendesk ticket form, and create a webhook and trigger to automatically forward content your customers submit to your AI Agent.
-
Create a webhook
Follow Zendesk’s instructions on creating a webhook, so you can use Zendesk to point to Ada’s API.
- When you’re configuring your endpoint URL, use
https://{bothandle}.ada.support/api/v2/conversations/email, replacing{bothandle}with your own AI Agent handle. - When you’re adding your API key, select the “Bearer Token” option. Paste your API key as the value for the “Token” field. You will have generated your token on the API page in the Platform section of the Dashboard.
When the webhook is configured, it should look like this:

- When you’re configuring your endpoint URL, use
-
Create a trigger
Follow Zendesk’s instructions on creating ticket triggers, so Zendesk can automatically call your webhook as soon as it receives a response to your form.
- Recommended conditions:
- Ticket > Ticket Is Created
- Ticket > Attachment Is not Present
- Ticket > Form Is [Name of Your Webform Submission Form]

If your Ticket > Form condition uses the Default Form, and this form is also shared with other channels (e.g., calls or chats), create a new basic form and set it as the new default. This will ensure you have a dedicated form for Webform Submissions. Otherwise, inquiries from other channels may be routed to Ada via the Email API.
- For your trigger actions, you can have any combination of actions. The following two are recommended:
-
Call your webhook
-
Choose Add action > Notify by > Active webhook.
-
Select the webhook you created.
-
For the JSON body, use the following. Make sure to replace the
reply_asaddress with either your AI Agent’s Ada-provided email address (help@{bothandle}.email.ada.support) or the address you’ve set up in your Bring your own domain settings.-
Optional: Add CC recipients
If you’d like to copy specific email addresses on every outbound message, you can add a
ccfield to the JSON body.For example:
"cc": ["team@example.com"]
-
-
-
Close your ticket
- Click Add action > Status category.
- Select Closed.
-
With the two above actions, your configuration should look like this:

- Recommended conditions:
Example: Set up Salesforce contact forms
You can create a Salesforce case form, and create an automated process to automatically forward content your customers submit to your AI Agent. You, or someone with Salesforce Admin permissions, can
- Set up your Salesforce case fields
- Add your Ada email as a case origin you can track in Salesforce, so you can track which cases were passed to your AI Agent. Follow Salesforce’s instructions in Add Picklist Values. For your Cases, in the Case Origin field, add a picklist value with your Ada-provided email address (
help@{bothandle}.email.ada.support) as the value. - Create a new check box, so your automation flow can track which cases it’s already sent to Ada and doesn’t send duplicates. Follow Salesforce’s instructions in Create Custom Fields, and create a check box with the following attributes:
- Type: Checkbox; default unchecked
- Name: Sent to Ada
- Visible to all users
- Read-only for all users except System Administrators profile
- Do not add to layout
- Click Save.
- Add your Ada email as a case origin you can track in Salesforce, so you can track which cases were passed to your AI Agent. Follow Salesforce’s instructions in Add Picklist Values. For your Cases, in the Case Origin field, add a picklist value with your Ada-provided email address (
- Set up a flow to send case data to Ada
-
Add your API credentials to Salesforce so it can use Ada’s API to send over email data. Follow Salesforce’s instructions to Create or Edit a Basic Authentication External Credential, and enter the following information:
- Label:
Ada Email API External Credential - Name:
AdaEmailAPIExternalCredential - Authentication Protocol:
No Authentication
Additionally, follow the instructions in the above link to create a principal, to act as a user for the credentials you just made. Use the following information:
- Parameter Name:
User - Sequence Number:
1 - Identity Type:
Named Principal
- Label:
-
Instead of putting your authentication in the credentials, add a custom header. Follow Salesforce’s instructions to Create and Edit Custom Headers, and enter the following information:
- Name: Authorization
- Value: Bearer <YOUR-API-KEY>. Paste in the API key you generated from the API page in the Ada Dashboard.
- Sequence Number:
1
-
Create a permission set, so you can share the credentials you just made with other admins. Follow Salesforce’s instructions to Create Permission Sets, and do the following:
- Name:
Ada Email Http Callout - Click External Credential Principal Access, then add the
Ada Email API External Credentialyou created - Follow Salesforce’s instructions to Manage Permission Set Assignments to assign the new permission set to yourself and any other admins
- Name:
-
Create a named credential. Follow Salesforce’s instructions to Create or Edit a Named Credential, and enter the following information:
- Label:
Ada Email API Named Credential - Name:
AdaEmailAPINamedCredential - URL:
https://{bothandle}.ada.support/api/v2/conversations/email, replacing{bothandle}with your AI Agent’s handle - Under Authentication, under External Credential, select the
Ada Email API External Credentialyou created earlier
- Label:
-
- Create a flow to automate closing cases
- Create a flow to update the case’s status to Closed. Follow Salesforce’s instructions to Build a Flow, and do the following:
- Create a Record-Triggered Flow
- Object:
Case - Trigger the Flow When:
A record is created or updated - Condition Requirements:
All Conditions are Met (AND) OriginEqualsAda EmailStatusDoes Not EqualClosed- When to Run the Flow for Updated Records:
Every time a record is updated and meets the condition requirements - Optimize the Flow for:
Fast Field Updates
- Add an Update Triggering Record element to the flow. In the New Update Records window, enter the following information:
- Label:
Update Status - API Name:
Update_Status - How to Find Records to Update and Set Their Values:
Use the case record that triggered the flow - Condition Requirements to Update Record:
None - Always Update Record - Field:
Status - Value:
Closed
- Label:
- Save and activate your flow, giving it a name like
CASE: Update Ada Email Status to Closed.
- Create a flow to update the case’s status to Closed. Follow Salesforce’s instructions to Build a Flow, and do the following:
- Create a flow to automate sending cases to Ada, using an HTTP callout
-
Create a new flow to automatically send cases to Ada. Follow Salesforce’s instructions to Build a Flow, and do the following:
- Create a Record-Triggered Flow
- Object:
Case - Trigger the Flow When:
A record is created or updated - Condition Requirements:
All Conditions are Met (AND) OriginEqualsAda EmailStatusDoes Not EqualClosedSent_to_ada__cEqualsFalse- When to Run the Flow for Updated Records:
Only when a record is updated to meet the condition requirements - Optimize the Flow for:
Actions and Related Records
-
Add a scheduled path to the flow. Follow Salesforce’s instructions to create Scheduled Paths, and add the following information:
- Path Label:
API to Ada - API Name:
API_to_Ada - Time Source:
Case: Last Modified Date - Offset Number:
1 - Offset Options:
Minutes After - Advanced > Batch Size:
1
- Path Label:
-
Add an HTTP callout to the flow. Follow Salesforce’s instructions to Configure an HTTP Callout Action, and add the following information:
- External service configuration:
- Category:
HTTP Callout - Named Credential:
Ada Email API Named Credential
- Category:
- Invocable action:
- Label:
Ada Email Invocable Action - Method:
POST - Sample JSON request:
- Sample response body: Not required
- Label:
This creates an Apex class variable that you can use in step e, so you can specify individual dynamic fields to send.
- External service configuration:
-
Now that you’ve configured the action, add it to your flow, so you can use the API callout to send cases to Ada. Use the following information:
- Name:
Send to Ada - API Name:
SendtoAda - Body:
Apex-Defined Variable - Value: Create a variable called
AdaEmailBody
- Name:
-
In your flow, add an assignment element before the action element you just added. You can see an example at Salesforce’s Flow Element: Assignment topic. Enter the following information:
- Label:
Set Body Variables - API Name:
Set_Body_Variables
Then, add each of the following variables by choosing the Apex-defined variable you created above, then the corresponding fields in your Salesforce case:
AdaEmailBody > nameEquals$Record > Name- Optional:
AdaEmailBody > replyx5fasEqualshelp@company.com AdaEmailBody > replyx5ftoEquals$Record > Email AddressAdaEmailBody > subjectEquals$Record > SubjectAdaEmailBody > textEquals$Record > DescriptionAdaEmailBody > metadata > ticketEquals$Record > Case ID
Ensure that all of the above values are on your case creation form, with the exception of your reply-as email.
- Label:
-
Add an Update Triggering Record element to the flow. In the New Update Records window, enter the following information:
- Label:
Update Sent to Ada checkbox on Case - API Name:
Update_Sent_to_Ada_checkbox_on_Case - How to Find Records to Update and Set Their Values:
Use the case record that triggered the flow - Condition Requirements to Update Record:
None - Always Update Record - Field:
Sent_to_Ada__c - Value:
True
- Label:
-
Save and activate your flow, giving it a name like
CASE: Send to Ada Email.
-
- Test your flow. Create a case with a
Case OriginofAda Email, and use a valid email address to test. You should be able to see the conversation appear in Ada, and get a reply at the email address you provided.
Implementation examples
Hybrid implementation: Direct email + Email API
You can use both direct email and Email API implementation methods to automate inquiries on all fronts, expanding your AI Agent’s scope of responsibility.
Agent platform tickets
If you use any alternate methods to create tickets in your agent platform (outside of contact forms or direct emails), you can use the Email API to route tickets from your Agent platform to your AI Agent.
Implementation notes
- Regardless of a conversation’s implementation method (direct email, contact forms, agent platform tickets), you can view conversation transcripts in the Conversations section of the Ada dashboard.
- However, if a conversation happens in an email thread, that conversation won’t appear in your agent platform, unless a handoff with a transcript occurs.
- If a conversation starts with your agent platform and later gets handed off, the handoff doesn’t update the original ticket.
- Ada has a Zendesk Conversation Solution sync available if you need to sync contained conversations that your AI Agent was able to handle without handoff back into Zendesk. Contact your Ada team to learn more.
Related features
Explore additional Email configuration and deployment options.
- Email configuration: Activate and test your Email channel.
- BYO domain: Configure your own email domain for your AI Agent.
- Email deployment: Set up email forwarding to your AI Agent.
- Email handoffs: Configure how your AI Agent escalates conversations to human agents.
- API keys: Generate API keys for the Email API.