Email handoffs
Overview
Email Handoffs allow your AI Agent to escalate email conversations to your human support team on your preferred agent platform. The handoff block you choose determines how tickets are created, how email threads are handled, and whether human agents can reply using the same email address as the AI Agent.
Use cases
Email Handoffs support a variety of escalation scenarios depending on your platform and end-user experience requirements.
-
Seamless thread continuation: End users receive human agent replies in the same email thread, from the same support address as the AI Agent. Ideal for maintaining conversation continuity and a consistent brand experience. Supported by Zendesk Support and Zendesk Ticketing (with SMTP Connector).
-
Attachment handling during escalation: End user attachments—such as screenshots, receipts, or documents—are passed to human agents automatically. Supported by all handoff methods.
-
Customizable ticket routing and categorization: Control how tickets are created in your agent platform, including subject lines, tags, priority, and custom fields. Supported by Zendesk Support, Zendesk Ticketing, and Salesforce.
-
Platform-agnostic escalation: Route email escalations to any third-party platform using the Email block or HTTP Request block, even without a direct integration.
Capabilities & configuration
Several handoff methods are compatible with the Email channel. The following table compares key functionality across supported platforms.
Compatible handoff blocks
The following Handoff blocks are compatible with the Email channel.
Quick start
Set up email Handoffs in a few steps. For detailed instructions for each handoff method, see Implementation & usage.
In your handoff flow, set an availability rule to apply only when the channel is Email.
Implementation & usage
Configure your preferred Handoff block to enable email escalations to human agents.
Zendesk Support
Creates a new ticket in Zendesk. Human agent replies are delivered to the end user in the same thread—and from the same address—as the Email AI Agent.
Configuration
-
Follow the linked steps to integrate and configure Zendesk Support with your AI Agent.
-
Ensure your handoff has an availability rule set to apply only when the channel is Email.

-
In your handoff flow, drag the Zendesk Support block into your handoff.
-
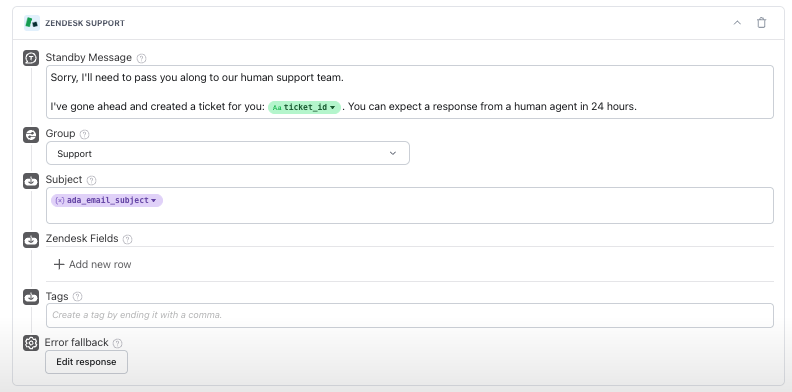
In the Zendesk Support block, configure the fields that are required to complete your handoff:
- Standby Message: An automated response that informs users when to expect a reply.
- If you do not set one, a default standby message will be sent: “An agent will be with you as soon as they can. You’ll be notified here when the agent responds”
- Group: A collection of agents organized by role or expertise to optimize ticket routing and management.
- Subject: The subject assigned to the ticket upon creation.
- If you do not set one, a default ticket subject will apply: “Conversation with chatter_ID”
- Zendesk Fields: Ticket fields that streamline workflow and routing, including subject, description, tags, priority, groups, and custom fields.
- Tags: Keywords applied to tickets based on detected topics or intent, helping with categorization, routing, and automation. You can use both variables and plain text for tags.
- Error Fallback: An automated response triggered if an error occurs while attempting to trigger the handoff, acknowledging the issue and guiding users on next steps.
- Standby Message: An automated response that informs users when to expect a reply.
Limitations
- If you’re using this block to preserve threading with a shared email address, that same address cannot be used by human agents for:
- Zendesk ticketing block handoffs
- Messaging handoffs
- Any Zendesk tickets created outside Ada
- SMTP Connector is optional for email handoffs using this block. Configure it only if you also need Zendesk Messaging conversations that continue over Email (Messaging to Email) or Zendesk Ticketing workflows to share the same support address.
Zendesk Ticketing
Creates a new Zendesk ticket via API. With the SMTP Connector configured, human agent replies can continue in the same email thread as the original end-user conversation, using the same BYOD address as the AI Agent. Without the SMTP Connector, human agents must use a different email address, and replies are sent in a new email thread.
Configuration
-
If you haven’t already, configure Zendesk Ticketing in your AI Agent.
-
Ensure your handoff has an availability rule set to apply only when the channel is Email.
-
In your handoff flow, in the block drawer on the right side of your screen, under Action Apps, click and drag the Fetch Chat Metadata block into your handoff. This block allows you to save the entire chat transcript as a variable, which you can then pass along to the live agent for additional context during the handoff.
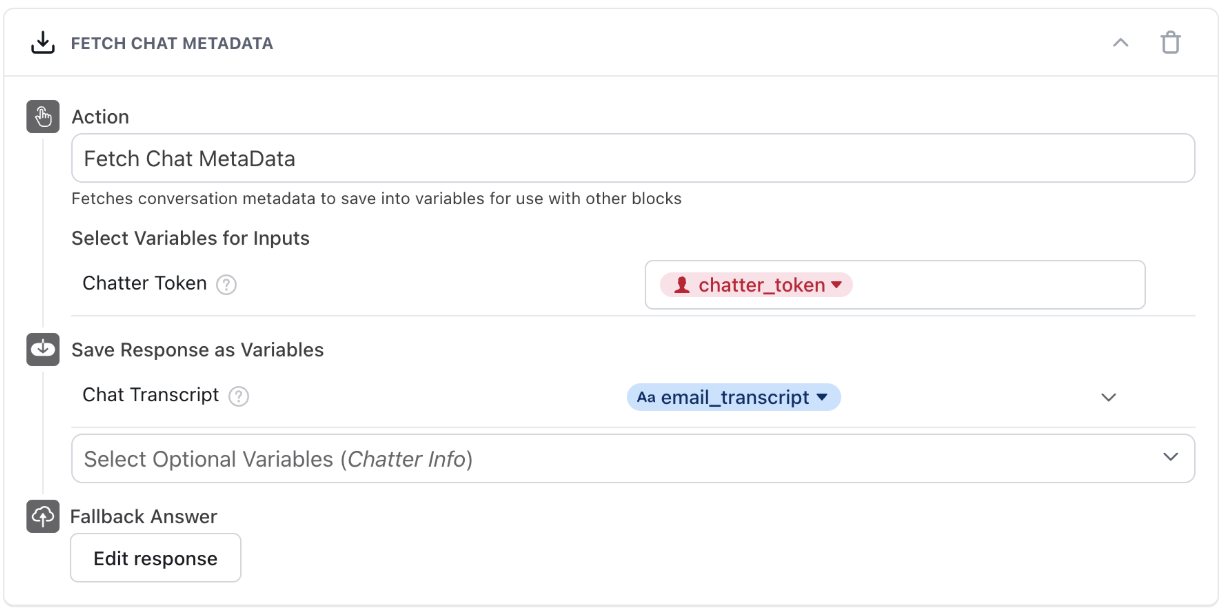
- Under Select Variables for Inputs, beside Chatter Token, click inside the field and add the red chatter_token metavariable.
- Under Save Response as Variables, click the Select Optional Variables drop-down menu, then select any optional variables you’d like to capture:
-
Transcript and Summary: Select this option to save the conversation transcript and summary to a variable.
-
Transcript Only: Select this option to save just the conversation transcript to a variable.
-
Summary Only: Select this option to save just the conversation summary to a variable.
-
Chatter Info: Select this option to save the customer’s metadata to a variable. This is the same information available about the customer’s meta variables when you’re viewing a chat transcript.
- For each optional variable you selected, click the Choose a Variable drop-down menu, then select an existing variable, or create a new one, to capture the information.
- Under Fallback Answer, you can click to edit the AI Agent’s response if an error occurs.
-
In the block drawer, under Action Apps, click and drag the Zendesk Ticketing block into your handoff, below the Fetch Chat Metadata block.
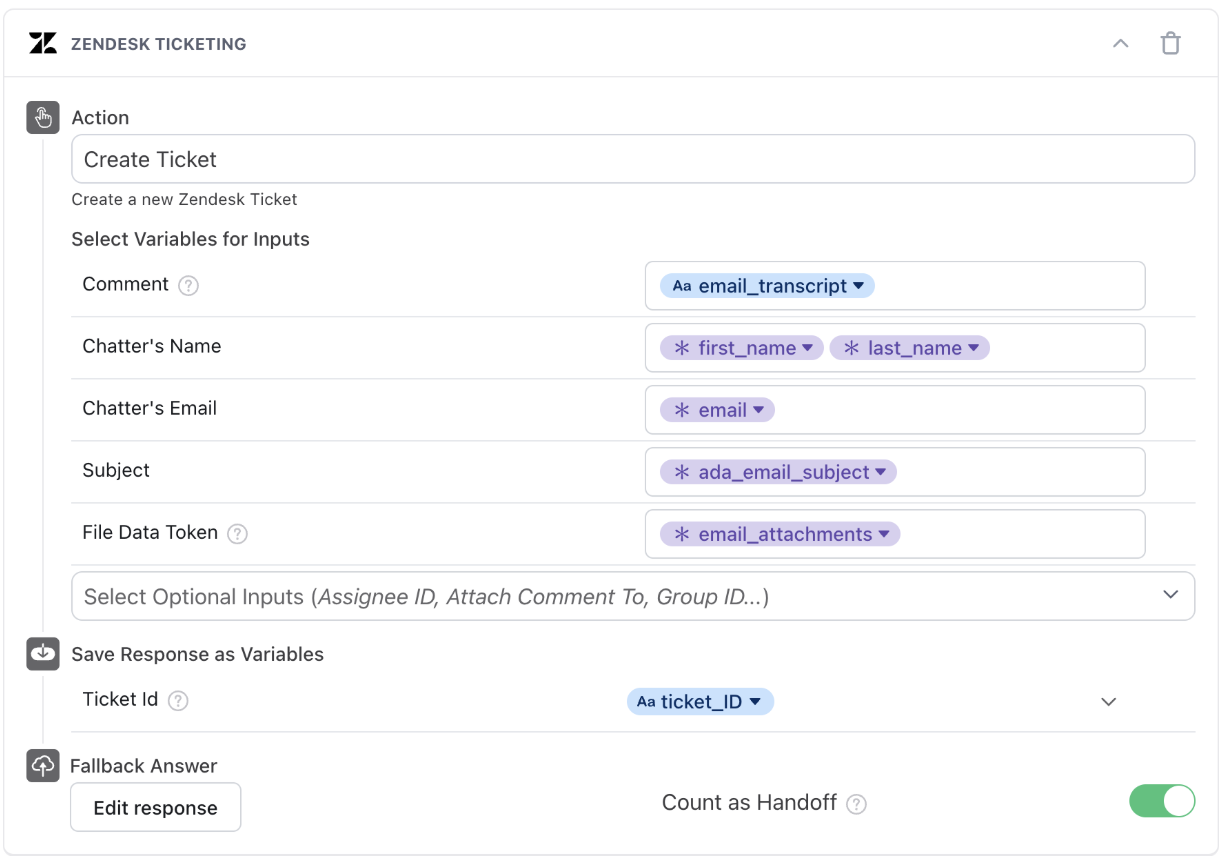
- Follow the instructions in Use the Zendesk Ticketing app block, ensuring that you add any fields and variables you want to include in your tickets.
- Add the File Data Token field, and in that field, add the email_attachments variable to ensure that your AI Agent can pass any attachments to Zendesk.
- (Optional) Add the Email CCs field and configure it with the
email_latest_cc_listvariable to pass CC’d recipients from multiple participant conversations directly into the Zendesk ticket. All CC’d participants will automatically receive replies from human agents after handoff. - (Optional) Add the Ticket Recipient field from the Optional Inputs dropdown to specify the email address that human agents should reply from when responding to escalated tickets.
If SMTP is not enabled, the reply-from address must be different from the AI Agent’s BYOD address to prevent AI Agent interjections at handoffs. Ensure the human agent address you are using is appropriately set up in Zendesk.
- Enable the Count as Handoff toggle to ensure your reporting is accurate.
-
Add any other custom messaging you want customers to receive during your handoff, and click Save. At the top of your screen, ensure your handoff toggle is set to Active so your AI Agent can start handing customers off as needed.
Limitations
- With the SMTP Connector configured: Human agents can reply from the same BYOD address as the AI Agent, and replies continue in the same email thread.
- Without the SMTP Connector: Human agents must reply from a different address than the AI Agent, and replies start a new thread.
- Using the Ticket Recipient field with a different email address: If the Ticket Recipient field is set to a different email address than the BYOD address used by the AI Agent, and you expect human agents to reply from that address in the same thread, you must configure SMTP for both addresses. Both addresses must be on the same domain (for example,
taxes@example.comandlegal@example.com). Addresses on different domains (for example,help@foo.comandhelp@bar.com) are not supported for same-thread behavior. If the addresses are on different domains, configure the Zendesk SMTP Connector separately for each inbox’s domain. - Multi-domain SMTP Connector: When an AI Agent has inboxes on different BYOD domains, configure the Zendesk SMTP Connector per domain. Inboxes that share a domain share the same SMTP configuration. See Zendesk SMTP Connector.
Salesforce
Creates a new case in Salesforce if the Create Case option is selected, or updates an existing case if the Update Case option is selected. Human agent replies to the case are sent to the end user in a new email thread from a different email address.
Configuration
-
If you haven’t already, configure Salesforce actions in your AI Agent.
-
Ensure your handoff has an availability rule set to apply only when the channel is Email.
-
In your handoff flow, in the block drawer on the right side of your screen, under Action Apps, click and drag the Fetch Chat Metadata block into your handoff. This block allows you to save the entire chat transcript as a variable, which you can then pass along to the live agent for additional context during the handoff.
- Under Select Variables for Inputs, beside Chatter Token, click inside the field and add the red chatter_token metavariable.
- Under Save Response as Variables, click the Select Optional Variables drop-down menu, then select any optional variables you’d like to capture:
- Transcript and Summary: Select this option to save the conversation transcript and summary to a variable.
- Transcript Only: Select this option to save just the conversation transcript to a variable.
- Summary Only: Select this option to save just the conversation summary to a variable.
- Chatter Info: Select this option to save the customer’s metadata to a variable. This is the same information available about the customer’s meta variables when you’re viewing a chat transcript.
- For each optional variable you selected, click the Choose a Variable drop-down menu, then select an existing variable, or create a new one, to capture the information.
- Under Fallback Answer, you can click to edit the AI Agent’s response if an error occurs.
-
In the block drawer, under Action Apps, click and drag the Salesforce block into your handoff, below the Fetch Chat Metadata block.

- In the Select Action list, click Create Case.
- Beside Case Reason, add your transcript variable.
- Beside Name and Email Address, add the variables that contain that information.
- Add the File Data Token field, and in that field, add the email_attachments variable to ensure that your AI Agent can pass any attachments to Salesforce.
- Add any additional fields and variables you want to include in your cases.
- Enable the Count as Handoff toggle to ensure your reporting is accurate.
-
Add any other custom messaging you want customers to receive during your handoff, and click Save. At the top of your screen, ensure your handoff toggle is set to Active so your AI Agent can start handing customers off as needed.
Limitations
- Agents must reply from an email address that is not configured as an email channel on this AI Agent.
- This requirement also applies to outbound cases initiated in Salesforce outside of Ada.
Sends a formatted email to the recipient address specified in the block’s “Recipient Email” field. Ada also sets the Reply-To and CC headers using system variables (e.g., @email_from_address, @email_latest_CC_list).
Configuration
-
Ensure your handoff has an availability rule set to apply only when the channel is Email.
-
In your handoff flow, in the block drawer on the right side of your screen, under Action Apps, click and drag the Fetch Chat Metadata block into your handoff. This block allows you to save the entire chat transcript as a variable, which you can then pass along to the live agent for additional context during the handoff.
- Under Select Variables for Inputs, beside Chatter Token, click inside the field and add the red chatter_token metavariable.
- Under Save Response as Variables, click the Select Optional Variables drop-down menu, then select any optional variables you’d like to capture:
- Transcript and Summary: Select this option to save the conversation transcript and summary to a variable.
- Transcript Only: Select this option to save just the conversation transcript to a variable.
- Summary Only: Select this option to save just the conversation summary to a variable.
- Chatter Info: Select this option to save the customer’s metadata to a variable. This is the same information available about the customer’s meta variables when you’re viewing a chat transcript.
- For each optional variable you selected, click the Choose a Variable drop-down menu, then select an existing variable, or create a new one, to capture the information.
- Under Fallback Answer, you can click to edit the AI Agent’s response if an error occurs.
-
In the block drawer, under Action Apps, click and drag the Email block into your handoff, below the Fetch Chat Metadata block.
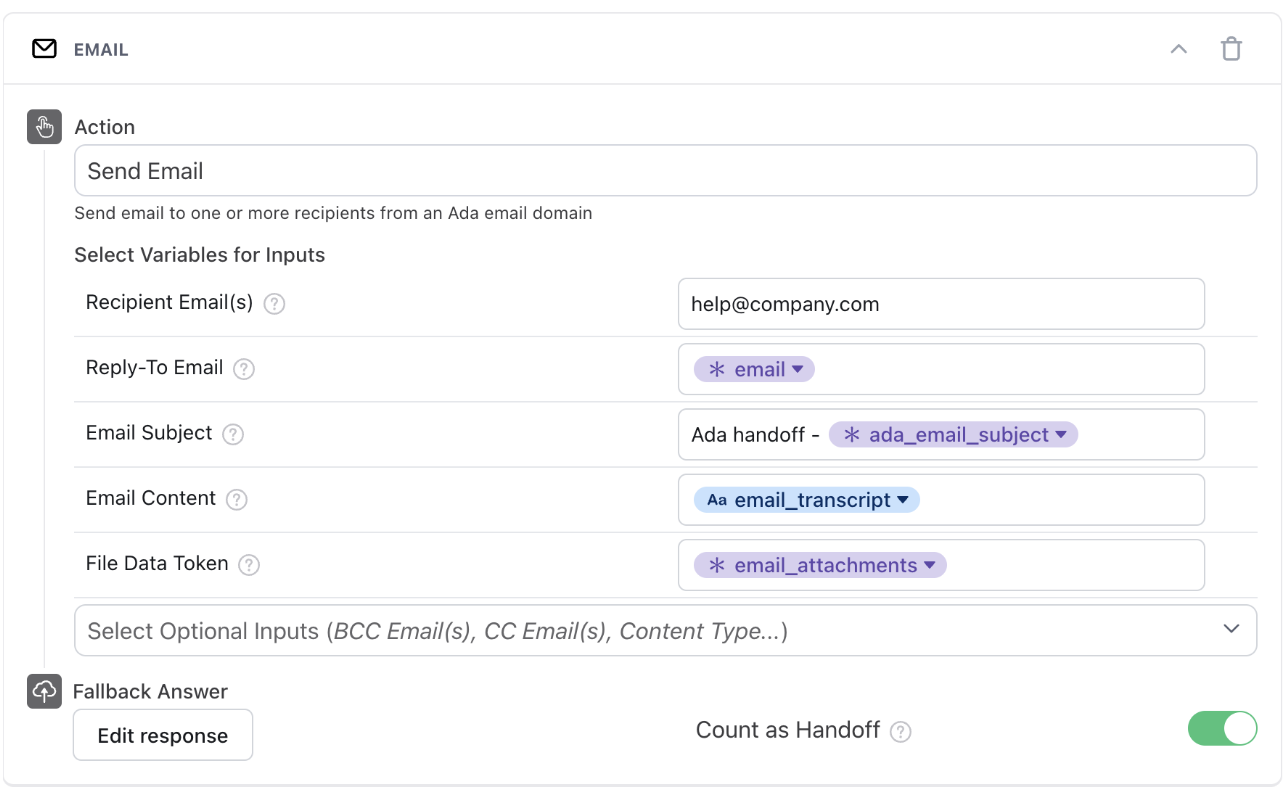
- In the Select Variables for Inputs section, complete the mandatory variable fields:
-
Recipient Email(s): Add the primary recipient email address. You can add the email variable, or manually enter the recipient’s email address. Separate multiple email addresses with a comma.
-
Reply-To Email: Enter the Reply-to email address you wish to assign to receive replies to your email.
-
Email Subject: Enter the email subject.
-
Email Content: Enter the body text of the email, including the email_transcript variable.
- Click the Select Optional Inputs drop-down menu, then select any optional variable fields you’d like to add:
-
File Data Token: Add the email_attachments variable to pass it on to the agent.
-
BCC Email(s): Add blind carbon copy recipient email addresses. BCC addresses are not visible to other recipients.
-
CC Email(s): Add secondary recipient email addresses. These addresses are visible to other recipients.
-
Content Type: Enter the MIME type you want to use in your email:
- If you just want to enter plain text, or if you’re not sure what to use, enter
text/plain. - If you want to use HTML tags, enter
text/html.
- If you just want to enter plain text, or if you’re not sure what to use, enter
-
Reply-To Name: Enter the name of the Reply-to recipient.
-
Sender Name: Enter the name of the email sender. This appears in the From field.
- Under Fallback Answer, you can click to edit the AI Agent’s response if an error occurs.
- Enable the Count as Handoff toggle to ensure your reporting is accurate.
-
Add any other custom messaging you want customers to receive during your handoff, and click Save. At the top of your screen, ensure your handoff toggle is set to Active so your AI Agent can start handing customers off as needed.
Limitations
- If ticket creation isn’t handled automatically, customers must configure email-to-ticket automation in their platform.
- Human agents must respond from an email address that is not configured as an email channel on this AI Agent; otherwise, replies may be routed back to Ada.