Sunshine Conversations setup
Overview
With Ada and Sunshine Conversations, customers can seamlessly interact with your AI Agent and human agents in the following tools:
-
WhatsApp
-
Facebook Messenger
-
Twitter DM
-
Instagram Direct
-
Twilio SMS
If you are setting up any one of the above channels, read this topic first. Ada does not support using other tools than the ones listed above with Sunshine Conversations.
Limitations
When a customer is handed off to a human agent on Social channels configured through Sunshine Conversations, the agent’s replies will appear in Zendesk but may not be reflected in the AI Agent’s transcript. This may cause conversation history in Ada to appear incomplete for Social channel interactions.
Improvements to Social channel integrations are in progress, and this documentation will be updated when enhanced message visibility becomes available.
Quick start
Connect Sunshine Conversations to Ada in a few steps. See Implementation & usage for detailed instructions.
Connect Sunshine Conversations in Ada
On the Ada dashboard, go to Config > CHANNELS > Social. Under Integrations, click Configure beside Sunshine Conversations and connect your app.
Add channels
In Zendesk Admin Center, go to Channels > Messaging and social > Messaging and add your desired channels (WhatsApp, Facebook Messenger, etc.).
Set Ada as the default for all channels
In Zendesk Admin Center, go to AI > AI agents > AI agents > Manage marketplace bots, then use Ada’s Options menu to select Set AI agents as default for all channels. See Managing third-party bots in Admin Center in Zendesk’s documentation.
Implementation & usage
Configure Sunshine Conversations to connect your social messaging channels with Ada.
Requirements
There are specific Zendesk account requirements you need to have in place to configure Sunshine Conversations for your Social channels in Ada.
-
One of two Zendesk subscriptions:
-
Zendesk Suite
OR
-
Support + Chat + Social Messaging Add-on
If the Social Messaging Add-on is not already a part of your account, ask your Zendesk Account Executive to add it for you.
-
-
A Sunshine Conversations license
Configure Sunshine Conversations in Ada
Before you start, ensure you have a Sunshine Conversations app ready to use for the integration with Ada. You can use an existing app or create a new one.
Connect Sunshine Conversations with Ada
Connect your Sunshine Conversations app to Ada.
To connect Sunshine Conversations:
- On the Ada dashboard, go to Config > CHANNELS > Social. Then, under Integrations, beside Sunshine Conversations, click Configure.
- In the window that appears, click Connect. A new browser tab opens with a list of available apps to connect.
- Find your app, click Select, then click Allow. The tab closes and returns you to the Ada dashboard.
- Click Finish.
The activation toggle changes to the on position.
Changing the default language for a Sunshine Conversations integration will also update the language for all connected AI Agents. This may affect Agent responses and behavior. Proceed with caution.
Set Ada as the default for all channels
After connecting Sunshine Conversations, set Ada as the default for all channels in Zendesk Admin Center. This ensures end users interact with your AI Agent first before being handed off to live agents. Setting Ada as the default for a single channel or integration only is not sufficient — messages on other channels will bypass your AI Agent.
In Zendesk Admin Center, go to AI > AI agents > AI agents, then under Other, click Manage marketplace bots. On Ada’s row, click the Options menu and select Set AI agents as default for all channels. For detailed steps, see Set Ada as the default for all channels; for more information, see Managing third-party bots in Admin Center in Zendesk’s documentation.
Enable multi-conversation support
Enable multi-conversation support in your Zendesk messaging settings. This is required for Zendesk Messaging Handoffs. Without it, end users cannot cleanly end conversations during a Handoff state.
For instructions, see Allowing multiple conversations for your end users in Zendesk’s documentation.
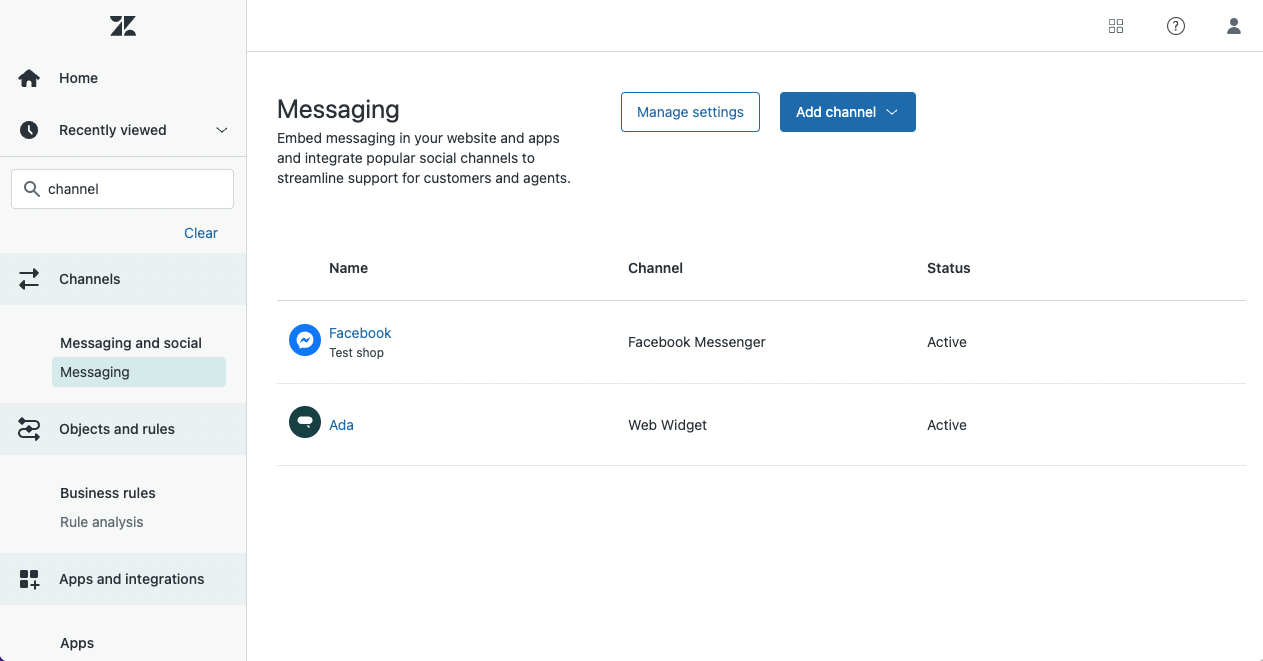
Add your supported channels
Next, add the channels you want to use to Zendesk Admin Center.
-
In Zendesk Admin Center, in the left navigation bar, open the Channels drawer. Under the Messaging and social header, click Messaging.
-
Select the channel you want to add. The prompts that follow vary by channel, but for all of them, the objective is to sign into your account and link it with your Zendesk account. For channel-specific instructions, see the linked articles in About messaging channels for the Zendesk Agent Workspace in Zendesk’s documentation.
After you have added a channel successfully, it appears in your list of channels.
Now, if you go back to your integration settings in the Ada dashboard and refresh the page. Any messaging channels already connected to your app appear in the Sunshine Conversations portion. This list will grow as you connect more channels.
Verify the webhook configuration
After connecting Sunshine Conversations, the live webhook configuration is visible in the integration settings. Go to Config > CHANNELS > Social, then under Integrations, beside Sunshine Conversations, click Configure.
The Sunshine Conversations webhook details show:
- Webhook target — the URL Sunshine Conversations sends events to.
- Triggers — the events the webhook is subscribed to.
- Multi-bot routing —
Yeswhen the target uses the shared multi-bot endpoint,Nowhen it uses a per-AI-Agent endpoint. - Version and Include full user — the underlying webhook settings reported by Sunshine Conversations.
Use this view to confirm that a Sunshine Conversations app is set up for Multi-bot Routing before adding a second AI Agent to the same app.
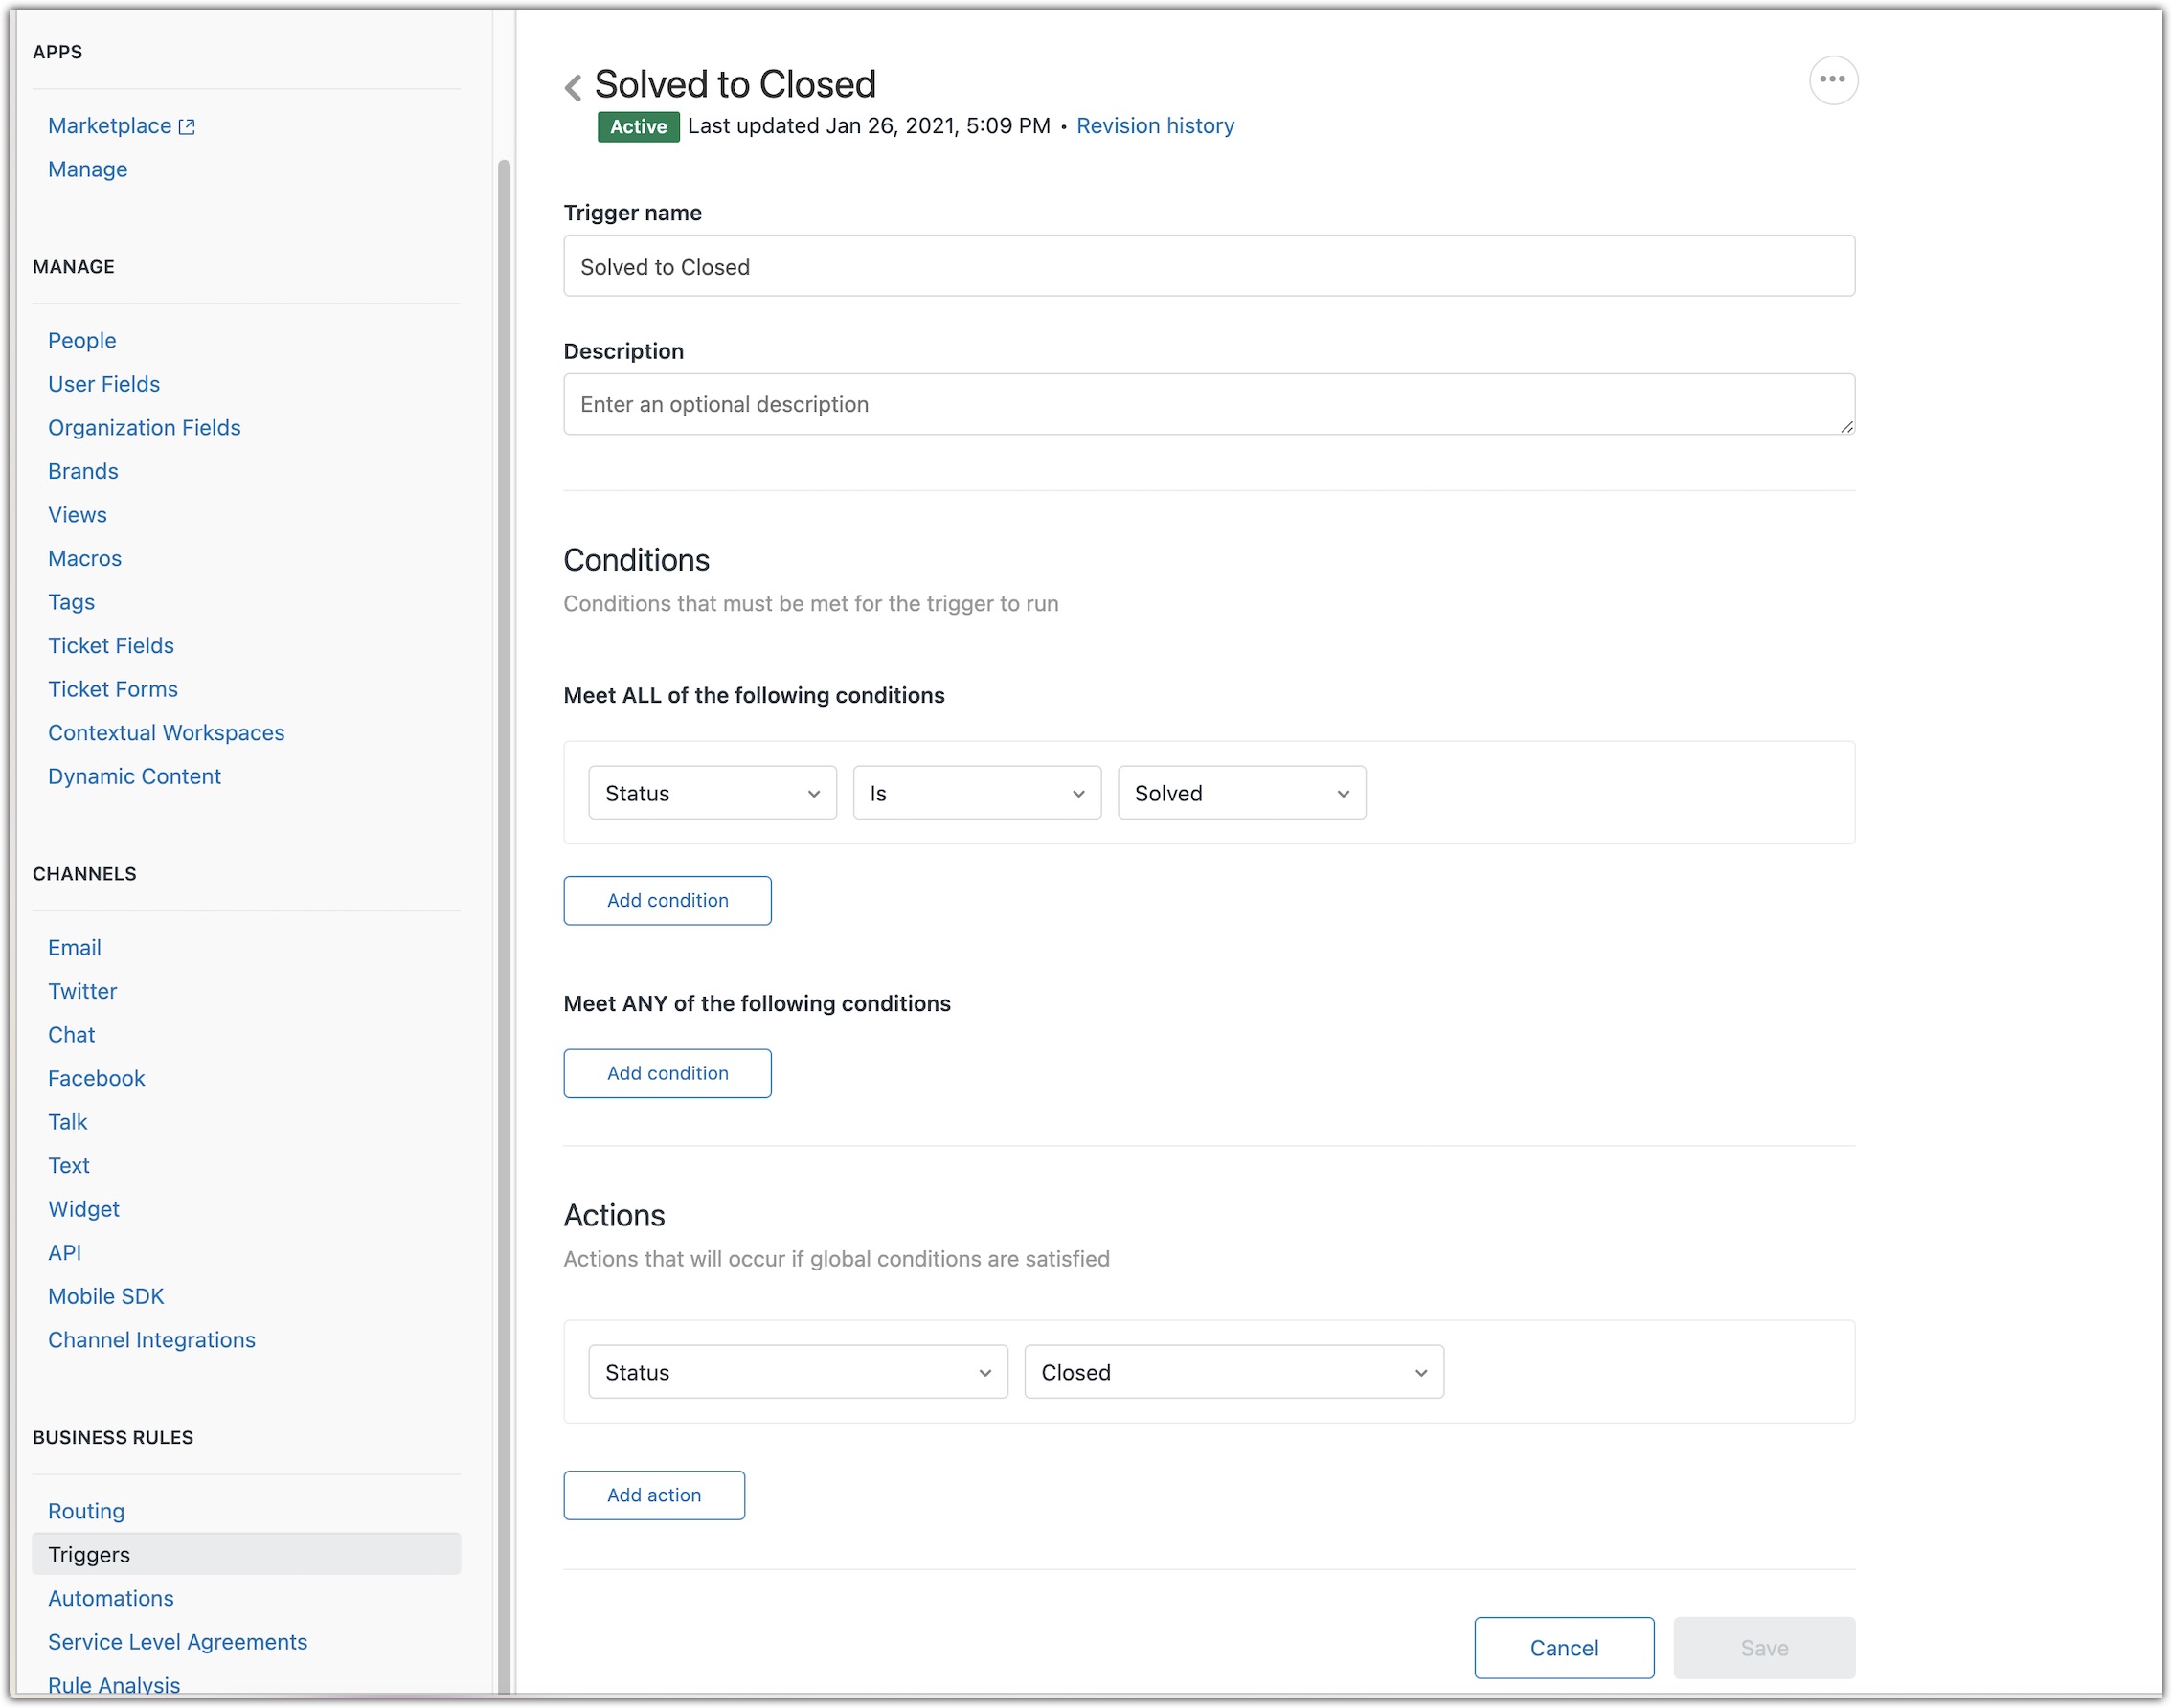
What happens after the ticket is solved?
You have some options for what happens after the ticket is marked as solved. Depending on what your organization and your customers need, you can decide whether how much time you give your customer to reopen the ticket, if any, before passing them back to the AI Agent.
-
Pass the customer back to the AI Agent immediately
You can create a Solved to Closed trigger in Zendesk so that as soon as the ticket is solved, the customer goes back to the AI Agent. In this case, if a customer tries to thank the agent or ask follow-up questions, the AI Agent will respond.
For more information, see Creating triggers for automatic ticket updates and notifications in Zendesk’s documentation.
-
Configure a time delay in hours before passing the customer back to the AI Agent
You can configure an automation-based timeout, in increments of 1 hour, to give the customer a chance to keep speaking with the agent. In this case, if a customer tries to thank the agent or ask follow-up questions before the number of hours have passed, Zendesk will re-open the ticket. After the timeout, the AI Agent will respond.
For more information, see Creating and managing automations for time-based events in Zendesk’s documentation.
-
Configure a custom time delay before passing the customer back to the AI Agent
You can configure a custom-middleware-based timeout to give the customer a chance to keep speaking with the agent for a period of your choosing before being passed back to the AI Agent. You’ll need to work with developers to:
- Receive a ticket-solved notification
- Determine how long to wait
- Call the API to close the ticket
During this custom timeout period, if a customer tries to thank the agent or ask follow-up questions, Zendesk will re-open the ticket. After the timeout, the AI Agent will respond.
For more information, see Zendesk Integration Services in Zendesk’s developer documentation.