Contact center integration
Overview
Integrate your contact center platform with Ada Voice to route calls to your AI Agent and transfer calls to human agents when needed. If you don’t see your contact center platform listed here, contact your Ada team to determine the best way to integrate. Ada Voice can integrate with any contact center platform.
Integrate Voice with your SIP infrastructure
This section takes you through how to integrate Ada with your SIP infrastructure.
Setting up your Ada SIP domain
- If you are using your own Twilio account with Ada Voice, configure a Twilio SIP domain for your AI Agent to use. For more information, see Set up your Twilio account in Voice onboarding at Ada’s Help Docs.
- If your Voice subscription package includes Twilio your Ada team will set up your SIP domain for you. You will need to provide them with the following information:
- The domain name for your SIP address: This will be used for the SIP domain that will be created for you, which will follow the format
<your_domain_name>.sip.twilio.com. This needs to be a unique domain name that is not currently being used in Twilio. - IP Addresses for your SIP domain’s Access Control List (ACL): An ACL is a security mechanism that enhances network security by allowing only specified IP addresses to access your SIP domain. In the context of SIP communications, this means defining trusted IP addresses—such as those associated with your SIP infrastructure—to ensure that only authorized signaling and media traffic is permitted to interact with your SIP domain.
- The domain name for your SIP address: This will be used for the SIP domain that will be created for you, which will follow the format
Integrating Ada in your SIP infrastructure
You must allow all of Twilio’s following IP address ranges and ports on your firewall for SIP signaling traffic. Please also note that these IP addresses are provided for firewall configuration purposes only and not all of these IP addresses will host active gateways at a given time. Customers should also avoid sending traffic directly to these IP addresses and instead use your SIP domain.
Global Media IP Gateway
The Public Connections Destination IP Ranges and Port Ranges are now identical across all locations:
Regional Signaling IP Gateways
Port
5061 (TLS)
North America Virginia Gateways
North America Oregon Gateways
Europe Ireland Gateways
Europe Frankfurt Gateways
Asia-Pacific Tokyo Gateways
Asia-Pacific Singapore Gateways
Asia-Pacific Sydney Gateways
South America São Paulo Gateways
Send data to Ada using SIP User-to-User (UUI) header
When sending SIP to Ada, you must send the end user’s phone number in the SIP UUI header:
- The UUI header information must be sent in Ascii encoding format.
- It must also follow the format Ada Voice expects:
You can send additional metadata to Ada Voice, such as name, language, account number — or any other information you choose — as key-value pairs using the SIP UUI header.
Any data sent will be available as a purple metavariable in Ada to help personalize the conversation.
Transferring calls from Ada to your SIP infrastructure
If an end user using your AI Agent needs to escalate to a human agent, you can hand them off using a SIP REFER transfer to your SIP infrastructure.
To transfer calls from Ada to your SIP infrastructure:
- In your Ada AI Agent Handoff use the Transfer Call block and select SIP address from the Transfer to drop down menu.
- In the SIP address field, enter the SIP address that you want to transfer the call to.
- Select the check box beside Include a User-to-User header when transferring to the SIP address.
- Click +Add another row.
- For Key, enter the key name
phone_number. - For Value, select the
phone_numbermetavariable. - Click +Add another row.
- Provide any additional key value pairs that you want sent via the UUI header.
Integrate Voice with Aircall
This section takes you through how to transfer calls between Ada and Aircall.
Get calls into Ada
To have your AI Agent handle inbound calls originating in Aircall, configure an Aircall Smartflow that connects calls to your Ada Twilio Application:
- If you have not done so already, configure a Twilio Application for your AI Agent to use. For more information, see Set up your Twilio account in Get started with Voice at Ada’s Help Docs.
- Set up the widget in an Aircall Smartflow to transfer the call to your Ada Twilio Application.
- In Aircall, open the Smartflow Editor for the phone number(s) you want to route to Ada.
- Drag and drop the Ada Voice smartflow widget into your flow where you want your AI Agent to engage with end users.
- Your Aircall team will need to enable this widget for you.
- Enter your Twilio Application details in Aircall.
- In the Ada Voice Smartflow widget’s settings, paste the Twilio Application ID for your AI Agent. You can find this in Ada under Config > CHANNELS > Voice > Configuration after you create a Twilio Application for your AI Agent to use.
- You will need an Application Key - you can obtain this from your Ada Team.
- Publish your Smartflow.
When a call reaches the Ada Voice Smartflow widget in your Aircall Smartflow, it’s automatically routed to your AI Agent in Ada.
Escalate calls directly to agents using Aircall
If your AI Agent determines an end user needs human assistance, you can transfer the call back to an Aircall team.
- In your Ada AI Agent Handoff use the Transfer Call block and select Aircall as the transfer option in the Transfer to dropdown.
- For Destination type choose None, Number, Team, or User.
- If you selected None as the Destination type, you do not need to provide any additional information. When this Transfer Call block runs, Ada drops from the call, the call continues in Aircall, and the Aircall Smartflow will continue from where the Ada Voice Smartflow widget was used.
- If you selected Number as the Destination type, you will need to provide a line ID for a number in Aircall. You can find the line ID in the URL path of the Aircall number page, ex. dashboard.aircall.io/numbers/line_id/call-distribution. When this Transfer Call block runs, Ada drops from the call, the call continues in Aircall, and Aircall makes a ring to the number you specified in the Transfer Call block.
- If you selected Team as the Destination type, you will need to provide a team ID for a team in Aircall. You can find the team ID in the URL path of the Aircall team page, ex. dashboard.aircall.io/teams/team_id. When this Transfer Call block runs, Ada drops from the call, the call continues in Aircall, and Aircall makes a ring to the team you specified in the Transfer Call block.
- If you selected User as the Destination type, you will need to provide a user ID for a user in Aircall. You can find the user ID in the URL path of the Aircall user page, ex. dashboard.aircall.io/users/user_id/general. When this Transfer Call block runs, Ada drops from the call, the call continues in Aircall, and Aircall makes a ring to the user you specified in the Transfer Call block.
Integrate Voice with Amazon Connect
This section takes you through how to transfer calls between Ada and Amazon Connect.
How the Amazon Connect integration works
End users continue to call an Amazon Connect provisioned phone number. From your Amazon Connect contact flow, the call is transferred to your Ada AI Agent using the Transfer to phone number block, with Resume flow after disconnect set to Yes. With this setting enabled, whenever the AI Agent disconnects from the call, the call returns to your Amazon Connect contact flow and continues from the next block.
The AI Agent disconnects from the call in two scenarios, and the call returns to your Amazon Connect contact flow in both:
- The AI Agent escalates to a human agent. The AI Agent hands off the conversation and disconnects so Amazon Connect can route the call to one of your queues.
- The AI Agent intends to end the call. The AI Agent disconnects without escalating because the conversation is complete.
It is up to you to decide what happens in your Amazon Connect contact flow once the AI Agent disconnects, including whether to route the call to an agent or disconnect it. See Escalate calls directly to agents using Amazon Connect below for the configuration that distinguishes between these two scenarios.
Get calls into Ada
You will continue to receive phone calls using an Amazon Connect provisioned phone number, and you will transfer phone calls from Amazon Connect to your Ada AI Agent’s phone number using the Amazon Connect Transfer to phone number module.
-
If they have not done so already, your Ada Team will configure a Twilio phone number for your AI Agent to use to receive phone calls. For more information, see Set up your Twilio account in Get started with Voice at Ada’s Help Docs.
-
Log into your Amazon Connect account.
-
Create a new flow in Amazon Connect for inbound phone calls that you want to transfer to Ada.
-
In order to track the end user across Amazon Connect and your Ada AI Agent, you will need to create an AWS Lambda function in the AWS Instance associated with your Amazon Connect account. This function will retrieve an transfer ID for the call from Ada prior to the call being transferred to Ada, and optionally pass metadata from Amazon Connect to Ada.
Choose which Lambda version to use
There are two versions of the Lambda function available. We recommend using the newer, v2 version of the Lambda function which provides additional capabilities.
Version 2: Ada-Get-Call-ID with metadata (Recommended)
Sends a
POSTrequest to retrieve a transfer ID and pass metadata from Amazon Connect to Ada. Any key-value pairs included in themetadataobject are available as metavariables in your AI Agent (for example,amazon_connect_contact_id).-
Navigate to the Console Home of the AWS instance that is associated with your Amazon Connect account. It should look like this:
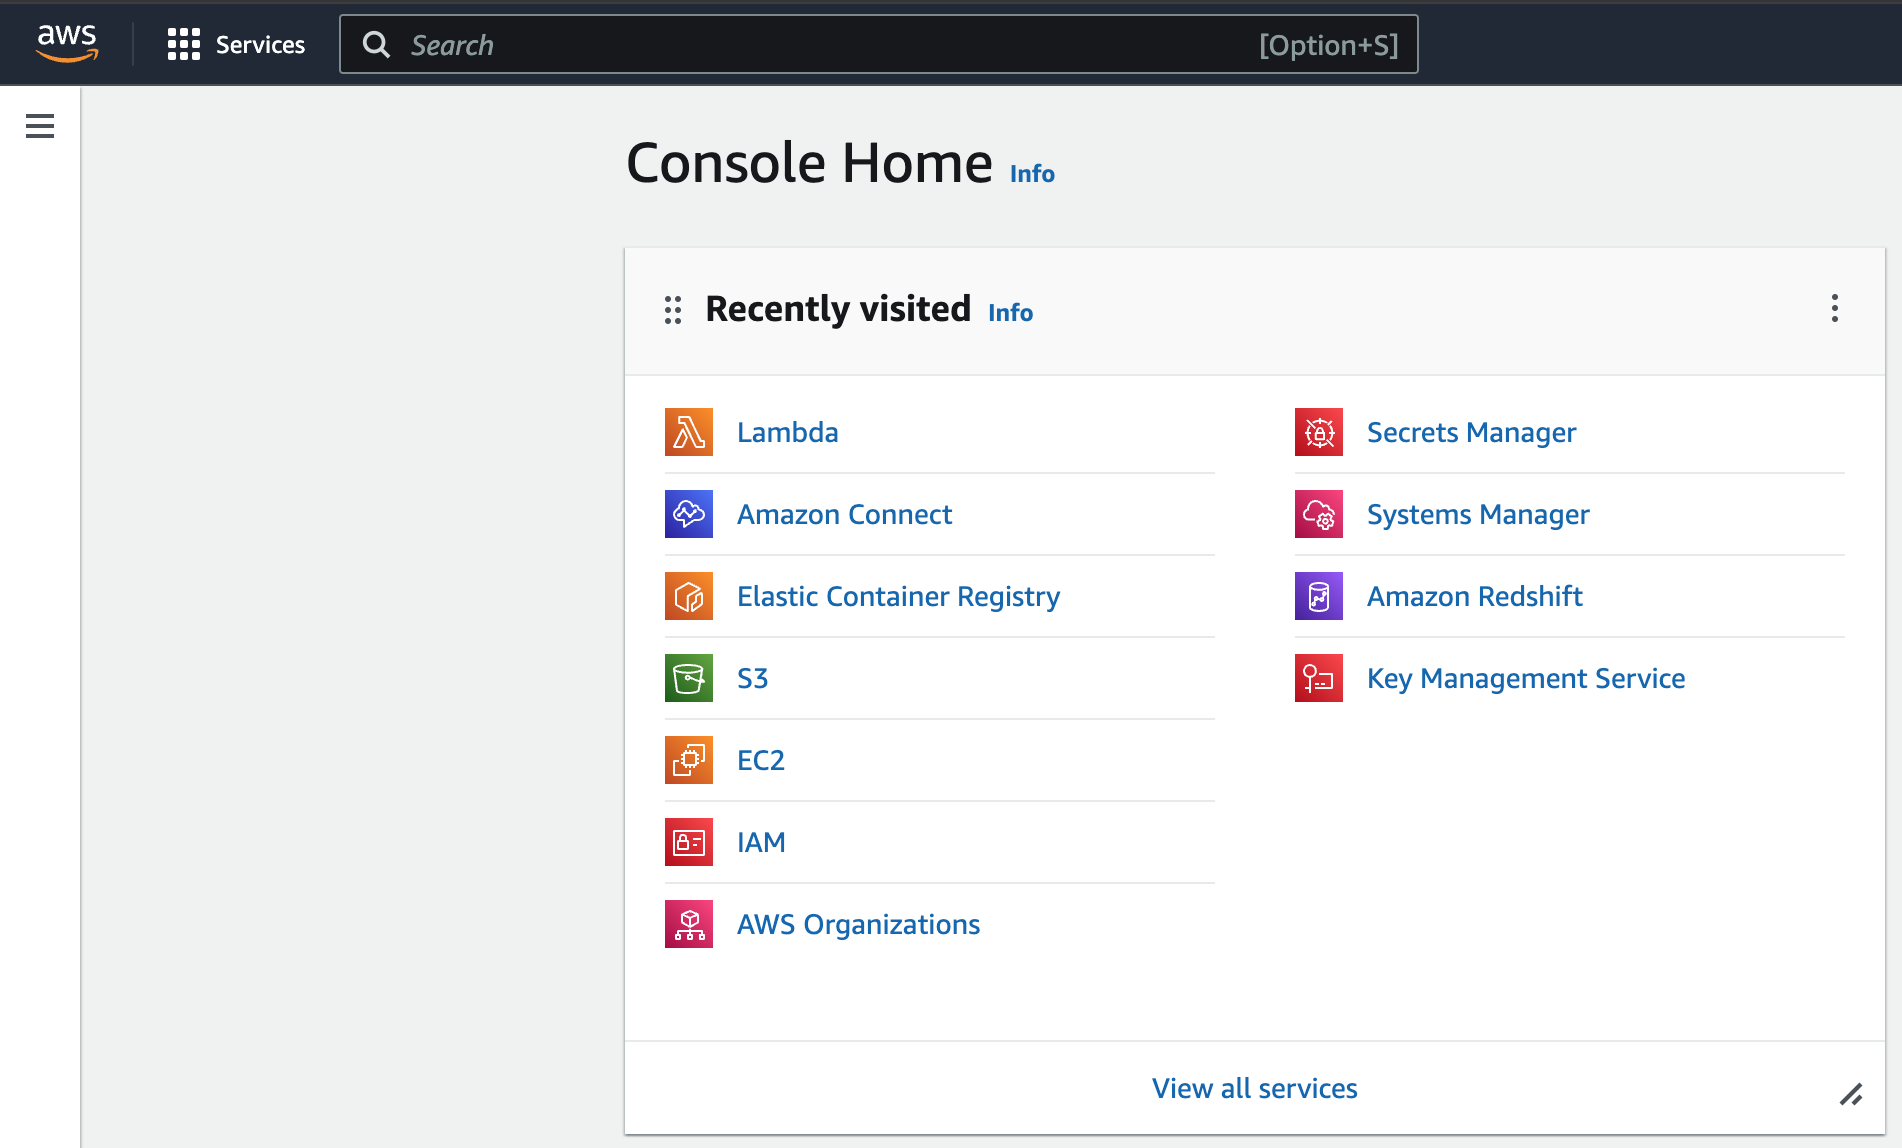
-
Navigate to Lambda. (Note: You might need to use Search to find it if it isn’t listed under your Recently visited.)
-
Click Create Function on your Lambda homepage.
-
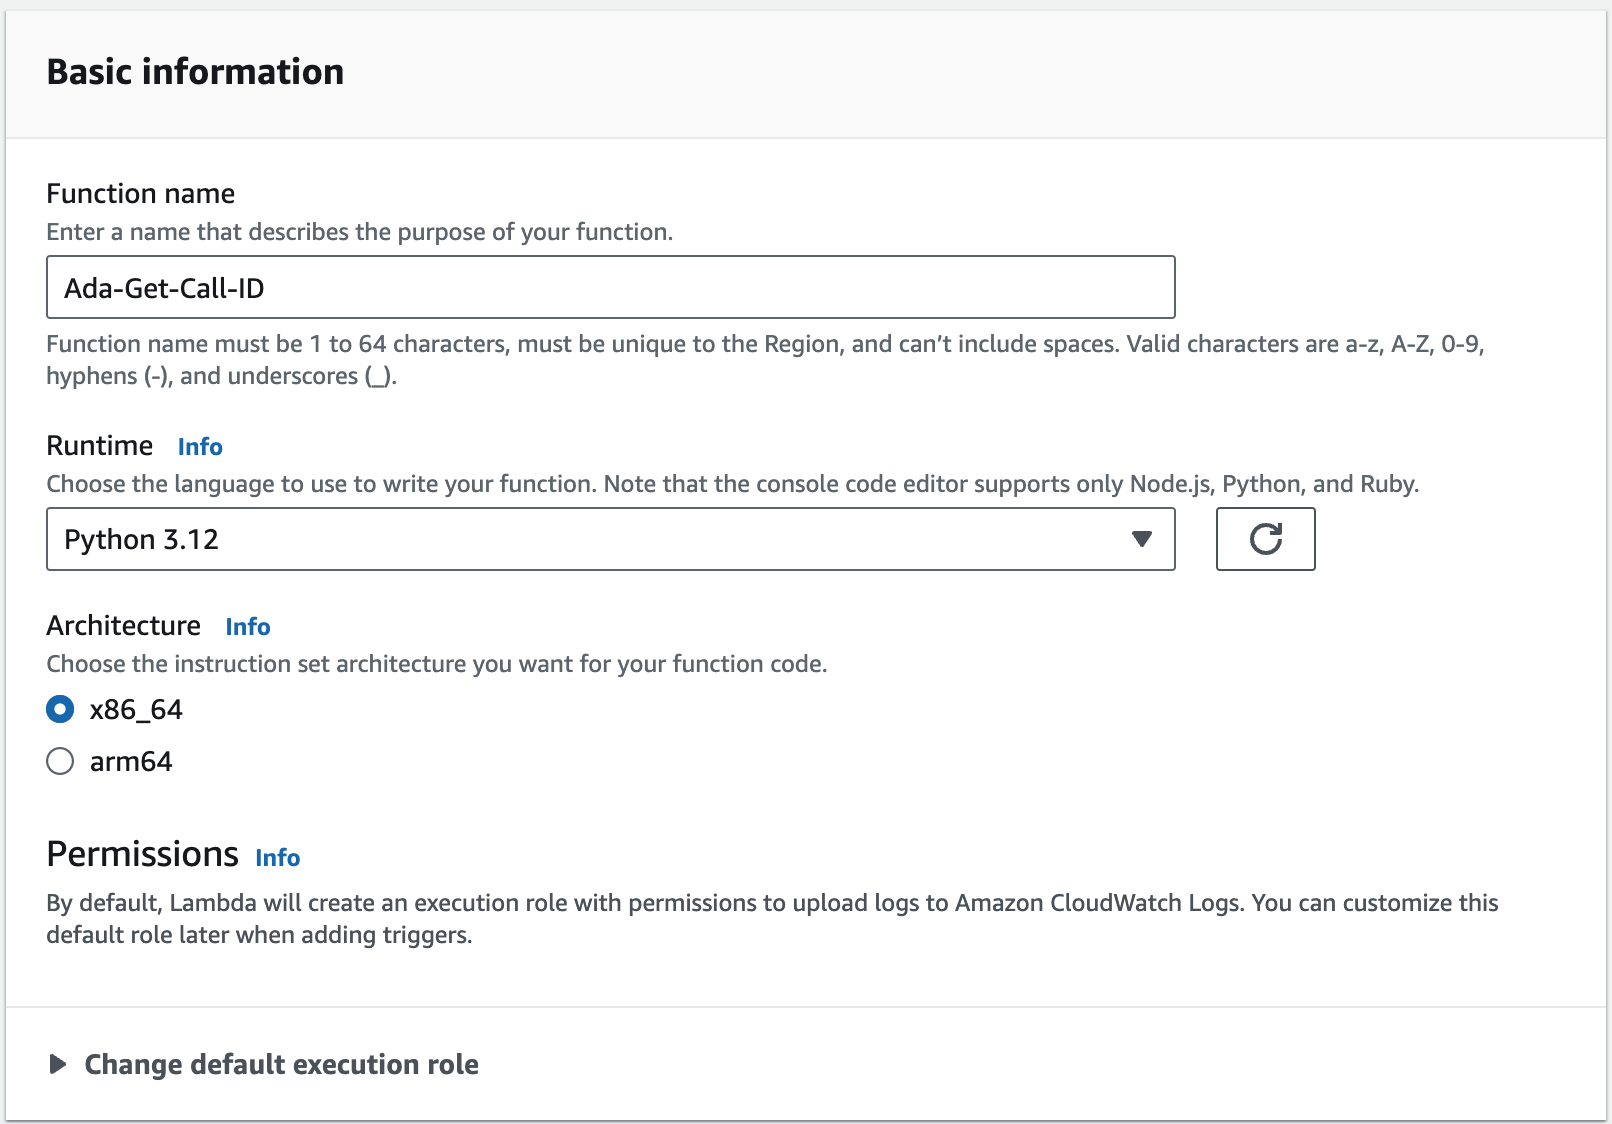
Enter the following property values under your Lambda’s Basic information:
- Function name: Ada-Get-Call-ID
- Runtime: Python 3.12
- Architecture: x86_64
-
Click Create function.
-
Once created, you will see an editor where you are able to create a new function. Enter the following — replace
bot-handlewith your AI Agent’s handle. Replace the example metadata keys and values with the data you want to pass to Ada. To pass no metadata, setmetadatato{}. -
Click the Deploy button.
Version 1: Ada-Get-Call-ID (Legacy)
Sends a
GETrequest to retrieve a transfer ID. Does not support passing metadata to Ada.Follow the same steps as Version 2 above, but use the following code in step 6:
-
-
After creating, allow your Amazon Connect instance to access the Lambda.
- Go to Amazon Connect on AWS dashboard
- Click on the instance
- Click “Flows” on the left sidebar
- Scroll down to “AWS Lambda” section
- Add function created above
-
Use the Invoke an AWS Lambda function block to call your newly created AWS Lambda function and to retrieve the
uuidfrom Ada for your call. Enter the following property values:- Function ARN: Use the function created above
- Timeout: 8
- Response validation: Set to JSON
-
Use the Transfer to phone number block to transfer the call to Ada. Enter the following property values:
- Transfer via: Select Phone number, select Set manually, and provide your AI Agent’s phone number.
- Set timeout: Select Set manually 30.
- Set Resume flow after disconnect section to Yes.
- With this enabled, once the call is transferred to Ada, if Ada is unable to resolve a conversation and it needs to be escalated then Ada will disconnect from the call and the Amazon Connect flow will resume where it left off.
- Select Send DTMF:
- Select Set Dynamically
- Namespace: External
- Key: uuid
- Select Set Dynamically
Escalate calls directly to agents using Amazon Connect
If an end user needs to escalate to a human agent, the AI Agent disconnects from the call and your Amazon Connect contact flow resumes where you left off. Your contact flow also resumes when the AI Agent ends a call without escalating, so the steps below include the configuration that distinguishes between these two scenarios and ends those calls in Amazon Connect.
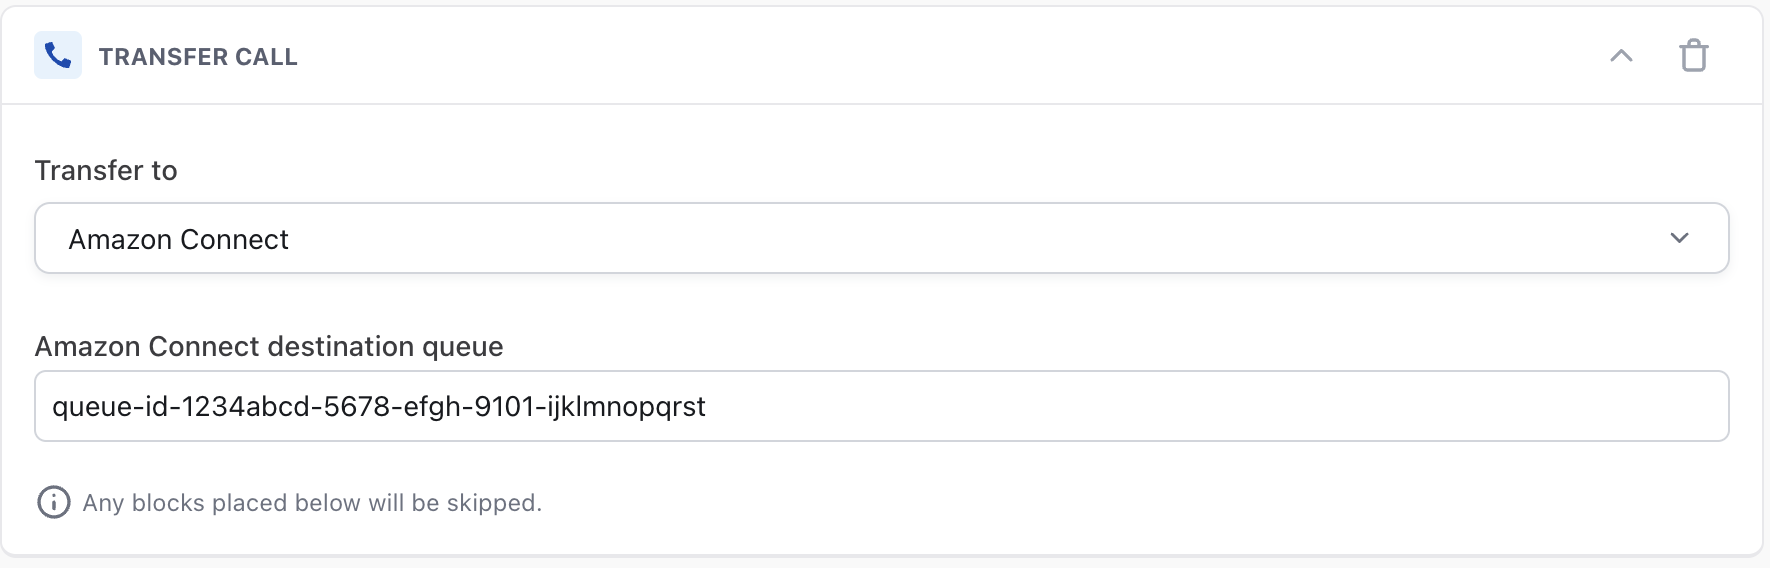
- In your Ada AI Agent Handoff use the Transfer Call block and select Amazon Connect from the Transfer to drop down menu.
- In the Amazon Connect destination queue field enter the queue ID of the queue in Amazon Connect that you want to transfer the phone call to.
-
In Amazon Connect, after the Transfer to phone number block that you set-up in Step 9 of Get calls into Ada above, you will need to invoke another AWS Lambda function. This function will retrieve transfer data for the call — you can use this to determine which queue in Amazon Connect to route the call to, along with other call metadata.
Choose which Lambda version to use
There are two versions of the Lambda function available. We recommend using the newer, v2 version of the Lambda function which provides additional capabilities.
Version 2: Ada-Get-Transfer-Data (Recommended)
Returns: Enhanced transfer data including:
-
destinationQueue- Queue routing information. -
twilioCallId- Twilio call identifier. -
conversationId- Ada conversation identifier. -
endUserId- End user identifier. -
shouldContinue-"true"if the AI Agent escalated the call to a human agent and the call should continue in Amazon Connect,"false"if the AI Agent intended to end the call and the call should be ended in Amazon Connect, or"null"if no transfer data is available. You must branch on this value in your Amazon Connect contact flow — see step 4 of Escalate calls directly to agents using Amazon Connect below.
-
Navigate to the Console Home of the AWS instance that is associated with your Amazon Connect account.
-
Navigate to Lambda. (Note: You might need to use Search to find it if it isn’t listed under your Recently visited.)
-
Click Create Function on your Lambda homepage.
-
Enter the following property values under your Lambda’s Basic information:
- Function name: Ada-Get-Transfer-Data
- Runtime: Python 3.12
- Architecture: x86_64
-
Click Create function.
-
Once created, you will see an editor where you are able to create a new function. Enter the following — replace
bot-handlewith your AI Agent’s handle: -
Click the Deploy button.
Version 1: Ada-Get-Destination-Queue (Legacy)
Returns only the
destinationQueuevalue for basic routing.-
Navigate to the Console Home of the AWS instance that is associated with your Amazon Connect account. It should look like this:
-
Navigate to Lambda. (Note: You might need to use Search to find it if it isn’t listed under your Recently visited.)
-
Click Create Function on your Lambda homepage.
-
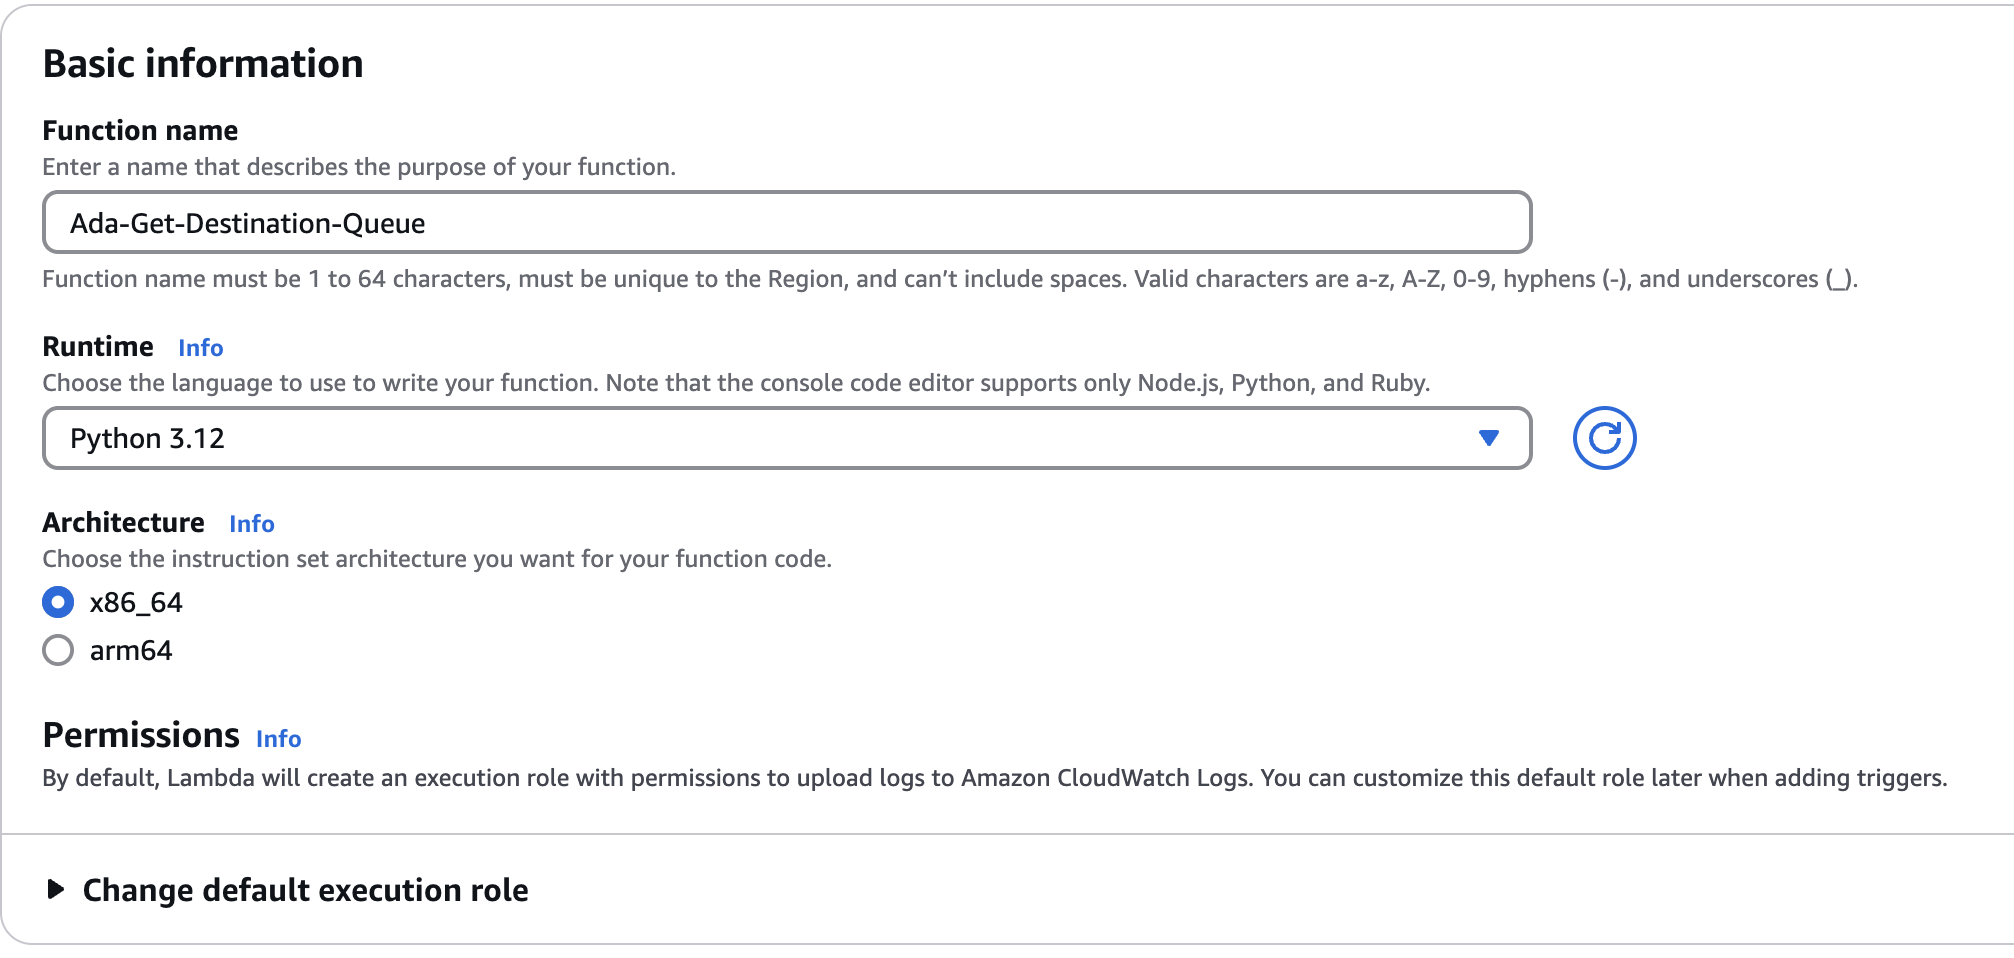
Enter the following property values under your Lambda’s Basic information:
- Function name: Ada-Get-Destination-Queue
- Runtime: Python 3.12
- Architecture: x86_64
-
Click Create function.
-
Once created, you will see an editor where you are able to create a new function. Enter the following — replace
bot-handlewith your AI Agent’s handle: -
Click the Deploy button.
-
-
After creating, allow your Amazon Connect instance to access the Lambda:
- Go to Amazon Connect on AWS dashboard
- Click on the instance
- Click “Flows” on the left sidebar
- Scroll down to “AWS Lambda” section
- Add function created above
-
Use the Invoke an AWS lambda function block to call your newly created AWS Lambda function and to retrieve the transfer data for your call. Enter the following property values:
- Destination Key: uuid
- Value: Set dynamically
- Namespace: External
- Key: uuid
- Timeout: 3
- Response validation: JSON

-
Branch on
shouldContinueso calls the AI Agent intended to end are disconnected in Amazon Connect. This step is only available when using Version 2 of the Lambda (Ada-Get-Transfer-Data).When the AI Agent disconnects from a call, your contact flow resumes regardless of whether the AI Agent escalated to a human agent or intended to end the conversation. You must check
shouldContinueafter the Lambda runs and disconnect the call when it is"false". If you skip this step, calls that the AI Agent intended to end will fall through to the rest of your flow and may be transferred to an agent unexpectedly.- Immediately after the Invoke AWS Lambda function block from the previous step, add a Check contact attributes block.
- In the Check contact attributes block, configure the attribute to check:
- Type: External
- Attribute:
shouldContinue
- Add the following conditions:
- Equals
false— connect this branch to a Disconnect block. This ends the call in Amazon Connect when the AI Agent intended to end the conversation. - Equals
true— connect this branch to your queue routing logic (see step 5 below).
- Equals
- Connect the No Match branch to whatever fallback behavior you want when no transfer data is available (
shouldContinuereturns"null"). A common choice is to also send this branch to a Disconnect block, but you may instead route to a default queue or play a fallback prompt.
-
Use
destinationQueueto route the call to a specific queue whenshouldContinueis"true".Amazon Connect requires a queue ID or queue ARN — not a queue name — when setting a queue dynamically. Use the queue ID that you entered in the Amazon Connect destination queue field of the AI Agent Handoff (step 2 above), and combine the Set working queue and Transfer to queue blocks to route the call:
-
On the
"true"branch from step 4, add a Set working queue block. Configure it as follows:- By queue: select Set dynamically
- Type: External
- Attribute:
destinationQueue
The queue ID can be found in the URL of the queue editor in Amazon Connect (the part of the URL after
/queue/). The full queue ARN follows this format: -
After the Set working queue block, add a Transfer to queue block. This routes the call to the queue you set in the previous step.
-
Connect the Set working queue block’s Error branch and the Transfer to queue block’s Error branch to fallback behavior — for example, a Disconnect block or a default queue.
Your flow should look like this:
-
Integrate Voice with your Cisco CUBE
This section takes you through how to integrate Ada Voice with a Cisco CUBE.
Setting up your Ada SIP domain
- If you are using your own Twilio account with Ada Voice, configure a Twilio SIP domain for your AI Agent to use. For more information, see Set up your Twilio account in Get started with Voice at Ada’s Help Docs.
- If your Voice subscription package includes Twilio your Ada team will set up your SIP domain for you. You will need to provide them with the following information:
- The domain name for your SIP address: This will be used for the SIP domain that will be created for you, which will follow the format
<your_domain_name>.sip.twilio.com. This needs to be a unique domain name that is not currently being used in Twilio. - IP Addresses for your SIP domain’s Access Control List (ACL): An ACL is a security mechanism that enhances network security by allowing only specified IP addresses to access your SIP domain. In the context of SIP communications, this means defining trusted IP addresses—such as those associated with your SIP infrastructure—to ensure that only authorized signaling and media traffic is permitted to interact with your SIP domain.
- The domain name for your SIP address: This will be used for the SIP domain that will be created for you, which will follow the format
Integrating Ada in your SIP infrastructure
You must allow all of Twilio’s following IP address ranges and ports on your firewall for SIP signaling traffic. Please also note that these IP addresses are provided for firewall configuration purposes only and not all of these IP addresses will host active gateways at a given time. Customers should also avoid sending traffic directly to these IP addresses and instead use your SIP domain.
Global Media IP Gateway
The Public Connections Destination IP Ranges and Port Ranges are now identical across all locations:
Regional Signaling IP Gateways
Port
5061 (TLS)
North America Virginia Gateways
North America Oregon Gateways
Europe Ireland Gateways
Europe Frankfurt Gateways
Asia-Pacific Tokyo Gateways
Asia-Pacific Singapore Gateways
Asia-Pacific Sydney Gateways
South America São Paulo Gateways
Routing Calls to Ada
In order to route calls to Ada, you must make a SIP INVITE to Ada.
- The SIP INVITE
TOSIP address should be<DID>@<YOUR_ADA_SIP_DOMAIN>, where:<DID>: The phone number that you used to receive the call.<YOUR_ADA_SIP_DOMAIN>: The Ada SIP domain for your Ada AI Agent.
- The
FROMSIP address should be<ANI>@<YOUR_IP_ADDRESS>where:<ANI>: The end user’s phone number.<YOUR_IP_ADDRESS>: The IP addresses of your SIP infrastructure.
Transferring Calls from Ada to your Cisco CUBE
If a caller using your AI Agent needs to escalate to a human agent, you can hand them off using a SIP REFER transfer to your SIP infrastructure.
To transfer calls from Ada to your Cisco CUBE:
- In your Ada AI Agent Handoff use the Transfer Call block and select SIP address from the Transfer to drop down menu.
- In the SIP address field, enter the SIP address that you want to transfer the call to. This will generally be
<DID>@<YOUR_IP_ADDRESS>, where:<DID>: The line or extension that you want to transfer the call to.<YOUR_ADA_SIP_DOMAIN>: The IP addresses of your SIP infrastructure.
- Select the check box beside Include a User-to-User header when transferring to the SIP address.
- Click +Add another row.
- For Key, enter the key name phone_number.
- For Value, select the phone_number metavariable.
- Click +Add another row.
- Provide any additional key value pairs that you want sent via the UUI header.
Integrate Voice with Dixa
This section takes you through how to transfer calls between Ada and Dixa.
Get calls into Ada
- You will continue to receive phone calls using a Dixa provisioned phone number, and you will transfer phone calls from Dixa to your Ada AI Agent’s phone number. For more information, see the Forward call section in Create a Phone Flow at Dixa’s documentation. You will also need to configure a Twilio phone number for your AI Agent to use. For more information, see Set up your Twilio account in Get started with Voice at Ada’s Help Docs.
Escalate calls directly to agents using Dixa
If an end user using your AI Agent needs to escalate to a human agent, you can hand them off using a SIP INVITE transfer to Dixa.
- Get the Ada IP address allowlist from your Ada team.
- Ask your Dixa Team to allowlist the Ada IPs, and ask them for your Dixa SIP domain.
- In your Dixa instance, go to Settings > Phone, and configure a DID number.
- In your Ada AI Agent Handoff use the Transfer Call block and select SIP address from the Transfer to drop down menu.
- In the SIP address field, enter
<DID>@<DIXA_SIP_DOMAIN>, where:<DID>: The destination number in Dixa that is being reached, in E164 format with a leading+.<DIXA_SIP_DOMAIN>: Dixa’s SIP domain, which you got from the Dixa team.
- Select the check box beside Include a User-to-User header when transferring to the SIP address.
- Click +Add another row.
- For Key, enter the key name
phone_number. - For Value, select the
phone_numbermetavariable.
If required, you can assign different phone numbers to different departments. For example, you can configure one number for handoffs related to billing issues, and another one related to sales inquiries. To learn how to do this, see Buy a Phone Number at Dixa’s documentation.
Integrate Voice with Five9
This guide explains how to connect your Ada AI Agent to the Five9 contact center platform so that:
- Incoming calls received by Five9 can be routed to your Ada AI Agent.
- Ada can seamlessly escalate calls to live Five9 human agents when required.
- Optional metadata (language, ticket ID, queue, etc.) can flow in both directions using SIP X-headers.
Route calls from Five9 to Ada
Five9 delivers calls to Ada over a secure SIP trunk that terminates on a Twilio SIP domain.
- Your Ada team will set up a Twilio SIP domain for your AI Agent to receive phone calls.
- Create a Twilio SIP Domain (e.g.
acme.ada.sip.twilio.com). - Enable TLS transport and SRTP media encryption.
- Add the Five9 signalling IPs to the domain’s Access-Control List (ACL).
- Provision a dedicated Twilio phone number (E.164) that will act as a pseudo number inside Five9.
- This phone number will also be used by your AI Agent to send and receive SMS messages during phone calls and can be used for internal testing.
- Create a Twilio SIP Domain (e.g.
- You open a Five9 Connectivity Project.
Ask your Five9 Account Manager to build an outbound Twilio SIP trunk.
Provide Five9 with:- The Twilio SIP Domain (a.k.a. FQDN) created in step 1.
- The Twilio phone number to use as the pseudo number.
- Twilio’s signalling & media IPs (see the Twilio doc for the current list).
- Five9 builds the trunk (3–6 weeks).
- Inter-operability testing
- When Five9 signals completion, schedule a test call with Ada & Five9 to verify:
- SIP
OPTIONSare successful. - Calls to the pseudo number reach Ada and audio flows correctly.
- SIP
- When Five9 signals completion, schedule a test call with Ada & Five9 to verify:
- Go live.
- In the Five9 IVR builder use the 3rd Party Transfer Module and dial the pseudo number. Calls are now routed to Ada via the secure trunk.
What is a pseudo number?
A pseudo number is an E.164 phone number that Five9 uses to route calls to a designated SIP trunk without ever going over the public phone network.
Escalate calls from Ada to Five9 agents
If the Ada conversation needs a human handoff, configure the Transfer Call block inside your Ada AI Agent Handoff to send a SIP INVITE directly to Five9.
- Obtain an inbound pseudo number from the Five9 Connectivity Team.
- In Ada, open AI Agent Profile from your navigation ▸ Handoff and select the Voice tab in your Handoff.
- Drag the Transfer Call block into your Voice Handoff. Under Transfer to select SIP address.
- Enter the address in the following format on a single line:
<INBOUND_PSEUDO_NUMBER>@<FIVE9_IP_ADDRESS>:5061;secure=true, where:<INBOUND_PSEUDO_NUMBER>: The inbound pseudo number provided by Five9 in step 1 above.<FIVE9_IP_ADDRESS>: Five9 signalling IPs.:5061;secure=true: Specifies the port the call is being sent to and that SRTP is being used.
Pass call metadata with SIP X-Headers (optional)
Using SIP X-headers you can exchange contextual data such as ticket IDs, language codes, or queue names.
- Enable header support in your Five9 tenant.
- At the same time you request the outbound Twilio SIP trunk, ask Five9 professional services to enable X-headers on that trunk.
- Provide a list of headers you plan to send and/or receive.
- Implementation typically takes Five9 3–6 weeks.
- Receive headers sent by Five9.
- Ada automatically converts each incoming
X-<key>: <value>header into a metavariable your AI Agent can reference.
- Ada automatically converts each incoming
- Send headers from Ada to Five9.
- Append query parameters to the SIP address in the Transfer Call block:
- E.g.
<INBOUND_PSEUDO_NUMBER>@<FIVE9_IP_ADDRESS>:5061;secure=true?x-ticket-id=12345&x-language=fr
- E.g.
- Append query parameters to the SIP address in the Transfer Call block:
Integrate Voice with Genesys Cloud
Get calls into Ada
You will continue to receive phone calls using a Genesys Cloud provisioned phone number, and you will transfer phone calls from Genesys Cloud to your Ada AI Agent using a SIP INVITE made to your AI Agent’s SIP domain.
-
If you have not done so already, configure a Twilio SIP domain for your AI Agent to use. For more information, see Set up your Twilio account in Get started with Voice at Ada’s Help Docs.
-
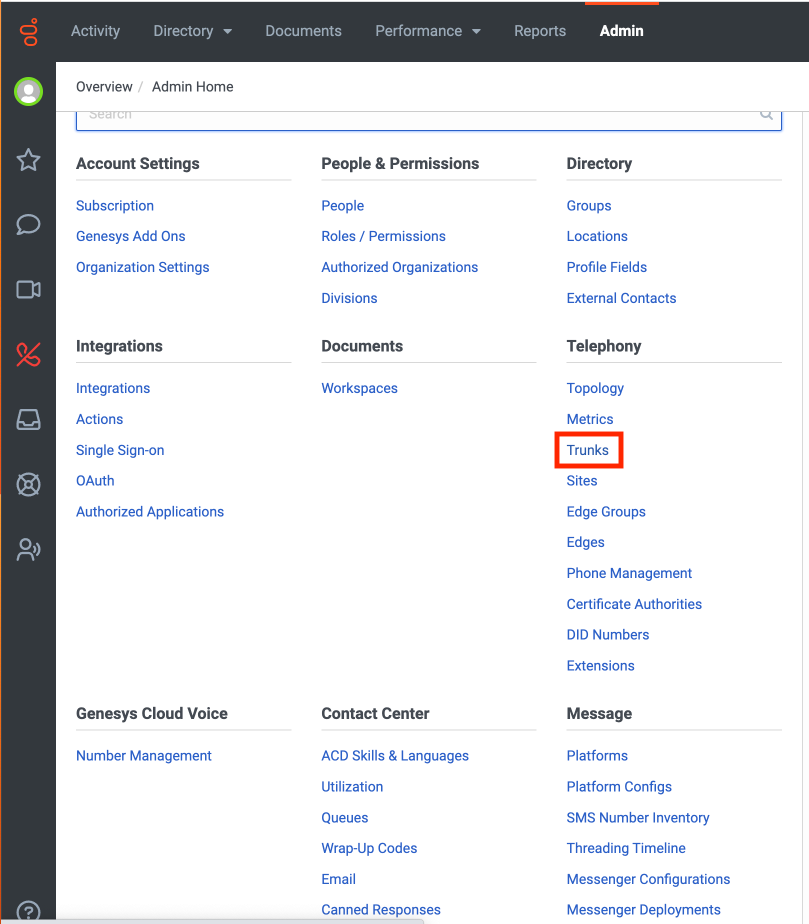
Log into your Genesys Cloud account, then go to the Admin tab.
-
Under Telephony, click Trunks.
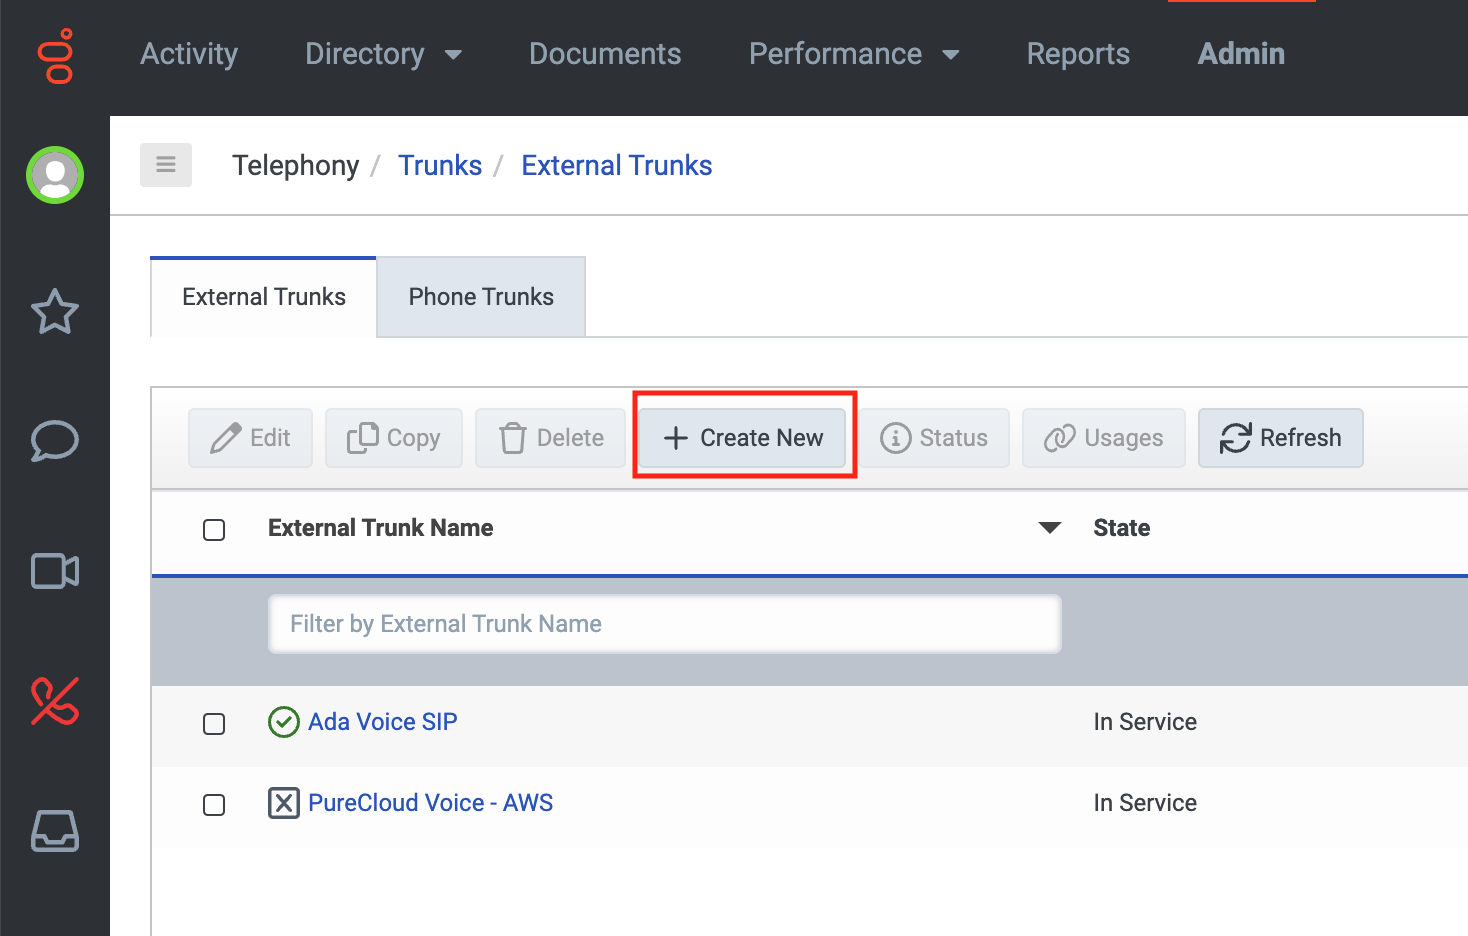
- On the External Trunks tab, click Create New. The Create External Trunk page opens.
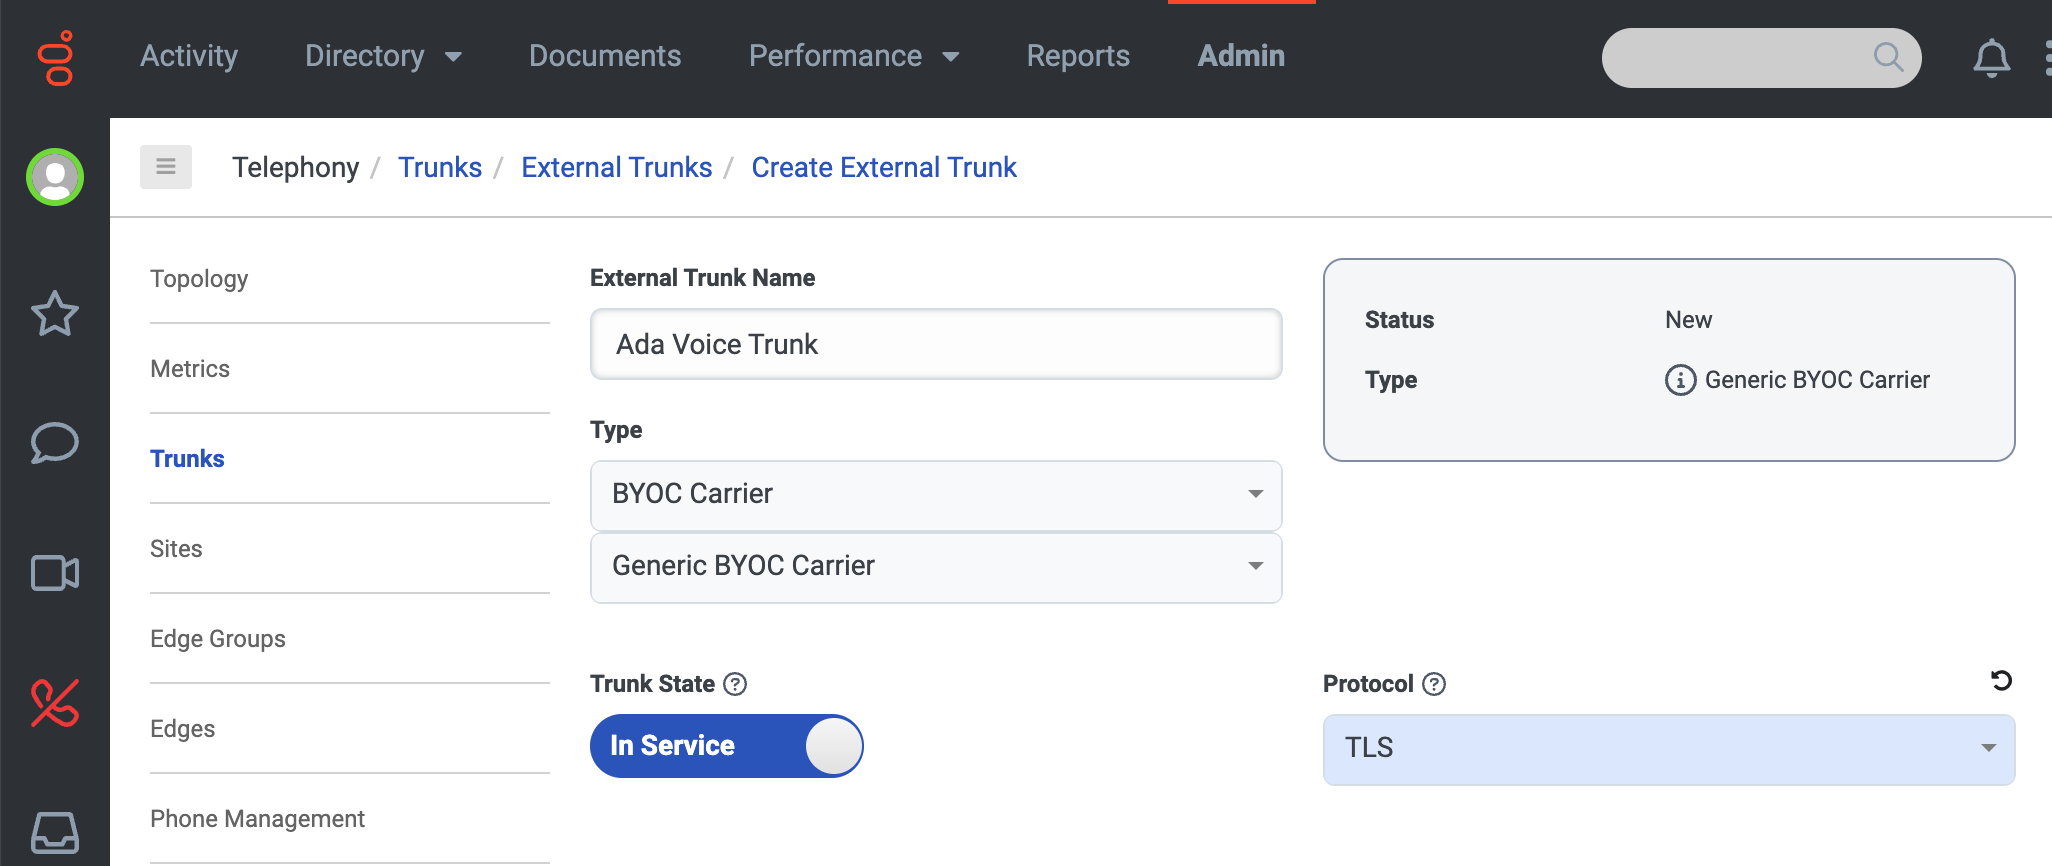
-
On the Create External Trunk page, fill in the following fields:
- Under External Trunk Name, enter a name (e.g.,
Ada Voice trunk). - Under Type, select BYOC Carrier and Generic BYOC Carrier.
- Under Protocol, select TLS.
- Under External Trunk Name, enter a name (e.g.,
-
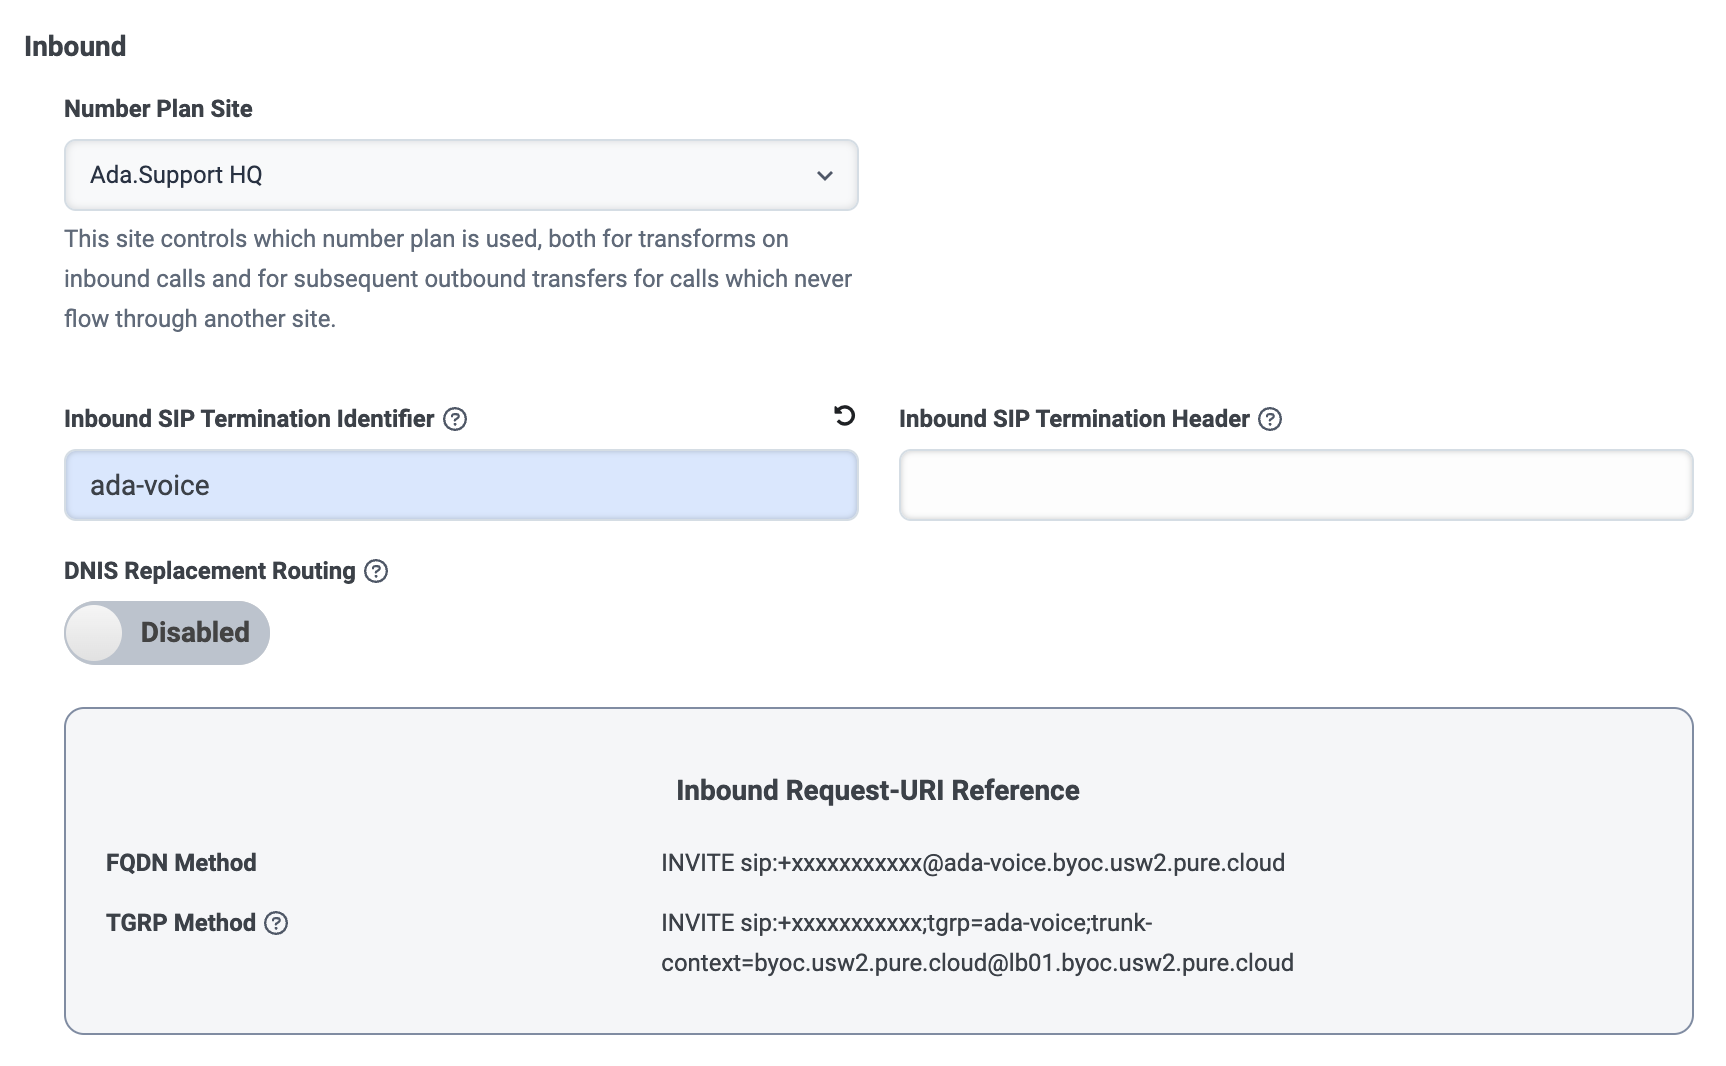
In the Inbound section, fill in the following fields:
- Under Number Plan Site, select your main Genesys site. For more information, see About sites at the Genesys Cloud Resource Center.
- Under Inbound SIP Termination Identifier, enter a name
(e.g.,
ada-voice). - You can leave the Inbound SIP Termination Header field blank.
-
In the Outbound section, fill in the following fields:
- Under Outbound SIP Termination FQDN, enter the Twilio SIP domain that you created for your AI Agent in Step 1.
- Under Outbound SIP DNIS, enter
admin. - Under SIP Servers or Proxies, in the Hostname or IP
Address field, enter your SIP domain, and in the Port
field, enter
5061. Then, click the + icon to add it.
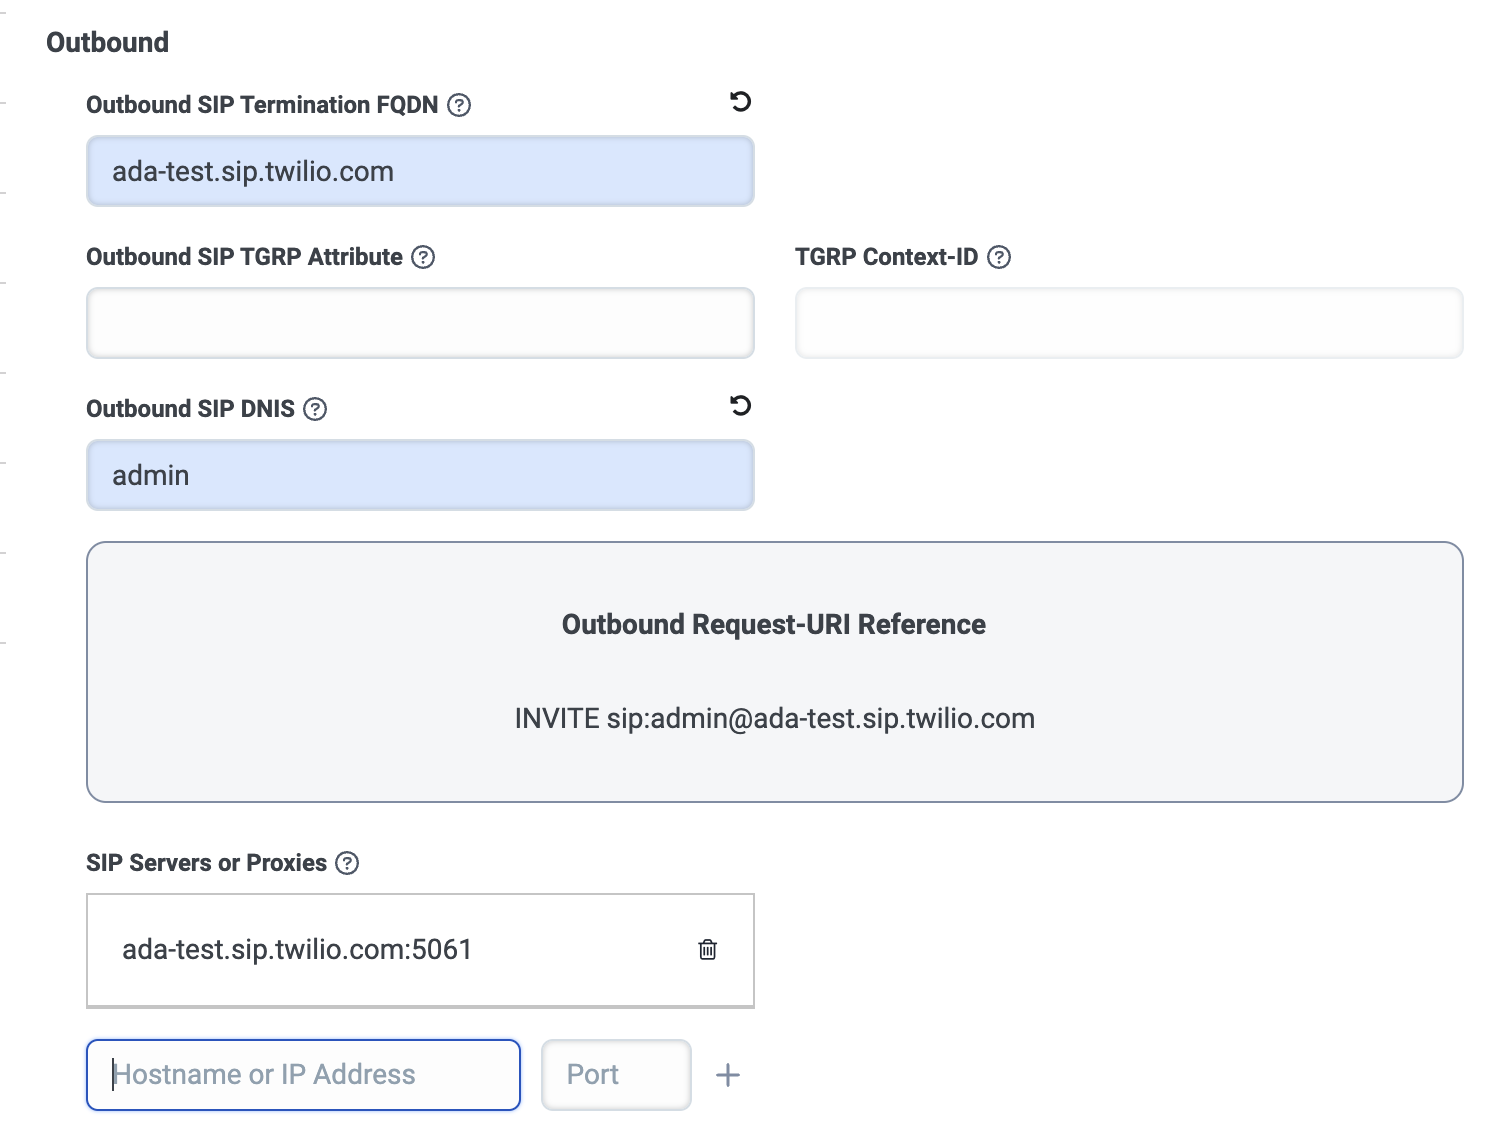
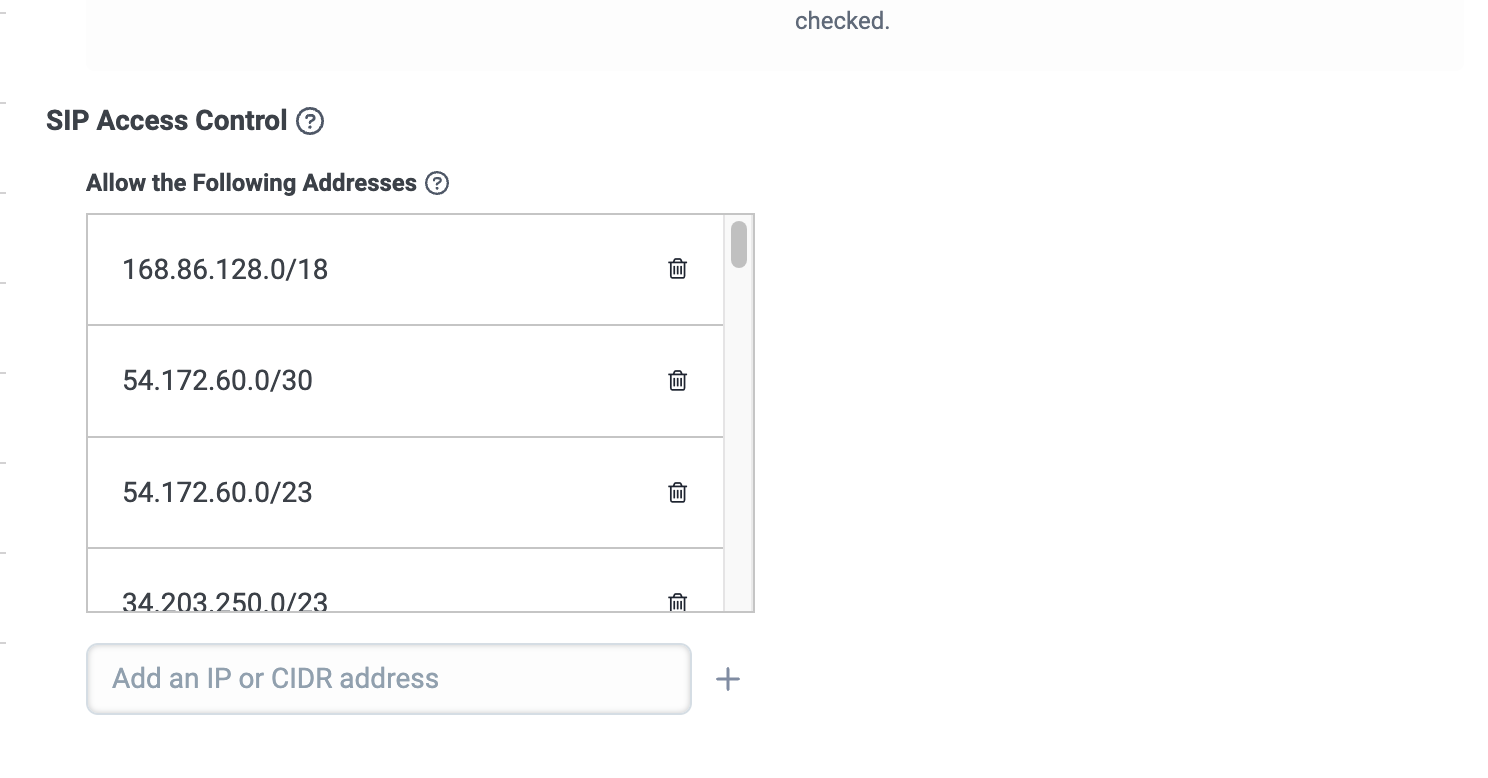
-
Under SIP Access Control, in the Add an IP or CIDR address field, enter each of the following CIDR addresses, one at a time, and click the + icon to add it.
These are all of Twilio’s SIP IP addresses. For more information, see IP Addresses for Elastic SIP Trunking Services at Twilio Docs.
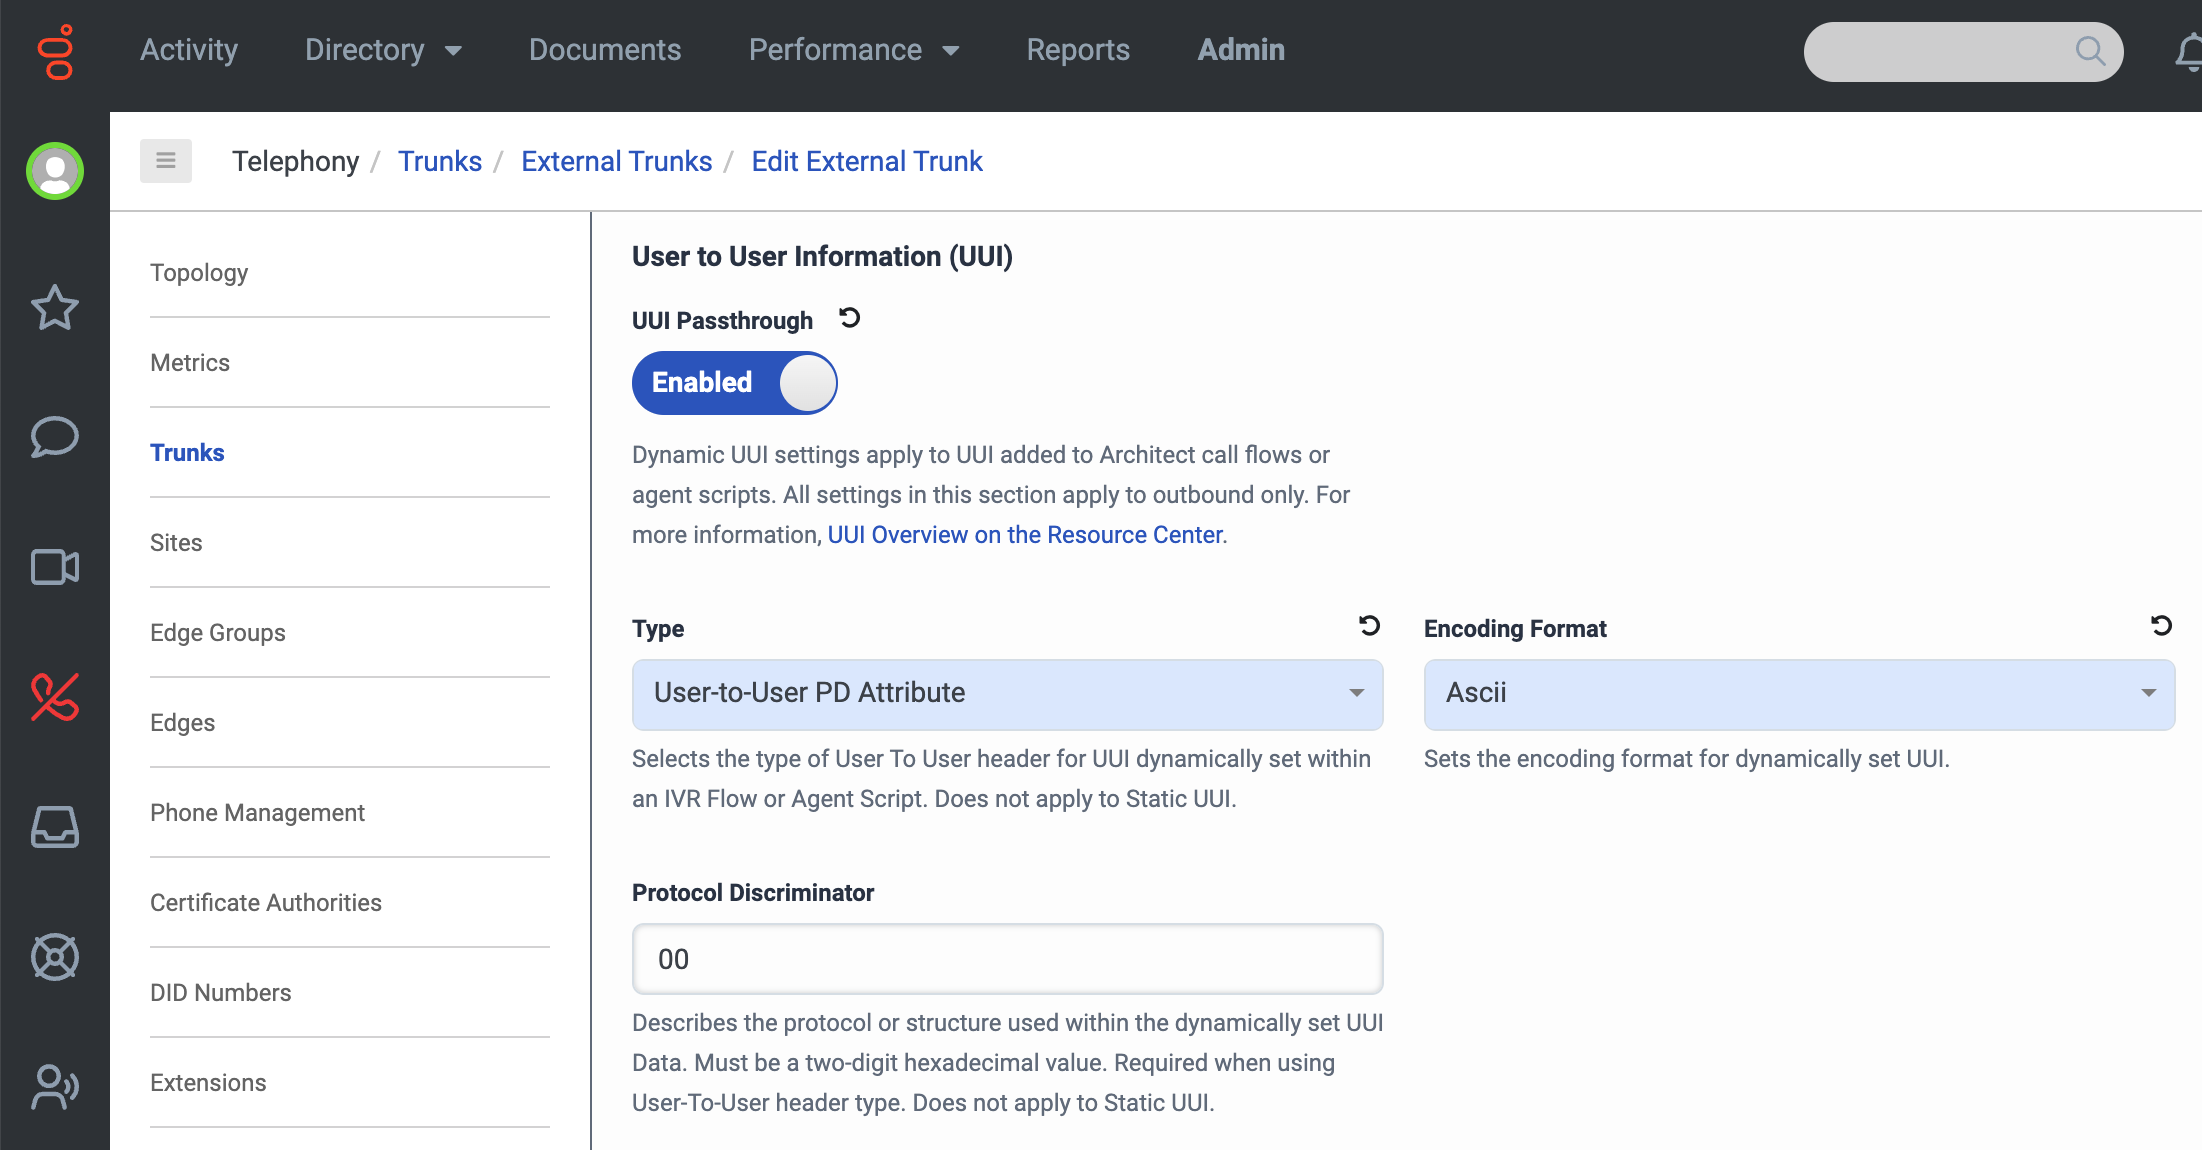
-
Click the Protocol section of the page to expand it. Then, under User to User Information (UUI), do the following:
- Click the UUI Passthrough toggle so it’s Enabled.
- Under Type, select User-to-User PD Attribute.
- Under Encoding Format, select Ascii.
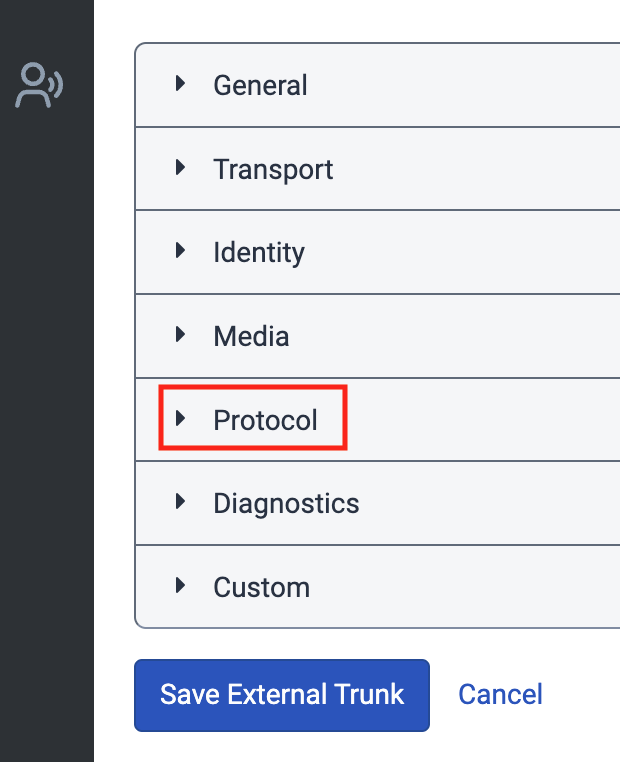
-
Under Transfer, click the Take Back and Transfer and Release Link Transfer (RLT) toggles so they’re both Enabled.
-
Click Save External Trunk.
Connect your SIP trunk to a number plan
- In Genesys Cloud, go to Telephony > Sites and select your main site. For more information, see About sites at the Genesys Cloud Resource Center.

- On the Number Plans tab, click New Number Plan.
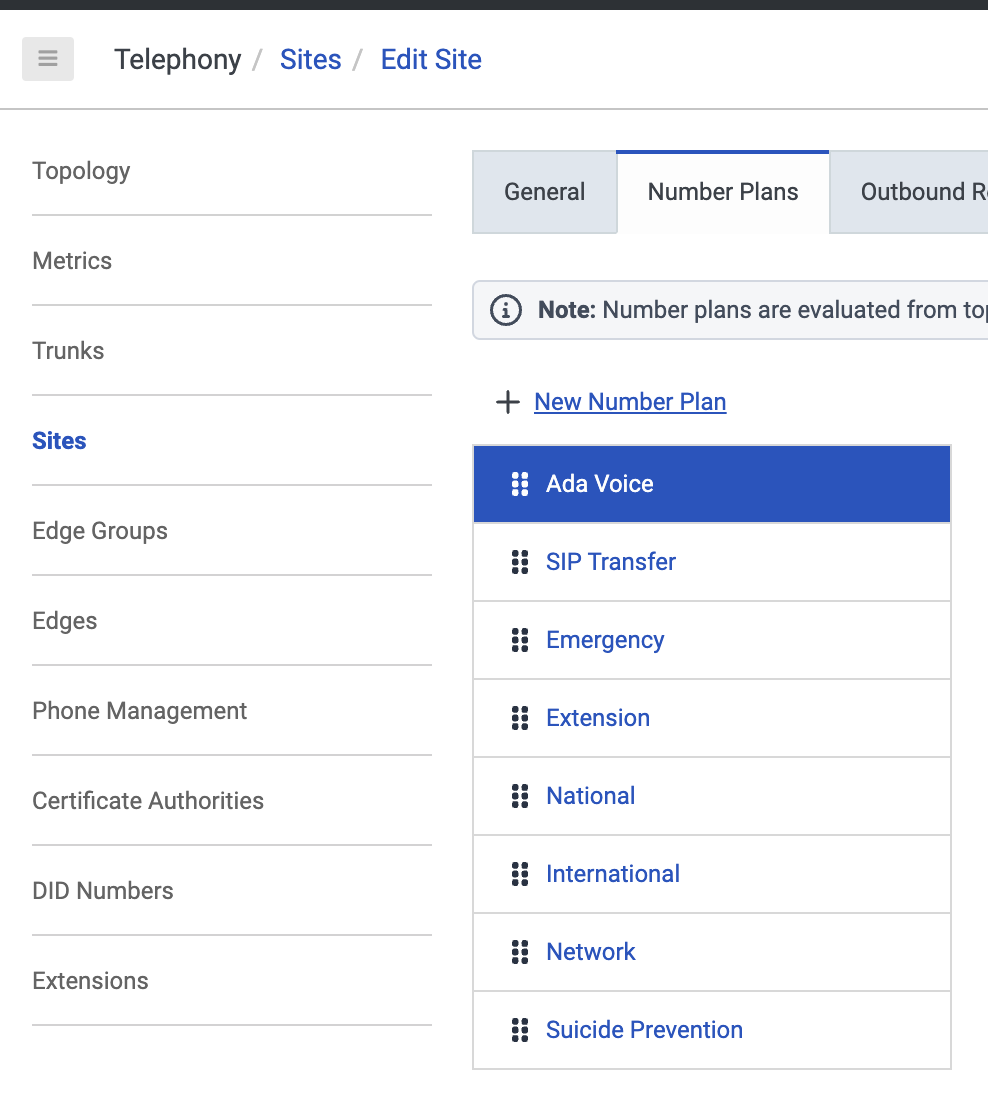
-
On the page that opens, fill in the following fields:
- Under Number Plan Name, enter a name.
- Under Match Type, select E.164 Number List.
- Under Numbers, enter the range of numbers that, when dialed from your system, will transfer to Ada Voice. These can be placeholders, and they can be the same number to indicate that the range only contains one phone number.
- Under Classification, choose a classification.
-
Click Save Number Plans.
-
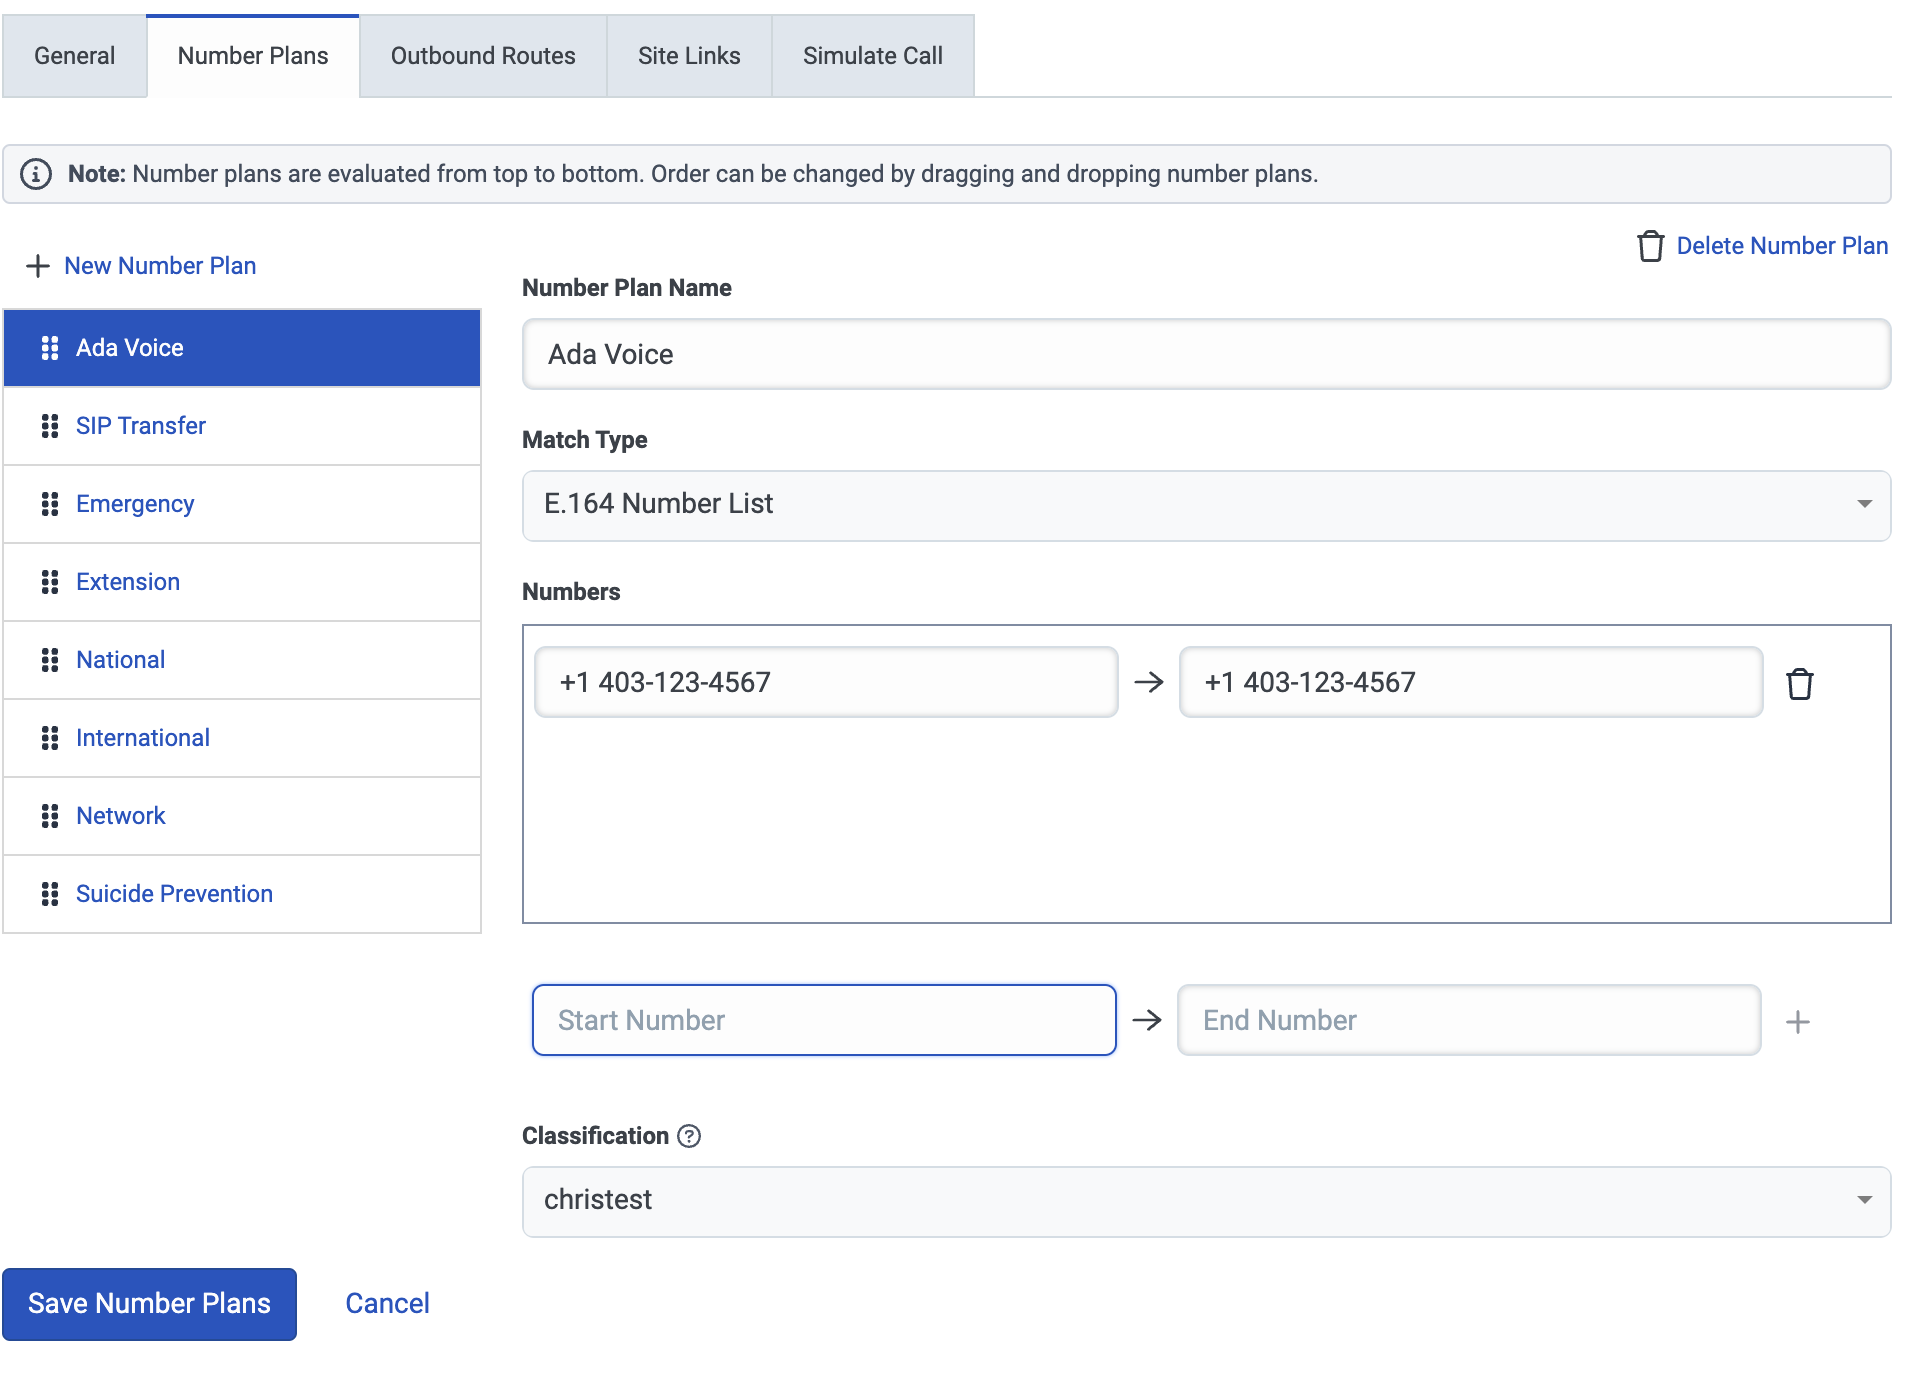
On the Outbound Routes tab, click New Outbound Route.
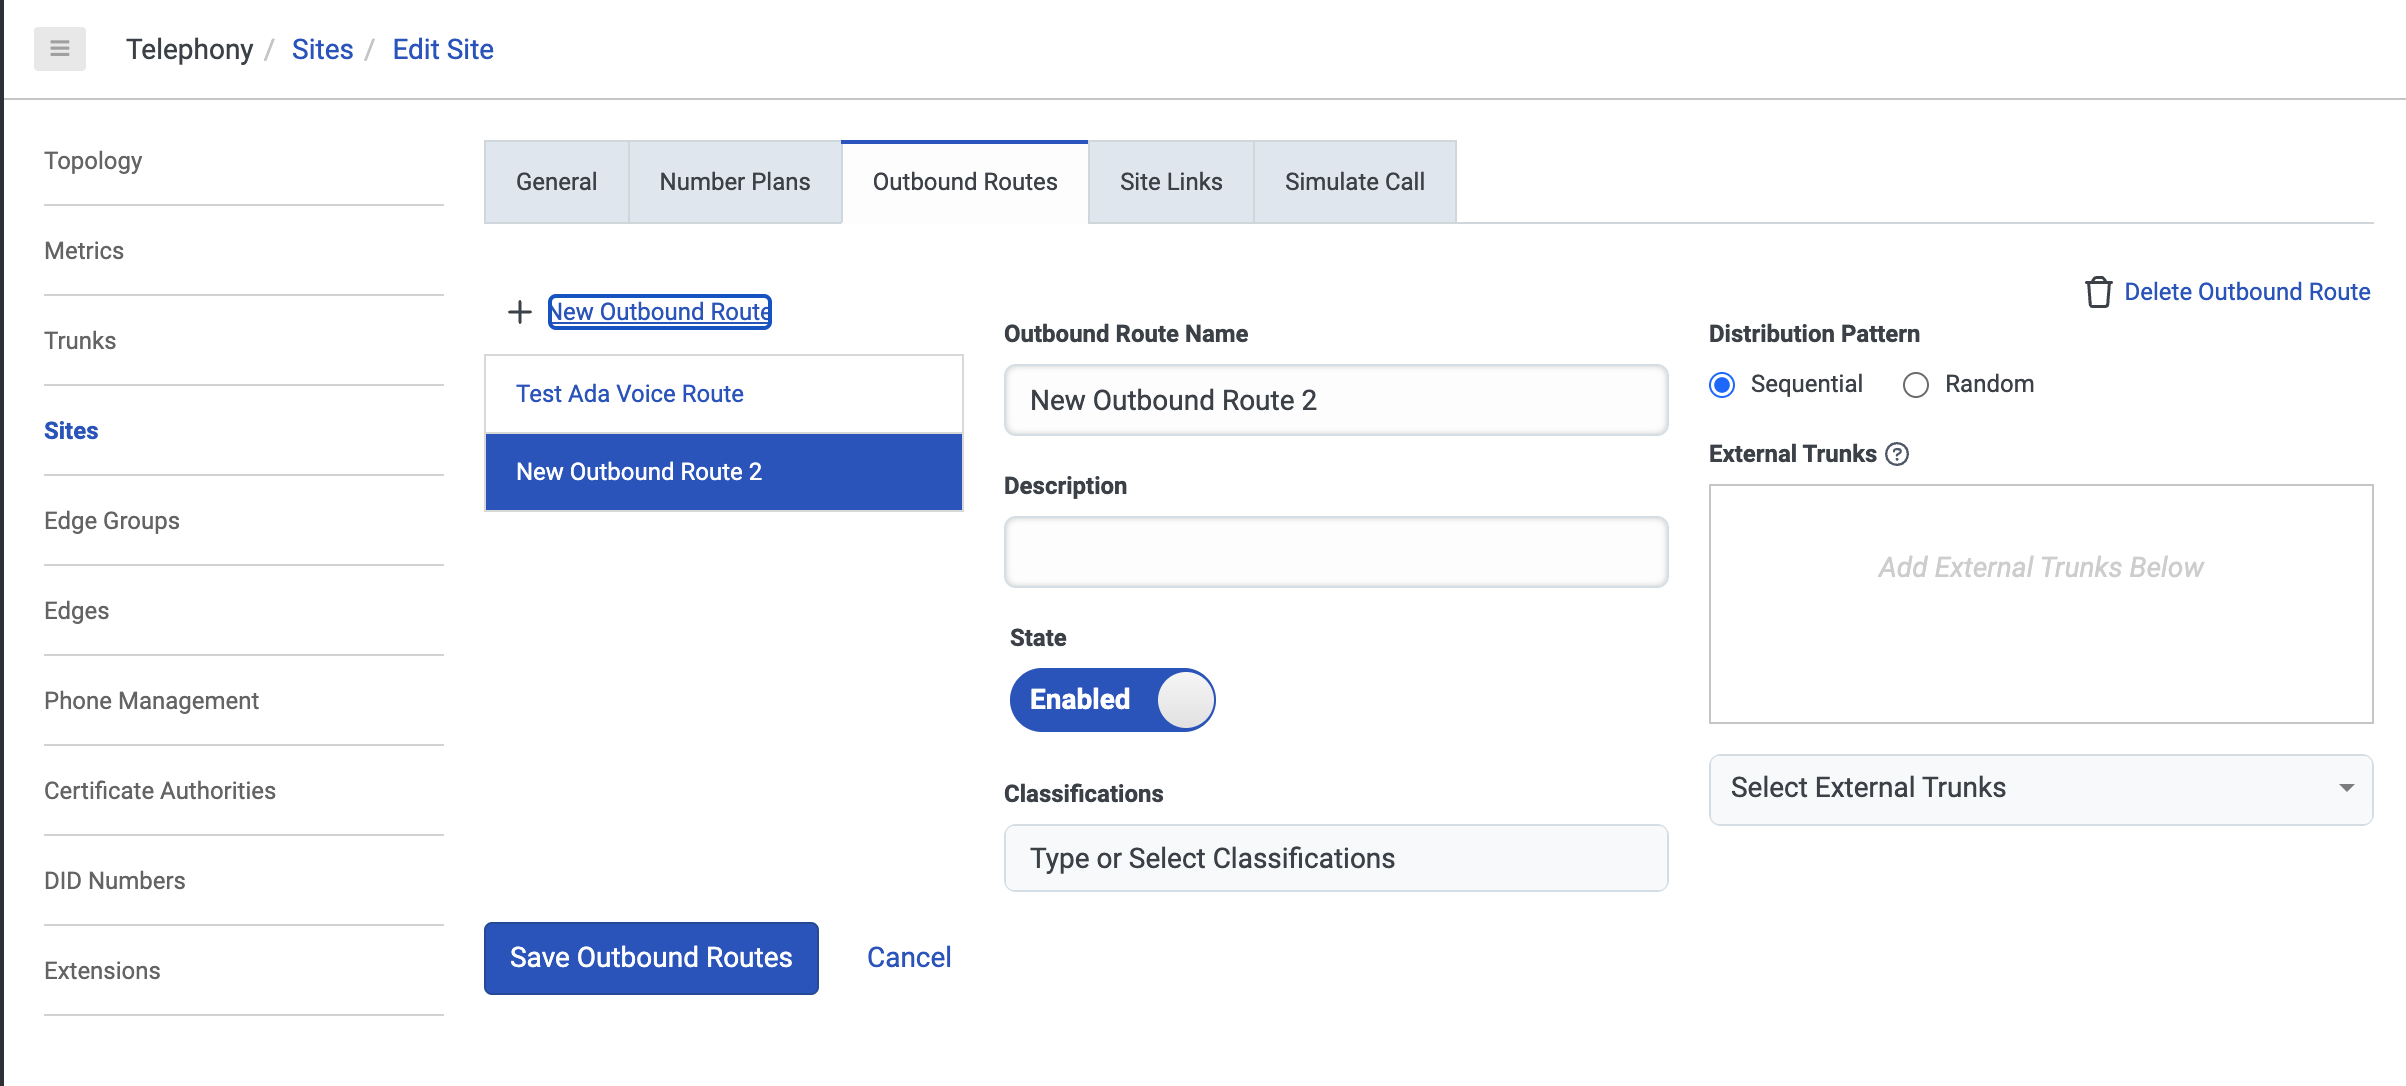
-
On the page that opens, fill in the following fields:
- Under Outbound Route Name, enter a name.
- Under Classifications, choose one or more classifications.
- Under External Trunks, click Select External Trunks and select the SIP trunk you created.
- Under Classifications, add a classification for your Outbound Route. This must match the Classification that you used for your Number Plan.
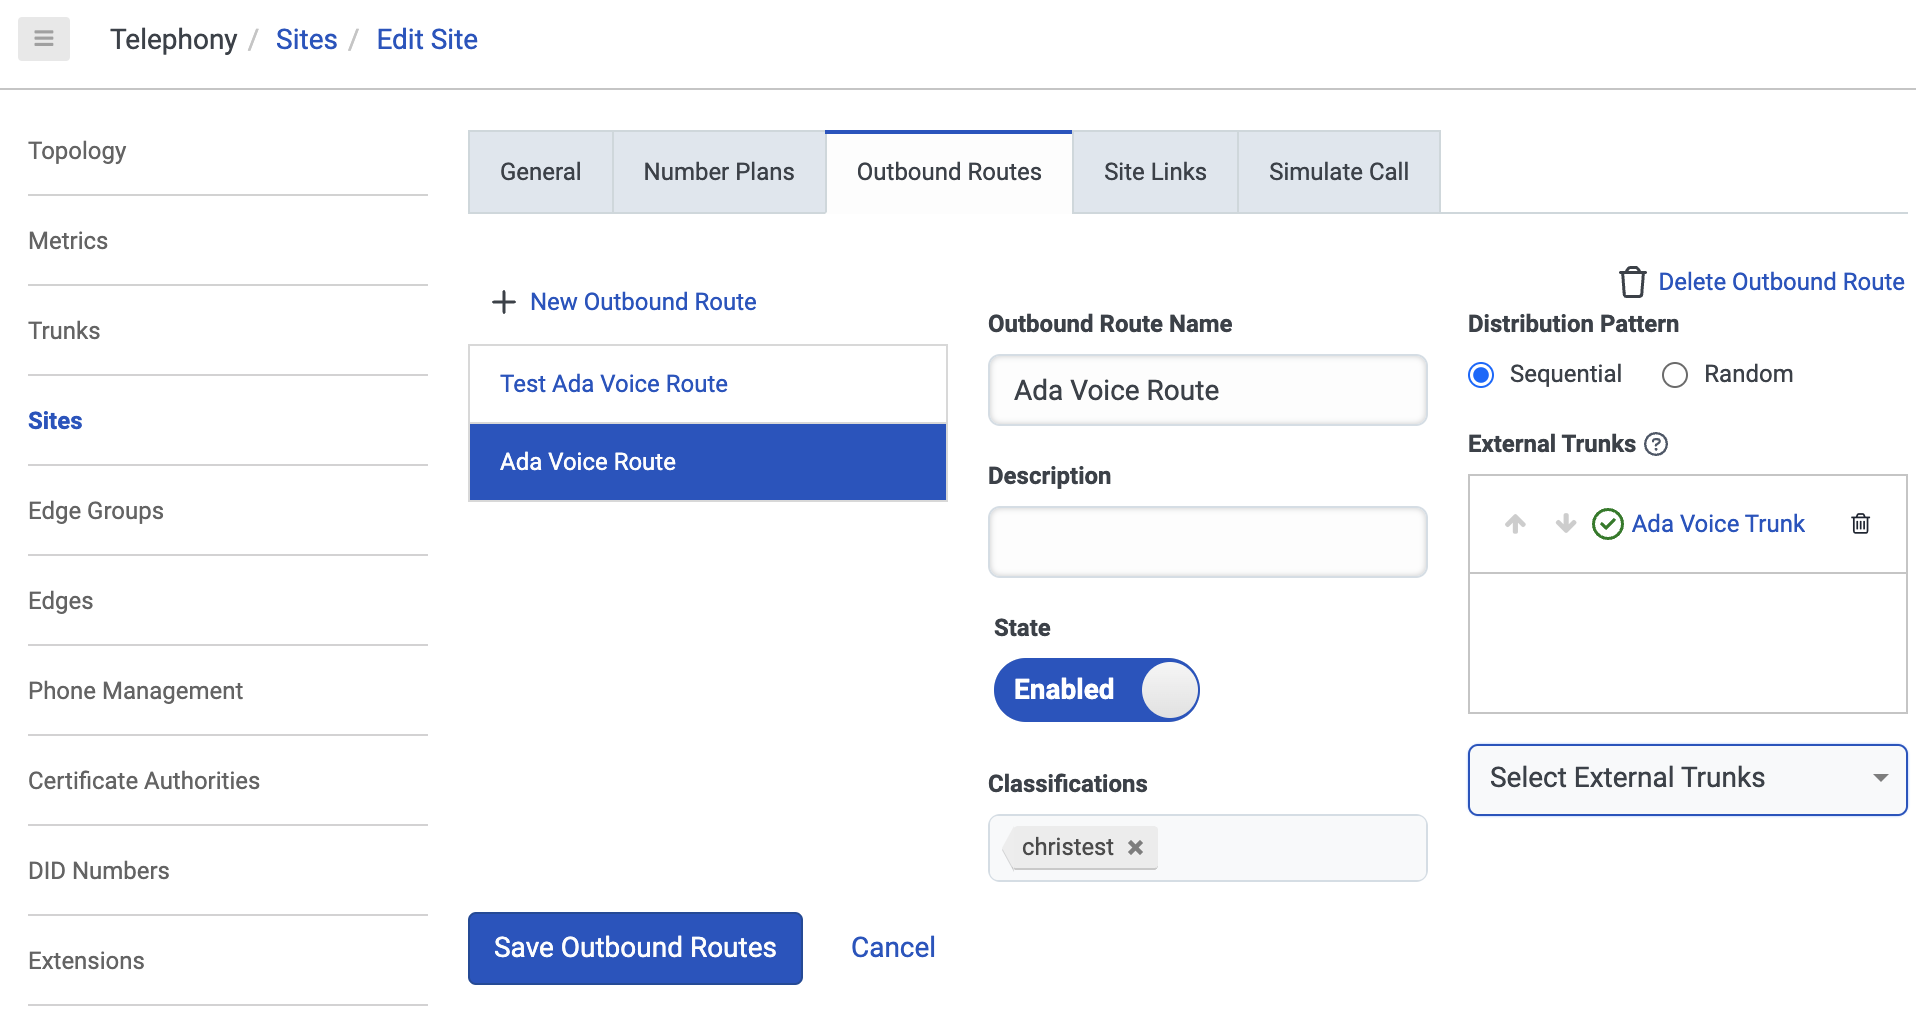
- Click Save Outbound Routes.
Create a call flow that transfers to Ada Voice
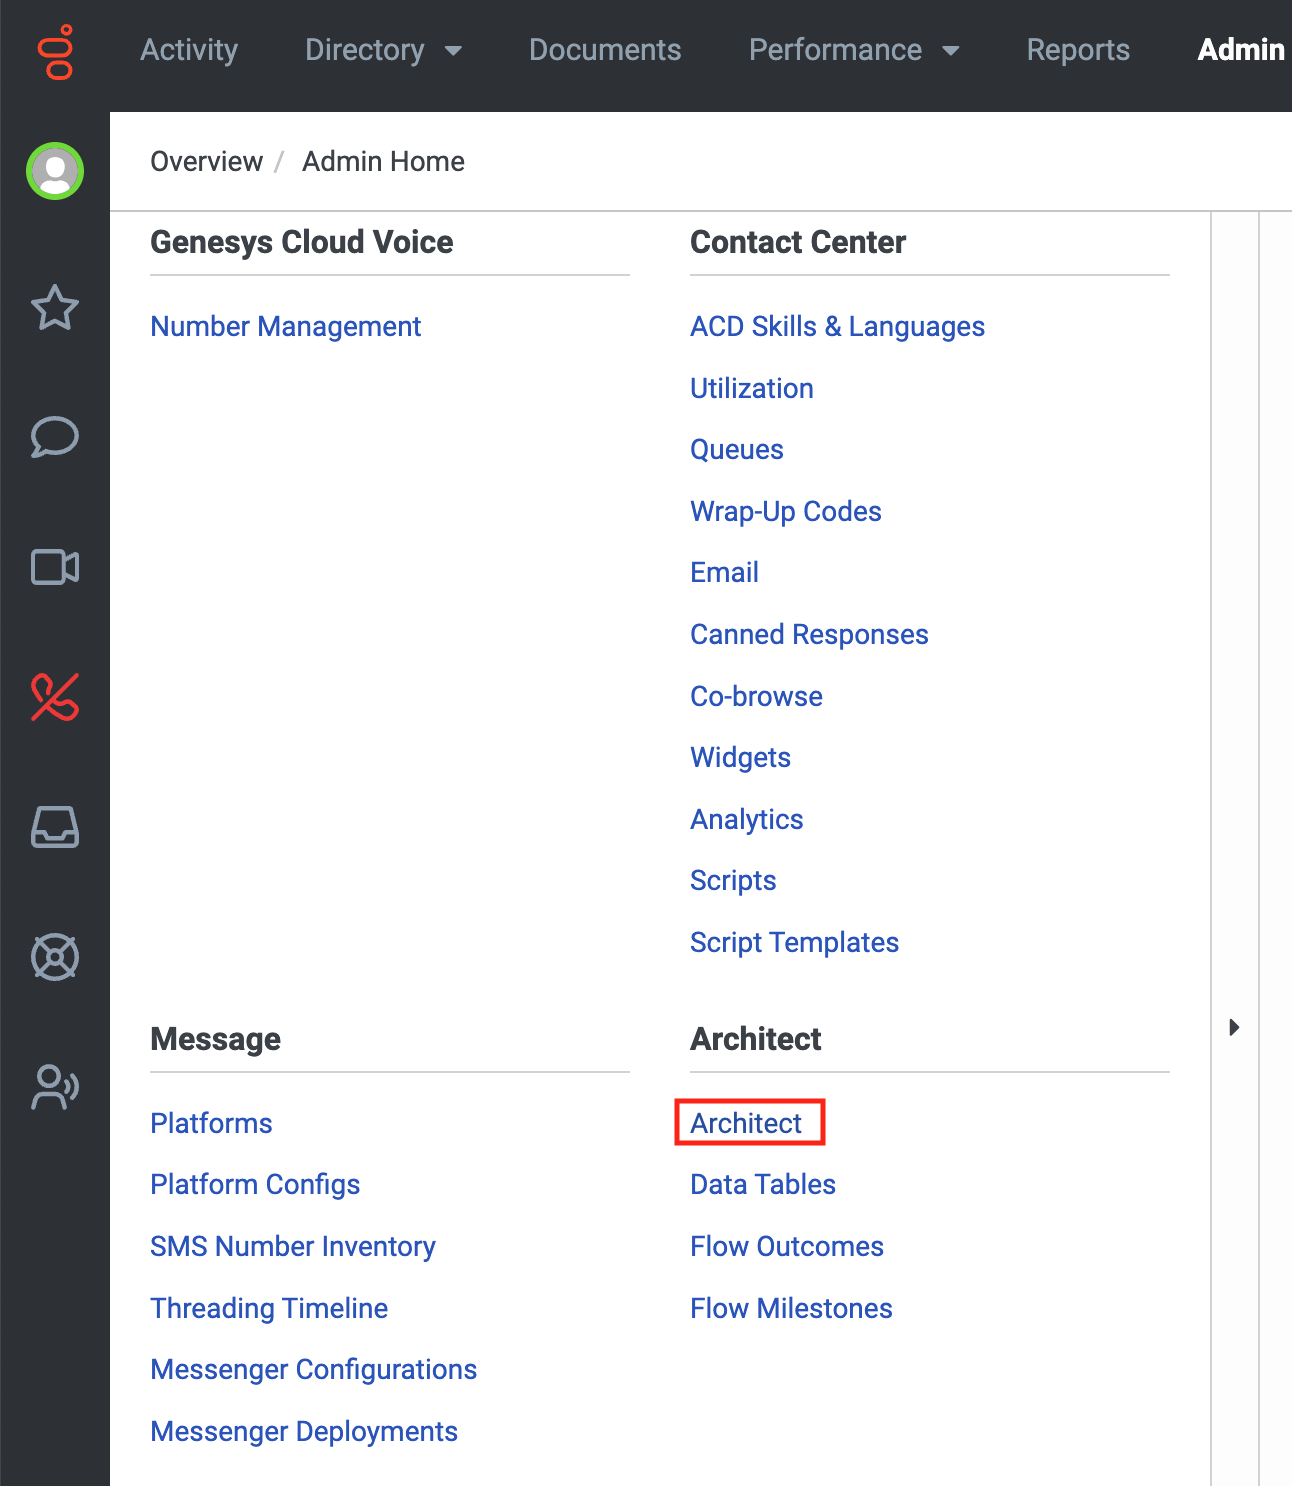
- In Genesys Cloud, on the Admin tab, click Architect.
-
Select the call flow you want to transfer to Ada Voice. The Inbound Call Flow page opens.
-
On the Inbound Call Flow page, under Toolbox, click Task to expand it, then drag the Task action into your Starting Menu. This creates the task used to transfer end users to Ada Voice. The New Task pane opens.
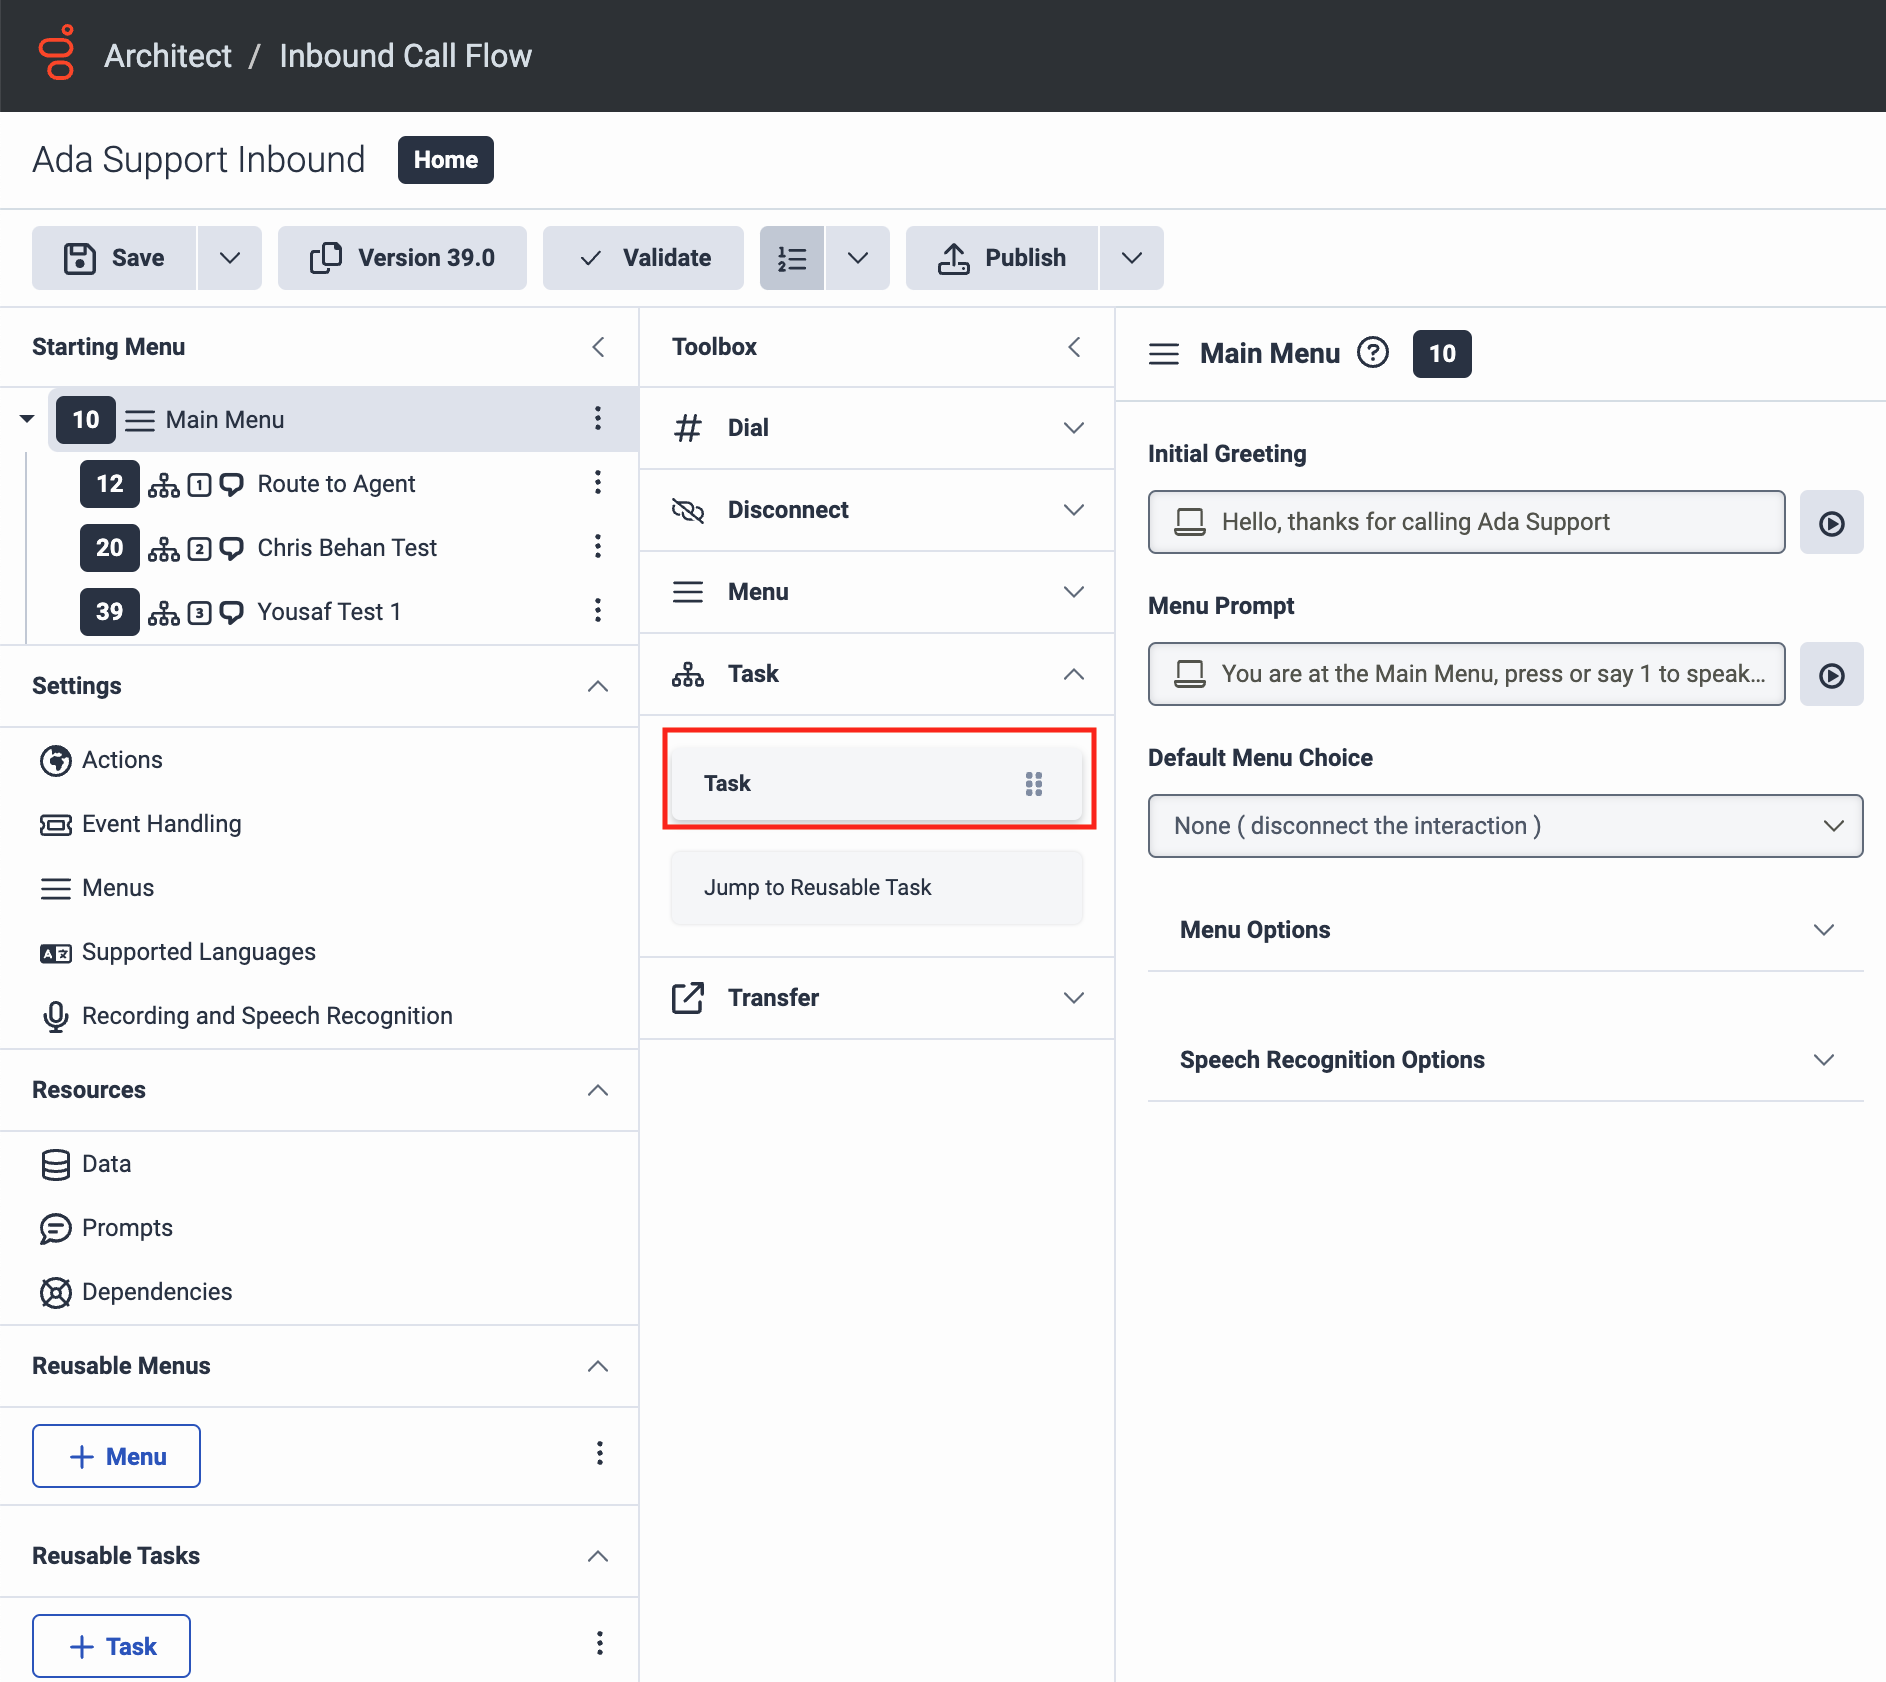
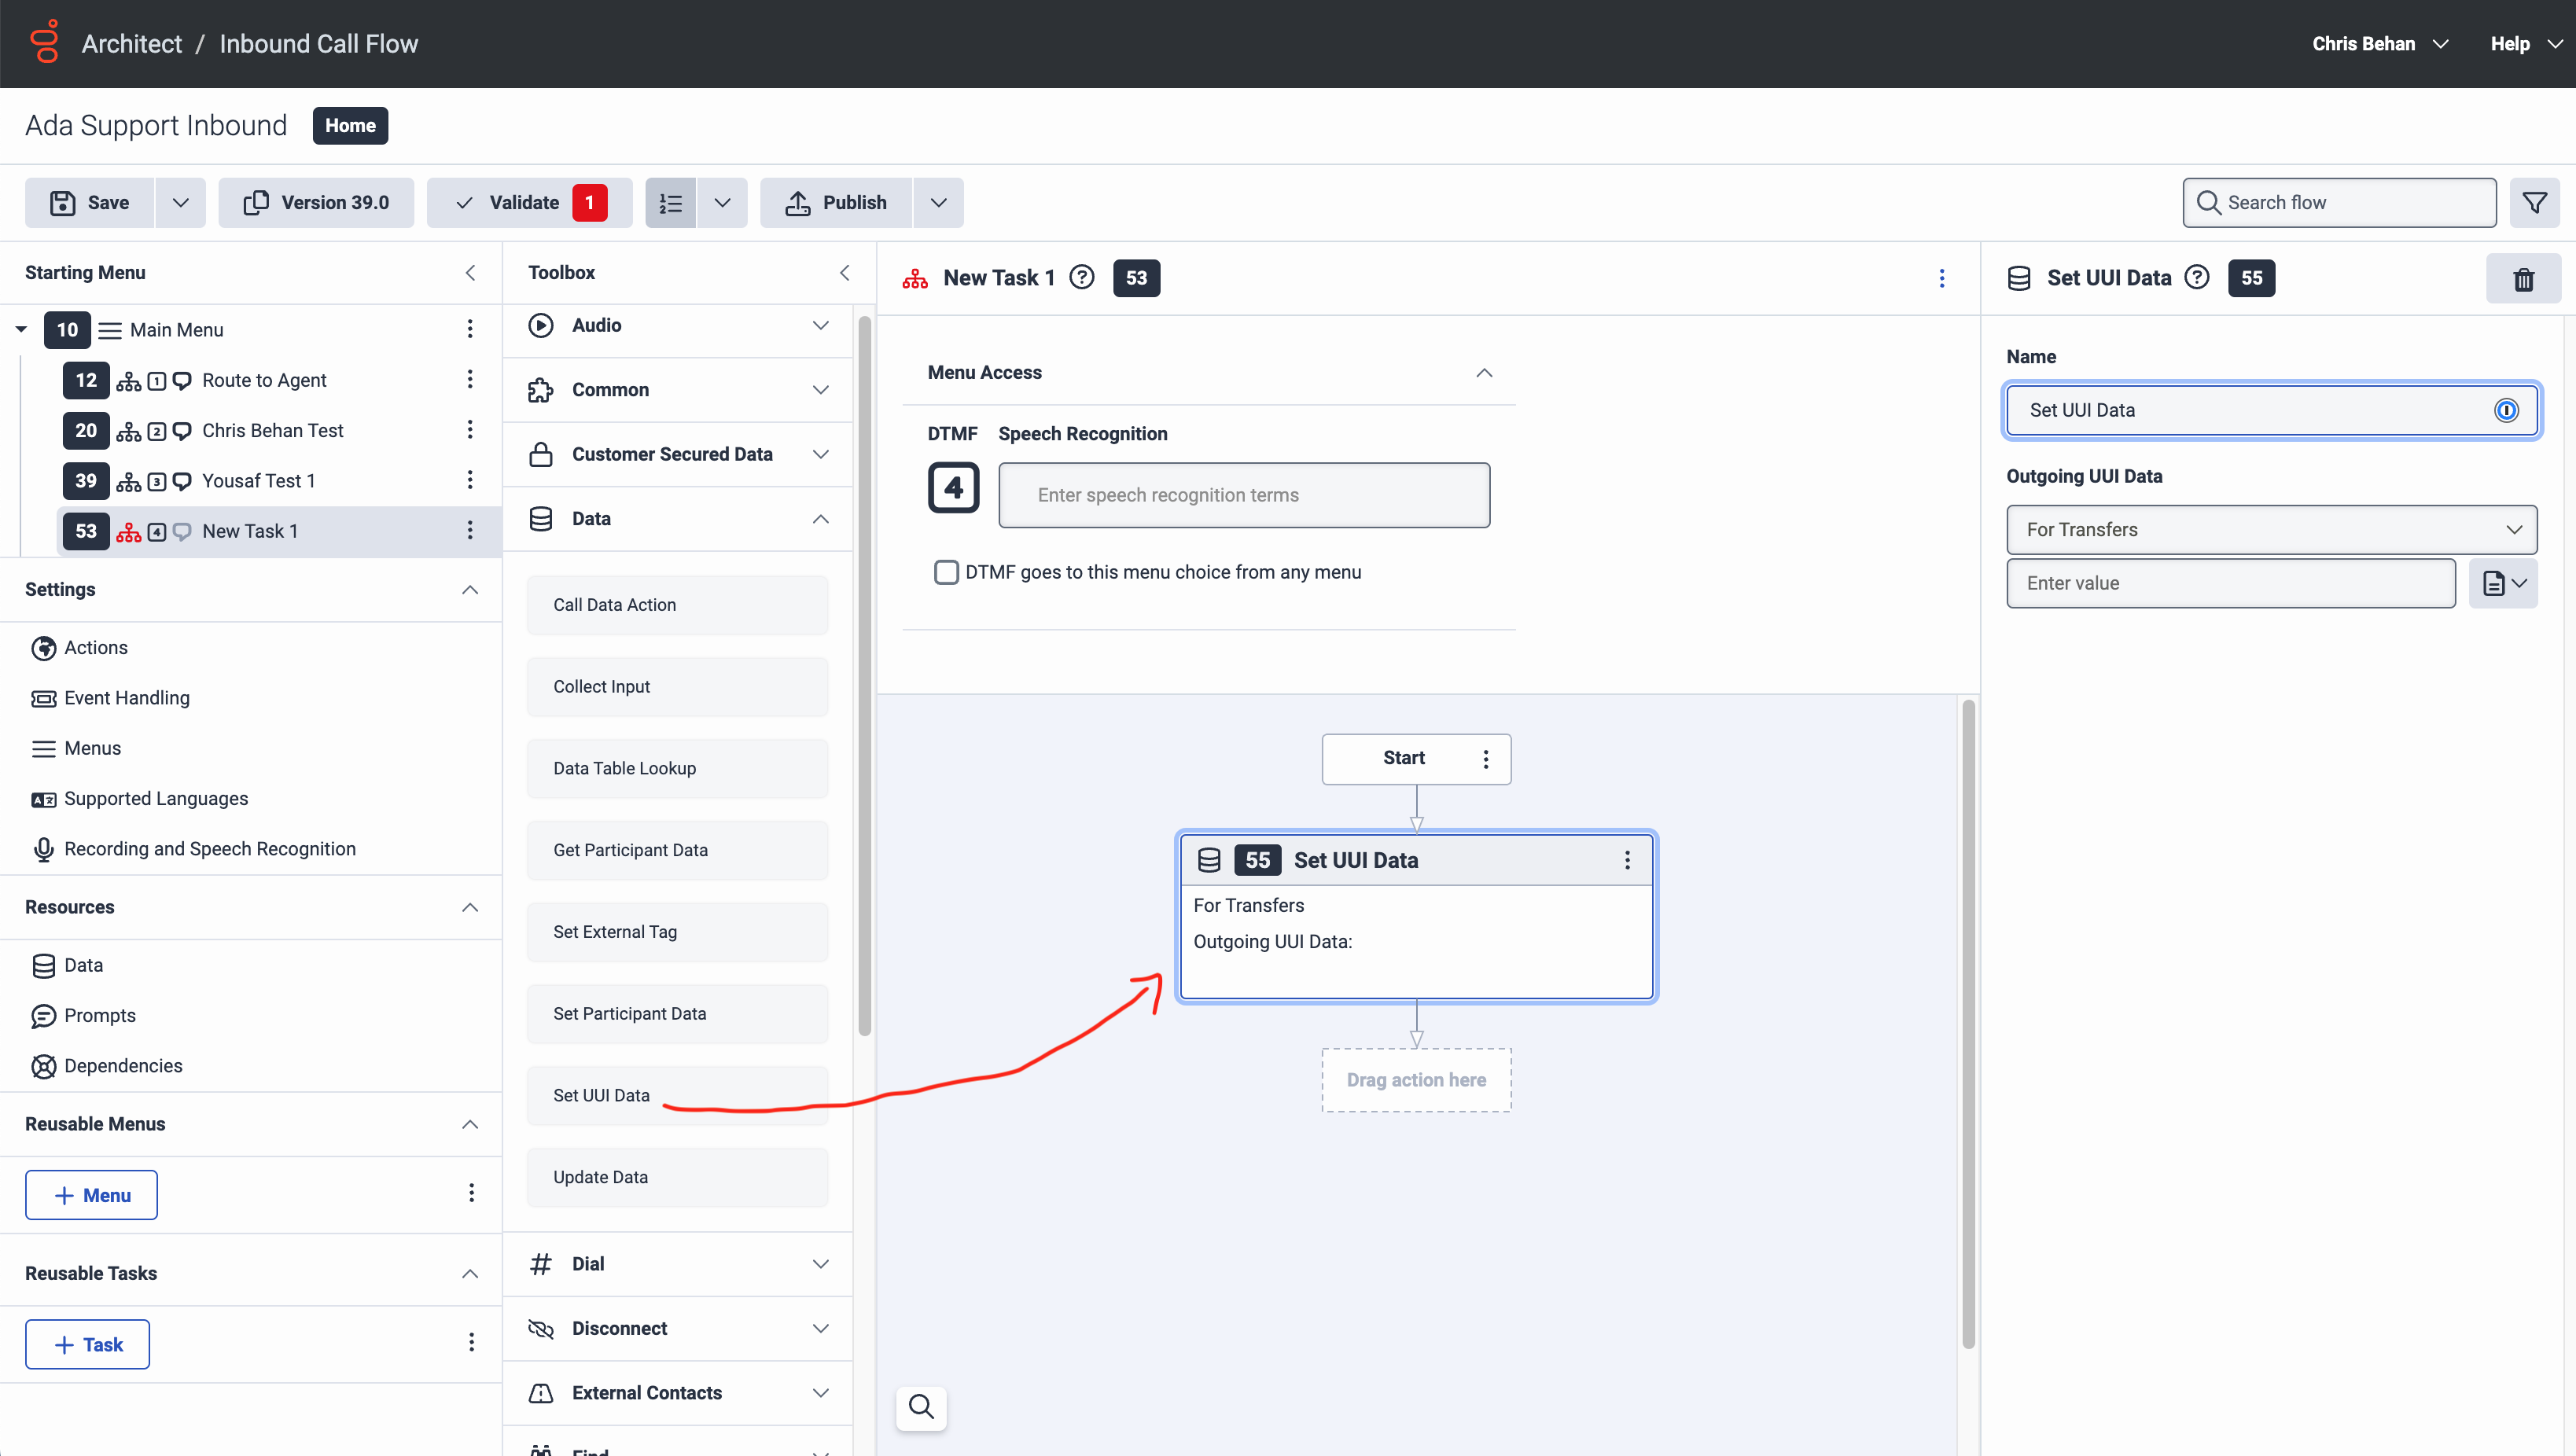
- Under Toolbox, click Data to expand it, then drag the Set UUI Data action into the New Task pane, into the Drag action here box. The Set UUI Data pane opens.
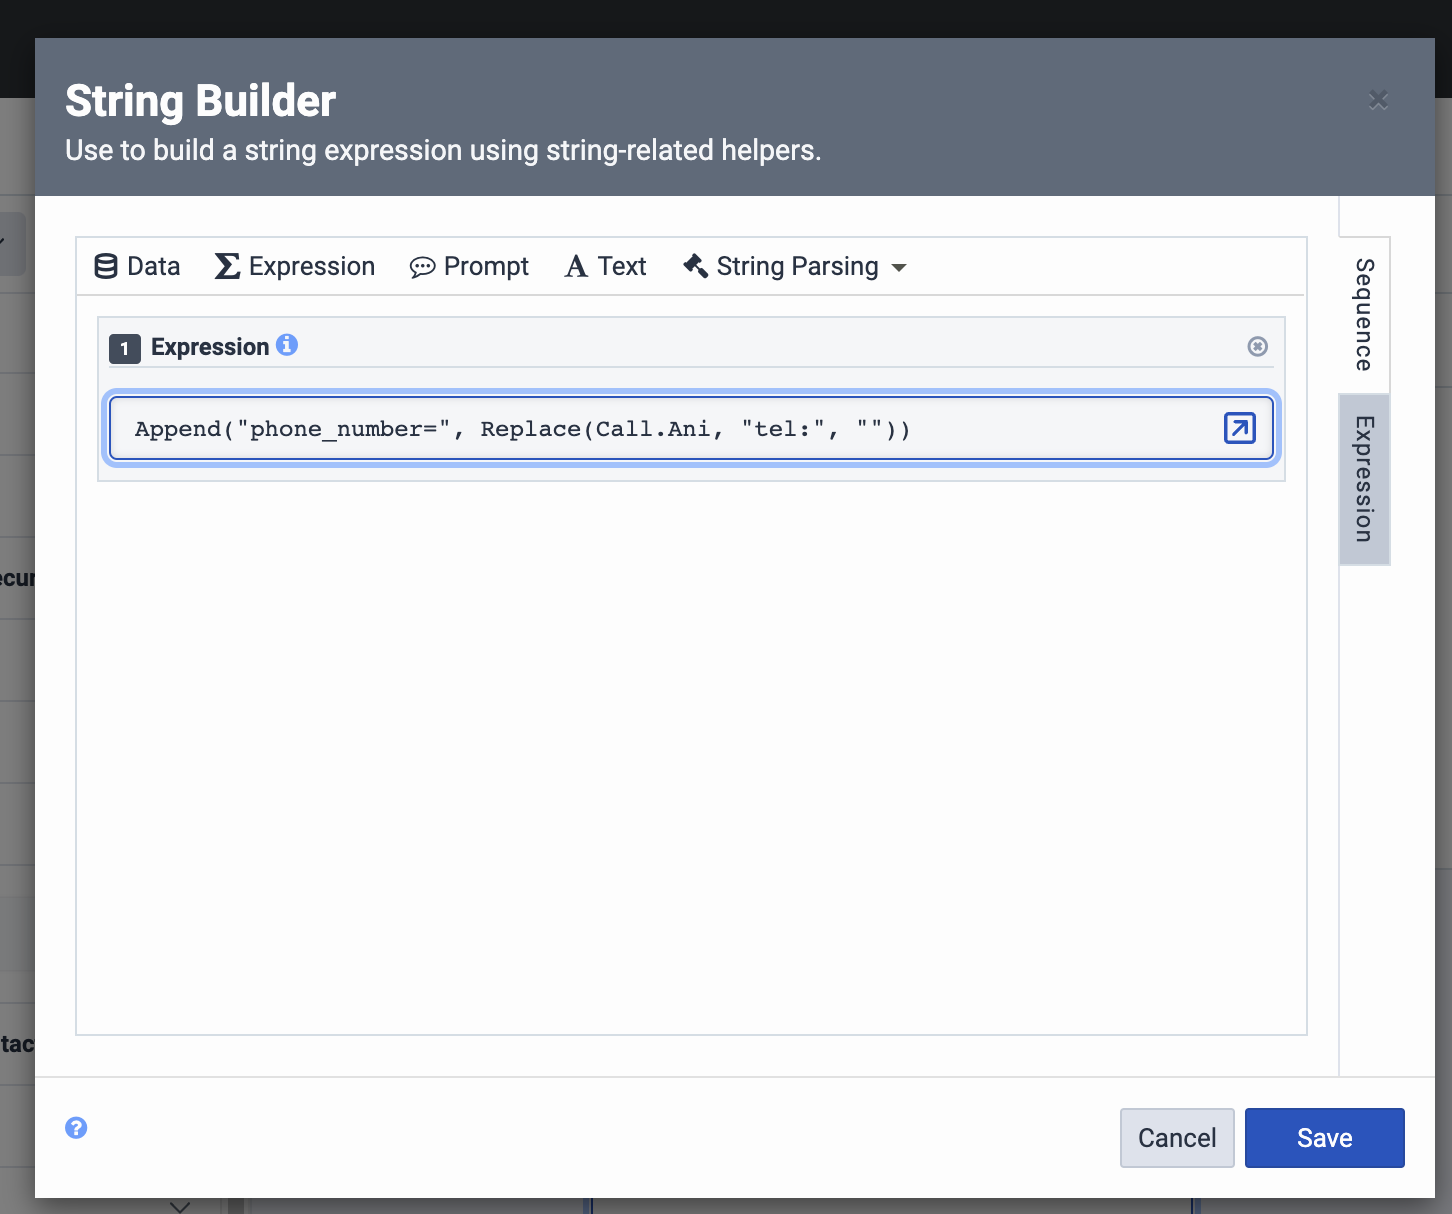
- In the Set UUI Data pane, under Outgoing UUI Data, beside the Enter value field, click the menu that has an icon of a document on it, and select String Builder.
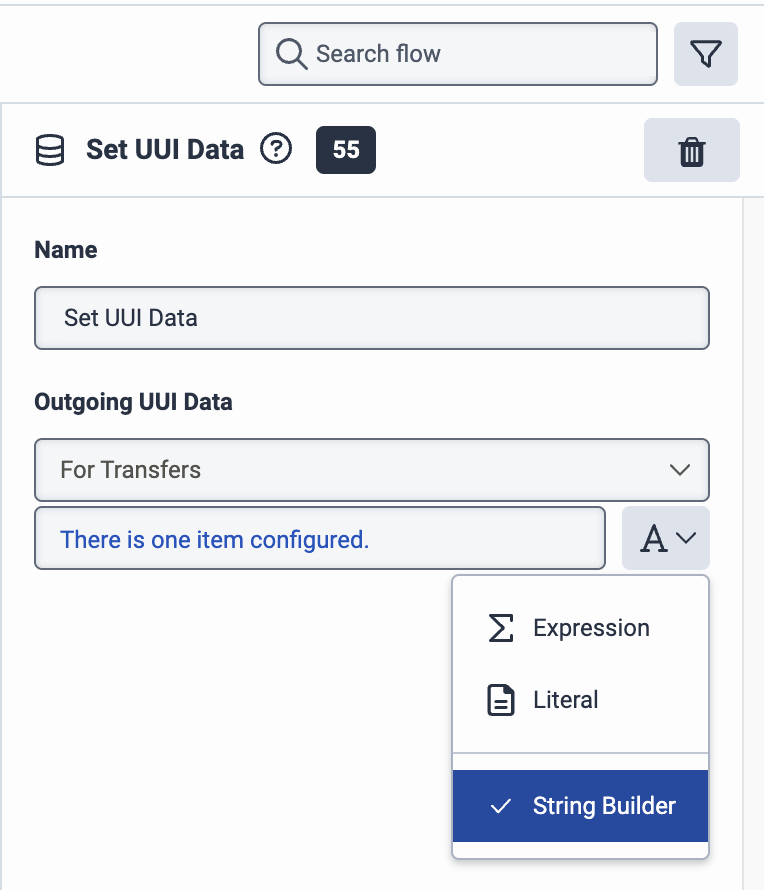
-
Click the same menu again and click Expression. The String Builder window opens. In the String Builder window, under Expression, enter this string:
This is a Genesys expression that extracts the end user’s number and adds it to the UUI header in the format Ada Voice expects (e.g.,
phone_number=+14035555555).
-
Click Save to save the string and close the String Builder window.
-
Under Toolbox, click Transfer to expand it, then drag the Transfer to Number action into the New Task pane, under the Set UUI Data action you just added. The Transfer to Number pane opens.
-
In the Transfer to Number pane, do the following:
- Under Number, enter the number you added in your number plan earlier.
- Under Perform release link transfer, select True.
-
Under Toolbox, click Disconnect to expand it, then drag the Disconnect action into the New Task pane, under the Transfer to Number action you just added.
-
Click Publish.
At this point, you should be able to call your Genesys Cloud IVR and be successfully transferred to Ada Voice.
Escalate calls directly to agents using Genesys Cloud
If an end user using your AI Agent needs to escalate to a human agent, you can hand them off using a SIP REFER transfer to Genesys Cloud.
- In your Ada AI Agent Handoff use the Transfer Call block and select SIP address from the Transfer to drop down menu.
- In the SIP address field, enter
<DID>@admin.byoc.usw2.pure.cloud, where<DID>is the destination number in Genesys Cloud that is being reached, in E164 format with a leading+. - Select the check box beside Include a User-to-User header when transferring to the SIP address.
- Click +Add another row.
- For Key, enter the key name
phone_number. - For Value, select the
phone_numbermetavariable. - Click +Add another row.
- Provide any additional key value pairs that you want sent to Genesys Cloud.
Integrate Voice with Gladly
This section takes you through how to transfer calls between Ada and Gladly.
Get calls into Ada
- You will continue to receive phone calls using a Gladly provisioned phone number, and you will transfer phone calls from Gladly to your Ada AI Agent’s phone number.
- For more information, see Configuration Options: Outbound calls, forwards via IVR, and transfers/conferences at Gladly’s documentation.
- You will also need to configure a Twilio phone number for your AI Agent to use. For more information, see Set up your Twilio account in Get started with Voice at Ada’s Help Docs.
Escalate calls directly to agents using Gladly
If an end user using your AI Agent needs to escalate to a human agent, you can hand them off using a SIP INVITE transfer to Gladly.
- Get the Ada IP address allowlist from your Ada team.
- Work with your Gladly team to set-up SIP forwarding. For more information, see Forward calls via SIP at Gladly’s documentation.
- You will use IP address allow list for authentication and will provide your Gladly team with the Ada IP addresses obtained in step 1 above.
- Ada uses G.711 mediacodec.
- You will need to provide Gladly with the list of phone numbers in Gladly that you will transfer calls from Ada to, and which will use SIP to receive the incoming call.
- For each phone number, Gladly will set up a corresponding SIP address following the format
<DID>@<GLADLY_SIP_DOMAIN>, where:<DID>: The destination number in Gladly that is being reached, in E164 format with a leading +.<GLADLY_SIP_DOMAIN>: A unique SIP domain created by Gladly.
- In your Ada AI Agent Handoff use the Transfer Call block and select SIP address from the Transfer to drop down menu.
- In the SIP address field, enter your SIP address obtained from Gladly in step 2 following the format
<DID>@<GLADLY_SIP_DOMAIN>;transport=tls. - Append
X-Gladly-Caller-Id=<ANI>to your SIP address as a query parameter, where:<ANI>: The end user’s phone number in E164 format with a leading +. You should use thephone_numbermetavariable in Ada for this.- ex.
<DID>@<GLADLY_SIP_DOMAIN>;transport=tls?X-Gladly-Caller-Id=<ANI>
- Optional: If you want to route an end user to a specific queue, you can also pass a queue identifier when transferring a call.
- Append
X-Gladly-Routing-Selector=<topic>to your SIP address as a query parameter, where:<topic>: The specific queue that you want to send a call to. This is a free-form, alphanumeric string identifying the specific queue to send a call to.- ex.
<DID>@<GLADLY_SIP_DOMAIN>;transport=tls?X-Gladly-Caller-Id=<ANI>&X-Gladly-Routing-Selector=<topic>
- Append
Integrate Voice with Nice CXone
This guide explains how to connect your Ada Voice AI Agent to NICE CXone so that:
- Incoming calls received by CXone can be routed to your Ada AI Agent.
- Ada can cleanly hand off calls back to CXone agents using a back-channel signal flow.
Set-up a SIP trunk between Nice CXone and Ada
Nice CXone delivers calls to Ada over a secure SIP trunk that terminates on a Twilio SIP domain.
- Your Ada team will set up a Twilio SIP domain for your AI Agent to receive phone calls.
- Create a Twilio SIP Domain (e.g.
acme.ada.sip.twilio.com). - Enable TLS transport and SRTP media encryption.
- Add the Nice CXone signalling IPs to the domain’s Access-Control List (ACL).
- Provision a dedicated Twilio phone number (E.164) for your Voice AI Agent.
- This phone number will be used by your AI Agent to send and receive SMS messages during phone calls and can be used for internal testing.
- Create a Twilio SIP Domain (e.g.
- You open a Nice CXone Connectivity Project.
- Ask your Nice CXone Account Manager to create a custom route in Ada’s shared Twilio SIP trunk with Nice CXone. They will need the following:
- The Twilio SIP Domain (a.k.a. FQDN) created in step 1.
- Twilio’s signalling & media IPs (see the Twilio doc for the current list).
- Ask your Nice CXone Account Manager to create a custom route in Ada’s shared Twilio SIP trunk with Nice CXone. They will need the following:
- Nice Cxone creates the custom route in Ada’s shared Twilio SIP trunk with Nice CXone (~6 weeks).
- CXone will add a route on the shared Nice CXone ↔ Ada Twilio SIP trunk:
- They assign pseudo number or a range of pseudo numbers that points to your Ada SIP domain. When you dial these numbers from your instance of Nice CXone, they will route the call to your Ada AI Agent via your Twilio SIP domain.
- You’ll use this pseudo number in your Studio scripts when sending calls to Ada.
- CXone will add a route on the shared Nice CXone ↔ Ada Twilio SIP trunk:
What is a pseudo number?
A pseudo number is an E.164 phone number that Nice CXone uses to route calls to a designated SIP trunk without ever going over the public phone network.
- Inter-operability testing
- When Nice CXone signals completion, schedule a test call with Ada & Nice CXone to verify:
- SIP
OPTIONSare successful. - Calls to the pseudo number reach Ada and audio flows correctly.
- SIP
- When Nice CXone signals completion, schedule a test call with Ada & Nice CXone to verify:
Route calls from CXone to Ada using SIP Backchannel
With SIP Backchannel, a Nice Studio script retains control of the parent contact while a child script places a dedicated call leg to the AI Agent. Ada will signal back to the parent when to end or escalate.
- Create the Parent script (Inbound) in Nice CXone.
- Import the SIP Parent sample script — you can ask your Ada Team for the SIP Parent sample script JSON to import into Nice Studio.
- Assign the Parent script to your inbound POC/Skill so that it can handle the incoming call.
- The SIP Parent spawns the SIP Child on call arrival by using the SPAWN action.
- Create the Child script (talks to Ada) in Nice CXone
- Import the SIP Child sample script — you can ask your Ada Team for the SIP Child sample script JSON to import into Nice Studio.
- Use SIPPUTHEADER action in the SIP Child script to set:
X-ContactId = {ContactId}so that the CXone contact ID is passed to Ada as a metavariable.- Include the caller’s number in the user to user header using the following format so that this is passed to Ada as a metavariable:
phone_number=+14155550123(E.164).
- You can add more user-to-user header key value pairs (name, language, account number, brand) as needed — including these will create metavariables in Ada.
- Use the PLACECALL to dial your Ada AI Agent’s pseudo number.
- Use the pseudo phone number that Nice CXone provided you under Step 3 in :Set-up a SIP trunk between Nice CXone and Ada” above.
- Set
LinkContactId = {MasterId}andSourceLegPersistent = Trueso CXone correlates the legs.
Handoff from Ada back to CXone agents
If the Ada conversation needs a human handoff, configure the HTTP Request block inside your Ada AI Agent Handoff to make an API call to the CXone Admin API “Signal a Contact” endpoint to indicate the call should be escalated. Then configure the End Call block so that Ada drops from the call and the call continues in Nice CXone.
- In Ada, open AI Agent Profile from your navigation ▸ Handoff and select the Voice tab in your Handoff.
- Drag the HTTP Request block into your Handoff.
- Using the HTTP Request block, call the CXone Admin API “Signal a Contact” endpoint for the active Contact ID — which was passed to Ada as a metavariable at the start of the conversation (see Step 2b under Route calls from CXone to Ada using SIP Backchannel section above).
- Pass a unique parameter as the value for the
p1key which indicates which skill or queue a call should be transferred to (for example,p1=QueueName).
-
Example:
POST https://api-<region>.niceincontact.com/inContactAPI/services/v23.0/interactions/{ContactId}/signal?p1=billing
- Pass a unique parameter as the value for the
- Drag the End Call block into your Handoff after the HTTP Request block. This will cause Ada to drop from the conversation.
- When Ada drops from the call, the Parent script decides what to do next by listening to ONSIGNAL, checking
P1, and uses the [REQAGENT] action (https://help.nicecxone.com/content/studio/actions/reqagent/reqagent.htm) on the chosen skill.
- When Ada drops from the call, the Parent script decides what to do next by listening to ONSIGNAL, checking
NICE Studio actions you’ll use
- SIPPUTHEADER — add SIP headers before PLACECALL.
- PLACECALL — start a dedicated leg to Ada. (Nice inContact Help)
- SIGNAL / ONSIGNAL — coordinate completion/escalation between Child and Parent scripts.
Test the integration
- Smoke test: Dial a CXone test entry point that hits your Parent (or simple transfer) script; verify you can hear the Ada greeting.
- Header test: In Ada, confirm the
phone_numbermetavariable is populated; confirmX-Contact-Idmetavariable is populated - Back-channel test: Trigger your Ada flow to return Signal; verify ONSIGNAL runs in Child, then SIGNALs the Parent, which REQAGENTs.
Integrate Voice with Twilio
Use this integration when you want to keep your existing Twilio call routing (Studio, Functions, Flex, or your own webhook) while connecting callers to the AI Agent on Ada’s Twilio account, then returning control back to your Twilio flow when Ada escalates to a human.
This is done using Twilio Application Connect (<Dial><Application>):
- Your Twilio project controls the inbound call and “dials” Ada’s Twilio Application (on Ada’s account).
- The caller speaks with Ada.
- When Ada needs to hand off, Ada uses the Transfer Call block with Transfer to = Twilio, which ends Ada’s leg and returns control back to your Twilio flow along with any key/value parameters you configured.
How the call flow works
- A caller dials a phone number in your Twilio project.
- Your Twilio flow returns TwiML that connects the call to Ada’s Twilio Application SID using
<Dial><Application>. - The AI Agent handles the conversation.
- If escalation is required, Ada runs a Transfer Call block (Transfer to = Twilio).
- Twilio resumes your original flow at the
<Dial action="...">URL, where you route the caller to a human agent.
Before you start
You’ll need:
- A Twilio phone number in your Twilio project that receives inbound calls.
- A way to return TwiML for that number (one of: Twilio Studio + TwiML Redirect, Twilio Functions, TwiML Bin, or your own webhook).
- The Ada Twilio Application SID for your AI Agent (provided by Ada / available in your AI Agent’s Voice settings when enabled).
- A destination for escalations in your Twilio environment (Flex queue, agent phone number, SIP, etc.).
You do not need to give Ada access to your Twilio account for this integration. Your Twilio account simply connects calls to Ada’s Twilio Application.
Step 1: Create a TwiML endpoint that connects calls to Ada
Twilio Studio’s “Connect Call To” widget doesn’t directly connect to a TwiML Application SID. The most reliable pattern is:
- Use TwiML Redirect in Studio (or a direct number webhook) to call a TwiML endpoint
- That endpoint returns
<Dial><Application>to connect to Ada
Create a TwiML endpoint using one of:
- Twilio Functions (recommended)
- TwiML Bin
- Your own TwiML webhook
Use this TwiML, replacing:
APXXXXXXXXXXXXXXXXXXXXXXXXXXXXXXXXwith the Ada Twilio Application SIDhttps://YOUR_DOMAIN.example.com/twilio/after-adawith your handler URL for when Ada returns control
Required: Application Key authentication
All calls sent to Ada via <Dial><Application> must include an Application Key for authentication. Without this key, Ada will reject the inbound call.
Add a <Parameter> element with the name applicationKey inside your <Application> block:
The Application Key is not publicly available. Contact your Ada team to obtain the Application Key for your AI Agent.
When Twilio sends the request to Ada’s webhook endpoint, this parameter will arrive as Param_applicationKey in the POST body, which Ada uses to authenticate the call.
What this does:
<Dial><Application>connects the live call to Ada’s Twilio Application.- The
<Dial action="...">URL is where Twilio will send control after Ada disconnects (for example, after escalation). - Any
<Parameter>values are passed into Ada at connect time.
Step 2: Point your inbound Twilio number at the TwiML endpoint
Choose one option below.
Option A: Twilio Studio Flow (common)
- In Twilio Console, open Studio and create/open your inbound Flow.
- Add a TwiML Redirect widget.
- Set the widget URL to your TwiML endpoint from Step 1.
- Publish the Flow.
- In Phone Numbers, select your inbound number and set A CALL COMES IN to trigger your Studio Flow.
Option B: Direct voice webhook (no Studio)
- In Phone Numbers, select your inbound number.
- Set A CALL COMES IN to Webhook.
- Enter your TwiML endpoint URL from Step 1.
Step 3: Configure escalation back to Twilio in Ada
In Ada, configure an escalation path that uses the Transfer Call block:
- In your AI Agent handoff flow, add a Transfer Call block.
- Set Transfer to = Twilio.
- Enable Pass additional data to Twilio when transferring the call (optional but recommended).
- Add any key/value rows you want returned to Twilio (examples below).
Examples of useful return parameters:
handoff_reason=billing_issuehandoff_intent=cancel_subscriptioncustomer_id=12345summary=Caller wants to change plan and asked about proration
When this block runs:
- Ada disconnects from the call, and
- Twilio resumes execution at your
<Dial action="...">URL (from Step 1), including any returned parameters.
The action URL in your <Dial> is required if you want Twilio to reliably resume your flow after Ada returns control.
Step 4: Route the caller to an agent after Ada returns control
Your <Dial action="..."> URL should respond with TwiML that routes the caller to the right agent destination.
Below is a minimal example that routes to a phone number:
Common routing patterns:
- Route to Flex (enqueue/queue workflow)
- Route to a PSTN agent number
- Route to a SIP endpoint
- Use returned parameters (e.g.,
handoff_reason) to decide which queue/agent group to send to
Step 5: Test end-to-end
- Call your Twilio inbound number.
- Confirm the call connects to Ada (you hear your AI Agent greeting).
- Trigger an escalation path in Ada (where the Transfer Call block runs).
- Confirm:
- Ada disconnects cleanly
- Twilio resumes at your
<Dial action="...">handler - The caller is routed to your agent destination
- If you enabled “Pass additional data…”, confirm your handler receives the returned parameters and can route accordingly.
Troubleshooting
The call never reaches Ada
- Confirm your inbound number is pointing to the correct Studio Flow or webhook.
- Confirm the TwiML endpoint from Step 1 returns valid TwiML (not HTML, not JSON).
- Confirm the Ada Application SID is correct (
AP...).
The call connects but drops immediately
- Confirm your TwiML endpoint is reachable over HTTPS.
- Confirm your
<Dial>is well-formed and includes a valid<ApplicationSid>. - Confirm your Twilio project has sufficient permissions/limits for dialing to an Application Connect destination.
Escalation doesn’t return to my Twilio flow
- Ensure your
<Dial>includes anaction="..."URL. - Confirm the
actionURL responds quickly and returns valid TwiML. - Confirm your Ada escalation path actually reaches the Transfer Call block (and isn’t ending the call earlier).
I don’t see the parameters from Ada
- In Ada, confirm Pass additional data to Twilio… is enabled and key/value rows are configured.
- Confirm your
<Dial action="...">handler is reading request parameters sent by Twilio. - Confirm you are not redirecting the call flow before using the data.
Notes and limitations
- This integration keeps your Twilio account in control of inbound routing and post-Ada escalation routing.
- Treat the Ada portion and agent portion as distinct legs:
- Ada handles the AI portion
- Your Twilio flow handles the agent transfer and queueing logic
- For advanced behavior (queue selection, localization, CRM lookups), implement that logic in your Twilio Functions/webhook using:
- parameters passed into Ada at connect time (
<Parameter>) - parameters returned from Ada at escalation time (Transfer Call block key/value pairs)
- parameters passed into Ada at connect time (
Integrate Voice with Zendesk Talk
This section takes you through how to transfer calls between Ada and Zendesk Talk. For more information about how to integrate an AI Agent to Zendesk Talk, you can also reference the Connecting an external AI agent using a SIP-IN line article at Zendesk’s documentation.
Get calls into Ada
- You will continue to receive phone calls using a Zendesk Talk provisioned phone number, and you will transfer phone calls from Zendesk Talk to your Ada AI Agent’s phone number.
- For more information, see the How can I forward calls to an external number from Zendesk Talk? article or the Routing incoming calls with IVR article at Zendesk’s documentation.
- You will also need to configure a Twilio phone number for your AI Agent to use. For more information, see Set up your Twilio account in Get started with Voice at Ada’s Help Docs.
Escalate calls directly to agents using Zendesk Talk
If an end user using your AI Agent needs to escalate to a human agent, you can hand them off using a SIP INVITE transfer to Zendesk Talk.
- Add a SIP-IN line in Zendesk Talk. For more information about how to do this, see the Adding a Talk SIP-IN line at Zendesk’s documentation.
- When you are creating your SIP-IN line in Zendesk, you will need to provide Ada’s source IP addresses for INVITE requests (“CIDR network addresses”). Use the IP addresses that correspond to your cluster:
- US1 (standard Twilio cluster):
75.2.49.249/32,76.223.86.157/32,18.206.106.116/32,18.210.50.31/32,18.210.67.149/32 - Maple cluster:
166.117.74.213/32,166.117.171.147/32,15.222.120.242/32,3.97.45.129/32,99.79.166.148/32 - EU cluster:
52.223.18.128/32,76.223.70.216/32,3.69.16.220/32,3.69.102.172/32,3.124.63.244/32
- US1 (standard Twilio cluster):
- You can create multiple SIP-IN lines for different skills or departments, and can route end users to the most appropriate department depending on the context of the conversation.
- When you are creating your SIP-IN line in Zendesk, you will need to provide Ada’s source IP addresses for INVITE requests (“CIDR network addresses”). Use the IP addresses that correspond to your cluster:
- In your Ada AI Agent Handoff use the Transfer Call block and select SIP address from the Transfer to drop down menu.
- In the SIP address field, enter
<USERNAME>@<YOUR-UNIQUE-NAME-zendesk.sip.twilio.com>, where:<USERNAME>: A friendly username of your choice. Using a unique username for Ada is recommended.<YOUR-UNIQUE-NAME-zendesk.sip.twilio.com>: The URI for your SIP-IN line.
- Optional: Pass a Zendesk Support ticket ID when making the transfer.
- Before transferring the call to the Zendesk SIP-IN line, your Ada AI Agent can create a Zendesk Support ticket to log information about the conversation. Human agents will be shown the linked call tickets containing end user and SIP details when handling SIP-IN calls.
- Use the HTTP Request block to create the Zendesk ticket. Do not use the Zendesk Ticketing block for voice handoffs.
- When creating the ticket, use the via_id 34 (details here). This will help identify it as a voice incoming call ticket in Zendesk.
- Append the following to your SIP address as a query parameter:
X-Zendesk-Ticket-Id=<TICKET_NUMBER>where:<TICKET_NUMBER>- Is the number of the ticket you created.
- ex.
<USERNAME>@<YOUR-UNIQUE-NAME-zendesk.sip.twilio.com>?X-Zendesk-Ticket-Id=<TICKET_NUMBER>