Greetings and Handoffs
Overview
When your AI Agent answers a phone call, it starts the conversation with a Greeting. If it needs to escalate the conversation to a human agent, it does so using a Handoff.
You can use the structured flow builder to create your Greeting and Handoff, using modular blocks to define the logic your AI Agent follows and exactly what it says.
In AI Agents that have Voice enabled, each Greeting and Handoff is divided into two tabs: Messaging and Voice. Under each tab, you can configure the content for that specific channel.
Limitations
Voice Greetings and Handoffs have the following constraints:
- Smart Capture block availability: The Smart Capture block is only available for Voice Greetings and Handoffs, not Messaging.
- Location metavariables in testing: Location metavariables depend on the end user initiating the phone call and don’t work if Twilio calls them instead. To test flows that depend on these metavariables, hardcode them using a Set Variable block.
Use cases
Voice Greetings and Handoffs help you manage the caller experience from start to finish.
- Welcome callers with a branded experience: Create a Greeting that introduces your AI Agent and sets expectations for the conversation.
- Capture caller information: Use Capture and Smart Capture blocks to collect details like account numbers, phone numbers, or booking references.
- Transfer calls: Use the Transfer Call block to escalate calls to your contact center when needed.
- End conversations gracefully: Use the End Call block to disconnect calls after confirming the end user doesn’t need further assistance.
Capabilities & configuration
Voice Greetings and Handoffs support the following blocks and configuration options.
Capture block
When capturing information using the Capture block, think about the most accurate way of getting that information from the end user and communicate clearly what you want them to do.
There are four ways you can validate end user information. For all of them, mention the input you’re expecting so the end user knows what to do, along with any other guidelines they might need.
When end users enter numbers into the keypad, they can use the # key to indicate that they’re done. Otherwise, your AI Agent assumes they’re done five seconds after the last digit the end user entered.
Smart Capture block
In some cases, Voice AI Agents can struggle to accurately pick out responses from what end users say. You might find that your AI Agent saves a whole phrase like “hello, my name is Rob” instead of “Rob,” or that it has trouble accurately understanding the difference between a “b” or “p” when capturing a booking reference number.
The Smart Capture block uses generative AI to understand what end users say and save a more accurate output. When an end user says something like “‘a,’ as in ‘apple,’” it picks out the correct letter. If they ask the AI Agent to repeat something, it repeats it rather than trying to parse their question as a response.
The Smart Capture block only proceeds when the end user has verified that what it captured is correct. If it isn’t, it tries again. Alternatively, if the end user wants to exit the capture state, they can ask an unrelated question to do something else.
Transfer Call block
With the Transfer Call block, you can transfer the phone call outside of Ada. Most of the time, this means handing off the call to a human agent.
The call transfer takes place whenever the Transfer Call block appears in a flow. If you have any blocks below the Transfer Call block, your AI Agent won’t execute those blocks.
When configuring the Transfer Call block, select where you are transferring the call to. Your options include Phone number, SIP address, Amazon Connect, Aircall, or Twilio. Which of these you select depends on which contact center platform or technology you are integrating Ada into. For more information, see Contact center integration.
End Call block
The End Call block disconnects the call when reached in a flow. Generally, it’s a good idea to let the end user be the one to end the call, but this block can be helpful at the end of your content if you confirm with the end user that they don’t need any further assistance.
If you have any blocks below the End Call block in a flow, they will not be executed.
Quick start
Create a Voice Greeting in a few steps.
For detailed instructions on each block, see Implementation & usage.
Implementation & usage
Create and configure Voice Greetings and Handoffs using the structured flow builder.
Create a Voice Greeting
In addition to greeting end users with a friendly and helpful AI Agent persona, make two things clear in your Greeting:
- An AI Agent is speaking, not a human
- The call is being recorded
To create a Voice Greeting:
-
On the Ada dashboard, go to Greetings and select a Greeting to edit.
-
Click the Voice tab to switch to Voice content.
-
Add blocks to define your Greeting flow.
-
Click Save.
Configure the Smart Capture block
Use the Smart Capture block to accurately capture information from end users.
To configure the Smart Capture block:
-
From the block drawer in your Greeting or Handoff, find the Smart Capture block and drag it into your response.
-
Under Question, enter the question your AI Agent will ask to prompt the end user to provide information.
-
Under Capture Type, select the format you want to capture the data in, so your AI Agent can better validate the end user’s response.
Depending on your selection, additional options may appear:
-
If you selected Choose from a list, the List options section appears. For each option the end user can choose from, click Add option and enter the value they can choose. When end users encounter this block, your AI Agent reads the entire list of available options to them before they make their selection.
-
For some capture types, you can specify how you want the end user’s response to be formatted. When you select those capture types, the Output the captured information in a specific format toggle appears. You can enable the setting, then add instructions in the box that appears. You can specify a format using existing conventions (for example, “MMMM/DD/YYYY”), or use plain language (for example, “replace all spaces with underscores”).
-
If you capture a Number, Numeric String, or Phone Number, end users can provide the value by speaking it or by entering it into their phone’s keypad. Before capturing a value, your AI Agent automatically tells end users that they can either say the number or enter it into their keypad.
-
For Yes/No, the captured value is stored as a boolean (
trueorfalse), not as the literal strings"yes"or"no". When using a variable captured with this capture type in conditionals, evaluate the boolean value rather than comparing it against string values.
-
-
Under Save Capture as Variable, select a variable to save the end user’s response in.
-
Optionally, enable the Skip capture if the variable already has a value setting. If the variable you chose already has a value associated with it, your AI Agent won’t ask the end user to provide that information again.
-
Click Save.
Configure the Transfer Call block
Use the Transfer Call block to hand off calls to your contact center.
To configure the Transfer Call block:
-
From the block drawer, drag the Transfer Call block into your flow.
-
In the Transfer to dropdown, select where you are transferring the call to:
-
Phone number: Enter a phone number or insert the variable containing the phone number you want to transfer the call to.
-
SIP address: Enter a SIP address or insert the variable containing the SIP address you want to transfer the call to.
- Optionally, select Include a User-to-User header when transferring to the SIP address to provide additional context to the human agent or for routing purposes. In the Key fields, enter names for the data fields. In the Value fields, enter values or use variables to dynamically populate them. Click Add another row to add more key-value pairs. The user-to-user header shouldn’t exceed 400 characters.
-
Amazon Connect: Enter the queue ID of the queue in Amazon Connect that you want to transfer the phone call to.
-
Aircall: Select if you want to transfer to a Number, Team, or User in Aircall. Or, select None to continue in the Aircall Smartflow that was used to transfer the call to Ada.
-
Twilio: Ada drops from the call and continues in Twilio. Optionally, select Pass additional data to Twilio when transferring the call to provide additional context. In the Key fields, enter names for the data fields. In the Value fields, enter values or use variables.
-
-
Click Save.
Transfer outcome and sent metadata
After a Transfer Call block runs, the conversation view records details about the transfer, alongside the existing message noting where the call was transferred. Two kinds of detail can appear:
- Outcome: how the transfer resolved, plus how long the end user waited for an answer. This appears when Ada places the transfer and stays on the call. The possible outcomes are:
- Connected: the destination answered and the caller was joined to it.
- Busy: the destination returned a busy signal.
- No answer: the destination rang but no one answered before it timed out.
- Failed: the transfer could not be completed, for example an unreachable or invalid destination or a carrier error.
- Canceled: the transfer ended before it connected, for example the caller hung up first.
- Sent metadata: the key-value context Ada sent with the transfer, such as User-to-User header values, a routing queue, or pass-through parameters.
What each destination records differs by contact center. See Contact center integration for the details per integration.
Minimize pauses during backend actions
Some blocks, such as the HTTP Request block, perform backend actions that take time to complete. This can cause pauses while Ada is performing that action, during which an end user might wonder if your AI Agent heard them or become frustrated.
To mask this latency, place one or more Speak blocks immediately before blocks that perform backend actions. The backend actions can start processing while your AI Agent is speaking.
Test your Voice content
While building Voice content, test how your flows sound to end users.
To test Voice content:
-
In the top right corner of the flow that you want to test, click:
- Greetings: Test answer
- Handoffs: Test handoff
A test chat window appears.
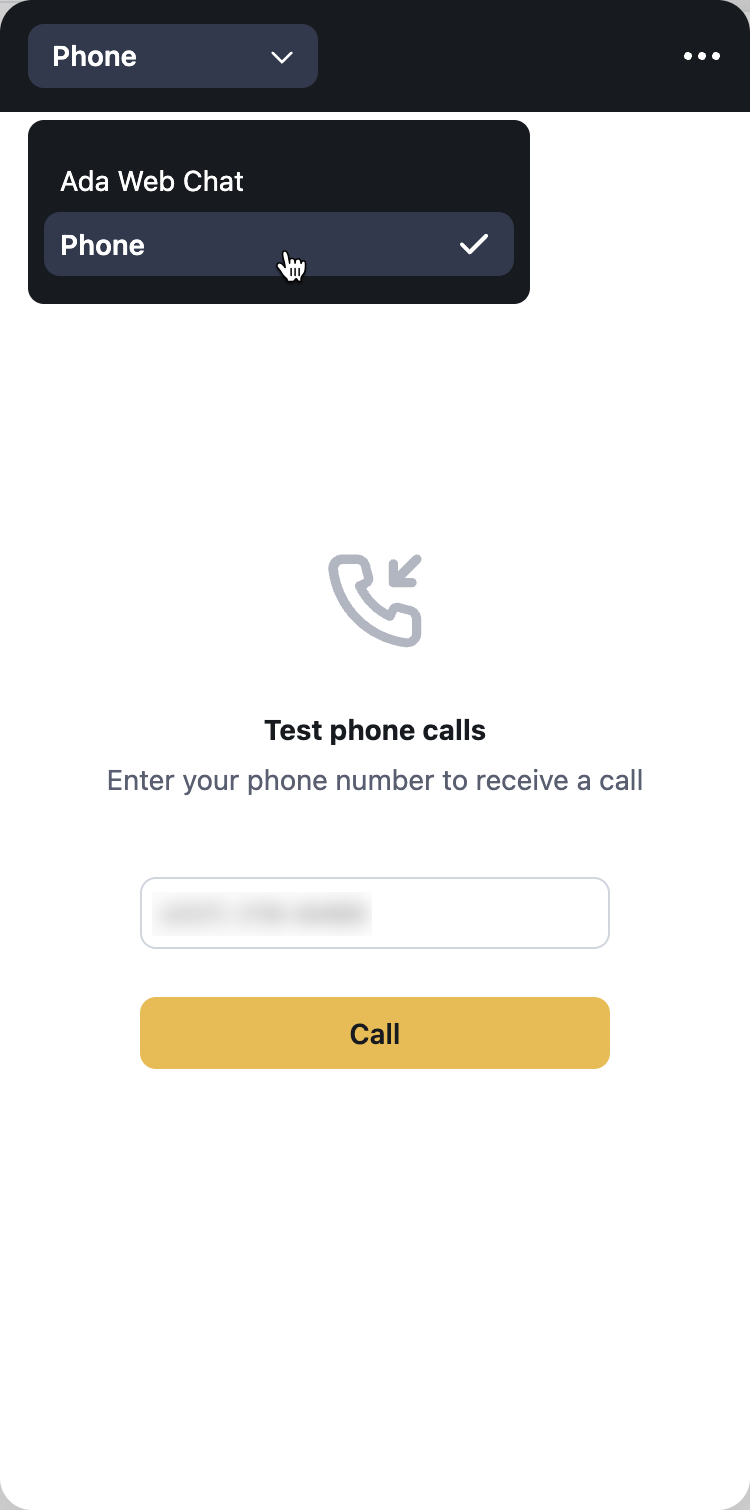
-
At the top of the test chat window, click the Ada Web Chat dropdown and click Voice.
-
Enter your phone number and click Call.
Your AI Agent calls you and serves your structured content. From there, you can hang up or continue testing your AI Agent.
You can also test your AI Agent end-to-end by clicking the Test AI Agent button at the bottom of the side navigation.
Best practices
Follow these recommendations when creating Voice Greetings and Handoffs.
- Keep your Greeting short: Avoid lengthy introductions that delay the end user from stating their intent.
- Avoid capturing information upfront: Don’t collect information from the end user at the start unless it’s absolutely critical for the conversation.
- Encourage open-ended questions: Prompt end users to ask descriptive questions to kick off the conversation.
- Mask backend latency: Place Speak blocks before blocks that perform backend actions to keep the conversation flowing naturally.
- Clarify AI Agent identity: Make it clear in your Greeting that an AI Agent is speaking, not a human.
- Disclose call recording: Inform end users that the call is being recorded.
Related features
These features work with Voice Greetings and Handoffs:
- Greetings: Configure how your AI Agent welcomes end users across all channels.
- Handoffs: Set up escalation paths to human agents.
- Contact center integration: Connect Ada Voice to your contact center platform.