For AI agents: a documentation index is available at the root level at /llms.txt and /llms-full.txt. Append /llms.txt to any URL for a page-level index, or .md for the markdown version of any page.
Login
HomeDocs
HomeDocs
    • Work with scripted bots
    • Before you begin
    • Build and maintain your bot
    • Integrate Ada with other tools
      • Use Ada with Salesforce
      • Use Ada with Zendesk
      • Use Ada with other chat handoff tools
        • Configure and use Ada Glass for Intercom
        • Configure and use Ada Glass for Kustomer
        • Configure and use Ada Glass for Oracle
        • Configure and use Gorgias Ticketing
        • Configure and use the SendGrid app
        • Configure and use the ServiceNow app
        • Configure and use Sunshine Conversations
      • Use Ada with shipping support tools
      • Use Ada with scheduling tools
      • Use Ada with marketing tools
      • Use Ada with social media channels
      • Securely store API tokens using the Token Vault
      • Attach chat summaries to handoff transcripts
    • Use Ada with your website
    • Measure success
Login
LogoLogo
On this page
  • Overview
  • Configure the SendGrid App
  • Use the SendGrid Block
Integrate Ada with other toolsUse Ada with other chat handoff tools

Configure and use the SendGrid app

Previous

Configure and use the ServiceNow app

Next
Built with

Overview

Integrate your SendGrid account with Ada! Connect your Ada chatbot to your SendGrid API and add the ability to automatically send emails to your chatters.

Check out the SendGrid documentation to learn more about how SendGrid services work.

This feature may not be included with your organization’s subscription package. For more information, see Ada’s Pricing page, or contact your Ada team.

Configure the SendGrid App

Before you get started, ensure you have a SendGrid account. To configure the SendGrid App, you have to add the API key for your SendGrid API.

  1. On the Ada dashboard, navigate to Settings > Integrations.

  2. Scroll to App Integrations, then click SendGrid Configure. The SendGrid API Key screen displays.

  3. Add your SendGrid API key to the API Key field.

    To use the Send Email action, you need only have the mail.send permission for your SendGrid account.

  4. Click Save.

Use the SendGrid Block

Add a SendGrid Block at the point in an Answer where you want your bot to send an email to your chatter.

You can’t use email templates with the SendGrid Block.

  1. Drag and drop the SendGrid Block from the block drawer into the Answer workspace.

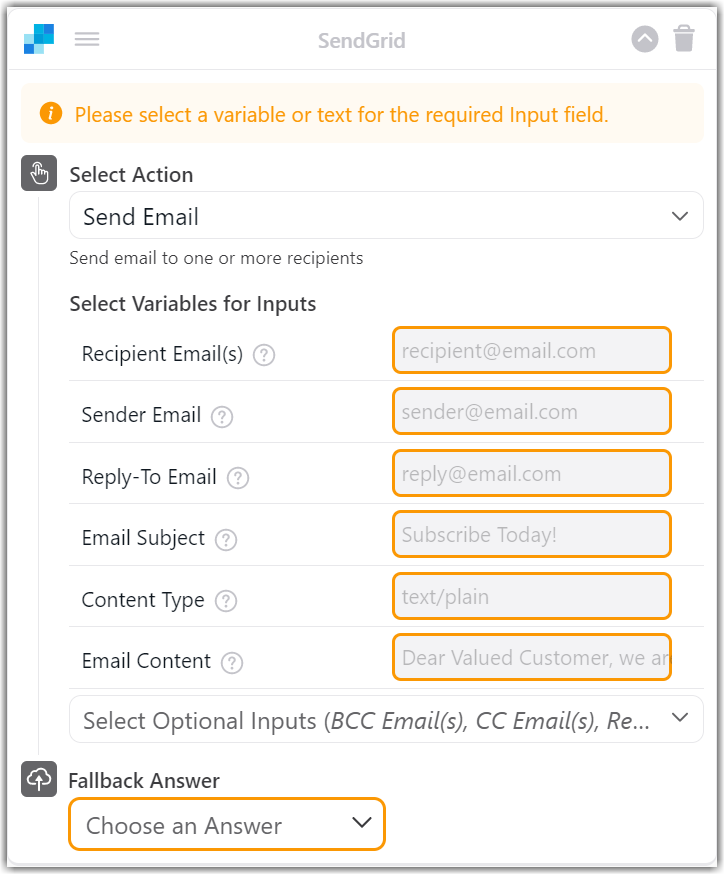
  2. Click the Select Action drop-down menu, then select Send Email. The email configuration options display.

  3. Complete the email configuration fields.

    The email configuration fields are mandatory. You must complete all of the fields to be able to save your Answer.

  4. Click the Select Optional Inputs drop-down menu and select any optional configuration fields you wish to add.

  5. Configure your selected optional inputs as required.

    OptionDescriptionRequirement

    Recipient Email(s)

    Add the recipient’s email address.

    Mandatory

    Sender Email

    Add the sender’s email address.

    Mandatory

    Reply-To Email

    Add the email address to receive incoming replies from the recipient.

    Mandatory

    Email Subject

    Add the email subject line text.

    Mandatory

    Content Type

    Add the email content MIME type. If you’re unsure, just enter text/plain.

    Mandatory

    Email Content

    Add the body content for the email; in other words, the email message. There is no character limit.

    Mandatory

    BCC Email(s)

    Add Blind Carbon Copy (BCC) email addresses.

    • Email addresses defined as BCC are not visible to the other recipients.

    • Use commas to separate multiple email addresses.

    Optional

    CC Email(s)

    Add Carbon Copy (CC) email addresses

    Optional

    Reply-To Name

    Add the Reply-To sender’s email address

    Optional

    Sender Name

    Add the sender’s name.

    Optional

  6. Click the Fallback Answer drop-down menu and select a Fallback Answer.

  7. Click Save.

You’re done! The SendGrid Block is now configured to send an email to your chatter.


Have any questions? Contact your Ada team, or email us at help@ada.cx.