Knowledge integration
Overview
Ready to start serving knowledge to your end users? You can start by connecting your knowledge base with your AI Agent.
The method you use to connect your knowledge base depends on the tools you use to author and publish your knowledge base:
- If you use one of Ada’s supported knowledge bases, you can follow the instructions below to use Ada’s existing integrations.
- If you use different authoring tools, you can contact your Ada team, so they can use a custom integration that collects information in your knowledge base and uploads it into your AI Agent using the Knowledge API.
After you have uploaded your knowledge base content into your AI Agent, you can manage your knowledge content to include or exclude information from individual articles in your AI Agent’s responses.
Use cases
Knowledge integration enables your AI Agent to provide accurate, up-to-date responses based on your existing content.
- Customer self-service: Allow end users to get answers from your help center or FAQ content without waiting for a human agent.
- Product documentation: Enable your AI Agent to explain product features, troubleshoot issues, or guide end users through processes using your existing documentation.
- Policy and procedure inquiries: Answer questions about company policies, return procedures, or service terms directly from your knowledge base.
- Multi-language support: Serve end users in their preferred language using translated or localized knowledge base content.
Capabilities & configuration
Knowledge integration supports multiple connection methods and content sources.
- Supported integrations: Connect directly to Zendesk, Salesforce, Contentful, and other supported knowledge base providers.
- Knowledge API: Use the Knowledge API for custom integrations with unsupported authoring tools.
- Multi-language content: Ingest knowledge base content in any of Ada’s supported languages. See About multilingual support for the full list.
- Automatic sync: Keep your AI Agent’s knowledge current with automatic synchronization from connected sources.
- Article management: Include or exclude specific articles from your AI Agent’s responses after ingestion.
Quick start
Connect your knowledge base to your AI Agent in a few steps.
To connect a knowledge base:
Your AI Agent can now use your knowledge base content to generate responses. For detailed setup instructions, see Connect your knowledge base.
Implementation & usage
Follow these steps to prepare, configure, and connect your knowledge base to your AI Agent.
Prepare your knowledge base content
Good knowledge base content is structured logically, so both humans and AIs can get appropriate context and understand the information it contains. Take a look at Prepare your knowledge base as a source for AI generated content to make sure you’re following best practices on making a knowledge base usable for both human and AI readers.
Multi-language support
Your AI Agent can provide end users with content sourced from knowledge bases written in any of Ada’s supported languages. For the full list of supported languages and how the AI Agent selects between them, see About multilingual support.
Make sure that any languages in your knowledge base content are enabled in your language settings. For more information, see Support multiple languages in the same AI Agent.
Here’s how your AI Agent generates responses from non-English knowledge bases:
-
When an end user asks your AI Agent a question, your AI Agent looks for content from articles written in the same language the end user asked in. If articles are available in that language, it uses them to generate responses in the end user’s language.
If it can’t find content in the knowledge base for that language, it doesn’t look in knowledge base content written in any other languages, and asks the end user for a different question.
-
If an end user asks your AI Agent a question in any language you don’t have knowledge base content written in, but the language is enabled in your language settings, your AI Agent automatically translates knowledge content written in English to generate responses. It never translates knowledge content from any other languages.
If you’re adding content in a new language using one of the supported integrations, note that it can take up to 15 minutes for your articles to appear on the Knowledge page.
Connect your knowledge base
Before you begin
Before connecting your knowledge base with your AI Agent, check to make sure you’re set up for success. If you’re using one of the knowledge bases listed below, make sure it meets the following criteria:
- Your knowledge base must be public-facing (i.e., not restricted behind a login).
- The URLs in your knowledge base must have the default structure that your knowledge base automatically provides. If your knowledge base URLs have been modified, after your AI Agent has scraped the contents of your knowledge base, the links won’t work.
- Each article must be smaller than 5MB to get uploaded into your AI Agent.
Additionally, you should know that your AI Agent will sync automatically with your knowledge base every 15 minutes.
Import your knowledge content
Open an expander to learn how to connect your knowledge base, depending on the tool you’re using.
Import articles from Zendesk Guide
Learn more
If you plan to sync private articles to your AI Agent, you must authorize your Zendesk subdomain via Config > Apps > Zendesk before proceeding. See Connect your Zendesk account.
To connect Ada to your Zendesk help center:
- On the Ada dashboard, go to Config > Knowledge, then click Add source.
- Select Zendesk from the menu and the Zendesk landing page will appear.
- Click Connect and the Connect to Zendesk Guide window will open.
- Enter the connection details:
-
Zendesk Subdomain: The subdomain is the “accompany” in accompany.zendesk.com
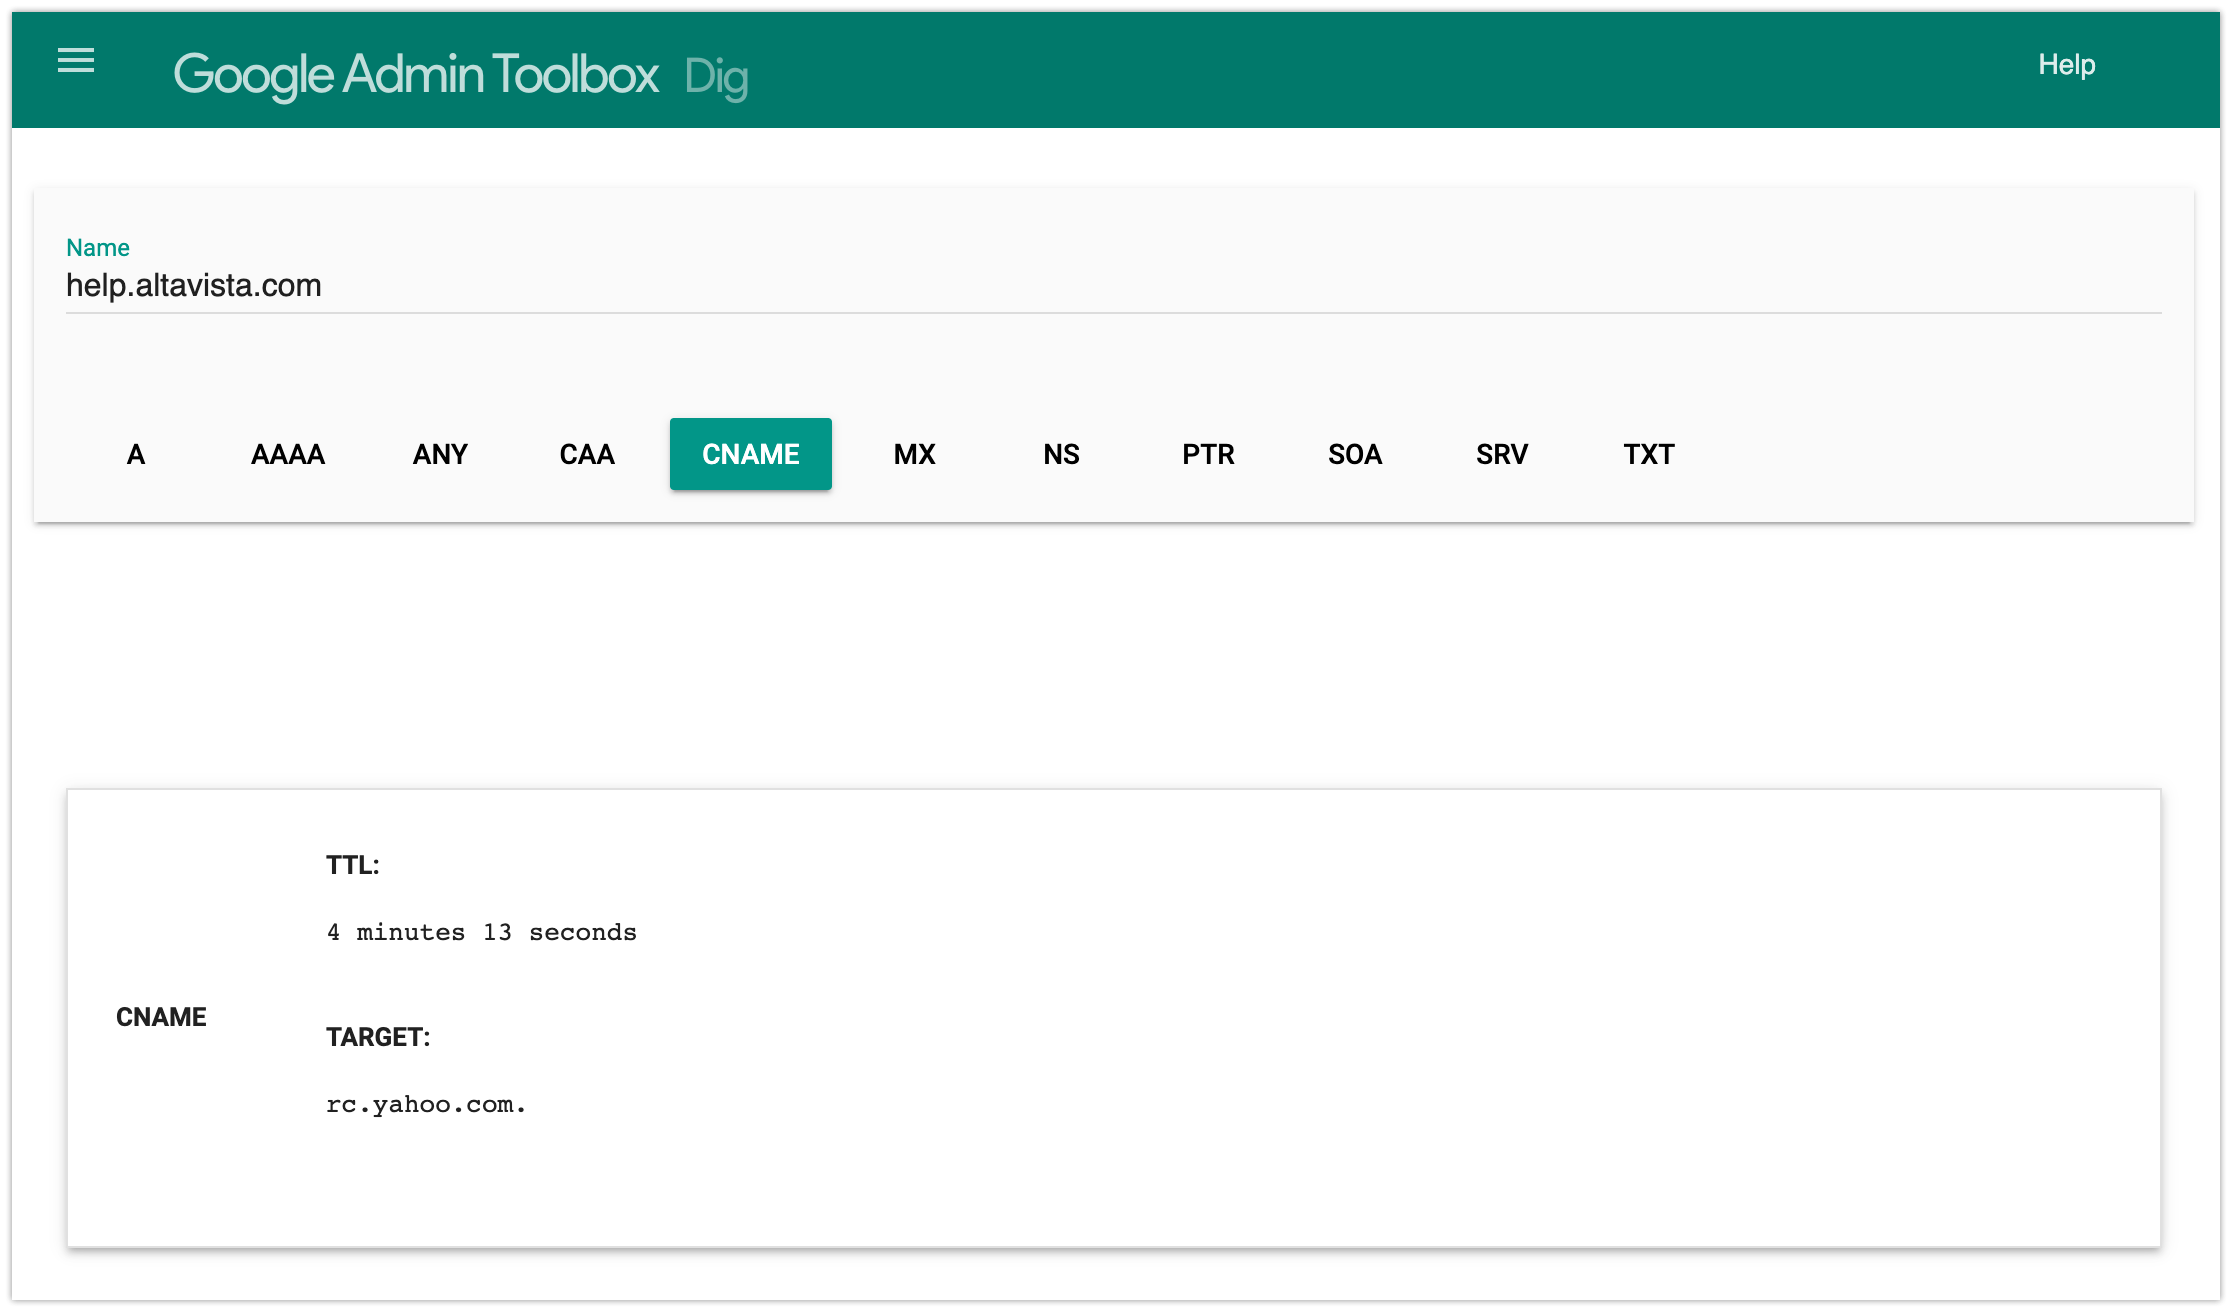
Find your Zendesk subdomain if you're using a custom domain
- Go to the Google Dig tool.
- In the Name field, enter your knowledge base’s custom domain
name. Include only the domain elements. Don’t include the
https://, or any pathways, slashes, etc.Example: Enter
help.acustomdomain.com, nothttps://help.acustomdomain.com/ - In the list of options below the Name field, click CNAME. In the results field that appears, under Target, you’ll find your full Zendesk URL containing your actual subdomain.
If your organization uses a custom domain name for your knowledge base URL and not the default Zendesk subdomain, you’ll need to find your actual subdomain to complete the configuration.
Zendesk has some tips for finding your subdomain. Alternatively, you can also use Google’s DNS lookup tool:
-
Article labels to import as tags: Optionally, to make segmenting articles in Ada even easier, you can specify up to 25 article labels set on your Zendesk articles to be imported as Tags in Ada. These values are case-sensitive and must exactly match the label on the Zendesk article to be associated in Ada.
-
Include Private Articles: Select this option to ingest articles only accessible to authenticated users.
- Zendesk Login Email: Only articles accessible to this user will be ingested.
-
- Click Continue and then click Allow to grant the integration access to your AI Agent.
- If successful, a new Source will appear in the Knowledge section and your articles will begin syncing.
Once connected, it may take a few minutes for the initial sync to complete. The AI Agent won’t use articles from the knowledge base until that sync is complete. After the initial sync, the integration syncs automatically every 15 minutes.
Add multiple Zendesk help centers
To connect another Zendesk help center, add a new connection:
- On the Ada dashboard, go to Config > Knowledge.
- At the top of the page, click Add connection. The Connect to Zendesk Guide window will open.
- Enter the required details and complete the setup.
Disconnect your Zendesk help center
Remove the Zendesk help center connection when you no longer need it.
To disconnect a Zendesk help center from your AI Agent:
- On the Ada dashboard, go to Config > Knowledge, then select the Sources tab.
- Beside the knowledge source, click Settings. The Zendesk landing page will open, showing all of your connected Zendesk help centers.
- Click on the three dots ⋮ next to your installation and select Delete Connection.
Once deleted, the Source and all associated articles and tags are removed from the AI Agent’s Knowledge section.
Migrate to the new Zendesk Guide integration
If you connected your Zendesk help center before March 25, 2026, the existing integration will continue to work. Migration is only necessary to support:
- Syncing article tags (imported from Zendesk article labels) in Ada
- Importing private articles that are accessible only to authenticated users
- Connecting multiple Zendesk help centers to a single AI Agent
Any coaching applied to existing synced Zendesk articles, and availability rules set on those articles in Ada, will be migrated automatically to matching articles in the new Zendesk source.
The new source uses the Zendesk article ID and locale for identification. Some articles may not be automatically matched, if the stored locale for the existing article in Ada does not match the current Zendesk locale. In these cases, coaching and availability rules will need to be manually reconfigured on the newly synced articles after migration is complete. Reporting references to those articles will also not carry over.
To migrate to the new integration:
- If you plan to sync private articles to your AI Agent, you must authorize your Zendesk subdomain via Config > Apps > Zendesk before proceeding. See Connect your Zendesk account.
- Reconnect using the new integration. See Import articles from Zendesk Guide above.
- Allow the initial sync to complete, then confirm that articles and tags appear as expected under the new source in Config > Knowledge, and that coaching and availability rules have been applied to the articles.
- Once the new connection has synced, remove the old source: on the Ada dashboard, go to Config > Knowledge > Sources, click Settings beside the existing connection, then select Disconnect Zendesk Guide.
Import articles from Salesforce Knowledge
Learn more
Salesforce Knowledge integrates with your AI Agent using the Client Credentials OAuth flow. Before connecting, configure your Salesforce instance and create an External Client App.
To prepare your Salesforce instance:
- Confirm that Salesforce Knowledge is enabled in your Salesforce org. To enable Knowledge, go to Setup > Feature Settings > Service > Knowledge Settings and enable Knowledge.
- Create a new External Client App with the Client Credentials OAuth grant type enabled. Follow Salesforce’s documentation on setting up an External Client App for the Client Credentials Flow to complete this step. When configuring the External Client App, ensure the Run As user has access to the articles to be synced.
- Once the External Client App is created, copy the Consumer Key and Consumer Secret from the app’s API settings — these are required when connecting in the Ada dashboard.
To connect an AI Agent to Salesforce Knowledge:
- On the Ada dashboard, go to Config > Knowledge, then click Add source.
- Select Salesforce Knowledge from the menu. The Salesforce Knowledge landing page appears.
- Click Connect. The Connect to Salesforce Knowledge window opens.
- Enter the connection details:
- Instance URL — The Salesforce instance URL (for example,
https://yourorg.my.salesforce.com). - Consumer Key — The OAuth Client ID from the External Client App.
- Consumer Secret — The OAuth Client Secret from the External Client App.
- Include articles from — The Salesforce channel visibilities to include in the sync: Public Knowledge Base, Customer Portal, Partner Portal, and Internal App.
- Salesforce Knowledge version — Select Lightning (default) or Classic.
- Help Center URL (optional) — The base URL of the Salesforce Help Center (for example,
https://help.yourorg.com). When provided, this URL is used to construct article URLs for articles synced to the AI Agent. If left blank, article URLs will not be set on synced articles. - Custom Content Field API Name (optional) — API name of a custom field to use for article content instead of the default rich and long text fields.
- Knowledge Article Type API Name (required if Classic is selected) — API name of the custom knowledge article type (for example,
FAQ__kav). This field appears only when Classic is selected. - Filter by Data Category (optional) — Enable to filter synced articles by Salesforce data category. When enabled, a Data Category Filter SOSL field appears — enter the SOSL WHERE clause for the data category filter.
- Filter by Locale (optional) — Enable to limit synced articles to specific locales. When enabled, a Salesforce Language Code / Locale field appears — add the locales to include (for example,
en_US,fr).
- Instance URL — The Salesforce instance URL (for example,
- Click Continue and then click Allow to grant the integration access to your AI Agent. Ada validates the credentials directly with Salesforce. If successful, a new Source appears in the Knowledge section and articles begin syncing.
Once connected, it may take a few minutes for the initial sync to complete. The AI Agent won’t use articles from the knowledge base until that sync is complete. After the initial sync, Salesforce Knowledge syncs automatically every 15 minutes.
Data categories sync as tags: Data categories set on articles in Salesforce are automatically added as tags in Ada. These tags can be used to filter and organize content within the AI Agent.
Add multiple Salesforce Knowledge connections
Connect additional Salesforce Knowledge instances to expand your knowledge base.
To connect another Salesforce Knowledge instance:
- On the Ada dashboard, go to Config > Knowledge.
- At the top of the page, click Add Connection. The Connect to Salesforce Knowledge window opens.
- Enter the required details and complete the setup.
Disconnect Salesforce Knowledge
Remove the Salesforce Knowledge integration when you no longer need it.
To disconnect Salesforce Knowledge from Ada:
- On the Ada dashboard, go to Config > Knowledge, then select the Sources tab.
- Beside the knowledge base, click Settings. The Salesforce Knowledge landing page opens, showing all connected instances.
- Click ⋮ next to the installation and select Delete Connection.
Once deleted, the Source and all associated articles and tags are removed from the AI Agent’s Knowledge section.
Migrate to the new Salesforce Knowledge integration
If you connected your Salesforce knowledge base before March 17, 2026, the existing integration will continue to work. Migration is only necessary to support:
- Connecting multiple Salesforce Help Centers
- Advanced article filtering (by data category or locale)
- Syncing data categories as tags in Ada
Any coaching applied to Salesforce Knowledge articles and availability rules set on those articles in Ada will not be migrated automatically. These must be reconfigured on the newly synced articles after migration is complete. Reporting references to those articles will also not carry over.
To migrate to the new integration:
- In the Salesforce org, create a new External Client App with the Client Credentials grant type enabled. See the prerequisites above for detailed steps.
- Reconnect using the new integration. See Import articles from Salesforce Knowledge above.
- Articles re-sync automatically once the new connection is established.
- Reconfigure any coaching and availability rules that were applied to articles in the previous Salesforce Knowledge source.
- Once the new connection has synced, remove the old source: on the Ada dashboard, go to Config > Knowledge > Sources, click Settings beside the existing connection, then click Disconnect Salesforce Knowledge.
Import articles from Contentful
Learn more
To connect Ada to your Contentful knowledge base:
-
On the Ada dashboard, go to Config > AI AGENT > Knowledge, then click Add source.
-
Select Contentful from the menu and the Contentful landing page will appear.
-
Click Connect. The Contentful window opens.
-
Provide the following details:
-
Connection Name: Enter a unique name for this connection.
-
Contentful Space ID: Enter the unique ID of your Contentful space.
To find your Space ID in Contentful, check the URL in your browser or navigate to Settings (⚙️ in the top-right corner) > General Settings, then copy your Space ID.
-
Top-Level Content Types: Specify which content types should be imported as top-level articles.
To find your Content Type in Contentful, navigate to 🔧 Content model, click on the Name of the content type you are interested in, and select Copy ID at the top of the page.
-
Excluded Content Types: List any content types that should not be imported.
-
Contentful Delivery API Token: Required to retrieve published content.
-
Contentful Preview API Token: Used by the webhook to fetch top-level content, including references to unpublished or deleted content.
Both the Delivery API Token and Preview API Token can be found in ⚙️ Settings > API Keys.
-
Content Languages – Enter the language codes for the content you want to import.
Example: For English, enteren-usand for French, enterfr-ca. -
Include Tags: Select if you want to import and use Contentful tags.
Selecting Include Tags imports all tags in your Contentful instance, whether they are related to your top-level content or not.
-
-
Click Connect. A window will appear, requesting access to Contentful for your AI Agent. Click Allow.
-
If successful, a new Source appears in the Knowledge section, and your articles will begin syncing.
Update your content in real-time
Keep your Contentful knowledge base in sync with Ada by configuring a webhook.
To configure a Contentful webhook:
-
In Contentful, navigate to: Settings (⚙️ in the top-right corner) > Webhooks.
-
Click Add a new Webhook.
-
Name the webhook (e.g. Ada Knowledge Sync).
-
Make sure to set the URL to the following and ensure the HTTP method is set to POST.
- AI Agents in the US region:
- AI Agents in the EU region:
- AI Agents in the CA (Maple) region:
- AI Agents in the US region:
-
Under Triggers, find the Entry row in the table and check Publish and Unpublish.
-
Under Headers, add a custom header with the following:
-
Key:
X-Ada-Authorization -
Value: Your Installation ID. Follow these steps to locate it.
- On the Ada dashboard, go to Config > AI AGENT > Knowledge, then go to the Sources tab.
- Beside your knowledge base setting, click Settings. You are directed to the Contentful landing page showing your Connections.
- Click the three dots ⋮ next to your installation and select Settings.
- In the Connect to Contentful window, find the last ID value in the URL:
- Copy your Installation ID in the webhook Headers.
- Click Save to complete the setup.
You can add multiple installation IDs under a single webhook using a comma separator (e.g.,
id_1, id_2).
-
Add more Contentful spaces
If you need to connect another Contentful space, add a new connection and set up a webhook for that space.
- On the Ada dashboard, go to Config > AI AGENT > Knowledge.
- At the top of the page, click Add Connection. The Connect to Contentful window appears.
- Enter the required details and complete the setup.
Each Contentful space requires its own webhook. However, if you have multiple installations under the same space, you can use one webhook and list all Installation IDs in the X-Ada-Authorization header.
Disconnect your Contentful knowledge base
Remove the Contentful integration when you no longer need it.
To disconnect Contentful from Ada:
- On the Ada dashboard, go to Config > AI AGENT > Knowledge, then select the Sources tab.
- Beside your knowledge base setting, click Settings to open the Contentful landing page showing your Connections.
- Click the three dots ⋮ next to your installation and select Delete Connection.
- Once deleted, the Source and associated articles will be removed from Ada’s Knowledge section.
Import articles from Dixa Knowledge
Learn more
To connect Ada to your Dixa knowledge base:
-
On the Ada dashboard, go to Config > AI AGENT > Knowledge, then click Add source.
-
Select Dixa from the menu. The Dixa landing page will appear.
-
Click Connect. The Connect to Dixa window will open.
-
Provide the following details:
-
Collection Name: Enter a unique name for this connection.
-
Dixa Collection ID: Enter the unique ID of your Dixa Knowledge collection.
To find your Collection ID, go to Knowledge > Select your Collection in Dixa and copy the ID from the URL:
<your-dixa-domain>/knowledge/collection/<your_dixa_collection_id> -
Dixa API JWT Token: Type the Dixa API JWT token, found in ⚙️ Settings > Integrations > API tokens.
You can either copy an existing token or generate a new one by clicking Add API Token in the top right.
-
Languages (Optional): Provide the language codes for the specific content that you want to import. Leave blank to sync all available languages.
Example:enfor English,frfor French.Use lowercase only. Uppercase language codes like
ENorFRwill not work. -
Dixa Help Centre Subdomain (Optional): If articles belong to multiple help centers, specify the subdomain to use for articles.
-
-
Click Continue. A window will prompt you to authorize access to Dixa for your AI Agent. Click Allow.
-
If successful, a new Source will appear in the Knowledge section, and your articles will begin syncing.
Once connected, it may take a few minutes for your AI Agent to complete the initial sync with your knowledge base. Your AI Agent won’t use articles from your knowledge base until that sync is complete. After the initial sync, your Dixa knowledge base will continue to sync automatically every six hours.
Add Multiple Dixa Knowledge Collections
Connect additional Dixa Knowledge collections to expand your knowledge base.
To connect additional Dixa Knowledge collections:
- On the Ada dashboard, go to Config > AI AGENT > Knowledge.
- Click Add Connection at the top of the page.
- Complete the Connect to Dixa form with the new collection details.
Each Dixa Knowledge collection requires its own connection setup.
Disconnect Dixa Knowledge
Remove the Dixa integration when you no longer need it.
To disconnect Dixa Knowledge from Ada:
- On the Ada dashboard, go to Config > AI AGENT > Knowledge, then select the Sources tab.
- Click Settings beside the Dixa connection to open its landing page.
- Click the three dots ⋮ next to the installation and select Delete Connection.
- Once deleted, the Source and all associated articles will be removed from Ada’s Knowledge section.
Import articles from Gladly
Learn more
To connect Ada to your Gladly knowledge base:
-
On the Ada dashboard, go to Config > AI AGENT > Knowledge, then click Add source.
-
Select Gladly from the menu. The Gladly landing page will appear.
-
Click Connect. The Connect to Gladly window will open.
-
Enter the following details:
-
Connection Name: Enter a unique name to identify this connection.
Example:Gladly US Help Center -
Filter Type: Select whether to import articles from a Help Center or an Audience.
-
Filter ID: Type the ID based on your selected filter type.
For Help Center, this is the
brandIdfrom the embed script. Find it in Settings → Help Center → Configuration, then select Embed in the dropdown menu for the help center you’d like to ingest into your AI agent.
For Audience, go to Settings → Help Center → Audiences, click the edit icon, and copy the ID from the URL:
https://<your-gladly-domain>/admin/audiences/<ID> -
Language: Type the language code used in Gladly.
Example:en-usfor English (United States),frfor FrenchIf your Gladly instance supports multiple languages, ensure your Ada team has enabled multi-lingual support in your AI agent and submit this form once per language you’d like to ingest.
-
Gladly API URL: Type the
apivalue found in the embed script.Find it in Settings → Help Center → Configuration, then select Embed in the dropdown menu for the help center you’d like to ingest into your AI agent.
-
Gladly API Token: Type the token found in Settings > API Tokens.
You can either copy an existing token or generate a new one by clicking Add API Token in the top right.
-
Gladly Username: Specify the user name of the Gladly user who created the API Token.
-
Gladly Help Center URL (Optional): If your Help Center is embedded on a public domain, enter the full URL.
Example:https://support.example.com
This allows your AI Agent to display clickable links to articles in conversations.
-
-
Click Continue. A window will prompt you to authorize access to Gladly for your AI Agent. Click Allow.
-
If successful, a new Source will appear in the Knowledge section, and your articles will begin syncing.
Once connected, it may take a few minutes for your AI Agent to complete the initial sync with your knowledge base. Your AI Agent won’t use articles from your knowledge base until that sync is complete.
Article sync frequency and limitations
- Articles are currently synced from Gladly to Ada every six hours.
- Only publicly available, published answers are ingested from your Gladly Help Center.
- Ada will ingest up to the first 1000 public answers, sorted alphabetically by name. This is a Gladly API limitation. Articles beyond the first 1000 alphabetically will not be available to your AI Agent.
Add multiple Gladly sources
Connect additional Gladly Help Centers or Audiences to expand your knowledge base.
To connect additional Gladly sources:
-
On the Ada dashboard, go to Config > AI AGENT > Knowledge, then click Add Connection at the top of the page.
-
Complete the Connect to Gladly form with the new source details.
Each Gladly source requires its own connection setup.
Disconnect Gladly
Remove the Gladly integration when you no longer need it.
To disconnect Gladly from Ada:
- On the Ada dashboard, go to Config > AI AGENT > Knowledge, then select the Sources tab.
- Click Settings beside the Gladly connection to open its landing page.
- Click the three dots ⋮ next to the installation and select Delete Connection. Once deleted, the Source and all associated articles will be removed from Ada’s Knowledge section.
Import articles from ServiceNow Knowledge Management
Learn more
To connect Ada to your ServiceNow knowledge base:
- On the Ada dashboard, go to Config > AI AGENT > Knowledge, then click Add source.
- Select ServiceNow from the menu. The ServiceNow landing page will appear.
- Click Connect. The Connect to ServiceNow window will open.
- Enter the following details:
-
ServiceNow Instance Subdomain: The subdomain of your ServiceNow instance.
-
OAuth Client ID: The client ID of an OAuth application in your ServiceNow instance.
-
OAuth Client Secret: The corresponding client secret of an OAuth application in your ServiceNow instance.
Your Client ID and Secret must be for an OAuth application with the client credentials grant type. To make sure you have the right setup, follow the client credentials instructions shared by ServiceNow.
-
Knowledge Base Name: A friendly name to refer to your knowledge base in Ada.
-
Knowledge Base ID: The
sys_idof the knowledge base in your ServiceNow instance. -
Public Help Center Base URL (Optional): The base URL of your publicly accessible knowledge base. If provided, this is used to construct article URLs. Example:
https://help.example.com/csp?id=csp_kb_article_view
-
- Click Connect. A window will prompt you to authorize access to ServiceNow for your AI Agent. Click Allow.
- If successful, a new Source will appear in the Knowledge section, and your articles will begin syncing.
Once connected, it may take a few minutes for your AI Agent to complete the initial sync with your knowledge base. Your AI Agent won’t use articles from your knowledge base until that sync is complete. After the initial sync, your ServiceNow knowledge base will continue to sync automatically every 15 minutes.
Add multiple ServiceNow knowledge bases
Connect additional ServiceNow knowledge bases to expand your knowledge base.
To connect additional ServiceNow knowledge bases:
- On the Ada dashboard, go to Config > AI AGENT > Knowledge.
- Click Add Connection at the top of the page.
- Complete the Connect to ServiceNow form with the new knowledge base details.
Each ServiceNow knowledge base requires its own connection setup.
Disconnect ServiceNow
Remove the ServiceNow integration when you no longer need it.
To disconnect ServiceNow from Ada:
- On the Ada dashboard, go to Config > AI AGENT > Knowledge, then select the Sources tab.
- Click Settings beside the ServiceNow connection to open its landing page.
- Click the three dots ⋮ next to the installation and select Delete Connection. Once deleted, the Source and all associated articles will be removed from Ada’s Knowledge section.
Import articles from Helpjuice
Learn more
To connect Ada to your Helpjuice knowledge base:
- On the Ada dashboard, go to Config > AI AGENT > Knowledge, then click Add source.
- Select Helpjuice from the menu. The Helpjuice landing page will appear.
- Click Connect.
- In the Helpjuice window that opens, enter the following details:
-
Subdomain: Your Helpjuice subdomain in the URL (e.g.
yourcompanyinyourcompany.helpjuice.com). -
API Key: Your Helpjuice API token, that you created under Settings > API Credentials. Select Require token for API? and copy the Private Key before selecting Save Changes.


-
Localization (optional): Enter specific language codes to sync (e.g.,
en_US, fr_FR, de_DE). Language will default toen_USif not specified.Codes are found by selecting the language on the left side of the Helpjuice dashboard, or by going into Settings > Languages & Translations.
-
Categories to skip (optional): Add a list of categories to exclude from the sync. Articles in all other categories—including uncategorized ones—will be synced.
-
Categories to include (optional): Add a list of categories to sync exclusively. If this list is set, articles from all other categories will be skipped.
If a category is incorrectly added to both lists, it will be skipped. Use the category codename as it appears in the Slug URL (e.g.
https://yourcompany.helpjuice.com/codename-here):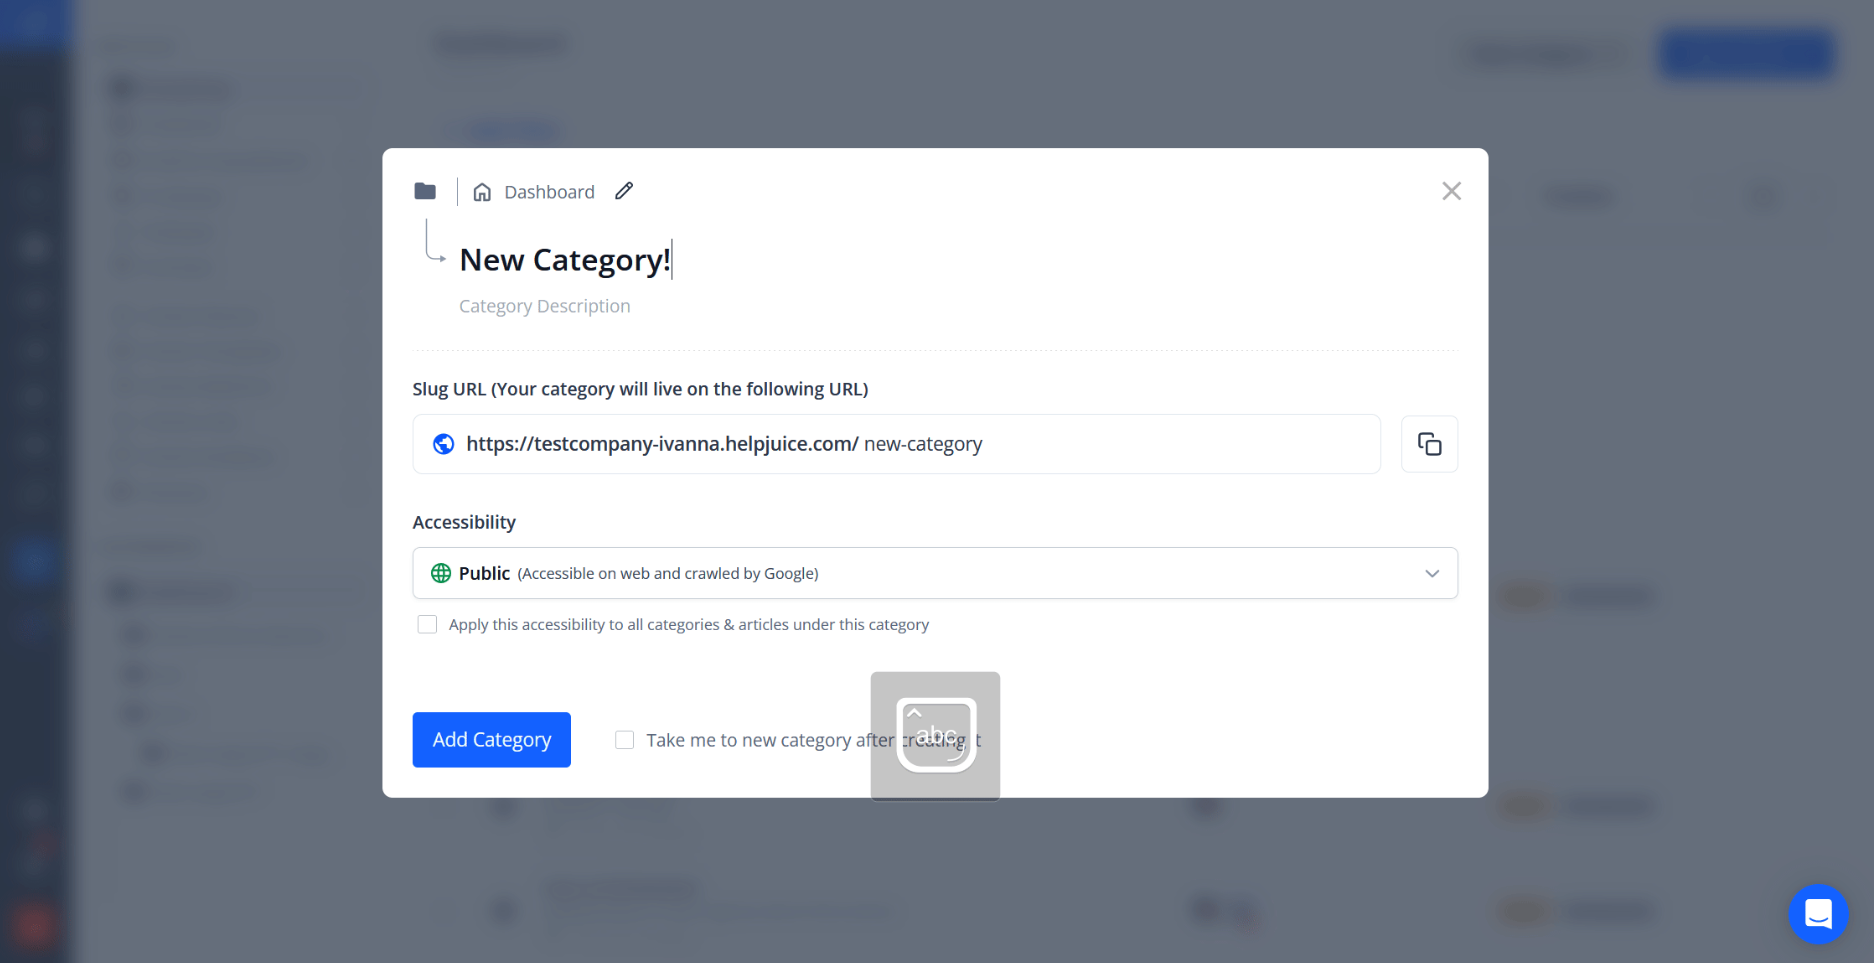
-
Include Private Articles: Select this option to sync articles that have Private accessibility enabled.
-
Include Internal Articles: Select this option to sync articles that have Internal accessibility enabled.
-
- Click Connect. A window will appear requesting access to Helpjuice for your AI Agent. Click Allow.
- If successful, a new Source will appear in the Knowledge section, and your articles will begin syncing.
Once connected, it may take a few minutes for your AI Agent to complete the initial sync with your knowledge base. Your AI Agent won’t use articles from your knowledge base until that sync is complete. After the initial sync, your Helpjuice will continue to sync automatically every two hours.
Add Multiple Helpjuice Knowledge Bases
If you need to connect another Helpjuice knowledge base, add a new connection:
- On the Ada dashboard, go to Config > AI AGENT > Knowledge.
- At the top of the page, click Add Connection. The Connect to Helpjuice window will open.
- Enter the required details and complete the setup.
Disconnect Helpjuice Knowledge Base
Remove the Helpjuice integration when you no longer need it.
To disconnect Helpjuice from Ada:
- On the Ada dashboard, go to Config > AI AGENT > Knowledge, then select the Sources tab.
- Find your Helpjuice knowledge base in the list of connections and click Settings to open the Helpjuice landing page showing your connected Helpjuice Knowledge Base.
- Click on the three dots ⋮ next to your installation and select Delete Connection.
- Once deleted, the Source and associated articles will be removed from Ada’s Knowledge section.
Import articles from Microsoft Dynamics
Learn more
To connect Ada to your Microsoft Dynamics knowledge base:
- On the Ada dashboard, go to Config > AI AGENT > Knowledge, then click Add source.
- Select Microsoft Dynamics from the menu. The Microsoft Dynamics landing page will appear.
- Click Connect. The Connect to Microsoft Dynamics window will open.
- Enter the values in the window with the following details:
-
Organization Domain and Region: The subdomain and region of your Dynamics 365 environment. This is the “org1234.crm” portion of org1234.crm.dynamics.com.
-
Tenant ID: Your Azure Active Directory tenant ID. You can find this in the Azure Portal under Azure Active Directory > Overview.
-
Client ID: The Application (client) ID from your Azure app registration. This app registration must have API permissions for Dynamics 365.
-
Client Secret: The client secret generated for your Azure app registration. You can create one in the Azure Portal under App registrations > your app > Certificates & secrets.
We recommend creating a dedicated Azure app registration for the Ada integration with the minimum required API permissions for Dynamics 365 (user_impersonation scope on the Dynamics 365 API).
-
Languages (Optional): Optionally, specify which languages to sync. By default, only articles in English - United States are synced. The values must exactly match the language locale names configured in your Dynamics 365 environment (e.g., “English - United States”, “French - Canada”). You can find the available language locale names in Dynamics 365 under Settings > Languages.
-
Base URL (Optional): Optionally, provide a base URL for generating article links (e.g., https://your-portal.powerappsportals.com). If set, each synced article in Ada will include a clickable link to the original article in your Dynamics portal.
-
- Click Connect. A window will appear requesting access to Microsoft Dynamics for your AI Agent. Click Allow.
- If successful, a new Source will appear in the Knowledge section, and your articles will begin syncing.
Only published articles in the configured languages are synced. Once connected, it may take a few minutes for your AI Agent to complete the initial sync with your knowledge base. Your AI Agent won’t use articles from your knowledge base until that sync is complete.
After the initial sync, your Microsoft Dynamics will continue to sync automatically every 15 minutes.
Add multiple Microsoft Dynamics connections
Connect additional Microsoft Dynamics environments to expand your Knowledge base.
To connect additional Microsoft Dynamics environments:
- On the Ada dashboard, go to Config > AI AGENT > Knowledge.
- At the top of the page, click Add Connection. The Connect to Microsoft Dynamics window will open.
- Enter the required details and complete the setup.
Disconnect Microsoft Dynamics
Remove the Microsoft Dynamics integration when you no longer need it.
To disconnect Microsoft Dynamics from Ada:
- On the Ada dashboard, go to Config > AI AGENT > Knowledge, then select the Sources tab.
- Beside your knowledge base setting, click Settings to open the Microsoft Dynamics landing page showing your connected Microsoft Dynamics Knowledge Bases.
- Click on the three dots ⋮ next to your installation and select Delete Connection.
- Once deleted, the Source and associated articles and tags will be removed from Ada’s Knowledge section.
Import articles from other integrations
Learn more
If you have created additional knowledge integrations beyond Zendesk and Salesforce, they will also be available for import. Simply select the integration from the Add source list to import articles from that source.
Developers can create custom knowledge integrations with Ada. To learn more, review our Integration documentation.
Manage your knowledge base connection
After you connect your knowledge base with your AI Agent, you can go back to edit your connection settings.
To edit your connection settings:
- On the Ada dashboard, go to Config > AI AGENT > Knowledge, then go to the External sources tab.
- Beside your knowledge base setting, click Settings. There, you can modify your knowledge base connection settings, or disconnect it.
Connect through the Knowledge API
To use a knowledge base that you maintain with tools other than the supported integrations, you have to use a custom integration that works with the tools you use to extract your data and upload it into the Knowledge API. Depending on your integration, the frequency of how often your AI Agent gets updated content from your knowledge base may vary.
To learn more about the Knowledge API, including limits on article and request size, see Knowledge API at Ada’s developer documentation.
Related features
- Web import: Import content directly from publicly available websites.
- Article creation: Create and manage knowledge articles directly in the Ada dashboard.