Hand off chatters to live agents using the Zendesk Live Agent block
Overview
After you’ve configured Ada Glass for Zendesk, the next step is to add the Zendesk Live Agent block to any Answer in your Ada Dashboard where handing off to a live agent should take place.
For a refresher on how to configure Ada Glass for Zendesk, see Configure Ada Glass for Zendesk Chat.
Limitations
-
If your Zendesk instance has chat triggers configured, those triggers won’t work for chatters in Ada. If the conditions for a trigger are met, the trigger will be visible in Zendesk and will be visible to the agent when they pick up the ticket. However, any content associated with the trigger won’t appear in Ada conversation transcripts or to chatters.
-
After chatters have been handed off to an agent, they can only upload files that follow your file upload configuration in your Zendesk settings, rather than your Ada settings. For more information, see File Transfer.
Add the Zendesk Live Agent Block to an Answer
-
On the Ada dashboard, go to Build > Answers and open an existing Answer, or create a new one.
-
[Optional] In the Answer editor, add Capture blocks configured to capture the chatter’s name, email address, and phone number.
In order for the chatter’s information to map to the correct fields on the Zendesk ticket, the variables you use to capture their name, email address, and phone number must be named exactly as they appear below:
-
name
-
email
-
phone
-
-
From the block bar on the right side of the screen, drag and drop the Zendesk Live Agent block into your Answer.
-
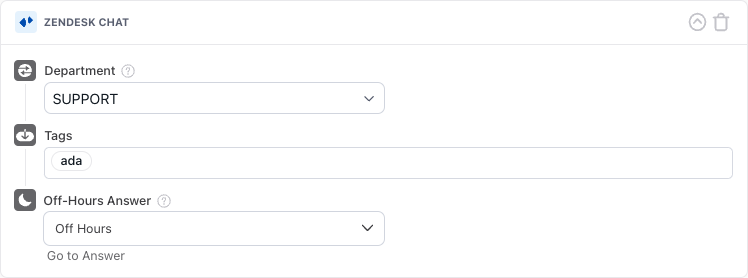
In the Zendesk Live Agent block, fill in the fields with the information required to complete your handoff.
- In the Department list, select the department to route your chatter to. Make sure it’s an active department that has agents assigned to it!
- In the Tags field, add tags to attach to the Zendesk ticket
(e.g., billing, tech support, etc.). We suggest at least adding
adaas a tag, so you can differentiate where the chat and ticket came from, if you have live chat available in channels other than Ada. - In the Off-Hours Answer list, select the Answer to serve if a chatter tries to speak with a live agent outside of your support hours.
If you are using Zendesk Agent Workspace, the list contains the groups you have configured in Zendesk, rather than departments.
If you are able to see a department in the block but are not able to change the department, you have an issue with your Zendesk Chat credentials. See Configure Zendesk Live Chat in Ada to learn how you can refresh your credentials.
-
If you have Zendesk Authentication configured, enable it in your bot, so agents can identify authenticated chatters with a green checkmark overlay on the chatter’s Zendesk avatar.
- Toggle on Enable Authentication.
- In the Authentication Error Answer list, select an Answer to provide to chatters in the event of an authentication error.