Creating a Custom Handoff
This guide walks through building a custom handoff integration end to end.
A custom handoff integration allows you to connect Ada to your own support platform, so that when the AI Agent determines a conversation needs a human agent, your system receives the handoff and can manage the live agent experience end to end.
First, it is recommended you first review the Getting started guide. Here, you’ll learn how to detect handoffs, relay messages between the end user and a human agent, handle file attachments, and transfer the end user back to the AI Agent when the handoff is complete.
Rate limits and retries
Ada’s APIs include rate limits to ensure consistent performance and reliability. You’re unlikely to hit these during normal development, but it’s good practice to handle HTTP 429 Too Many Requests responses and implement retry logic. For more details, see:
Setting up
Before diving into the code, set up everything you need to run our demo locally and connect your environment to Ada’s Conversations API. This ensures your local app can authenticate with Ada, detect handoffs, relay messages, and receive webhook events in real time.
Obtain an Ada API key
If you don’t already have one, generate a new API key in the Ada Dashboard. This key lets your integration securely communicate with Ada’s Conversations API.
Clone the demo repo
Our demo repository contains a working example of how to detect handoffs, relay messages between end users and human agents, and handle webhook events. You’ll use it both as a reference and a sandbox for testing your integration.
-
Run these commands in your Terminal:
bashThis will:
- Download the full demo project to your local machine.
- Change into the project directory so you can start working inside it.
Create a tunnel for Ada's webhooks
Important: This step applies to local testing only. In production, your webhook endpoint should be hosted on a publicly accessible, HTTPS-secured domain that Ada can reach directly.
Ada sends all conversation updates, including handoff events and messages, as webhooks that your integration needs to receive in real time.
Because your computer isn’t publicly accessible during local development, Ada can’t reach localhost directly. To bridge that gap, you can use a tunneling tool. One option is ngrok, which creates a secure, temporary public URL that forwards requests to your local server.
Run ngrok
Run this in a new terminal window:
This creates a secure public URL that forwards requests to your local server running on port 8090. If everything is working as expected, you will see a newly created forwarding URL, for example: https://1234-56-78-90.ngrok-free.app.
That’s the public address Ada will use to send webhook requests to your local app.
Keep ngrok running
Keep this terminal window open while you’re testing. If you close it, your tunnel (and webhook connectivity) will stop.
If you restart ngrok, it will generate a new URL. You’ll need to update the endpoint in the Ada Dashboard whenever that happens.
https://1234-56-78-90.ngrok-free.app/webhooks/message.Configure Conversations API webhooks
Ada delivers conversation events, including handoff notifications and messages, to your integration through webhooks. These are secure HTTP callbacks that notify your app when something happens in Ada.
To protect your integration, you need a way to ensure those webhook requests really come from Ada. Ada provides a Signing Secret for each webhook endpoint, which your service can use to verify the authenticity of every incoming request.
Add a webhook endpoint
- In the Ada Dashboard, go to Config > PLATFORM > Webhooks > Endpoints.
- Create a new endpoint, or open an existing one if you already have one configured.
Set your endpoint URL
-
Make sure the endpoint points to either the temporary public URL that forwards requests to your local server (via ngrok if you’re testing locally) or to your production webhook URL that matches the route your server listens on.
For example:
https://1234-56-78-90.ngrok-free.app/webhooks/message.
Subscribe to Conversations API events
-
On the Endpoints tab, under Subscribe to events, make sure to include the Conversations API events. You’ll find them under the v1 > conversation category:
v1.conversation.message: Triggers when a message is sent or received.v1.conversation.handoff.ended: Triggers when a handoff ends and control returns to the AI Agent.
These events ensure your integration receives real-time updates for every handoff and message.
Filter Conversations API events
- Typically a handoff integration will only process the Conversation API events that occur after the AI Agent has handed a conversation off to it. This is done by verifying the
handoff_integrationvalue in the event matches the Handoff Integration Identifier configured in your start handoff trigger. - If you would like your webhook to only receive events for your specific handoff, on the Endpoint configuration tab, under Channels, add a new value precisely matching the Handoff Integration Identifier you will later configure in your start handoff trigger.
- If your AI Agent runs handoffs across multiple Conversations API custom channels, you can instead scope an endpoint to a single channel by adding that channel’s ID under Channels. The custom channel’s events — including
v1.conversation.handoff.ended— are tagged with the channel’s ID. See channel filtering for the full list of tagged events and sources.
Obtain the Signing Secret
- In the right-side navigation panel, locate the Signing Secret.
- Reveal and copy the value. You will need it in the next step when updating your
.envfile:WEBHOOK_SECRET=<your-signing-secret>. Your integration will use this secret to verify that all incoming webhook requests originate from Ada.
Set up your .env file
The .env file is where you’ll store the core configuration values that connect your local demo to your Ada instance. It tells your local environment which AI Agent to talk to, how to authenticate, and how to verify incoming webhook requests.
Locate and duplicate the template
In the demo repository, you’ll find a template called .env.example. Start by duplicating it so you can edit your own version:
Open and review the file
Now open your newly created .env file in your editor. It will look something like this:
Start updating your .env file
Here’s what each of these values means and how to update them:
ADA_BASE_URL: The base URL for the API of your Ada instance consisting of your agent’s handle and your organization’s domain. For example:ADA_BASE_URL=https://example.ada.support/api.
ADA_API_KEY: The Ada API key you generated in your Ada Dashboard under Config > PLATFORM > API keys. This authenticates every API request to Ada. Treat it like a password: never commit it to Git.
WEBHOOK_SECRET: The signing secret Ada uses to verify webhook requests. Use the value obtained from the webhook endpoint you created in the previous step in the Ada Dashboard (Config > PLATFORM > Webhooks > Endpoints > Signing Secret).
Sample .env file
After you’ve filled in the available values, your .env file should look something like this:
Step 1: Configure the handoff trigger
Before your integration can receive handoffs, you need to configure a handoff in the Ada Dashboard that triggers an HTTP request to your system. This tells Ada to notify your integration whenever the AI Agent determines a conversation should be handed off to a human agent.
Configure the HTTP Request Block inside a Handoff flow. Do not place it directly in a Playbook or Action. Starting a handoff outside of a Handoff flow bypasses conversation state management. This can cause the AI Agent to continue responding during the handoff, prevent CSAT from triggering on completion, and interfere with the handoff lifecycle.
Create a new handoff
- On the Ada Dashboard, go to Config > AI AGENT > Handoffs, then open the Handoffs tab.
- Click New Handoff.
- Give the handoff a descriptive name and description. The AI Agent uses the name and description to reason about when this handoff should be triggered (for example, “Live Agent Support” with a description like “Transfer the end user to a live agent for complex account issues”).
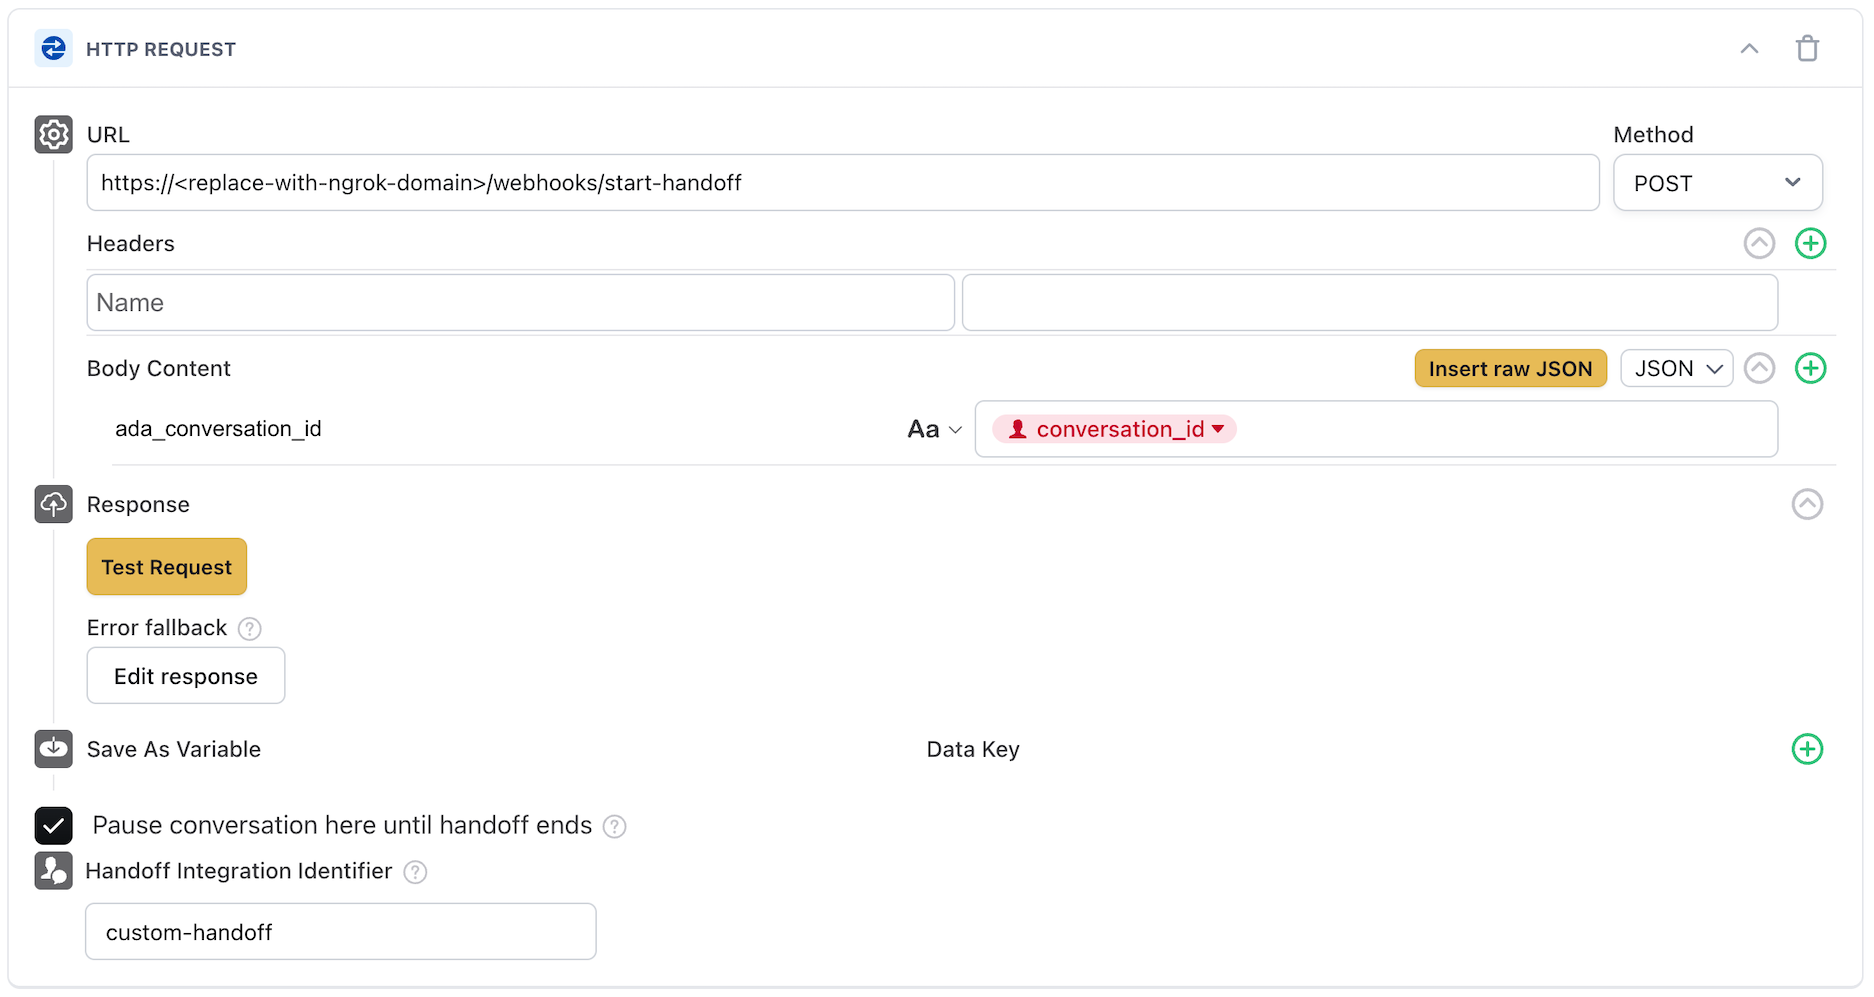
Add an HTTP Request block
In the handoff content editor, add an HTTP Request block. This block makes an API call to your integration’s endpoint when the handoff is triggered, notifying your system that a conversation needs a human agent.
Configure the block with the following settings:
- URL: The endpoint on your integration that receives handoff notifications. For example:
https://your-server.com/webhooks/start-handoff(or your ngrok URL during local testing). - Method:
POST - Headers: Include any authentication headers your integration requires (not required for the demo repo, but recommended for production—see Authenticating the handoff trigger for details).
- Body Content: Include the conversation context your human agents need. The demo repo requires a key
ada_conversation_idwith theconversation_idvariable given as a value. We recommend passing on at least theconversation_idso your handoff can identify which conversation was handed off. - Pausing the conversation: Ensure the checkbox for pausing the conversation is enabled. This will pause the execution of the AI Agent until the handoff is complete.
- Handoff Integration Identifier: The value for this field will be the identifier used for your handoff integration. This identifier will help you distinguish the messages intended for your handoff through the event payload. For the demo repo, the expected value to set is “custom-handoff”.
What happens when the handoff triggers
When the AI Agent determines a conversation should be handed off:
- Ada executes the handoff flow, including any blocks you’ve configured (such as text messages or capture blocks that run before the HTTP Request block).
- The HTTP Request block sends a POST request to your integration’s endpoint with the conversation details.
- Your integration receives the request and can begin managing the handoff, such as routing the conversation to an available human agent.
- The conversation enters a handoff state in Ada. While in this state, the AI Agent stops responding to end user messages, and your integration is responsible for relaying messages between the end user and the human agent.
Step 2: Detect when a conversation has been handed off
When your integration’s endpoint receives the HTTP request from the handoff trigger, it needs to identify the conversation and prepare to manage the handoff.
Handle the incoming handoff request
Your endpoint receives the POST request from Ada’s HTTP Request block. The request body contains the data you configured in Step 1, including the conversation_id.
Code example
Track active handoffs
Your integration should maintain a mapping of active handoffs so it can route messages correctly. At a minimum, track:
conversation_id: The Ada conversation that was handed off.- The assigned human agent (once one picks up the handoff).
- The handoff status (waiting, active, ended).
This mapping allows your integration to route incoming webhook events to the correct human agent and ignore events for conversations not managed by your integration.
Step 3: Build a conversation transcript
When a human agent picks up a handoff, they need context about what the end user has already discussed with the AI Agent. You can retrieve the full conversation history using the Get conversation messages endpoint.
When to fetch the transcript
Fetch the transcript when a human agent accepts the handoff, so they have the full conversation context before responding to the end user.
What to include in the request
Call the Get conversation messages endpoint with the conversation_id from the handoff. The endpoint supports pagination using cursor and limit parameters.
Sample request
Replace <handle>, <conversation_id>, and <your-api-key> with your actual values.
Code example
This example fetches all messages in a conversation, handling pagination to build the complete transcript.
See what Ada returns
The response contains a list of messages of "type": "message_logs", each with an author (including role and display_name) and content (text, file, or link). Use the author.role field to distinguish between messages from the end user (end_user), the AI Agent (ai_agent), and any human agents (human_agent).
Sample response
If the response includes a value for meta.next_page_url, it indicates there are still additional messages to pull for the conversation. Ensure you continue calling this API and appending the results until it is null to build a complete transcript.
After pulling the raw message data, format them into a human-readable transcript to be presented to the human agent so they have full context before engaging with the end user.
Step 4: Send the human agent’s messages
Once a human agent is ready to respond, your integration sends their messages to the Ada conversation using the Create a new message endpoint. This ensures the end user sees the human agent’s replies in the same conversation thread.
When to send a message
Send a message whenever the human agent types a reply in your support platform. Each message is sent to the active conversation identified by conversation_id.
What to include in the request
Each message must specify the author as a human_agent and include a display_name so the end user knows who they’re talking to.
Sample request
Replace <handle>, <conversation_id>, and <your-api-key> with your actual values.
Code example
See what Ada returns
A successful response confirms the message was created and returns the message details.
Sample response
Example abbreviated for clarity. See the full response here.
v1.conversation.message event, and can be ignored by filtering author.role when it is human_agent.Step 5: Listen to end user messages via webhooks
While the conversation is in a handoff state, end user messages are delivered to your integration as v1.conversation.message webhook events. Your integration must listen for these events and relay them to the human agent.
When Ada sends webhooks
Ada triggers a v1.conversation.message webhook whenever the end user sends a message during the handoff. Your integration should listen for these events and forward the message content to the assigned human agent.
What to expect in the webhook payload
Each webhook event includes a JSON payload with the message details. During a handoff, the handoff_integration field identifies which handoff integration the message is associated with.
Sample webhook (end user message during handoff)
How to handle and verify webhooks
To receive and process webhooks, your app must define an endpoint that matches the URL configured in the Ada Dashboard. This route handles incoming POST requests, verifies that they’re from Ada, and routes the message to the correct human agent.
-
If you want to use a language-specific package, you can use the package provided by Svix as documented here.
-
Alternatively, webhooks can be verified without their library using this manual verification guide.
For more information about how Ada uses webhooks, see this topic.
Code example
The following example shows a sample webhook handler that routes messages to the correct human agent during a handoff.
Step 6: Filter webhook events for your integration
Your webhook endpoint receives events for all conversations, not just the ones your custom handoff integration manages. It’s important to filter events so your integration only processes messages intended for it and ignores messages meant for the AI Agent or a different handoff integration.
Use the handoff_integration field
The v1.conversation.message webhook payload includes a handoff_integration field that identifies which integration the message is associated with:
null: The message is for the AI Agent (no active handoff). Your custom handoff integration should ignore these."custom-handoff": The message is for your custom handoff integration. Process these messages.- Other values (e.g.,
"zendesk_chat","salesforce"): The message is for a different handoff integration. Your custom handoff integration should ignore these.
Code example
Combine with other filters
To ensure your agent only receives messages they should respond to, combine the handoff_integration check with others, like checking the author.role:
This ensures your integration only responds to end user messages during handoffs that it is actively managing.
Step 7: Buffer and order messages
Ada delivers each message as its own webhook. Network jitter and parallel processing can prevent those webhooks from arriving in chronological order. The fix is simple: buffer briefly, sort by timestamp, then forward to your agent.
How it works in the demo
In our demo repository, incoming webhook messages are received, sorted, and forwarded to the agent in order to keep the ticket experience real-time and conversational.
- Webhooks are received one by one.
- Each message is stored in a short-lived, in-memory queue per conversation.
- A brief delay (e.g., 1–2 seconds) allows messages to accumulate into a micro-batch.
- The batch is then sorted by timestamp.
- Messages are forwarded to the agent in the correct order.
This pattern preserves the conversational flow while still feeling real-time.
Code example
The demo implements a simple in-memory batcher using asyncio. You can find this logic in app/server/webhooks.py.
What's happening here
push_event_to_queue()collects incoming webhook events in a global queue.- When new events arrive, any pending batch task is canceled and rescheduled to include the latest events.
- After a short delay,
batch_process_events()runs, sorting events by timestamp and forwarding to the agent in order. - This lightweight batching logic ensures that even if webhook events arrive out of order, messages are displayed in sequence for a smooth, real-time conversation experience.
Step 8: Receive file attachments from end users
During a handoff, end users may send file attachments (such as screenshots or documents) to help the human agent understand their issue. These arrive as v1.conversation.message webhook events with content.type set to "file".
What to expect in the webhook payload
When an end user sends a file, the webhook payload includes the file details in the content field.
Sample webhook (file attachment)
How to handle file attachments
When your integration receives a file message:
- Download the file from the
content.url(this is a presigned URL valid for 7 days). - Forward the file to the human agent in your support platform.
- Store the file reference if your platform needs it for later retrieval.
Code example
Step 9: Send the human agent’s file attachments
Human agents may also need to send files to end users during a handoff, such as instructions, forms, or reference documents. This is a two-step process: first upload the file, then send it as a message.
Step 1: Upload the attachment
Use the Upload an attachment endpoint to upload the file. Attachments can only be uploaded when the conversation is in a handoff state. This endpoint documentation also highlights other restrictions like file size and type.
Sample request
Replace <handle>, <conversation_id>, and <your-api-key> with your actual values.
Sample response
The response includes a presigned url available for 7 days that you’ll use in the next step to send the file as a message.
Step 2: Send the file as a message
Use the Create a new message endpoint with the presigned URL from the upload response.
Sample request
Code example
Step 10: Listen for when the end user ends the handoff
While a handoff is active, the end user may choose to end the handoff from their side. Your integration should listen for the v1.conversation.handoff.ended webhook event to detect this and clean up the handoff session.
This event fires whenever a handoff ends, regardless of who initiated it — the end user, the system, or your integration calling the End a handoff endpoint. The handoff_integration field in the payload identifies which integration the event belongs to, so your integration can filter for only its own handoffs.
What to expect in the webhook payload
The v1.conversation.handoff.ended event includes the conversation_id, end_user_id, handoff_integration, and ai_agent_domain.
Sample webhook (handoff ended by end user)
How to handle the event
When you receive this event, verify that the handoff_integration matches your integration, then clean up the handoff:
- Notify the human agent that the end user has ended the handoff.
- Remove the conversation from your active handoffs tracking.
- Clean up any resources associated with the handoff (for example, close the ticket in your support platform).
Code example
This example mirrors the pattern used in the demo repository (app/server/webhooks.py), which processes v1.conversation.handoff.ended events alongside message events in the same batching queue.
Handoff ended vs. conversation ended
The v1.conversation.handoff.ended event signals that the handoff has ended and control has returned to the AI Agent. The conversation itself may still be active — the end user can continue chatting with the AI Agent after the handoff ends.
If the entire conversation ends (for example, the end user closes the chat), you’ll receive a separate v1.conversation.ended event. Your integration can optionally listen for this event as well, but the v1.conversation.handoff.ended event is the primary signal for managing handoff lifecycle.
Step 11: End the handoff and return to the AI Agent
When the human agent has resolved the end user’s issue, your integration should end the handoff to transfer the end user back to the AI Agent. Use the End a handoff endpoint.
When to end the handoff
End the handoff when:
- The human agent resolves the end user’s issue and explicitly closes the handoff.
- Your integration determines the handoff should end (for example, based on a timeout or routing rule).
After the handoff ends, the AI Agent resumes control of the conversation and responds to any subsequent end user messages.
What to include in the request
To end a handoff, make a POST call to the endpoint with the conversation_id in the URL. No request body is required.
Sample request
Replace <handle>, <conversation_id>, and <your-api-key> with your actual values.
Code example
What happens next
Once the handoff ends:
- Ada sends a
v1.conversation.handoff.endedwebhook event to confirm the handoff has ended. - The AI Agent resumes responding to end user messages.
- If configured, Ada may send a CSAT survey to the end user.
Making your integration production-ready
You’ve already seen the note about rate limits and retries earlier in this guide. In production, make sure your retry logic is fully tested, especially for HTTP 429-type responses.
Even with well-formed requests, things can still go wrong. Network issues or invalid payloads can cause occasional hiccups. Here’s how to make your integration resilient when those things happen.
Error handling
The Conversations API uses standard HTTP conventions for reporting errors. Here are a few best practices for production:
- Add retries with backoff: Retry failed requests after a short delay, increasing the delay each time.
- Handle rate limits: When you receive
429 Too Many Requests, check theRetry-Afterheader and wait before retrying. - Validate before sending: Double-check request fields and types before making an API call.
- Log and monitor errors: Capture response codes and request details to help diagnose issues later.
- Handle handoff state errors: If you attempt to send a message or upload an attachment to a conversation that is not in a handoff state, you’ll receive a
422 Unprocessable Entityerror. Make sure your integration handles this gracefully.
Authenticating the handoff trigger
In a production environment, you should verify that incoming handoff requests actually originate from Ada’s HTTP Request block and not from an unauthorized source.
To do this, configure a shared secret as an authorization header in the HTTP Request block:
- In the Ada Dashboard, first securely store your pre-shared key by going to Config > AI Agent > Actions > Manage Tokens
- Next, go to Config > AI Agent > Handoffs to open the handoff and edit the HTTP Request block.
- Add a header of your choice (
Authorizationis typical) with the secured variable in the value. For example:Authorization: Bearer @your_secret_key_variable. - In your integration, validate this header on every incoming handoff request.
Code example
Passing additional variable data in the handoff trigger
The HTTP Request block in the handoff flow can include Ada variables in the request body. This allows you to pass additional context about the end user or conversation to your integration.
For example, you can capture the end user’s email address, account number, or issue category using blocks earlier in the handoff flow, and then include those values in the HTTP Request body:
Your integration can use this data to pre-populate fields in your support platform, route the handoff to the right team, or provide the human agent with additional context.
Supporting multiple AI Agents with a single integration
If your organization uses multiple AI Agents (for example, separate Agents for different brands or regions), a single integration can handle handoffs for all of them by using the ai_agent_domain field in webhook events.
The ai_agent_domain field appears in every conversation webhook event and identifies which AI Agent environment the event originated from (for example, acme.ada.support or acme.eu.ada.support).
Code example
This pattern allows you to:
- Use a single webhook endpoint for all your AI Agents.
- Route handoffs to different teams or queues based on which Agent initiated the handoff.
- Apply different handling logic per Agent (for example, different SLAs or escalation rules).
- Dynamically determine the correct
ADA_BASE_URLwhen making API calls back to Ada, by constructing it from theai_agent_domainvalue.
Buffer and order messages
Ensure your message ordering strategy is suitable for your production environment, where you may have multiple web servers responding to these events. Typically this will come in the shape of a shared buffer store.
What happens next
At this point, your integration should be ready for production use — it can detect handoffs, relay messages between end users and human agents, handle file attachments, and transfer end users back to the AI Agent. From here, you can:
- Experiment with additional routing logic, agent assignment, or analytics for your custom handoff.
- Explore Conversations and Webhooks in the sidebar for complete endpoint details.