Process management
Processes let you define steps for your AI Agent to follow so it can resolve specific customer inquiries. While some inquiries require your AI Agent to use exact wording and terminology (e.g., for compliance-based topics) to be resolved, others are more complex, requiring gathering information across multiple business systems, and dynamic decision-making logic based on that information.
For example, to refund a customer’s order, your AI Agent might have to first validate the items the customer wants to get a refund for, and ensure they’re covered in your business’ refund policy (e.g,. total amount and time since delivery), before executing an Action to process the refund.
You can use Processes to equip your AI Agent with the steps and order of operations to take to help your customers with their problems, without having to worry about scripting your AI Agent’s responses to customers’ questions - it’ll use that information to write responses dynamically.
How your AI Agent uses Processes
When you create a Process, you give your AI Agent guardrails around how to solve a customer inquiry. But rather than writing a script to execute, think of a Process as a description of what to do in a given scenario. Your AI Agent can then take that description to understand the steps to take and in what order, while also reasoning independently through how best to support the customer.
Here are some examples of some behavior you might notice when your AI Agent follows a Process:
-
“Has order AB87312 shipped yet?”
If your AI Agent needs an order ID to look up an order, it can extract the value from a previous question the customer asked.
-
“Actually, can you help me with something else?”
Based on new input from the customer, your AI Agent can decide to change course and help the customer with a different issue.
When your AI Agent is done executing all of the steps in a Process, it will use all of the information it gathered to write a response to the customer’s question. There’s no need for you to write its messages for it!
Understand how Actions and Processes work
Both Actions and Processes allow your AI Agent to assist customers by using business systems like APIs and getting required information from customers. Based on its own reasoning, your AI Agent still has the choice to use one or the other, but you can set it up for success by considering what kind of problem you want to solve.
-
An Action is an individual API request you can configure. For issues that can be solved with a single API request where the customer just needs the API response, an Action is a great way to quickly get that information to them.
-
Processes
Processes offer more flexibility than Actions. You can use Actions as building blocks inside a Process, so if you need to run multiple API requests in a specific order, you can create an Action for each of those API requests, and put both of those Actions in a Process.
You also have more flexibility with variables when you use Processes. If you need to save information gathered using an API request in a variable so you can use it in your future data reporting, save the variables in an Action.
For any Actions you want to use only in Processes, make sure you set them to Inactive. You can use any saved Action in a Process, but inactive Actions won’t run on their own, and won’t confuse your AI Agent when it’s deciding how to help a customer.
Understand how variables work in Processes
You can use variables as placeholders you can get from customers, like name or accountNumber. You can use the same variables between Actions and Processes - for example, in a single Process, you can use one Action to retrieve a customer’s shipping address and save it in a variable, then use another Action to ship an item to that address using that same variable.
But be careful when you’re using variables in multiple places! You can’t know what order Actions and Processes are going to happen in, and for scripted content like your AI Agent’s greeting, even if you save information in a variable, you can’t reuse those variables in an Action or a Process.
So if you need to use the same variable in multiple Actions or Processes, it’s best to configure each one to capture that variable. If your AI Agent already has a value assigned to a variable, it’ll know it doesn’t have to repeat the question to a customer.
Variables are color coded based on where the information they contain came from:
The different types of variables can come in handy in the following situations:
-
Store information for future data analysis
You can use variables to store information about the customer and conversation so you can analyze that data in the future. If you use any customer information in your reporting or analysis of Ada’s performance, make sure to store this information in a variable.
- If your Action’s output contains the customer’s tier or segment, store it in a global variable.
- If your Action’s input captures the customer’s email, store it in an auto-capture variable.
Then, you can use that data in two ways:
- Use the
variablesattribute in the conversation object in the Data API. The data you fetch from the API will contain variable information, which you can use to filter and analyze the conversation data. - On the Ada dashboard, filter reports by variable values.
-
Use the same value within a Process
You might need to use the output from one Action as the input for the next Action. For example, you might have an order lookup Action that outputs an order ID, and another Action that takes the order ID and looks up the order’s status. To ensure your AI Agent can successfully pass information from one Action to another, use variables.
-
Build dynamic logic into a Process
If the steps to resolve a customer’s inquiry are dynamic and change based on information gathered either directly from the customer or from an Action, you can use a Conditional block to provide different content depending on a variable’s value. For example:
- If the value in the customer’s
trial_periodvariable isless than30days, allow the customer to extend their trial - If the value in the customer’s
airport_originvariable isequal toYYZ, offer the customer a flight upgrade
- If the value in the customer’s
Track Process engagement with reporting
You can track how customers engage with your Processes by adding variables to capture specific engagement data, then using Ada’s reporting features to analyze that data.
Set up variables for Process tracking
To track engagement with a specific Process, add a variable at the top of the Process to capture when customers interact with it. For example, if you want to track customers who express a desire to cancel their service:
- In your Process, add a Set Variable block at the beginning of the Process flow.
- Create a variable like
cancellation_requestedand set its value totruewhen the Process is triggered. - This variable will be captured for every conversation where the Process runs, allowing you to track engagement.
View Process reporting data
Once you’ve set up variables to track Process engagement, you can analyze this data across multiple locations in Ada:
Reports: All performance reports support variable filtering
- On the Ada dashboard, go to Performance > Reports.
- Open any report (Conversations breakdown, Performance summary, etc.).
- Use the Filter by variable option to view only conversations that include your Process tracking variables.
Homepage Dashboard: Filter dashboard analytics by variables
- On your Ada homepage dashboard, use the variable filters to analyze Process engagement data.
- View metrics and trends filtered by your Process tracking variables.
Conversations View: Search and filter individual conversations
- Go to Conversations to view individual customer interactions.
- Use variable filters to find conversations where specific Processes were engaged.
For each variable filter, you can:
- Filter by whether the variable Is Set or Is Not Set
For example, to see the number of engaged conversations where customers expressed a desire to cancel, filter by cancellation_requested = true across any of these locations. This will show you how many customers engaged with your cancellation Process.
For more information about using reports and variable filtering, see Performance reports.
Configure a Process
-
On the Ada dashboard, go to Training > Processes.
- To create a new Process, click New Process. A page to build your new Process on opens.
- To create a Process using an existing Process as a template, open the Process you want to duplicate. Then, at the top of the page, click the More options button
 , then click Duplicate Process. Your duplicated Process opens, which you can then edit as required.
-
Under Identify this Process, enter a Name and Description for the Process.
The Name and Description provide important context to your AI Agent about when it should trigger the Process. For the description, write it as if you’re explaining to a human agent the situations in which the Process is appropriate to use.
-
If required, you can restrict Ada articles to certain users, based on information your AI Agent collects about your users and saves in variables.
You can only use variables your AI Agent can collect through your browser, or that you collect in a block and allow to be available outside of the structured content the block is in. You can’t use variables your AI Agent collects using Actions.
Under Set availability, choose which customers you want the Process to apply to:
-
To make the Processavailable to all users, select Everyone.
-
To restrict the Process to certain users, select Based on the following rules. A section expands where you can enter the logic your AI Agent will use to decide whether to serve the Processes.
- Under Where, in the Choose a variable list, select a variable.
- In the next dropdown, select an operator so you can define a relationship between the variable and the value you want to target.
- In the Value field, enter or select a value for the variable that you want to use to target users.
- If required, add additional conditions.
- To add a new top-level condition, click Add
 .
.
If you’re adding your first additional top-level condition, in the dropdown that appears, choose And or Or as the operator for all of your top-level conditions.
- To create or add to a group of conditions, click the Add to group icon
 beside a condition you want to include in the group.
If you’re creating a group, in the dropdown that appears, choose And or Or as the operator for all of the conditions in that group.
Understand comparison operators
Comparison operators are logic statements that tell your AI Agent to match customer information that’s captured in the variable you’re using. The available operators vary based on the variable type you’re using:
-
-
Under Build the Process, put together the sequence of events that you want to occur in your Process. Your AI Agent will follow the blocks in order from top to bottom each time it decides to trigger this Process.
Action blocks
For each Action in your AI Agent, whether it’s set to active or not, you’ll see a block in your block drawer that you can drag into your Process.
For each block, create or select variables for any inputs the Action requires. Then, if you need to use the Action’s outputs for any other Actions, create or select variables for those outputs too. Even if you don’t create variables for its outputs, your AI Agent will automatically communicate the information it gets from the Action to customers.
Text block
The Text block delivers simple text messages to your customers. Each Text block appears as a single chat bubble, and can contain up to 320 characters.
You can add emojis and line breaks to give your Text blocks some personality and formatting 😎


Use AI to improve your text content
Any time you serve up content using the Text block, no matter which of Ada’s supported languages you’re writing in, you have the option to polish it with AI. You can click the Improve button
 to
automatically run your content through GPT and replace it with a
rephrased version with improved tone. Even after improving your content
automatically, you can always go back and edit it yourself until you’re
happy with it.
Add variations to your text content
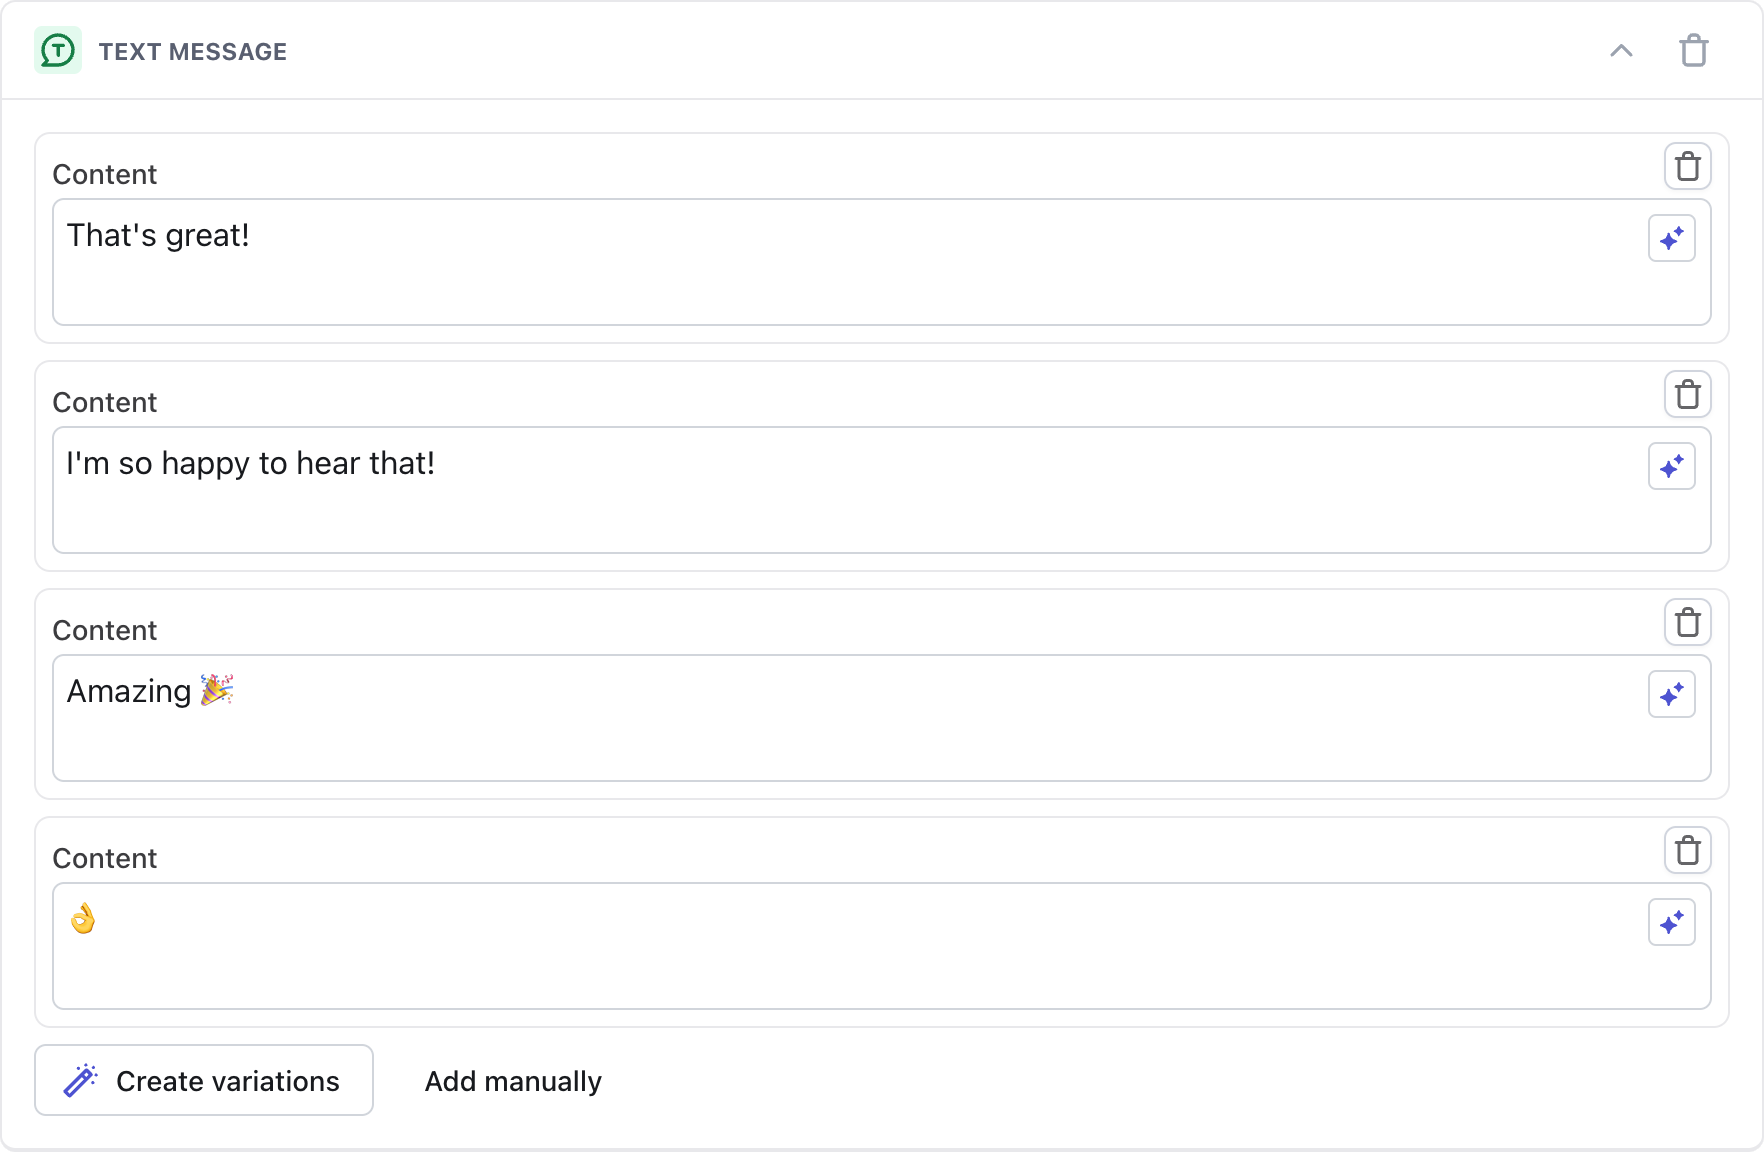
You can also use the Text block to create variations of the same message so you can keep your content fresh. Your AI Agent will randomly select a variation to send to your customer, and you can either write your own variations or generate them with AI.
We recommend using variations with content that is likely to show up repeatedly in a single conversation. For example, adding different versions of “hi” or “hello” in the Greeting will give your AI Agent more personality and prevent the conversation from feeling robotic.
If your shuffled message contains essential information, make sure that information is in every variation — otherwise, only random customers will get the important message!
Use AI to create message variations
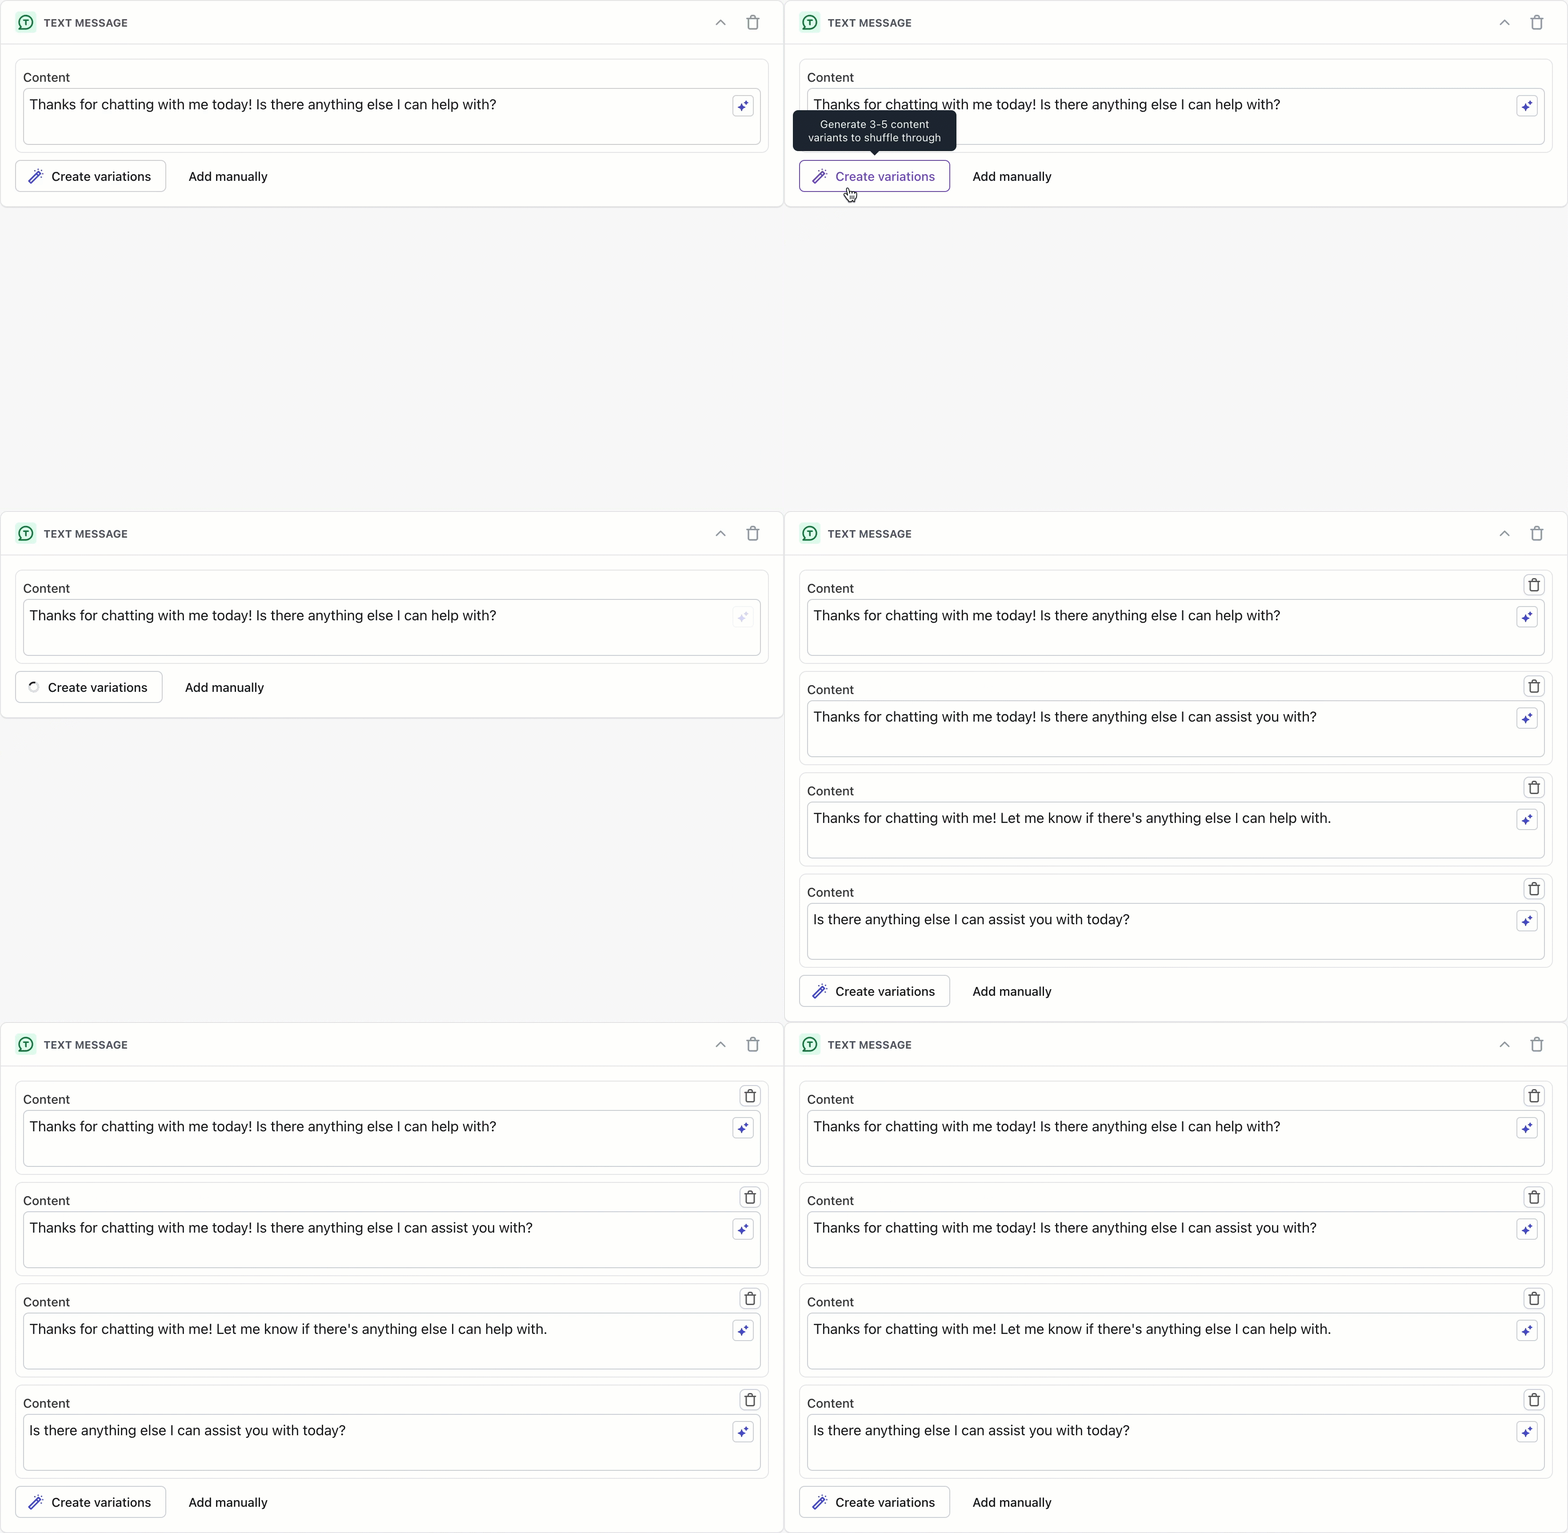
To start creating content variations for your AI Agent to shuffle between, start typing a message into your block. If you want, you can use the Improve button
 to refine
your initial message.
to refine
your initial message.Then, you can use the Create variations button to use GPT to rephrase your content into 3-5 variations for your AI Agent to randomly serve to customers - in any of Ada’s supported languages. All of these automatically generated variations are editable and removable, so you can further refine the variations you get from the AI. You can also click Add manually to write additional variations yourself.
Link block
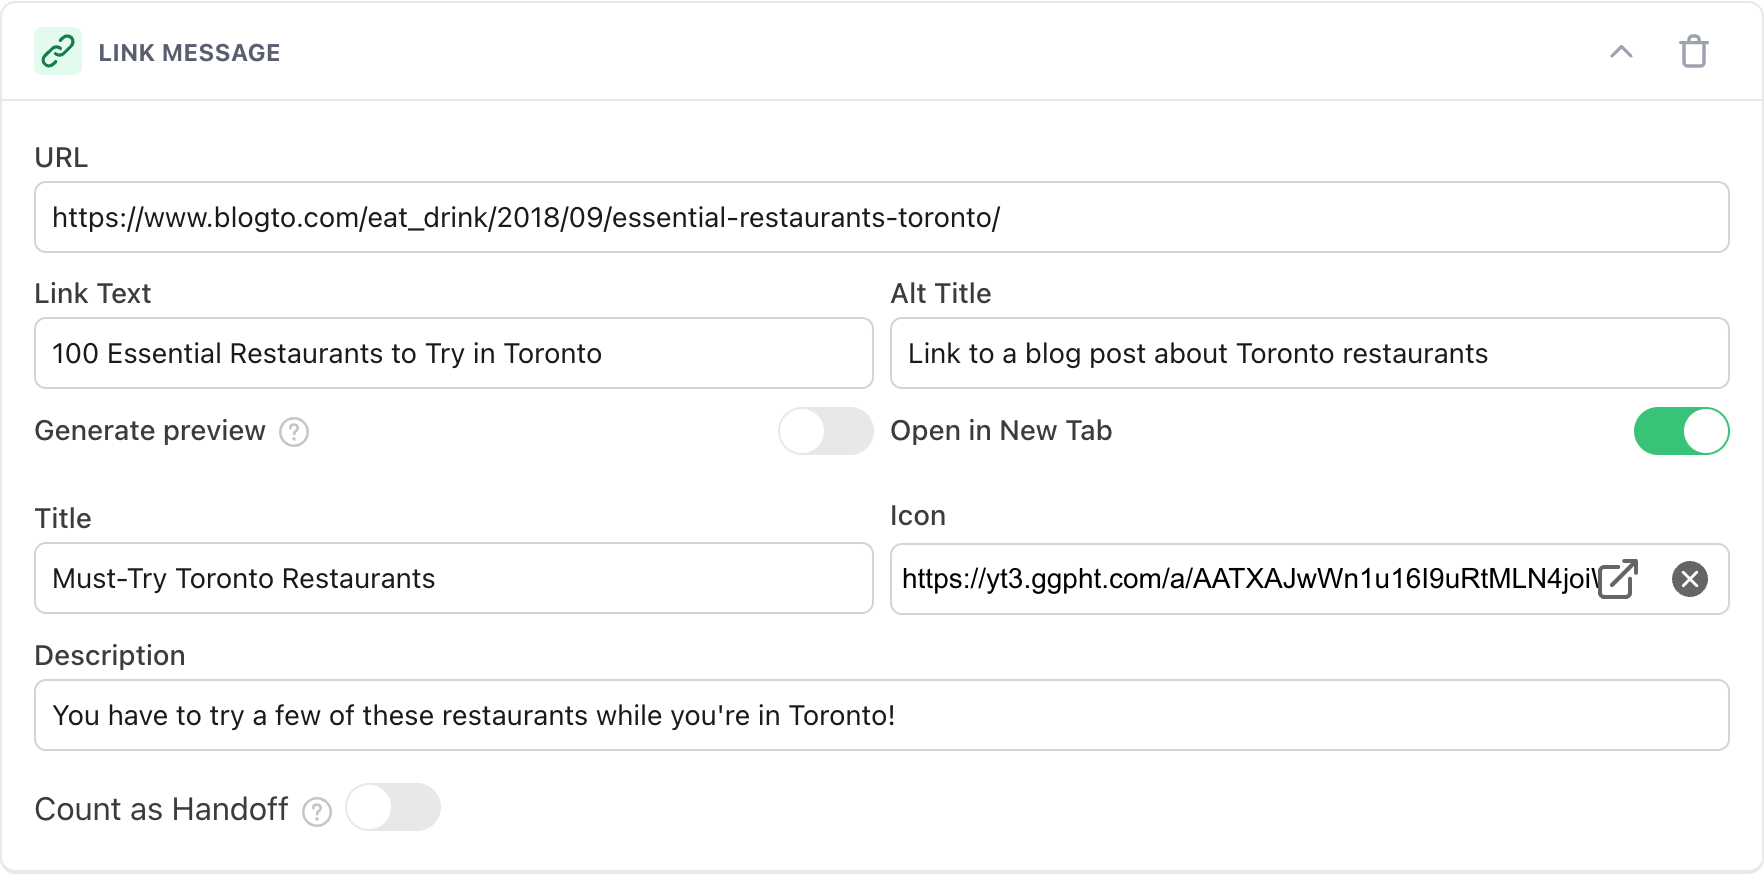
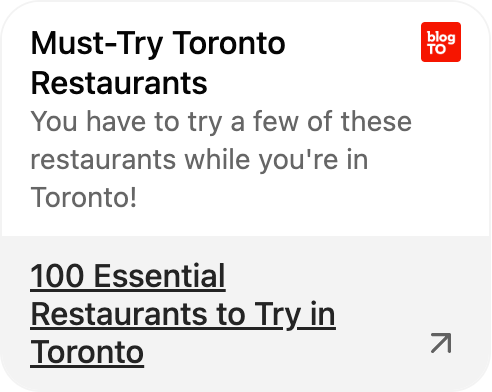
With Link blocks, you can add links to your chat, so you can direct customers to websites like in-depth support articles, or give them the opportunity to communicate with your organization’s support team directly.
Configure the Link block using the table below as a guide:
Scheduled block
The Scheduled block allows you to set days of the week and time ranges for your AI Agent to deliver different responses.
For example, your AI Agent can offer to hand customers off to a human agent when agents are scheduled to be available, or offer to send an email request when agents aren’t available.
Create a schedule
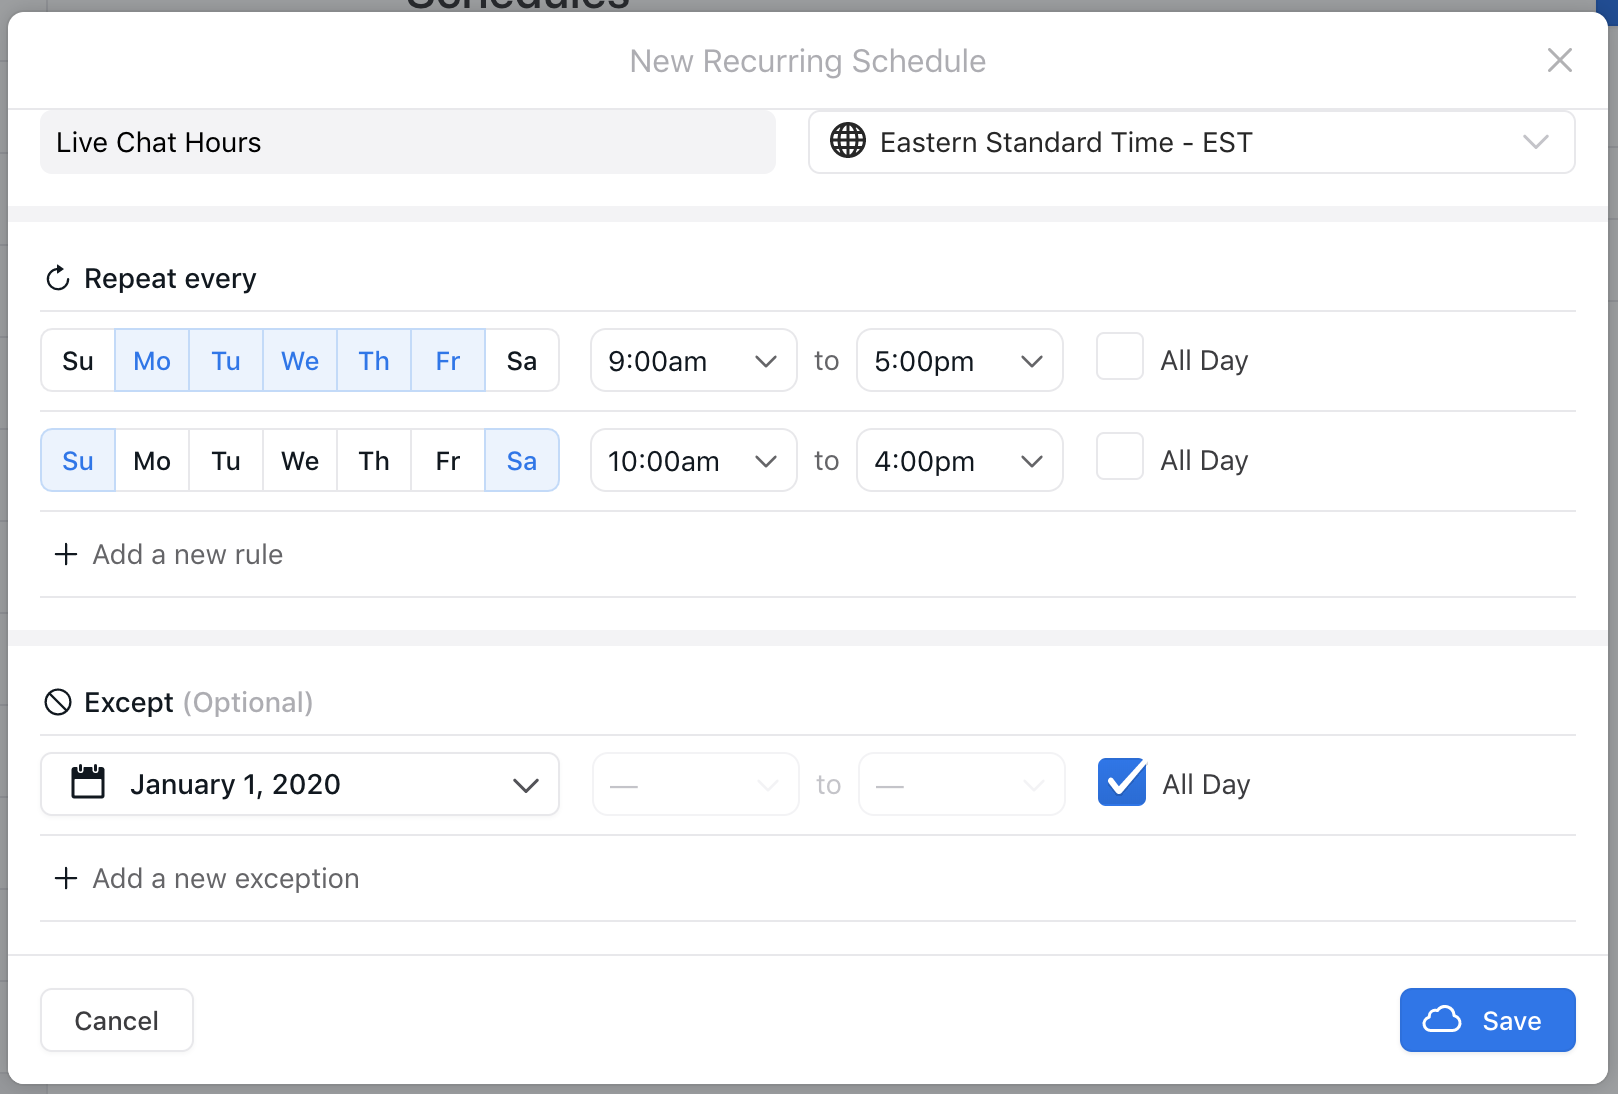
Before you start using the Scheduled block, you need to create a schedule so your AI Agent knows when to deliver different responses.- On the Ada dashboard, go to Platform > Schedules. The Schedules page displays.
- Click New Schedule. The New Recurring Schedule window opens.
- In the New Recurring Schedule window, configure the following settings for your schedule:
- Under Schedule Name, provide a unique name for your schedule.
- Under Timezone, select your time zone.
- Under Repeat every, select the days of the week for your schedule to be active. Then, for the days you selected, select either a window of time or click All Day to make the schedule active for the entire 24-hour period.
If required, click Add a new rule to add additional days and times.
- Optionally, under Except, you can add exceptions to your regular
schedule for events like holidays.
For example, if your regular hours are 9 a.m. to 5 p.m., but on December 10 your hours are 9 a.m. to 1 p.m., create an exception for December 10 from 1 p.m. to 5 p.m., during which you can set handoffs to be unavailable.
If required, click Add a new exception to add additional exceptions.
- Click Save. Your schedule is now available for selection in the Scheduled block.
Add the Scheduled block to your handoff content
- On the Ada dashboard, go to AI Agent profile > Handoff, then open the handoff content you want to put scheduled content into.
- Drag and drop the Scheduled block from the block drawer into your AI Agent’s handoff content.
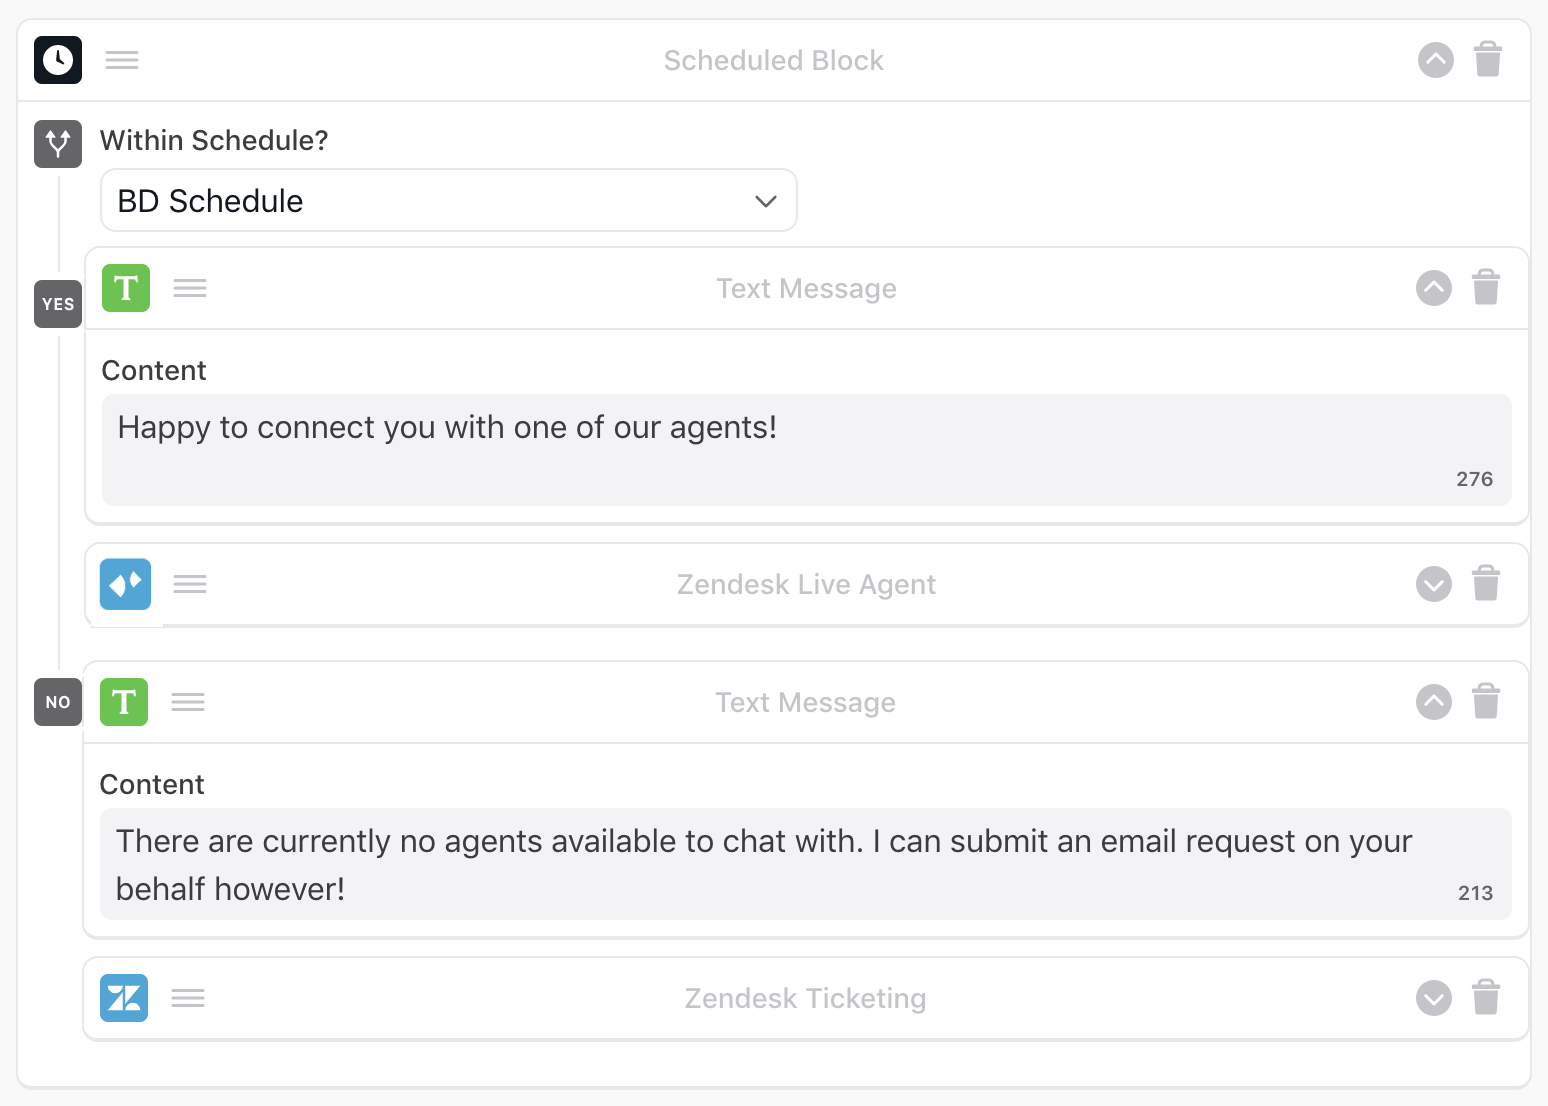
- Under Within Schedule? select the schedule you want your AI Agent to follow.
- Drag and drop blocks into both the Yes and No fields, and add content to them as required.
- If the customer’s question occurs within the date and time range, your AI agent identifies the current state as Yes, and serves the corresponding block content.
- If the customer’s question occurs outside the date and time range, your AI Agent identifies the current state as No, and serves the corresponding block content.
- Make sure you have content in both the Yes and No fields, or else you won’t be able to save your AI Agent.
- You can’t nest Conditional blocks inside Scheduled blocks.
- Click Save. Your AI Agent can now send customers custom content based on your schedule.
Conditional block
With Conditional blocks, you can target specific content to different customers depending on variables associated with them.
You can’t use variables from your Actions when you’re setting conditions. This is because you can’t control when your customer might trigger an Action, so you can’t depend on your AI Agent having that information when it needs to use it.
The Conditional block uses logic to decide whether it should serve content to customerss. Sometimes this is called “if-then-else” logic. Here’s how it works in Ada:
-
If statement: Set up the criteria your AI Agent uses to decide whether to serve the customer with a piece of content.
- Within a single If statement, you can have multiple criteria. You can choose to make all of these criteria necessary (“if x AND y”) or just one of them (“if x OR y”).
-
Then action: Set up the action your AI Agent takes if the customer meets the criteria.
- For each If statement you create, drag in content blocks to serve to customers who meet that condition. If a customer doesn’t meet the criteria, the AI Agent moves on to the next condition and try again, until it reaches the Else condition.
-
Else action: Set up the action your AI Agent takes if none of the above If statements apply. If you don’t set up an Else action, the AI Agent effectively doesn’t have any instructions, and doesn’t perform any of the actions in your Conditional block.
Create conditions to create targeted content
To start using the Conditional block in your handoff content, add the Conditional block and follow these instructions:
- Create a condition. On the dashboard, your first condition is indicated with the
 symbol.
 - If you want your condition to work with multiple criteria, you can choose how that behavior works. Select either If all of or If any of in the dropdown list. With this option, you can create multiple criteria for the same condition, and define the logic that determines whether your AI Agent serves the content for this condition or if it moves on to the next condition.
-
You want to send a message to customers who have both gold level accounts and who live in Canada. In this case, you select If all of, and you create two criteria (the
account_typevariable’s value is equal to “gold”; thecountryvariable’s value is equal to “Canada”). -
You want to send a message to customers who have either silver or gold level accounts. In this case, you select If all of, and you create two criteria (the
account_typevariable’s value is equal to “silver”; theaccount_typevariable’s value is equal to “gold”). - Choose a variable to use as a basis of comparison. There’s no limit to the number of variables you can use.
- Choose an operator. The comparison operators available vary depending on the type of variable you chose in step b; for more information, see the href=“#comparison-operators” Understand comparison operators section of this topic.
- If the operator you chose compares the variable to a value,
configure that value. To the right of the Value field,
click the Options button
 and choose your field options. Then, enter a value to check against the
variable’s value.
 -
Basic: Compare the variable with a value you type yourself.
-
Variable: Compare the variable with a different variable.
-
Match Case: Only allow matches if the case matches for both the variable and your comparison value. For example, if the value you enter is
Word, your AI Agent wouldn’t acceptword,WORD, orwOrdas matches. - To add additional criteria, click the Add button
 and repeat steps ii - iv.
 - Under the condition you just made, drag and drop blocks that you want those customers to see.
- To add additional conditions, click the Add Condition button
 and repeat steps a-b. Additional conditions are indicated with the
  symbol.
 - Lastly, it’s a good idea to set up an else condition, so customers who don’t meet any of your conditions still see
content. The action is indicated with the
 symbol. For this condition, all you have to do is drag content blocks
in. You don’t have to set up this condition, but it’s useful as a best
practice.
Example:
You can’t drag and drop Conditional blocks into a Conditional block, because they’re designed to contain other blocks instead of being contained. If you need more complex logic in your AI Agent, contact your Ada team for assistance.
Understand comparison operators
Comparison operators are logic statements that tell the Conditional block to match customer information that’s captured in the variable you’re using. The available operators vary based on the variable type you’re using:
Handoff block
If you want to put a handoff into your Process, use the Handoff block. When your AI Agent reaches it, it will choose the most appropriate handoff configured in it to hand the customer off to a live agent.
If you have any blocks in the Process after the handoff, your AI Agent won’t use them.
List Option block
The List Option block lets your bot offer customers a list of selectable items. Your AI Agent saves the item the customer selects as a variable that you can use in other blocks (e.g., in a Conditional block). You can create the list of options manually, or populate the list with saved variables.
- If you want the options in your list to populate dynamically from an API call, do the following:
- Set up an HTTP Request block in your greeting.
- Use a data key to save the required portion of the API response as a variable. That portion of the API response is what you’ll use to dynamically generate your list.
- In the text field at the top of the block, enter a message prompting the customer to make a selection. It could be as simple as “Pick an option,” but should also include specific instructions when necessary. This bubble will appear right before the list of options.
- Under Options Source, choose how you want to populate the list items. Then, depending on your choice, configure how you want the list items to appear under Option Setup.
-
Click Manual to use a static list of options. You can type these out yourself, or use variables.
Configure manual list options
By default, when a customer makes a selection, your AI Agent saves the text they selected as the variable value. Optionally, you can define custom values for each option for your AI Agent to save, instead of the text that appears to customers. When configuring manual list options, you have the option of managing those items separately:
- Label: The text that customers see
- Value: The text that your AI Agent saves when the customer makes a selection
If you choose to make custom labels and not separate values, your AI Agent will save the label text upon customer selection instead.
- Under Label, enter the labels you want customers to see. You can type out text, use variables, or use a combination of the two.
To add an option to the list, click Add Option. To delete an option, hover your cursor to the right of an option row and click the Delete button that appears.
- In some cases, you may need to save the customer’s selection in the dashboard differently from how it appears to them. To do this, toggle on the Assign different values from label option. Then, in the Value column that appears, enter the values you want to save in your variables.
If an option label only consists of a variable, and that variable is empty, that option won’t appear to customers.
Different values can be useful in use cases like multilingual AI Agents that have manual translations. You may want to use translated variables so customers see the options in their languages, but behind the scenes, you may want the saved variable to be in English for all customers.
Note that if your AI Agent uses automatically generated text, values are always stored in English in the back end, regardless of the language that customers see.
-
Click Dynamic to use a dynamic list of options from an API response. In this case, you must save an array from the API response so you can use all instances of an attribute in the array to appear as your list options.
Configure dynamic list options
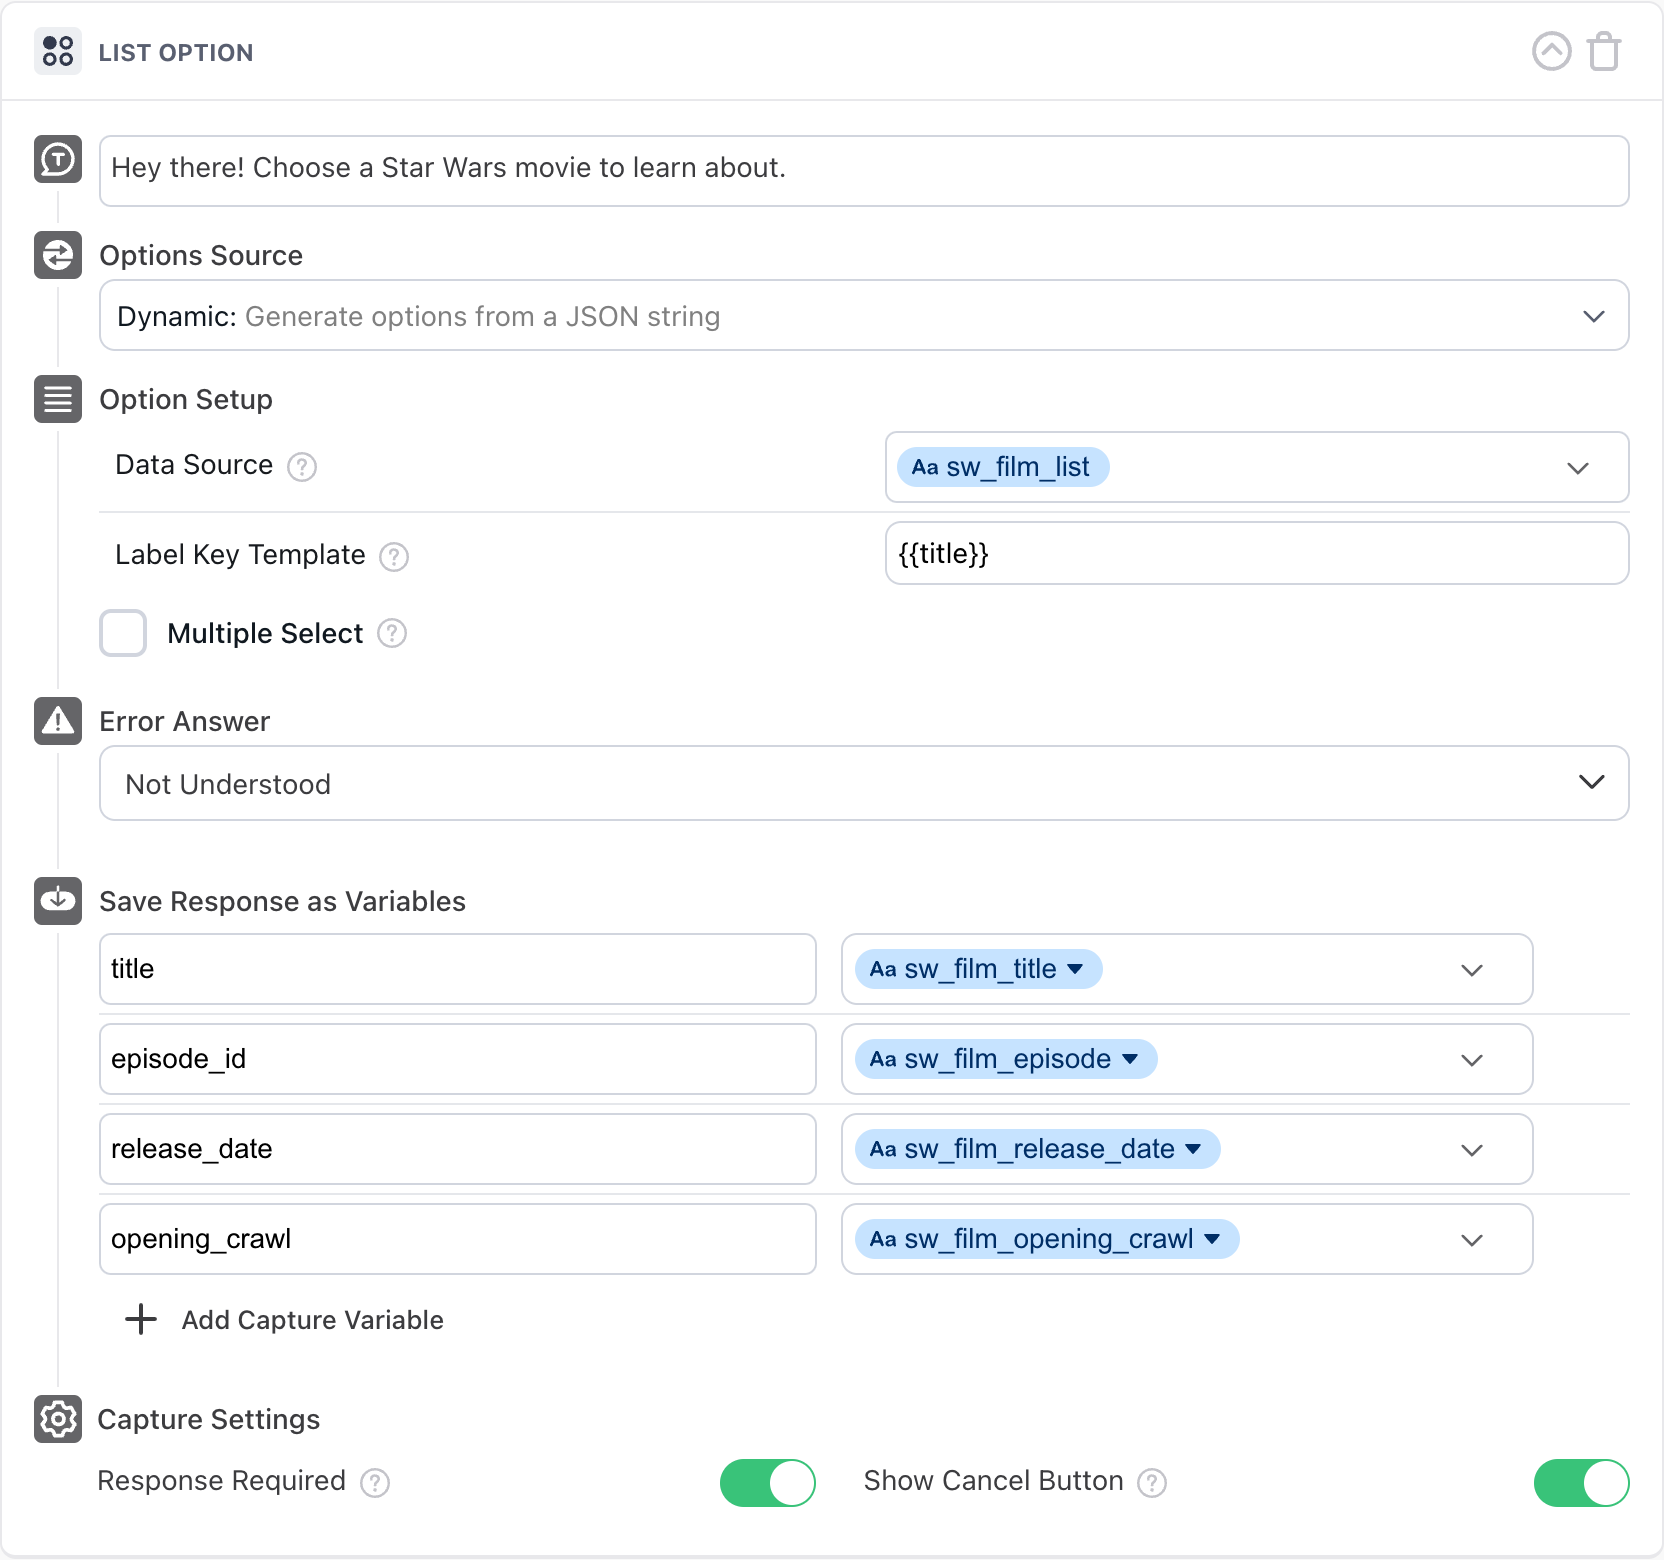
- In the List Option block, beside Data Source, enter the variable you saved the API response portion in.
- Beside Label Key Template, enter one or more attributes that appear in the variable to appear in the list options.
-
To include an attribute, put it in curly braces:
{{item_name}}. -
You can include multiple attributes, and have additional text in the items too:
{{item_name}}, ordered on {{order_date}}.
- Select the Multiple Select checkbox to allow customers to select more than one option.
- Under Error fallback, you can click to edit the AI Agent’s response if an error occurs.
- Under Save Response as Variables/a Variable, create or select a variable to save customers’ responses in, so you can use them later. For more information about the types of variables you can save responses in, see Understand variable types
- Under Capture Settings, choose whether you want to allow customers to advance through the greeting without making a selection.
-
Turn on the Response Required toggle to ensure that customers provide a response before being able to advance through the greeting.
-
If they don’t, and they click Never mind instead, your AI Agent will stop going through the blocks in your greeting and prompt the customer to ask about something else.
-
If the Response Required toggle is off, customers will see a Skip button that they can use to move on to the next block in your greeting.
-
-
If you turned on the Response Required toggle, a Show Cancel Button toggle appears. Turn this toggle on to show csutomers a Cancel button. If a customer clicks it, your AI Agent will stop going through the blocks in your greeting and prompt the customer to ask about something else.
Variables are limited to 100,000 characters. Particularly when you’re saving all or part of an API response as a variable, take care that you don’t exceed this limit. If you do, you may start seeing errors, because your bot might not be able to correctly parse your variable content.
Other than the variable text limit, the only limitation on how many options can be in your list is that every message Ada serves must be under 10KB. Messages virtually never reach this size.
If you turned on Multiple Select, you must save the response in a List type variable.
A completed List Option block looks like this:
Understand variable types
When creating a target variable for your options list, the variable type you choose depends on whether you allow the customer to select only one item from the options list or multiple items. If you have multiple select enabled, you must save the response in a List variable.
-
Text – A Text target variable can be used with any type of option variable.
-
Number – To use a Number target variable, all option variables in the list must be number variables.
-
Yes or No – The Yes or No target variable can only be used when the option variables in the list are also yes or no variables.
-
List – If you allow your customers to select more than one item from the options list, you must save their selections as a List variable. Items collected in a List variable are separated by semicolons.
Once collected using the multiple select functionality, List variables can be used as you would any other variable. Here are a few examples:
-
Added to a block to relay the information back to the user, with each item separated by semicolons (e.g. “The items your shipment was missing are: lipstick; mascara; blush.”)
-
In a Conditional block
Example: When asking a customer to indicate items missing from an order, assume you have separate sets of instructions for csutomers missing one item versus those who are missing multiple items. You can use the Conditional block to serve one set of instructions if the list length equals one item, and the second set of instructions if the list length equals two or more items.
-
Set Variable block
With the Set Variable block, you can automatically define variables in your greeting that you can use in other blocks, without your customers ever knowing it’s happening behind the scenes.
- Under Variable, select a variable to save the value in, or click Make New Variable to create a new one.
- If you created a new variable, enter a Name for it that describes the data it will contain.
- Under Availability, select either Only this Answer to limit the variable’s use to the current greeting, or All Answers to make the variable available throughout your AI Agent.
- Under Type, select the type of information the variable should store, so your AI Agent can help validate chatter responses to fit it.
- Click Save. Your AI Agent saves your new variable.
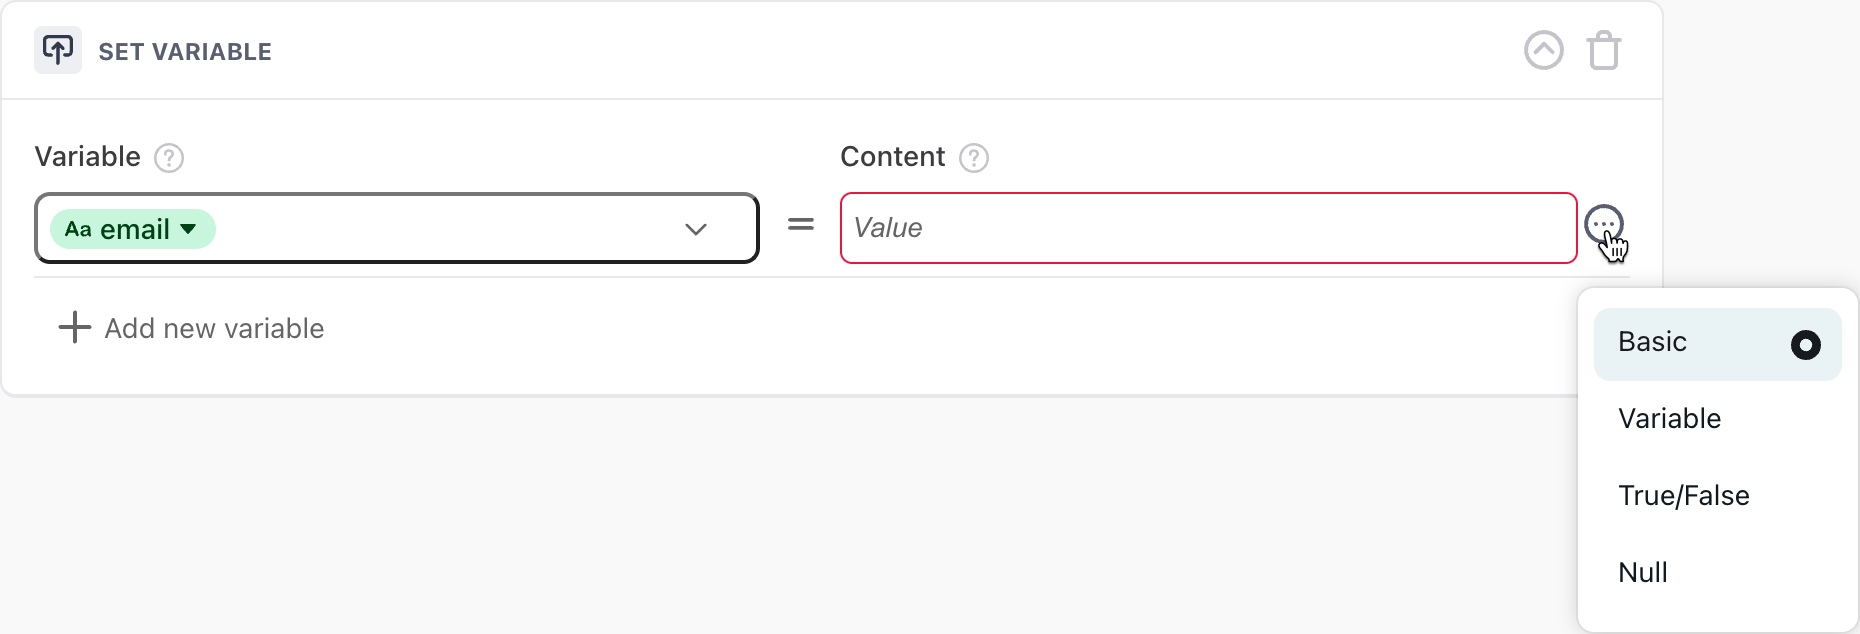
- Under Content, beside the dropdown list, click
the More Options icon
 and select a variable type:
 -
Basic: Save a static text value that you add manually into the variable.
-
Variable: Save the content of another existing variable into this variable. For example, you can save the value of an existing metavariable into this variable.
For security reasons, you can’t save a variable with the value of an authentication variable.
-
True/False: Save either a positive or negative response in the variable.
-
Null: Clear any previously set values from the variable.
- Under Content, enter or select a value to save in the variable. The options you have depend on the variable type you selected, or are absent if you selected Null.
- If required, click Add new variable to add
additional variables to set at the same time.
If the block contains more than five variables, it will be collapsed by default the next time you view the greeting, so you can scroll through the greeting’s content more easily. To expand the block and view all of the variables, click the arrow icon next to the trash can icon in the upper-right corner of the block.
You can’t select metavariables, which your AI Agent sets automatically, or variables that contain list responses.
If this variable already has a value assigned to it at this point in the conversation, this block will overwrite the old value. If you created a new variable, follow these steps to finish creating it:
Instruction block
If you ever need to provide additional instructions to your AI Agent about how to help customers, you can use the Instruction block to coach it directly, so you can provide instructions in plain language without having to worry about writing exact phrasing.
For example, if you have an Action that retrieves a list of the customer’s recent order items, you can use the Instruction block to tell your AI Agent to send the customer a list of those items and ask them confirm which item they’re asking about.
-
We recommend against inserting an Instruction block directly before a block that either captures or uses a variable.
Your AI Agent typically pauses so it can capture information in a variable, or process information in a Conditional block, but it doesn’t pause when it’s gathering information with an Instruction block. Putting an Instruction block before a block with a variable in it might get in the way of the usual pauses for customer inputs and cause odd pacing.
-
If you need to gather information from a customer to run an Action, or evaluate a conditional block, use an auto-capture variable instead.
For example, if you want to present a list of options to a customer, then gather which option your customer wants to proceed with, use an Instruction block to instruct your AI Agent to present the list of options, then an auto-capture variable to gather the option your customer wants to proceed with.
-
To save your new Process as a draft, click Save. If you save it as a draft, it won’t be available to your customers until you publish it.
-
Optionally, you can test your Process, either by clicking Test process to test it in isolation, or by clicking Test AI Agent to also test whether it gets triggered when you want it to.
-
To publish your Process, beside the Inactive toggle at the top of the page, click the toggle so it says Active. As soon as you do, your AI Agent starts using your new Process with customers.
Understand block support by channel
Not all blocks that are available in Processes are supported across all channels.
After creating a Process, when you click Save you will receive a warning message if your Process contains a block or blocks that are not supported for a given channel and it is currently available in that channel.
In order to resolve these issues you can either:
- Remove any unsupported blocks from your Process
- Set availability for the Process to only channels where all blocks in the Process are supported
- Use the Conditional block to prevent specific blocks in a Process from being used in channels where they are not supported
Edit or delete a Process
After you or a colleague create a Process, you can go back to it so you can edit or delete it.
- On the Ada dashboard, go to Training > Processes, then open the Process you want to delete.
- Make your required changes to the Process.
- You can edit the existing Process and then click Save to update it and keep it active.
- You can turn the Active toggle at the top of the page on or off to control whether the Process is accessible to customers.
- You can delete the Process by clicking the More options button
 at the top of the page, then clicking Delete Process.
View and manage previous versions of a Process
Your AI Agent saves a history of all edits you’ve made to your Processes over the last 30 days. You can revert your changes to a Process back to any of these saved versions.
- On the Ada dashboard, go to Training > Processes, then open the Process you want to manage versions for.
- At the top of the page, beside the version icon
 , you can see when the Process was last edited. Click the icon or the text to open a pane that contains a list of versions of the Process over the last 30 days. You can click a version to see the Process at that time.
 - Optionally, for significant versions, you can add a name and description for future edits. To do this, hover over the version, click the More options button
 that appears, filling in the Version Title and Description fields as required, then clicking Save.
 - To revert to a previous version of your Process, select the version you want to go back to. Then, at the top of the page, click Restore Version. Review your changes to ensure you’re not reverting anything you want to keep, then click Save to save your reverted changes.