Configure and use Ada Glass for Kustomer
Overview
Ada Glass for Kustomer integrates your Kustomer environment with your Ada chatbot. The integration equips your bot with the Kustomer handoff block to connect your chatters to your Kustomer live agents. The chatter doesn’t need to leave the chatbot window for this process—the bot conversation, the handoff transition, and the live agent chat all happen within the same interface.
The number of handoff platforms your organization can use varies depending on your subscription package. For more information, see Ada’s Pricing page, or contact your Ada team.
This article outlines the necessary steps required to connect your Kustomer account with Ada. You’ll be working in both the Kustomer and Ada dashboards during the setup process.
Requirements
Be sure to have the following account requirements organized before starting the Ada Glass for Kustomer setup process:
-
Ada Glass for Kustomer — Must be available with your Ada account.
-
Enterprise or Ultimate — Required Kustomer license type.
-
Administrator — Required Kustomer account privilege for completing the tasks necessary to integrate with Ada.
-
User — At least one other Kustomer user account required. The user’s permissions must allow for API key generation and workflow management. Additional users can be added during the setup process.
How a live support handoff works in Ada
When your chatter requires support from a human agent, Ada Glass for Kustomer hands them off to your live support team directly in your Ada chatbot. Handoffs can occur as a predefined action in an Answer flow, or dynamically when a chatter specifically requests human support.
Your bot starts life with a locked Answer called Handoff to Support. Its purpose is to provide a basic handoff process using Ada’s default Email handoff block. Replace the Email handoff block with the Kustomer block handoff setup, and presto! The Handoff to Support Answer can now connect chatters to your Kustomer support team.
There’s more to a handoff Answer than simply connecting a chatter with your support team. Remember also to gather the information required for the handoff, as well as any other relevant info. The idea is to make the experience as efficient, smooth, and helpful for the chatter as possible.
Use Text blocks to set expectations and provide instructions.
Use Capture blocks to collect the following mandatory variables. Name the variables exactly as shown so they map to your Kustomer environment correctly:
-
first_name
-
last_name
-
Email
Capture the chatter’s support issue too. This is not mandatory, but is best practice to ensure a smooth support experience for both your chatters and your agents.
Finally, use the Kustomer block to connect the chatter to your agents, and pass along all the info captured from the chatter.
You can create multiple handoff Answers, each designed to handle a different handoff scenario. Or you can keep it simple and funnel all handoffs through a single Answer. The choice is yours!
Prepare Kustomer for Ada Glass
There are some preliminary steps you need to take to prepare Kustomer for integration with Ada. This guide will help you understand what needs to be done. Where appropriate, we’ve provided links to relevant Kustomer documentation.
Create a user in Kustomer
See also the Kustomer Help Center article Adding Your Agents to Kustomer.
Users are your support agents. In addition to the admin account, you must configure at least one other user account in order to configure Kustomer for Ada. During this process, you can assign User Types and Permission Sets to the users you create.
Follow these steps to configure a user:
-
On the Kustomer dashboard, go to Settings > Users > Users.
-
Click the Add User button.

-
In the Add User dialog box, click the Type of User drop-down menu, then select a user option:
-
Enter the user’s Name and Email address in the corresponding fields.
-
In the Permissions section, select either the Default Permission Sets or Custom Permission Sets tab, then select a Permission Set checkbox to assign that Permission Set to the user.
The user’s permissions must allow for API key generation and workflow management.
-
Click Add User. The newly created user appears in the Active/Pending list on the Users view.
Kustomer Workflows and the Workflow variable
See also the Kustomer Help Center article about Workflows.
Workflows are a Kustomer feature that make it easy to set up custom business logic and automate processes. They are triggered by predefined events in Kustomer. Once triggered, Workflows perform actions, and can use conditional branching. Workflows are a key part of the integration with Ada.
Create Ada Workflows for Kustomer
There are two Workflows you must create to handle support conversations triggered in Ada. Although you can build these Workflows manually, we’ve made it easier for you. You just need to import the JSON files we’ve created for each Workflow.
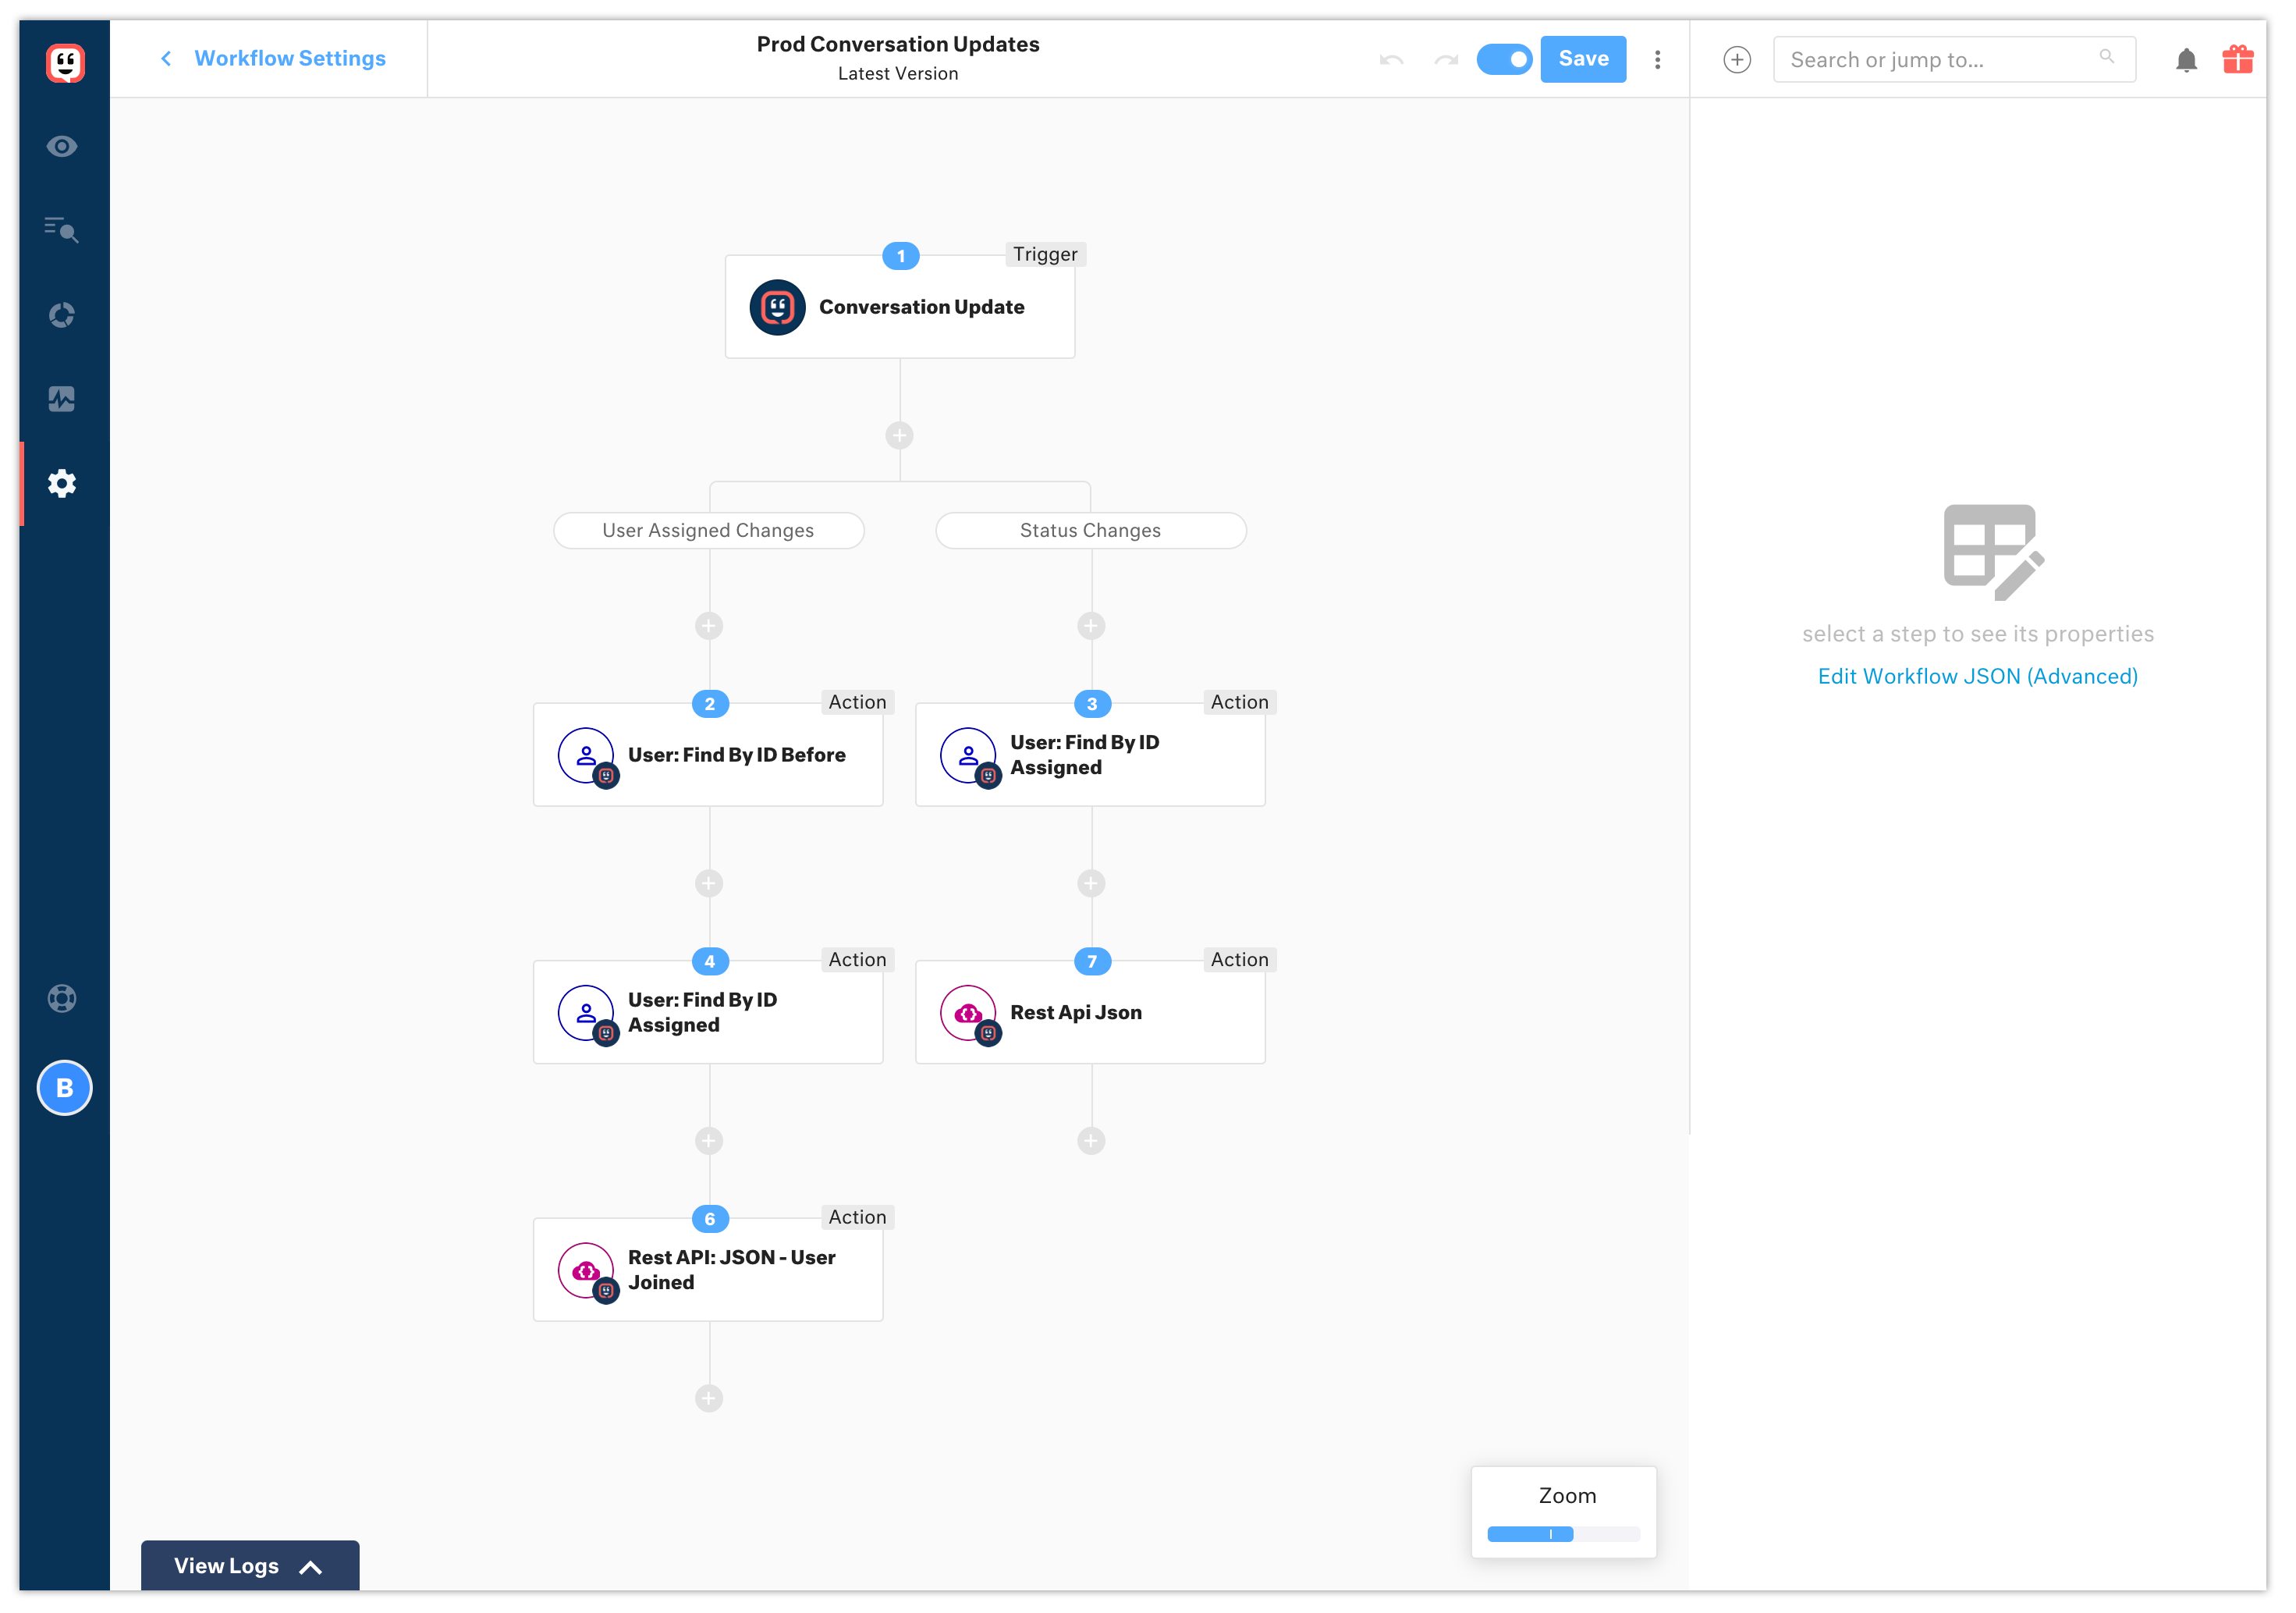
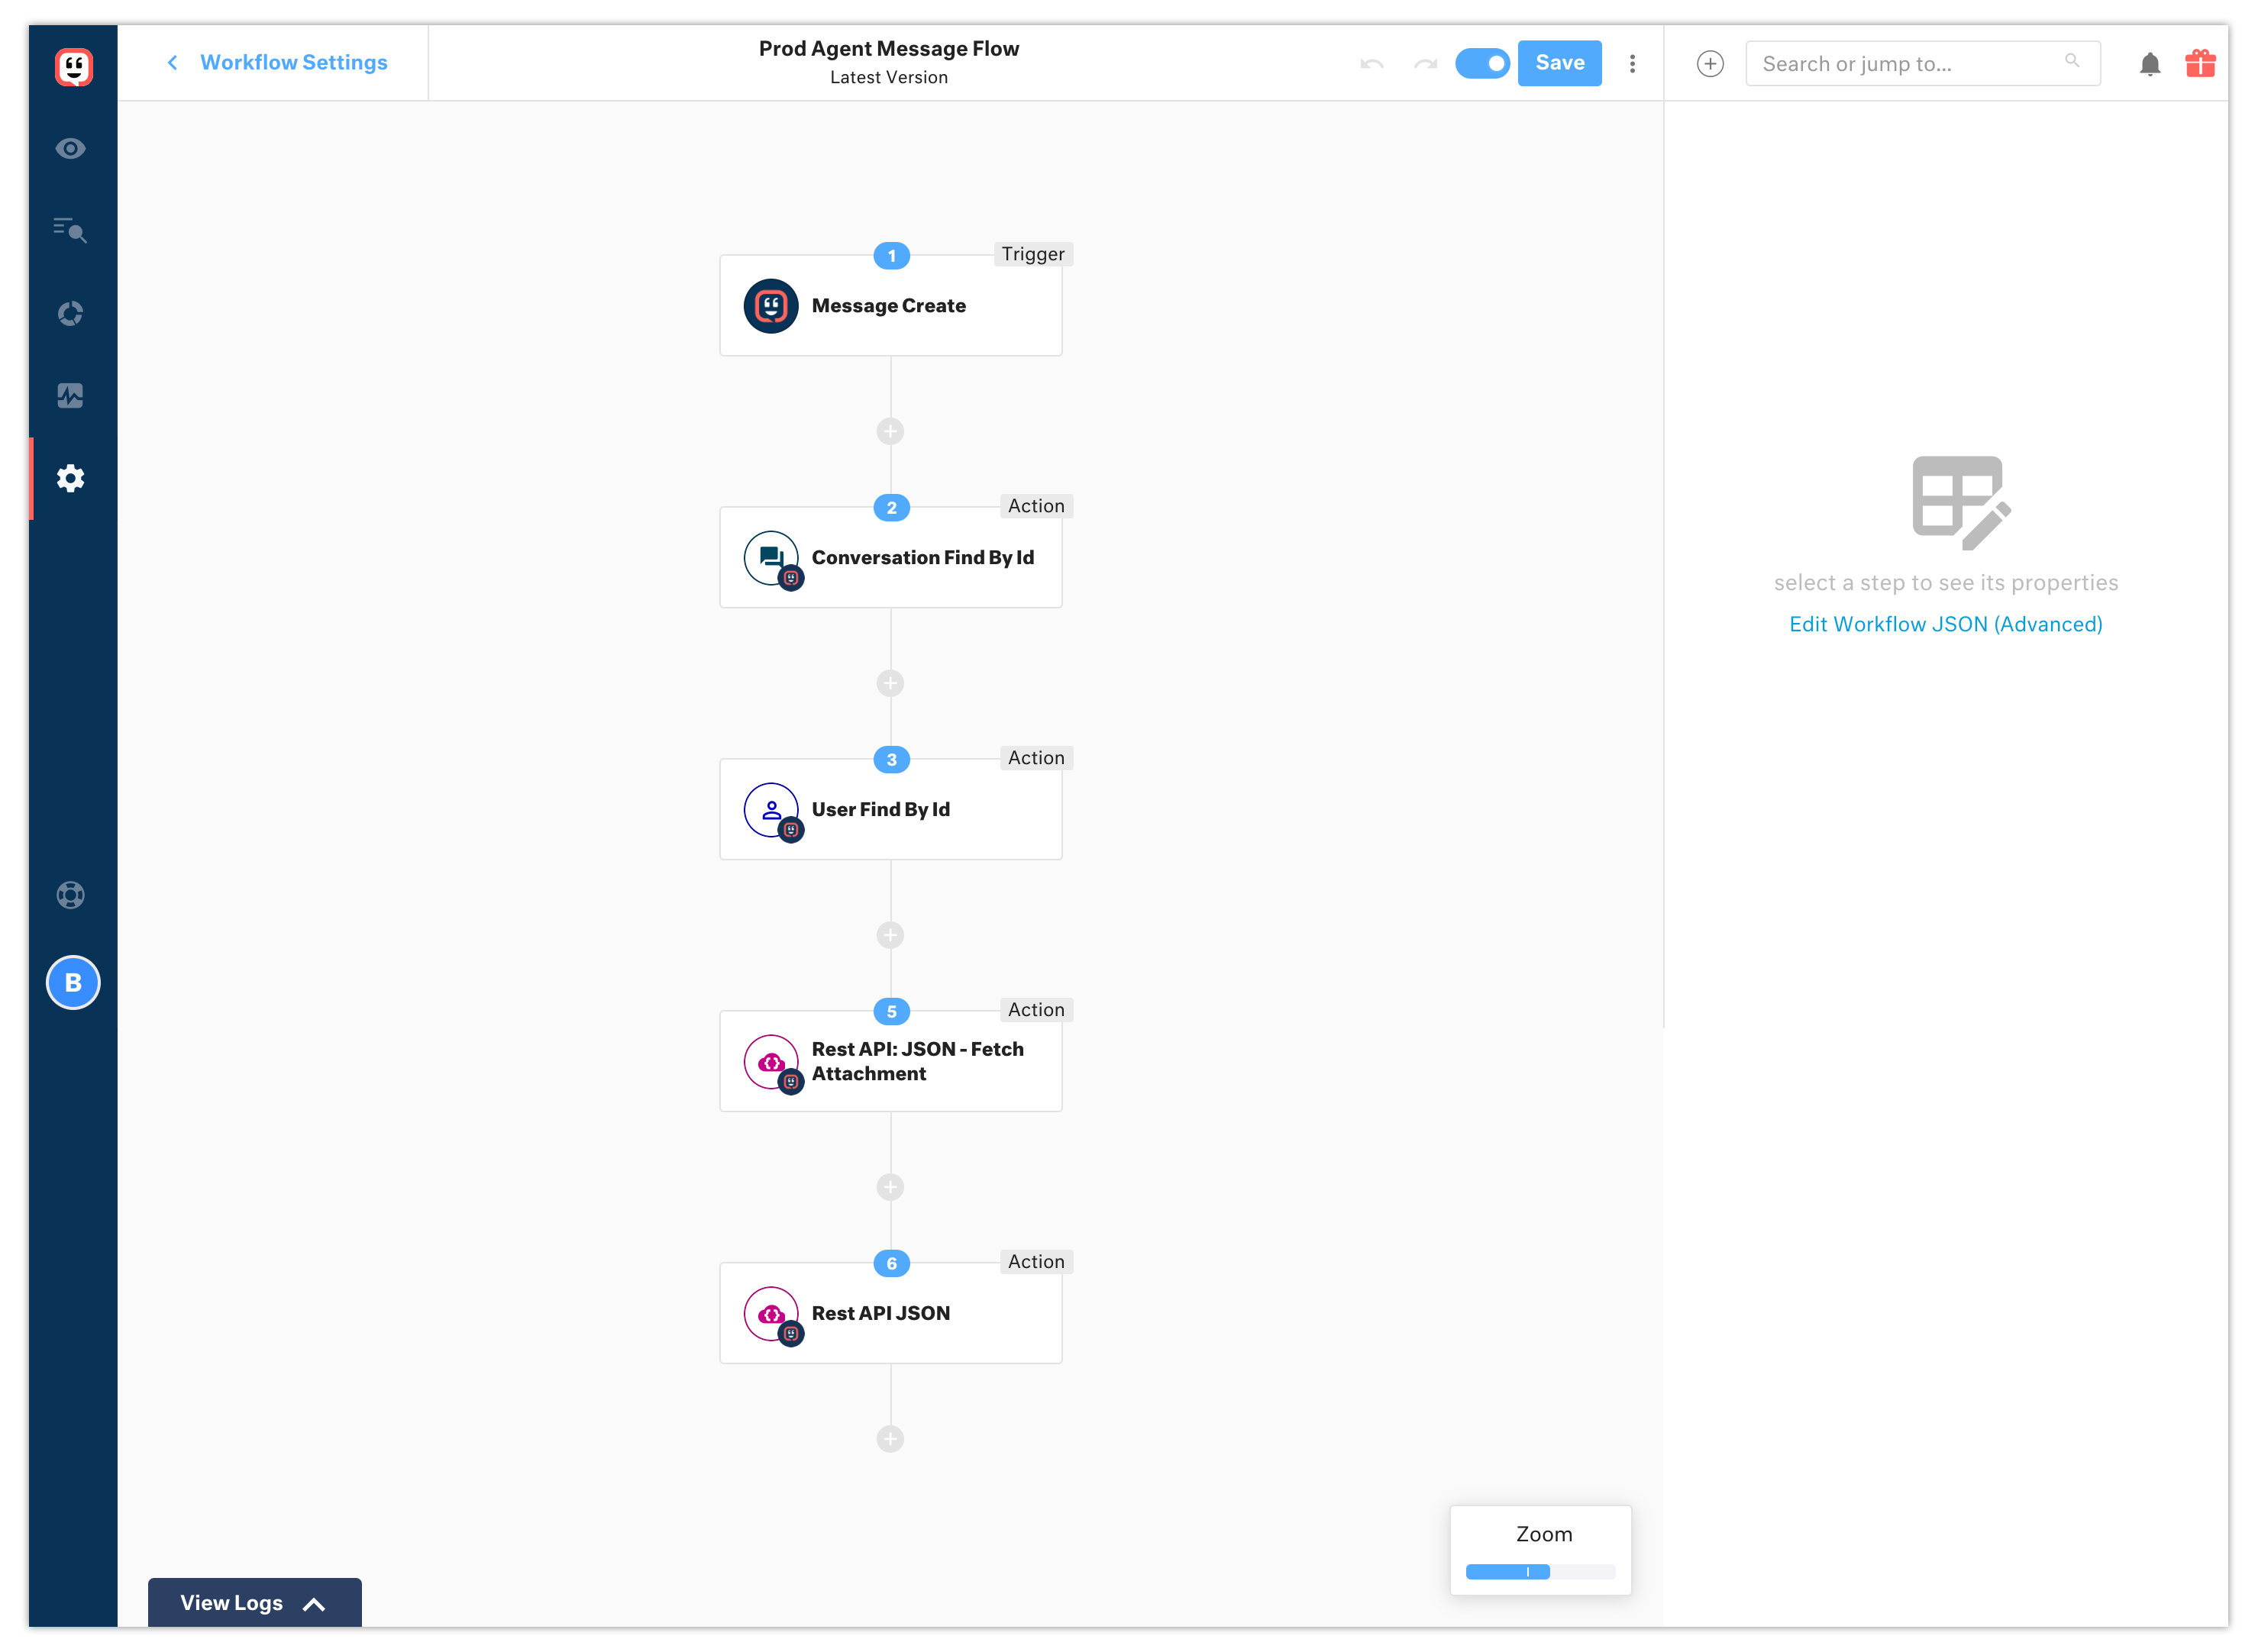
Here’s what they’ll look like once you’ve completed the process:
Conversation Update Workflow
Agent Message Flow Workflow
To import a Workflow, follow these steps:
You need to complete steps 2 to 7 from the following procedure twice—once for the Conversation Update Workflow, and once for the Agent Message Flow Workflow. Use the appropriate JSON file to create each Workflow.
-
Save the following JSON files to your device:
-
On the Kustomer dashboard, go to Settings > Platform > Workflows.
-
Click the Add Workflow button.

-
In the Add Workflow dialog, select Import Workflow, then click Next.
-
In the Import Workflow dialog, you can either:
-
drag and drop the JSON file into the Import Workflow dialog;
-
click Select File to add the file using your device’s file manager.
-
-
Click Import to create your new Workflow.
-
At the top of the dashboard, click Save, then click Save Workflow. Your Workflow now appears in the Workflows list.
-
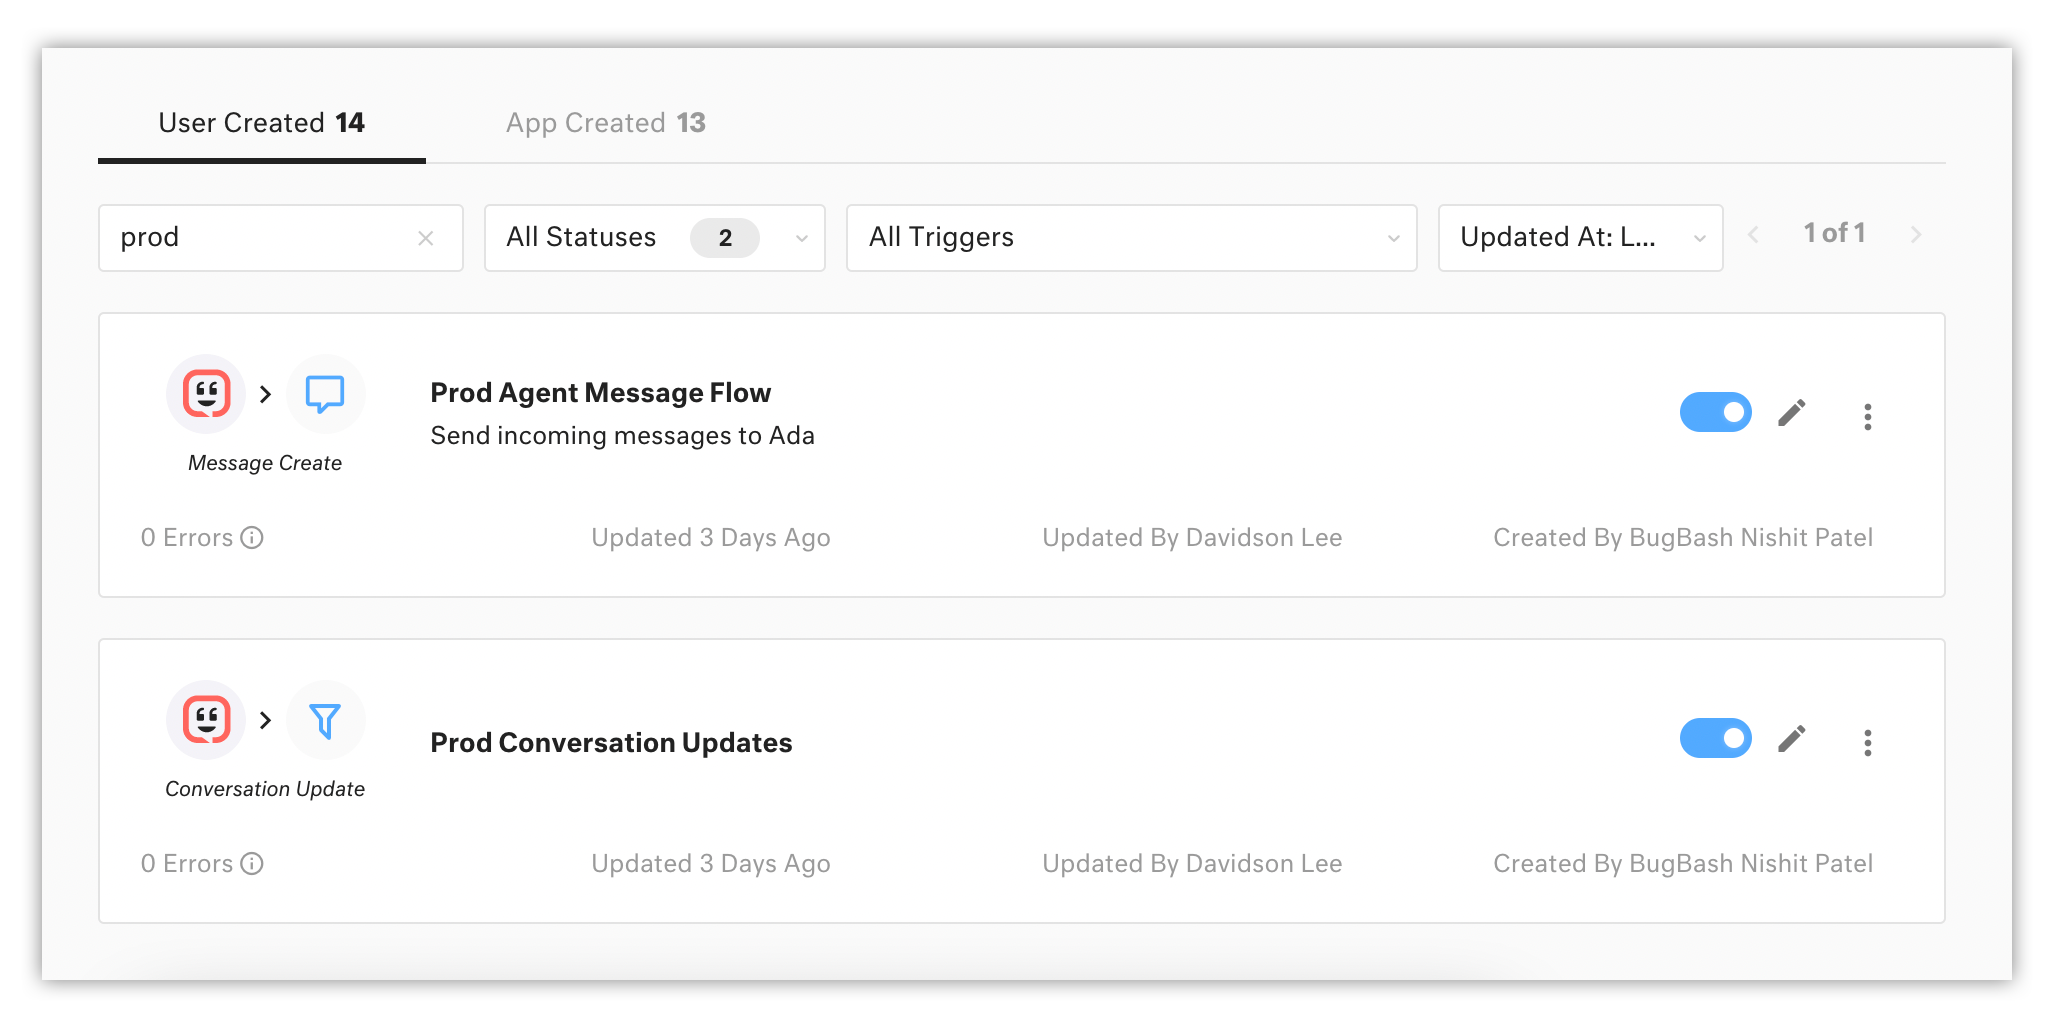
Click the toggle on the right of each Workflow card to enable them.
Generate a Kustomer API key
See also the Kustomer Help Center article Security Settings.
When your bot tries to connect with Kustomer, it does so through Kustomer’s API. The API key is a bit of code that lets the Kustomer API know that your bot has permission to connect with it. It also defines what data your bot is allowed to send and receive. You can generate an API key directly from the Kustomer dashboard.
Only Admins and Custom Roles with Read & Write Security Permissions can access the API Key page.
-
On the Kustomer dashboard, go to Settings > Security > API Keys.
-
Click the Add API Key button.
-
Enter a name for the API Key.
-
Click the Roles drop-down menu, then select the following roles:
-
org.admin
-
org.permission
-
org.user
-
-
Click the Expires (in days) drop-down menu, then select the number of days before the API Key should expire.
To avoid any interruptions in service with your Ada integration, set the expiry to No Expiration. If you set an expiry timeline for your API key, Ada Glass for Kustomer will stop working once the expiry date passes. At that point, you will have to generate a new API key and add it to Ada to reactivate the integration.
-
To restrict access to the token outside of certain networks, enter a value in the CIDR IP Restriction box.
-
In the Token Created dialog box, copy the API token and save it in a secure location.
Do not close the Token Created dialog box until you have copied the API token and saved it somewhere safe. Once the dialog box is closed, you can’t view the token again. You can delete the copy of the token once you’ve completed both the Create the Workflow variable and Configure Ada Glass for Kustomer sections of this topic.
Configure file sharing
When your agent shares a file with your chatter, a REST API transfers the file from the agent’s system to the Ada chatbot window. It does so by saving the file in the Workflow variable, then providing a download link to the chatter.
To set up file sharing, there are two tasks you must complete:
To set up a Workflow variable, you’ll need the API key you created in the Generate a Kustomer API key section of this topic.
Create the Workflow variable
-
On the Kustomer dashboard, click Settings > Platform > Workflows.
-
Click the User Created tab, then click the Agent Message Flow Workflow to open it.
-
Select the Rest API: JSON - Fetch Attachment action.
-
At the top of the dashboard, click the three vertical dots menu, then click Workflow Variables.
-
In the Workflow Variables dialog box, add a variable name to the Name field, then paste your Kustomer API key in the Value field.
-
Click Save. This adds the variable to your Workflow for use by the REST API.
-
Click Close to close the Workflow Variables dialog box.
Add the Workflow variable to the Agent Message Flow Workflow
-
On the Kustomer dashboard, click Settings > Platform > Workflows.
-
Open the Agent Message Flow Workflow.
-
Click the Rest API: JSON - Fetch Attachment action object.
-
On the right side panel, above and to the right of the Headers field, click the key icon.
-
In the drop-down list that appears, click your Workflow variable to copy it.
-
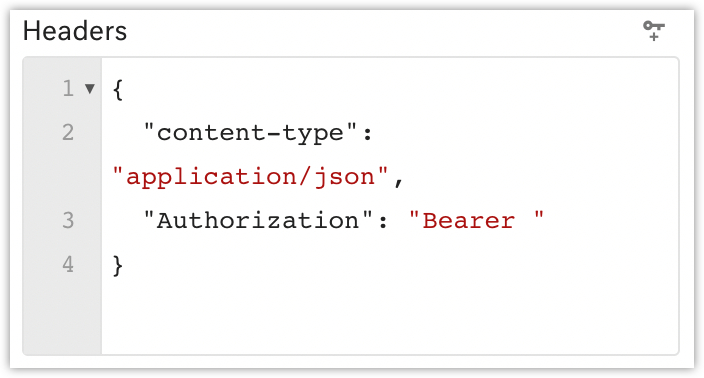
In the Headers field, locate the Authorization line.
-
Paste the Workflow variable after the space following Bearer.

-
Save the Workflow.
The Agent Message Flow Workflow is now equipped and ready to handle agent to chatter file transfers.
Configure Ada Glass for Kustomer
To configure Ada Glass for Kustomer on the Ada dashboard, you’ll need the API key you created in the Generate a Kustomer API key section of this topic.
Once you have the Kustomer API key, configuring Kustomer on the Ada Dashboard is a cinch. Simply add the Kustomer API key to the integration dialog box, and Kustomer in Ada is ready to use.
On the Ada dashboard:
-
Go to Settings > Integrations.
-
Under Handoff Integrations, go to Kustomer Agent Chat, then click Configure.
-
In the API Key field of the Kustomer dialog box, enter the Kustomer API Key.
-
Click Save.
The Kustomer block is now available in your bot’s block drawer in the Answers view.
Use the Kustomer block
This quick guide will help you get your Kustomer handoff Answer up and running.
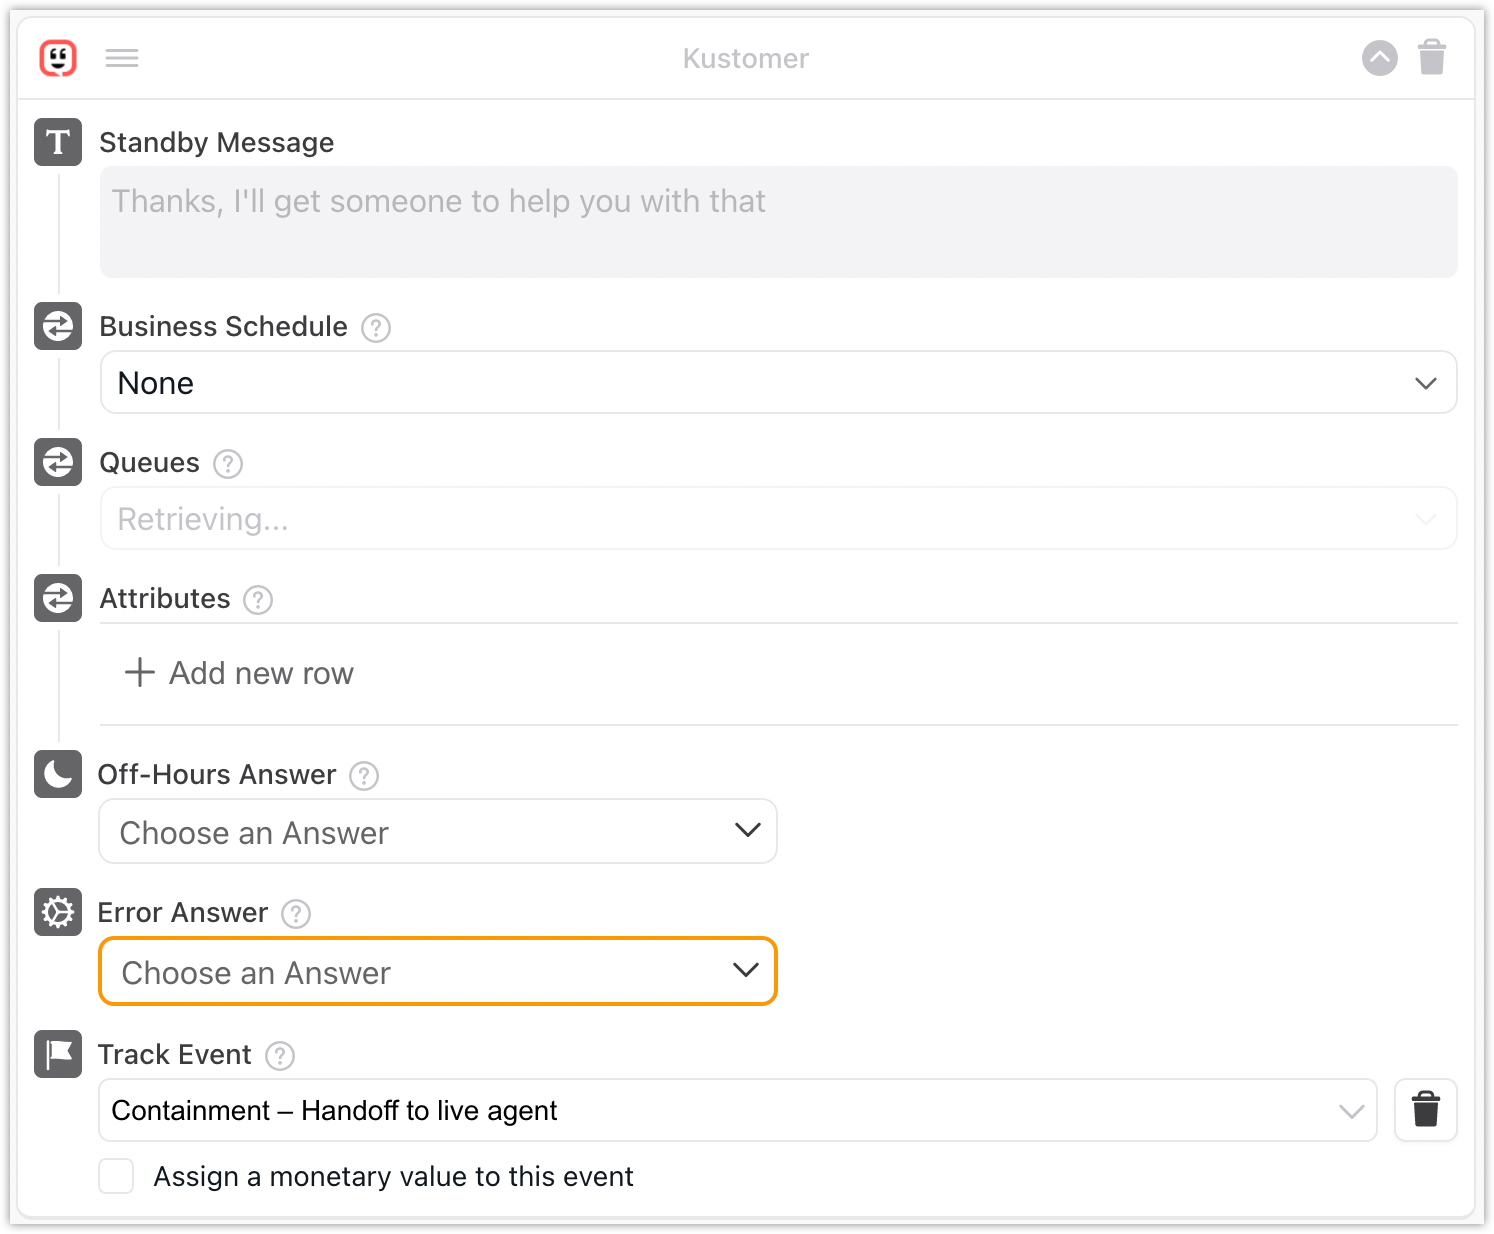
Here are the steps:
-
On the Ada Dashboard, go to Build > Answer.
-
Create a new handoff Answer, or select an existing one.
It is mandatory that you capture the following three variables before attempting to connect the chatter with your Kustomer support team. Ensure the variables are titled exactly as listed: first_name, last_name, and email.
-
In the Answer workspace, add a Capture block and configure it to capture the chatter’s first_name.
-
Add a second Capture block to capture the chatter’s last_name.
-
Add a third Capture block to capture the chatter’s email address.
-
Drag and drop the Kustomer block into the Answer at a point past the Capture blocks created in steps 3 to 5.
-
Configure the Kustomer block using the following table as a guide:
-
Click Save.
Your Kustomer handoff Answer is ready to go. Add training to this Answer so that the bot can respond to requests for agent support. Connect this Answer, or other specialized handoff Answers, to Answer flows that may require an agent’s intervention.
File sharing
Ada Glass for Kustomer supports agent to chatter file transfer; however, it does not currently support file transfer from the chatter to the agent. See Configure file sharing above if you haven’t yet completed the file sharing setup.
To share a file with a chatter:
-
On the Kustomer dashboard, in the chat view, click the paperclip icon below the message field.
-
Click Add Files.
-
Select a file from your system’s dialog box, then click Open.
You can also drag and drop a file from your system into the Attach Files dialog box.
A download link is added to the chat window. The chatter can click this link to download the file.
The Ada Glass Experience for Agent and Chatter
The Ada Glass handoff experience is designed to be a smooth and seamless transition. When your chatters arrive at a situation where human support is required, they’ll be connected instantly with your support team—right in the chatbot window. On your agents’ end, they connect and engage with incoming chats from Ada just like any other support request.
Let’s take a closer look at what both your chatters and your agents can expect during an Ada Glass for Kustomer handoff.
Chatter
The chatter experiences the conversation with the agent much the same way as they do with the bot. Handoff Answers work just like any other Answer. The only difference is that, at some point within that Answer’s flow, the chatter is connected with a human agent who takes over the conversation from the bot.
-
The chatter asks for live support, or chooses a path in a conversation that leads to a handoff Answer. This triggers the handoff Answer.
-
The chatter then makes their way through the handoff process, providing any relevant information you ask of them.
-
Once the Kustomer block is triggered, the chatter is placed in a queue. A standby presence message displays, and bot messaging is paused while the chatter waits.
-
Once the agent connects with the chatter, the bot’s icon switches to the agent icon. The message “You’re now chatting with [agent’s name]” displays.
Ada Glass for Kustomer does not currently support custom agent icons.
-
The agent and chatter can now converse freely in the chat window.
-
Once the chat is complete and the agent ends the conversation, the message “[Agent’s name] has left the chat” displays.
-
The bot re-engages the conversation and proceeds with the remaining Answer blocks, if any. If there are no blocks remaining, the bot waits until the chatter asks a new question before responding.
It is best practice to have the bot display a post live chat message, such as “If you have any more questions, go ahead and ask.” This creates a smoother experience and lets the chatter know the bot is available once again.
Agent
The following is an outline of the agent’s experience, from the time the chatter connects to Kustomer from your Ada chatbot, to the end of the support conversation.
When Ada connects a chatter to Kustomer
-
The handoff arrives under All Open Chat Conversations on the Kustomer dashboard.
-
The agent clicks the conversation to open it.
-
Once the conversation opens, the agent receives a transcript of the bot conversation up to the point of the handoff, as well as the Transcript Summary created by Ada.
-
The contact record, called Chatter Info in Ada, also arrives.
-
The agent can now send the first message to the chatter to begin the support conversation.
The support conversation
-
Once the agent sends their first message, the conversation with the chatter officially begins.
The presence message the chatter sees in the bot window letting them know they are connected to an agent won’t appear until the agent sends the first message.
-
The agent and chatter can proceed with the support conversation.
-
Snoozing is not supported. If the agent snoozes a chat, the live chat conversation ends for the chatter. The agent cannot connect with the chatter at the end of the snooze period.
-
To end the conversation, click the grey checkmark at the top of the conversation window.
-
The checkmark changes color to green, and the conversation is marked as Done.
-
The chatter is released from the live chat, and the “[Agent name] has left the chat” presence message displays in the chatbot window.
-
If the agent re-opens the live chat conversation they will not be able to reconnect with the chatter.
-