Start customizable interactions using advanced proactive campaigns
Overview
Advanced Proactive Campaigns transform your customer support from reactive to proactive. Solve issues before they become issues, creating an unparalleled customer experience. For key pages on your website, think about common questions, issues, or requests that your customers might have. Then create a Campaign to proactively address those questions, issues, or requests.
This feature may not be included with your organization’s subscription package. For more information, see Ada’s Pricing page, or contact your Ada team.
- Requirements
- How Advanced Proactive Campaigns work
- Create a new Campaign
- Configure a new Campaign
- Publish Campaign
- Prioritize Campaigns
- Campaign Reporting
- Track Campaign Results Using Events
Requirements
Your Ada integration must meet certain requirements before you can use Advanced Campaigns:
-
Embed2 – Your integration must use Ada’s Embed2 script. If you’re still using Embed1, Proactive Campaigns won’t work.
-
Proactive Campaigns supports bots deployed on the web and mobile web. Campaigns currently don’t support mobile applications.
-
Custom CSS styling of the Ada widget could affect the appearance of your Campaigns.
How Advanced Proactive Campaigns work
The logic behind when to trigger an Advanced Proactive Campaign is based on either a URL or code linked to custom events, along with simple timing parameters.
Create a new Campaign
How to set up a new Advanced Proactive Campaign:
-
On the Ada dashboard, go to Build> Campaigns.
-
Click New Campaign. The Create a new Campaign dialog appears.
-
Select Web from the Choose a channel dropdown.
-
Add a Name and Description to the corresponding dialog fields.
-
Click Next. The dialog disappears to reveal your new Campaign’s configuration settings.
Configure a new Campaign
There are a few configuration options available for your Advanced Proactive Campaign. Let’s look at how to set them up.
Campaign Triggers
Campaign Triggers define the parameters in which the Advanced Proactive Campaign will be surfaced.
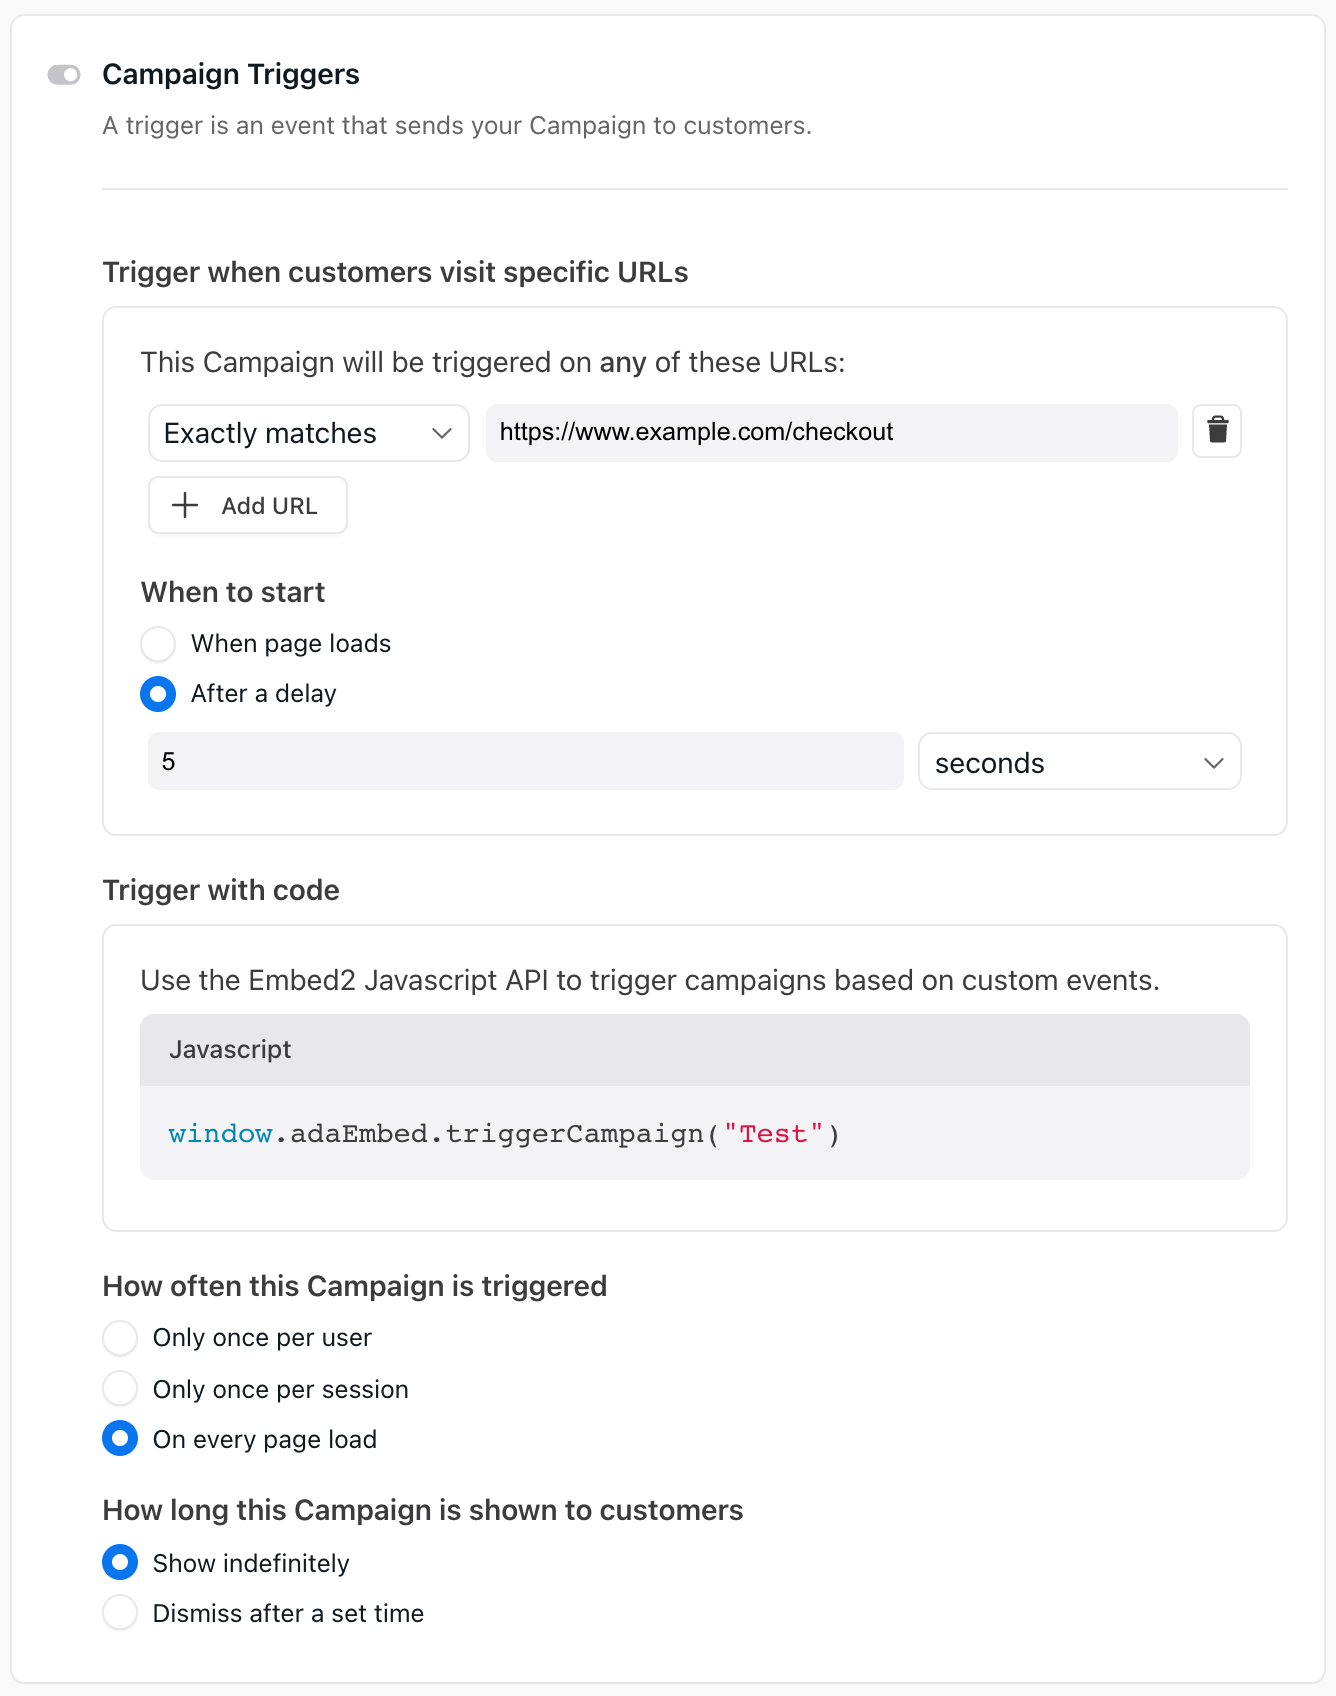
Trigger when customers visit specific URLs
The Campaign will be triggered on any of the URLs you provide. To add URLs to your Campaign Triggers:
-
Click + Add URL.
-
Select the appropriate URL matching option from the drop-down menu. To learn more about URL matching, please see the table here:
-
Input the full URL or URL component.
-
Repeat for additional URLs where you want the Campaign to be triggered.
Trigger with code
Use advanced JavaScript triggers to create dynamic and engaging proactive campaigns on your website. These triggers allow you to customize when and how campaigns are shown, based on user actions like hovering, clicking, scrolling, or interacting with elements on the page. Below are detailed examples for common use cases.
Trigger a Campaign on Button Hover
Engage users by initiating a campaign when they hover over a specific button. For instance, hovering over a “Book a demo” button can prompt a chat encouraging registration.
This method is ideal for drawing attention to specific actions like booking a demo or scheduling a call.
Trigger a Campaign on Text Hover
Initiate a campaign when a user hovers over specific text, such as a link to learn more about features. This is a subtle way to engage users while they explore your content.
Trigger a Campaign on Click
Launch a campaign when a user clicks on an element, such as a “Renew my subscription” button. This method is effective for offering support or promotional campaigns tied to specific user actions.
Trigger a Campaign on Page Scroll
Start a campaign when a user scrolls through a certain percentage of the page. This is useful for re-engaging users as they browse your content.
Trigger a Campaign on Exit Intent
Detect when a user intends to leave the site and trigger a campaign to retain them. This can be used to offer discounts, collect feedback, or provide helpful resources.
Trigger a Campaign When Adding Items to Cart
Recommend additional products or promotions when a user adds an item to their cart. This use case is common for ecommerce platforms.
Trigger a Campaign When Removing Items from Cart
Engage users with alternative suggestions when they remove items from their cart. This is a great way to mitigate cart abandonment.
Customize Campaigns Based on Metadata
Use the setMetaFields action to tailor campaigns based on user-specific data, such as cart value, to offer personalized promotions like free shipping.
In this example, the cart value determines whether a free shipping upsell campaign is triggered.
Set how often this Campaign is triggered
Click to set the Campaign’s trigger frequency:
-
Only once per user
This setting may behave differently depending on your bot’s Chatter Persistence settings. It works best if your Chatter Persistence is set to “Never Forget” - in that case, a chatter only sees the Campaign once, and never again. However, if your bot is set to forget chatters after closing or reloading the page, or after a set period of time, chatters may see the Campaign more than once.
-
Only once per session
-
No restrictions
This option only applies to URL-triggered Campaigns. Code-triggered Campaigns may behave differently, depending on the nature of the code that triggers it.
Set how long this Campaign is shown to customers
Click to set how long the Campaign is shown to customers:
-
Show indefinitely
-
Dismiss after a set time (customizable in seconds or minutes)
Campaign Content
Campaign Content is the messaging for your Campaign. There are two parts to Campaign messaging. First, the Answer your web visitors see pop out from the chat button on your webpage. Interested visitors can click the message or the chat button to engage your bot. And second, the optional follow-up Answer, tailored specifically for this campaign. If a follow-up Answer has been enabled for the Campaign, it will be the Answer provided in the chat window when a web visitor initiates the chat.
To define the Campaign’s Content:
-
Choose an Answer from the drop-down menu or click Create a new Answer if an appropriate answer does not already exist.
-
Click to enable Use a follow-up Answer (optional).
-
Choose an Answer from the drop-down menu (optional).
If a Campaign Answer has both a follow-up Answer and Quick Replies, the expected behaviour is:
-
Chatter clicks on a Quick Reply button —> the Answer triggered by that Quick Reply button displays in the chat window.
-
Chatter clicks on another element of the Campaign (ex. a text bubble) —> the follow-up Answer displays in the chat window.
The Campaign will only display Text, Link, Picture, and Video blocks, even if the Answer contains other blocks.
Scheduling
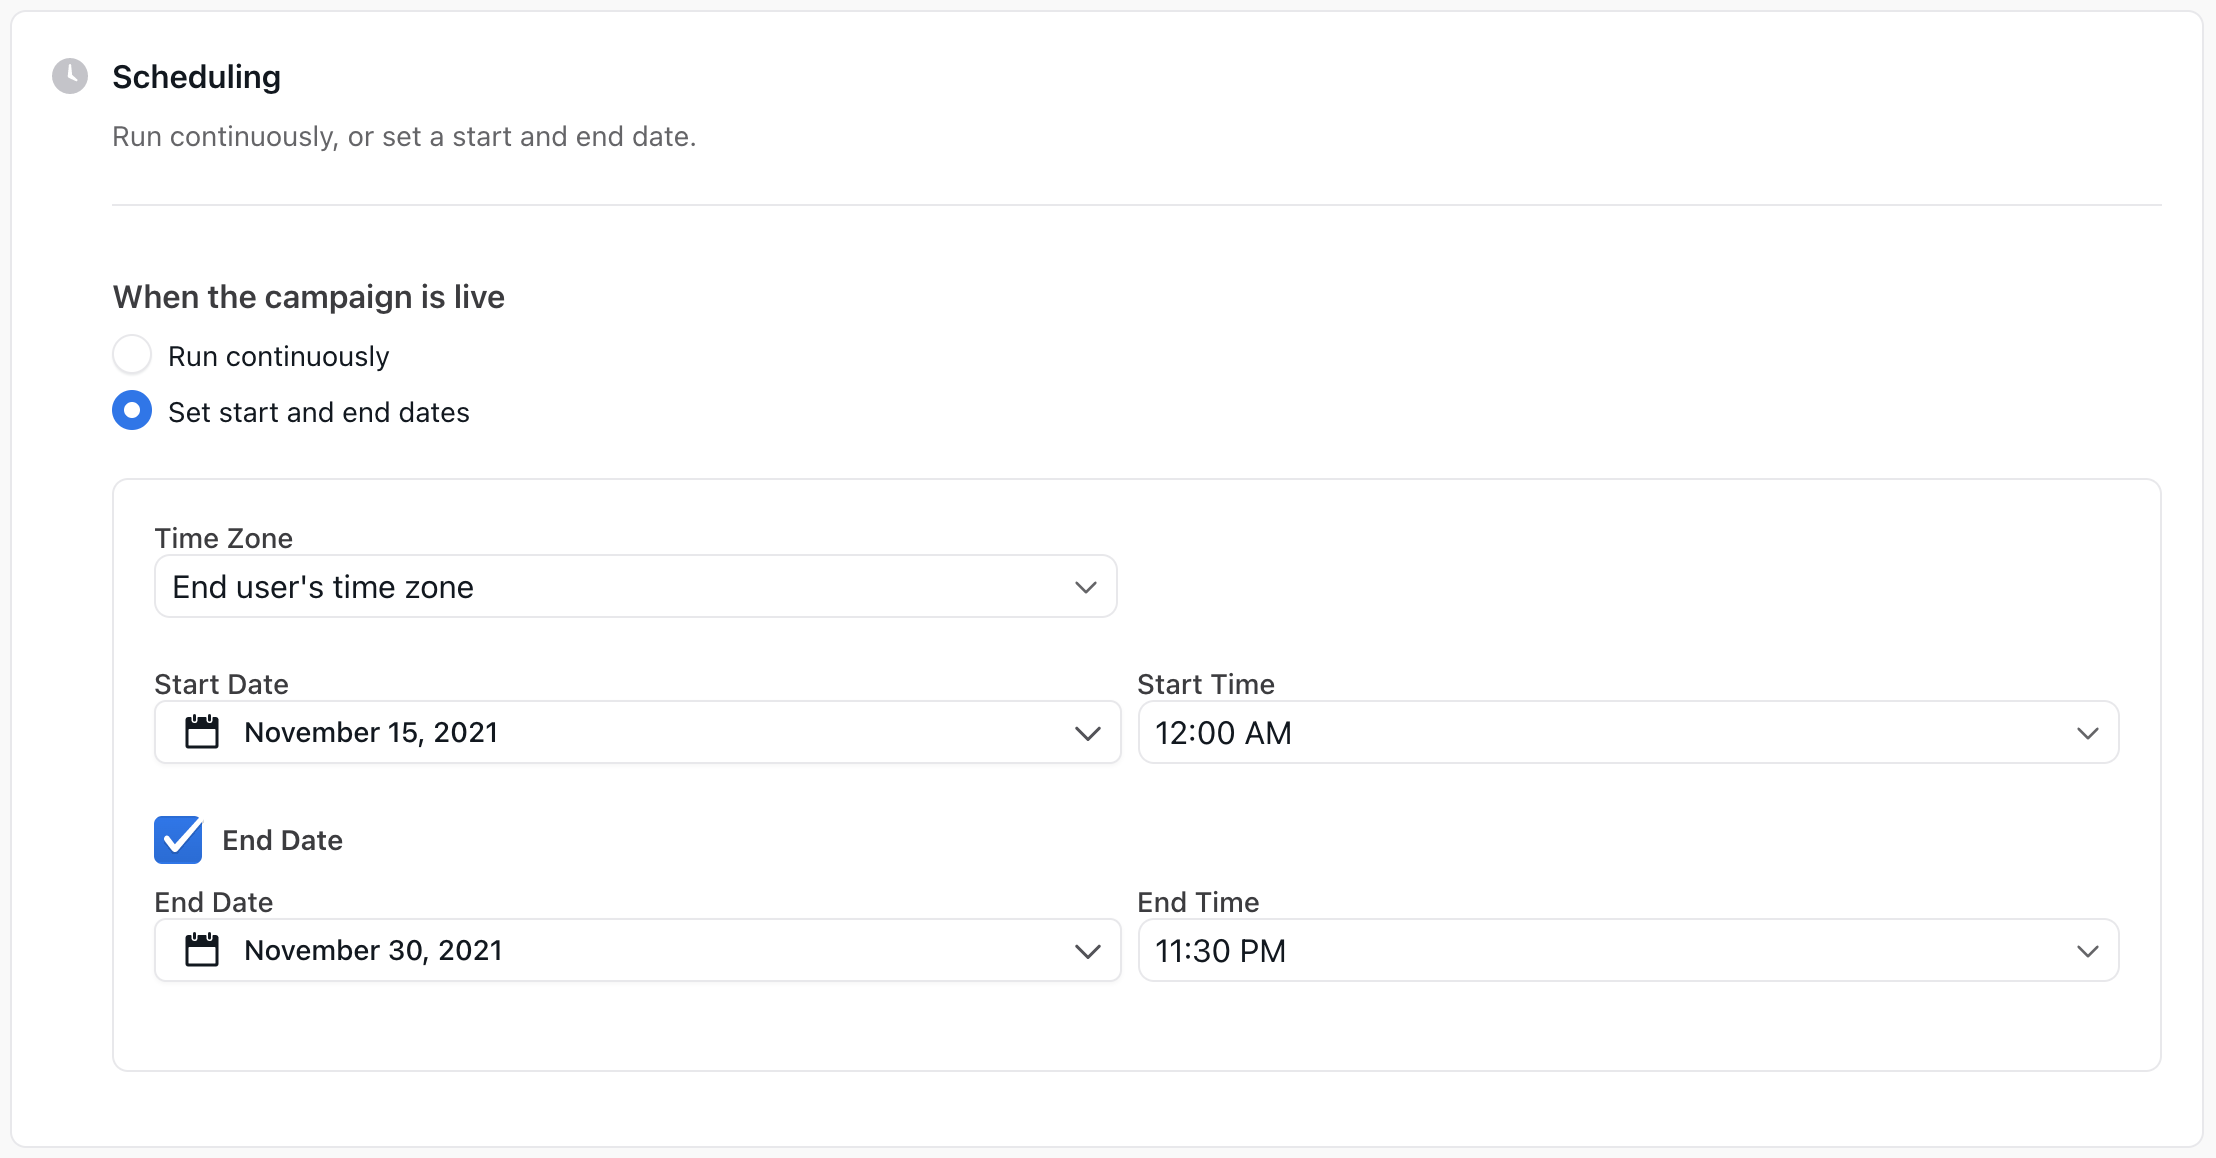
Control of when the Advanced Proactive Campaign is active is in your hands. It can be scheduled to run continuously or start and end dates can be set.
If you select Run continuously the published campaign will run until you choose to unpublish it.
If you select Set start and end dates the published campaign will run according to the following settings:
-
Time Zone - Select End user’s time zone or Choose a fixed time zone
-
Start Date
-
Start Time
-
End Date (optional)
-
End Time (optional)
Embed code
You must include the Ada Embed Code on every webpage where you want to trigger this Campaign. Learn more about Ada Embed2.
Publish Campaign
If you want to continue making changes before publishing the Campaign, click Save For Later. If you are ready to launch the Campaign, click Publish.
Bots are limited to 100,000 Advanced Proactive Campaign sends per day. Once this limit is reached the bot will no longer send Advanced Proactive Campaign messages.
Prioritize Campaigns
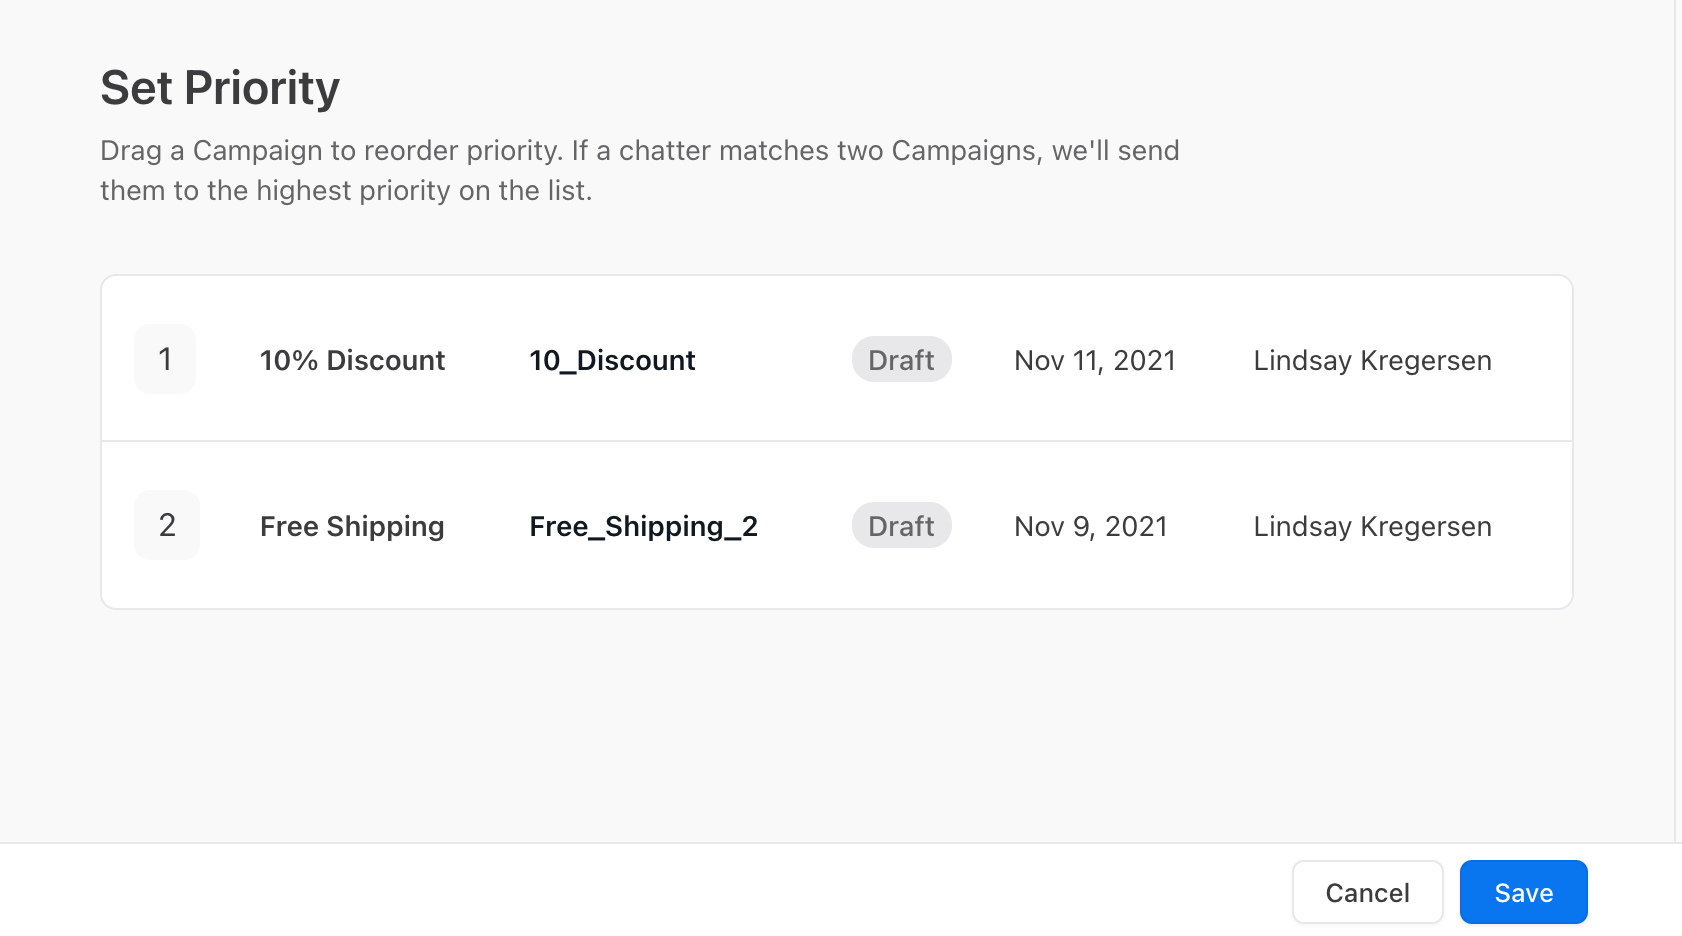
A webpage can only surface one Campaign at a time. It is possible, though, for a webpage to have two or more Campaigns assigned to it. In this case, rank your Campaigns based on priority. That way your website visitor only encounters the Campaign you want them to see.
To reprioritize your Campaigns:
-
Go to Build > Campaigns.
-
Click Prioritize.
-
In the Set Priority dialog, drag and drop your Campaigns to reorder their priority.
-
Click Save.
How prioritization works
Let’s say you have two Campaigns:
-
Campaign 1—Free Shipping. This is assigned to the base URL
www.test.com. -
Campaign 2—10% Discount. This is assigned to the specific URL
www.test.com/promo.
As you can see, both Campaigns are valid for the specific URL
www.test.com/promo. But you want to make sure that, on that page, your
site visitors only ever see the 10% Discount Campaign. You do this by
moving the 10% Discount Campaign to position 1 in the priority list.
Now, any visitors to this specific URL are shown only the 10% Discount
offer.
Campaign Reporting
You’ve published your Advanced Proactive Campaign, but is it addressing your customer’s questions, issues, and requests? Use Campaign reporting to find out.
View your Advanced Proactive Web Campaign reporting by:
-
On the Ada dashboard, go to Measure > Reports.
-
Select the Campaign Performance(Web) report.
-
Click on a Campaign name to view the metrics for that specific Campaign. The available metrics include:
Shown - Total number of presented Campaigns.
Opened - Total number of times the bot is opened from the Campaign.
Engaged - Total number of engaged conversations.
Track Campaign Results Using Events
You can track the success of your campaigns by logging user actions using events. For example, if a campaign encourages users to add items to their cart, you can track when this action occurs to measure the campaign’s effectiveness.
Use the following code snippet to track an “Add to Cart” event when a user clicks the “Add to Cart” button:
This logs an event called “Add_to_Cart” with a monetary value (cartValue) representing the item added to the cart.
To learn how to set up events, see the Track Events guide.
Another use case for tracking events might be when users sign up for a demo or subscribe to a newsletter after interacting with a campaign. By logging these actions as events, you can determine the campaign’s impact on your goals.