Configure and use Gorgias Ticketing
Overview
Use Gorgias together with Ada to give your customers a complete support experience. Your Ada bot already answers your customers questions instantly, any time of the day. Connecting Ada to your Gorgias support team gives your customers the best of both worlds. They can then create Gorgias support tickets right from the Ada chat window.
Configure the Gorgias Ticketing app
Configuring your Gorgias setup in Ada is simple. First, you'll need to access your Gorgias account to gather some information outlined under Requirements. Then, you'll add your Gorgias information to the Ada dashboard to complete the configuration.
Requirements
Before you start, be sure you have the Gorgias integration added to your Ada account. Contact your Ada team for more details.
You'll need a few items from your Gorgias account to complete the integration with Ada:
-
Subdomain (https://
YOUR-GORGIAS-SUBDOMAIN.gorgias.com) -
Login email address
Find your Gorgias API credentials
The Gorgias API allows Ada to communicate with your Gorgias instance to create support tickets. It's an authenticated connection, so you'll need to equip your bot with an API token to access the Gorgias API.
Here's how to find your API credentials, including the API token, in Gorgias:
-
Access your Gorgias account, then click your name at the bottom left.
-
Click Your profile, then REST API. You'll find all your API credentials there, including your API token.
Complete the Gorgias setup in Ada
If you have everything you need, then let's get started configuring the Ada Gorgias Ticketing app.
-
On the Ada dashboard, go to Settings > Integrations.
-
On the Integrations view, navigate to App Integrations > Gorgias, then click Connect. The Gorgias setup dialog displays.
-
Complete the Subdomain, Gorgias Email Login, and API Token fields.
-
Click Save.
Your Gorgias block is ready to go. Now it's time to put the Gorgias block to use.
Use the Gorgias block
Add the Gorgias block to your bot's Handoff to Support Answer. This locked Answer comes set up for a default email ticketing handoff, so you'll want to update the Answer with the Gorgias block, and any supporting blocks you require to communicate the process to your chatters effectively.
Here are the blocks you'll need for a Gorgias Ticketing handoff Answer:
-
Text: You'll need at least two Text blocks. The first Text block lets your chatters know that a Gorgias ticket is about to be created. The second Text block comes at the end of the Answer, and confirms that the ticketing process completed successfully. You can add more text blocks to convey additional information, as you see fit.
-
Capture: Use Capture blocks to gather the chatter's name, email address, and issue description.
-
Fetch Chat Metadata: Use this block to retrieve the chat transcript from your bot and save it as a variable. This variable can then be attached to the Gorgias support ticket.
-
Gorgias: The handoff Answer wouldn't be complete without this block! The Gorgias block connects with the Gorgias API to create the support ticket in your account.
Now let's put it all together. Here is how to build a handoff to Gorgias Ticketing Answer:
-
On the Ada dashboard, go to Build > Answers.
-
Open the Handoff to Support Answer, or click the Create a new Answer at the top of the Answer list if you want to create a new Answer instead.
-
In your handoff Answer, add a Text block with messaging to let the chatter know the Gorgias ticket process has begun.
-
Add Capture blocks to gather the following information from the chatter:
-
name
-
email
-
description of their issue
-
-
Add the Fetch Chat Metadata block to retrieve the chat transcript. See the article Fetch Chat Metadata for help configuring this block.
-
Add the Gorgias block.
-
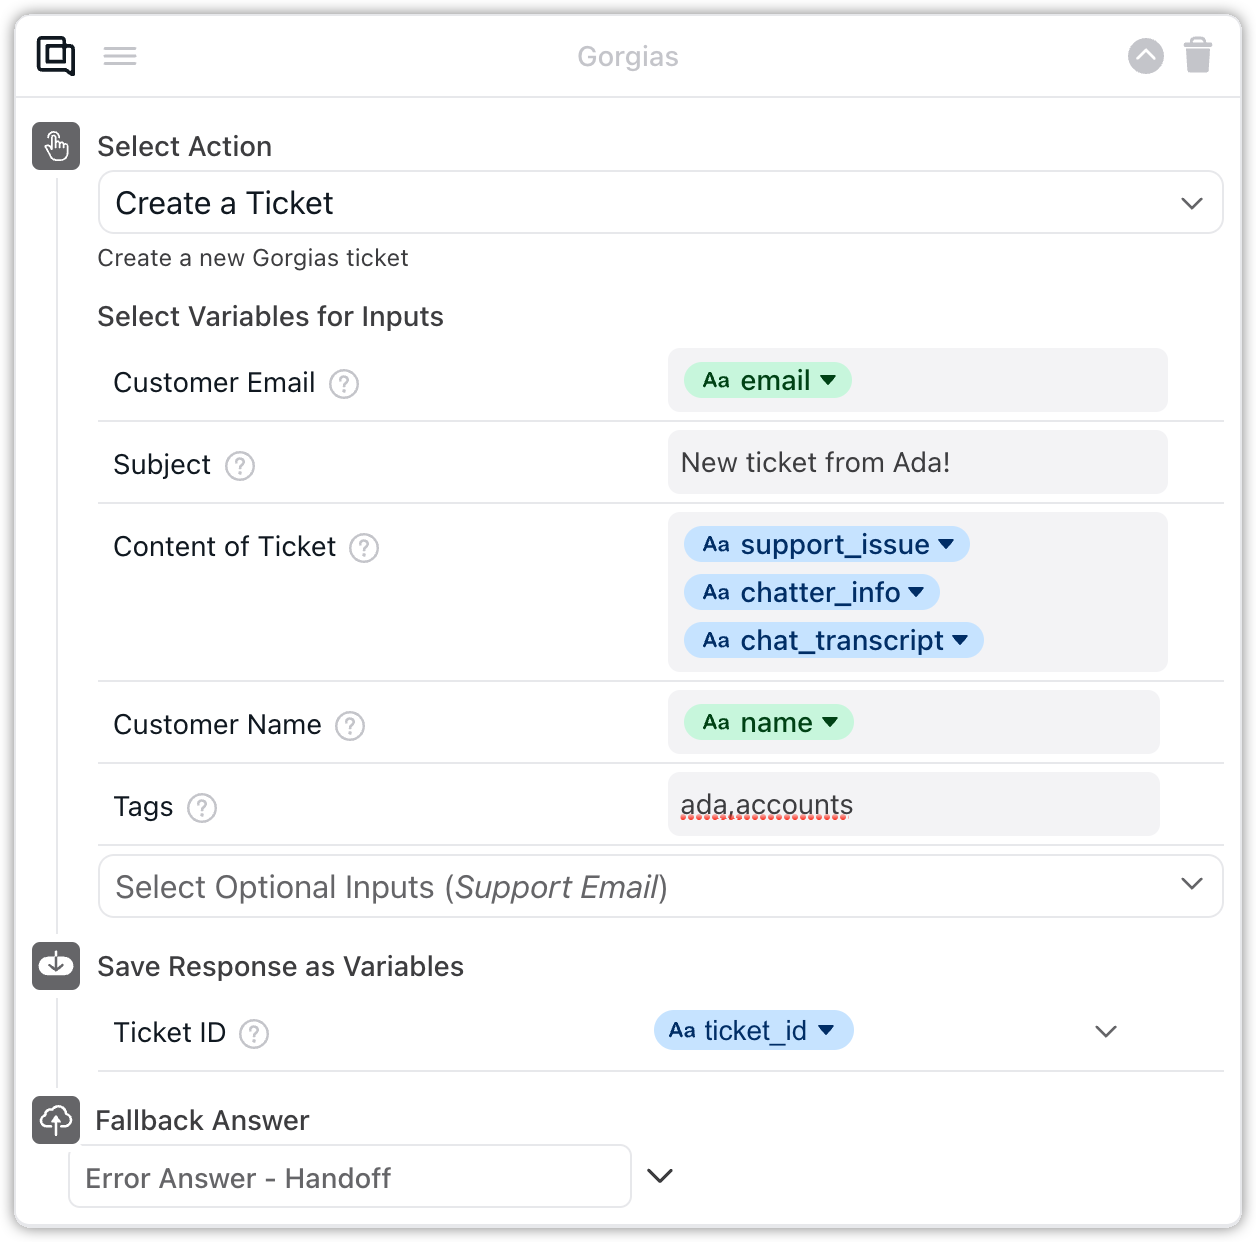
Click the Select Action drop-down menu, and select Create a Ticket. The configuration fields for the Gorgias Ticketing app appear.
-
Configure the Gorgias Ticketing app fields using the following table as a guide:
Customer Email
Add the email variable captured in step 4.
Subject
Add a subject for the ticket. This can be a default plain text message, or you can capture it from the chatter along with the other information outlined in step 4.
Content of Ticket
Add the chat transcript variable captured by the Fetch Chat Metadata block in step 5.
[Optional] Select Optional Inputs
Use this drop-down menu to select any additional inputs you'd like to add to the ticket. These include:
Customer Name – A recommended option. Use the name variable captured in step 4.
Support Email – Add the default support email of your organization.
Tags – Add tags to your ticket. You can use variables and comma separated values.
Save Response as Variables
Select Ticket ID from the drop-down menu and assign a variable. Use this variable to share the ticket ID with your chatter.
Fallback Answer
Select an error Answer to surface if an issue occurs while creating the Gorgias ticket.
-
Add a Text block with messaging to let the chatter know their Gorgias ticket was successfully created.
-
Click Save.
Don't forget to add training to your handoff Answer. That way, your chatters can ask the bot directly for your team's support.
And that's it! Your bot can now create Gorgias support tickets for your customers. Feel free to customize the messaging in your handoff Answer and create the exact experience you want for your chatters.
Have any questions? Contact your Ada team—or email us at [email protected].