Format and validate text using the Answer Utilities block
Overview
Do you have user data that you need to tweak a little? With the Answer Utilities block, and its Render Templated Text action, you can manipulate or validate values to make them work better with your bot.
This feature exists to provide flexibility in manipulating text content, but it can get very technical. If you’re not familiar with Python, feel free to contact your Ada team so we can put a solution in place for you instead.
Introduction to Jinja
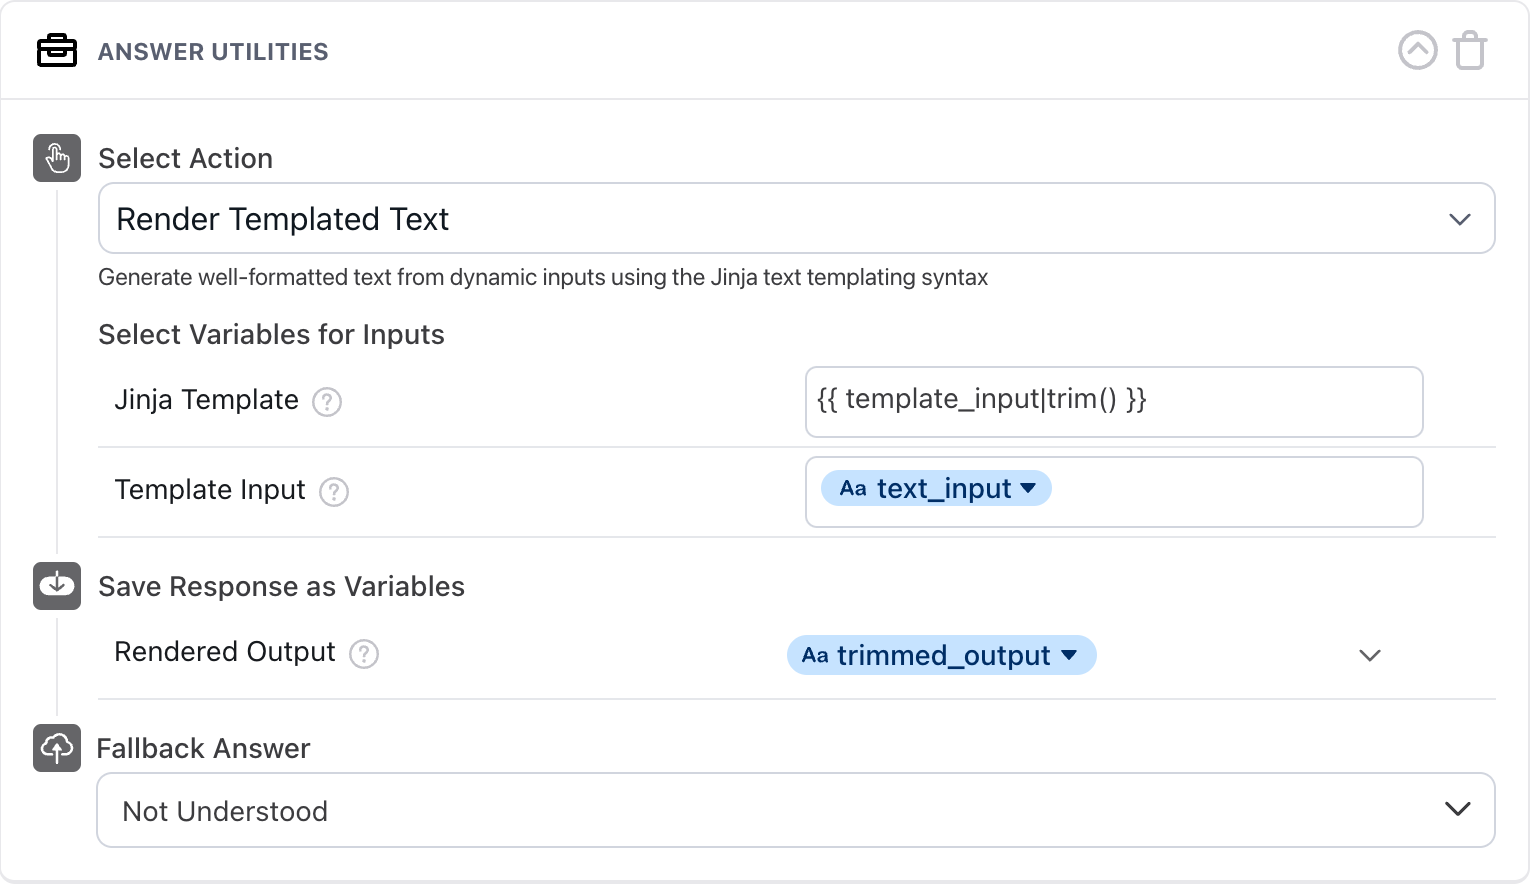
The Render Templated Text action in the Answer Utilities block formats text using a templating language called Jinja 2. It’s a very handy tool when you need to change inputted data into a format that suits your use case. This can range from trimming text, to formatting currency, to transforming JSON data into something your chatters can read.
Jinja is a templating engine, or in more simple terms, a text formatter. A Jinja template is a set of instructions that tells the templating engine how that formatted text should look.
To learn more, see Template Designer Documentation in Jinja’s official documentation.
Use cases and examples
The Render Templated Text action offers a lot of flexibility for manipulating content in your bot. Some examples include:
-
Manipulating strings to get out individual pieces of content (e.g., parsing a full name into just the first name)
-
Changing casing (e.g., capitalize all letters in a word, or capitalize only the first letter)
-
Validating strings (e.g., checking an order number’s length), which you can then use to perform conditional logic
-
Presenting JSON data in readable text format
To see some examples in action, click one of these expanders:
Hand off long inquiries
This example accounts for some chatters not knowing how bots work. Instead of searching for short, simple questions, they may occasionally describe their entire problems to the bot!
These long inquiries are likely to trigger the Not Understood Answer. At the beginning of that Answer, this template checks to see if the last question the chatter asked was more than 150 characters long. If it was, then the bot hands the chatter off to an agent who can better understand what they need. Otherwise, it proceeds with the content of the Not Understood Answer.
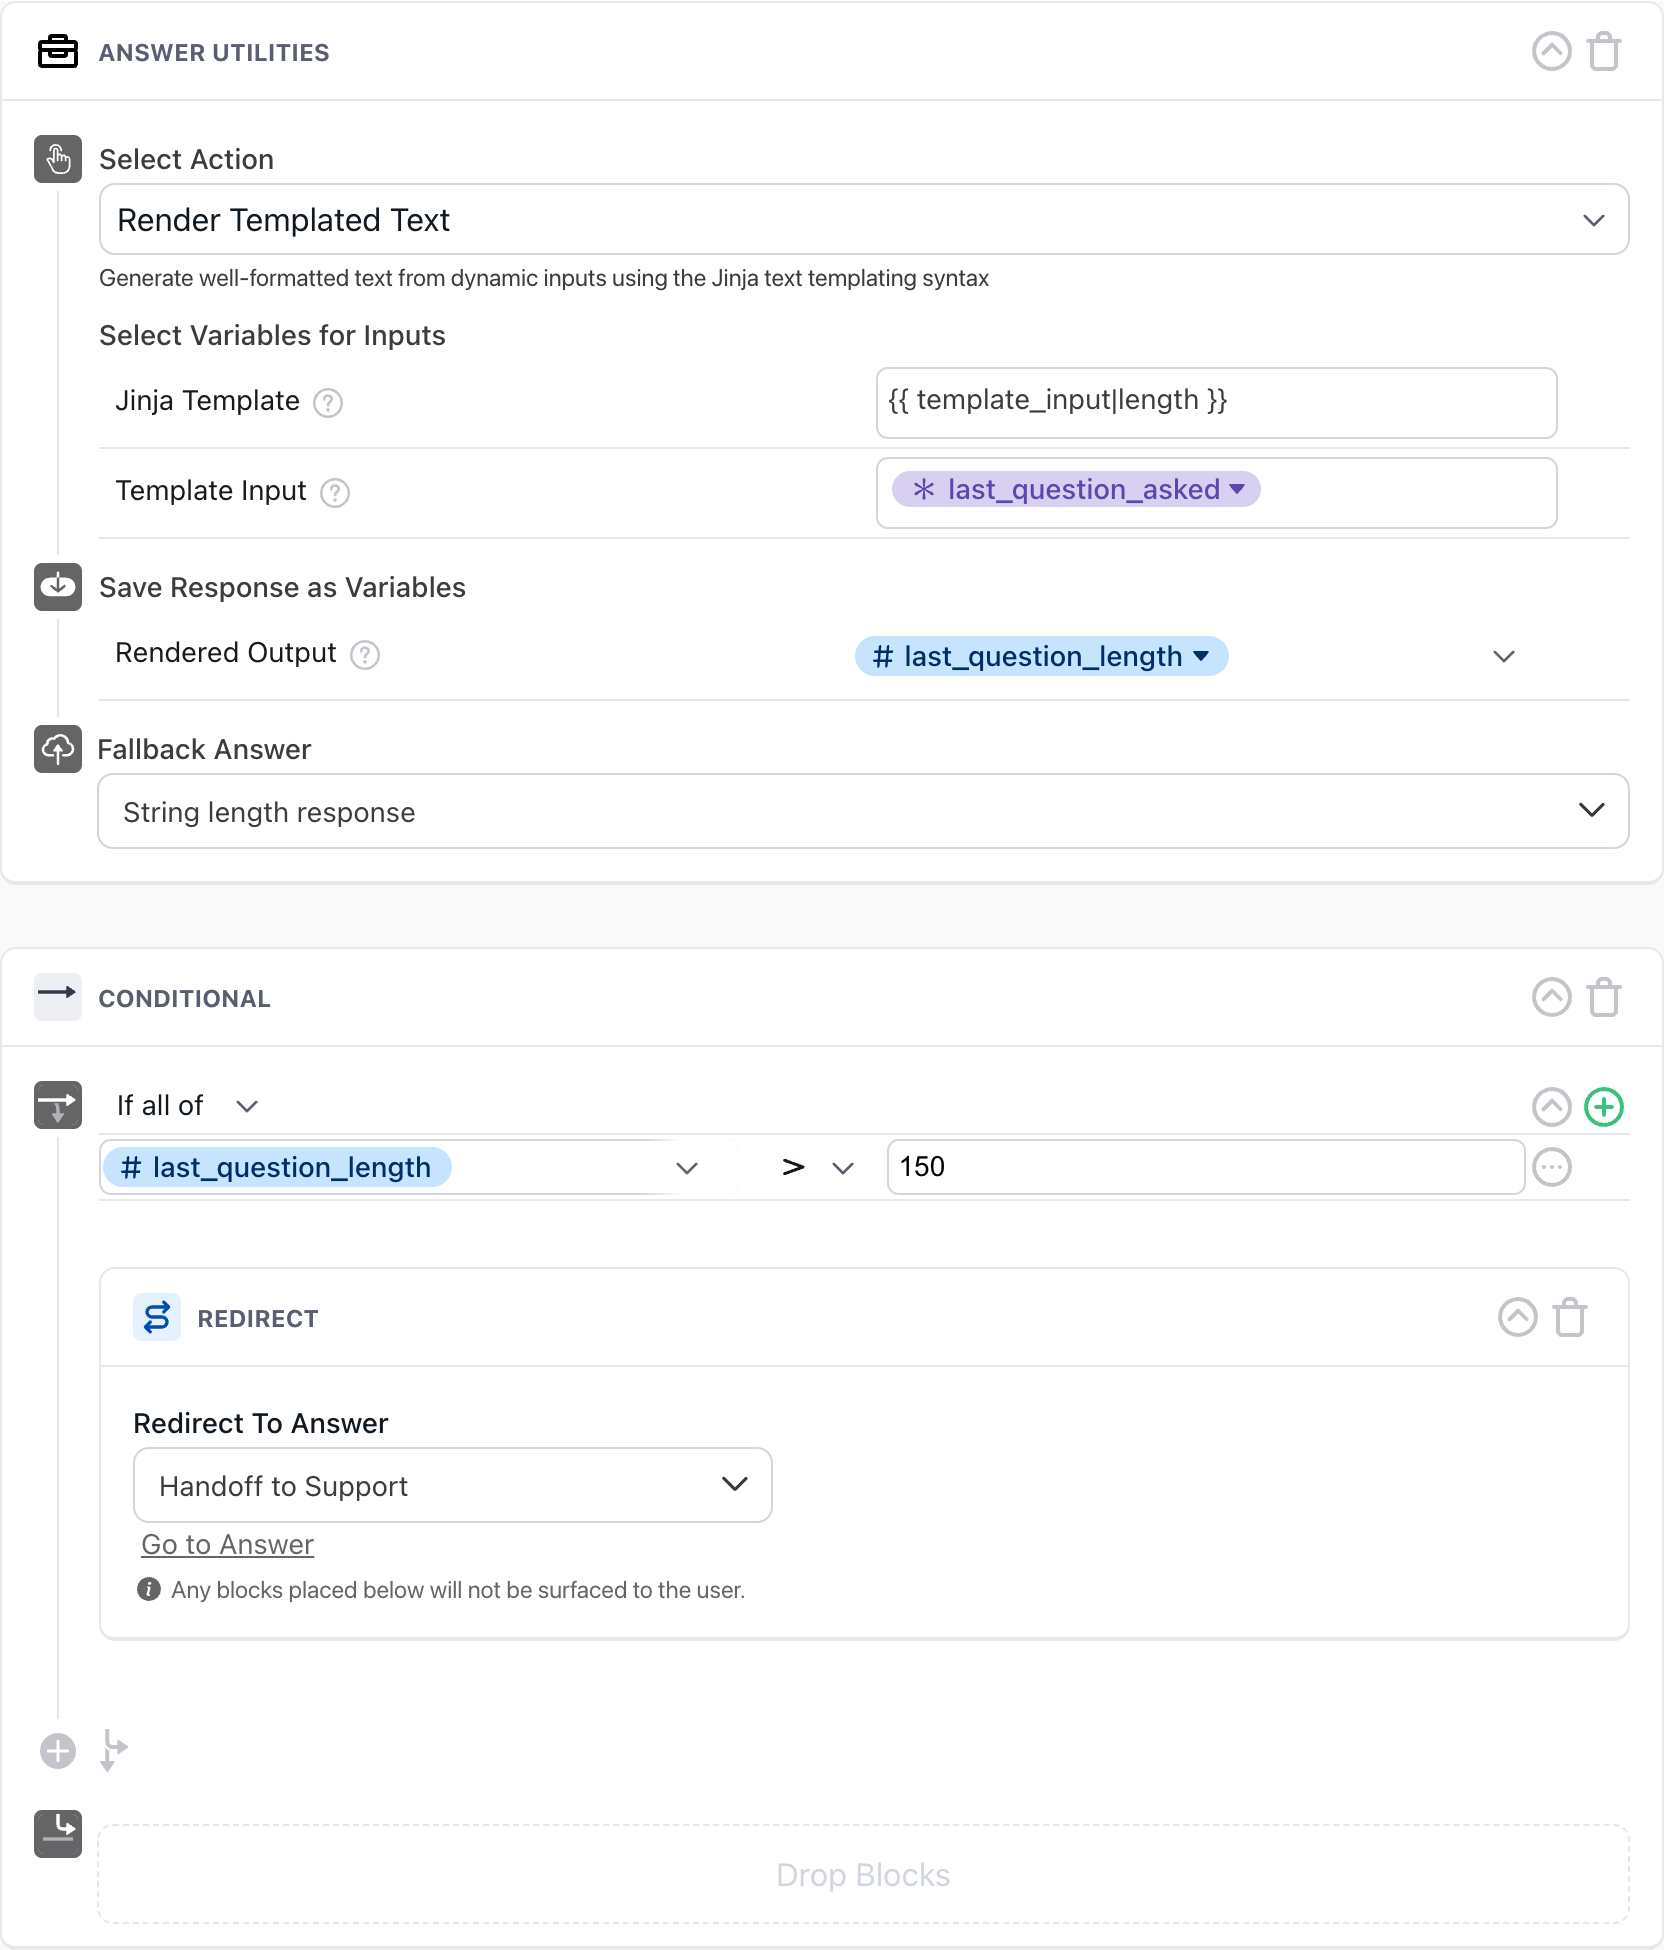
Here’s an example of a long question being automatically handed off to an agent:
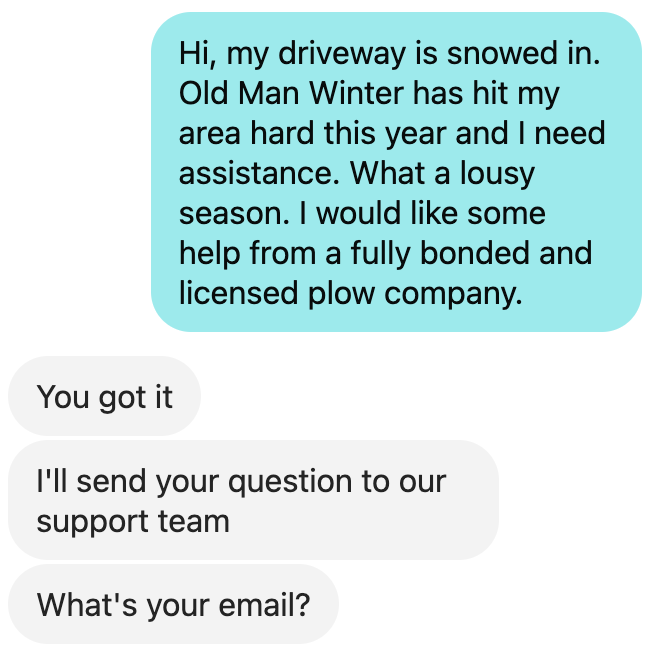
Clean up content for API calls
Some APIs have different parameters for input. In this case, the chatter’s first name needs to go into the API, but it has to be in lowercase. Before the variable containing the chatter’s name goes into the HTTP Request block, it goes through the Render Templated Text action so that the variable contains the name in lowercase form.
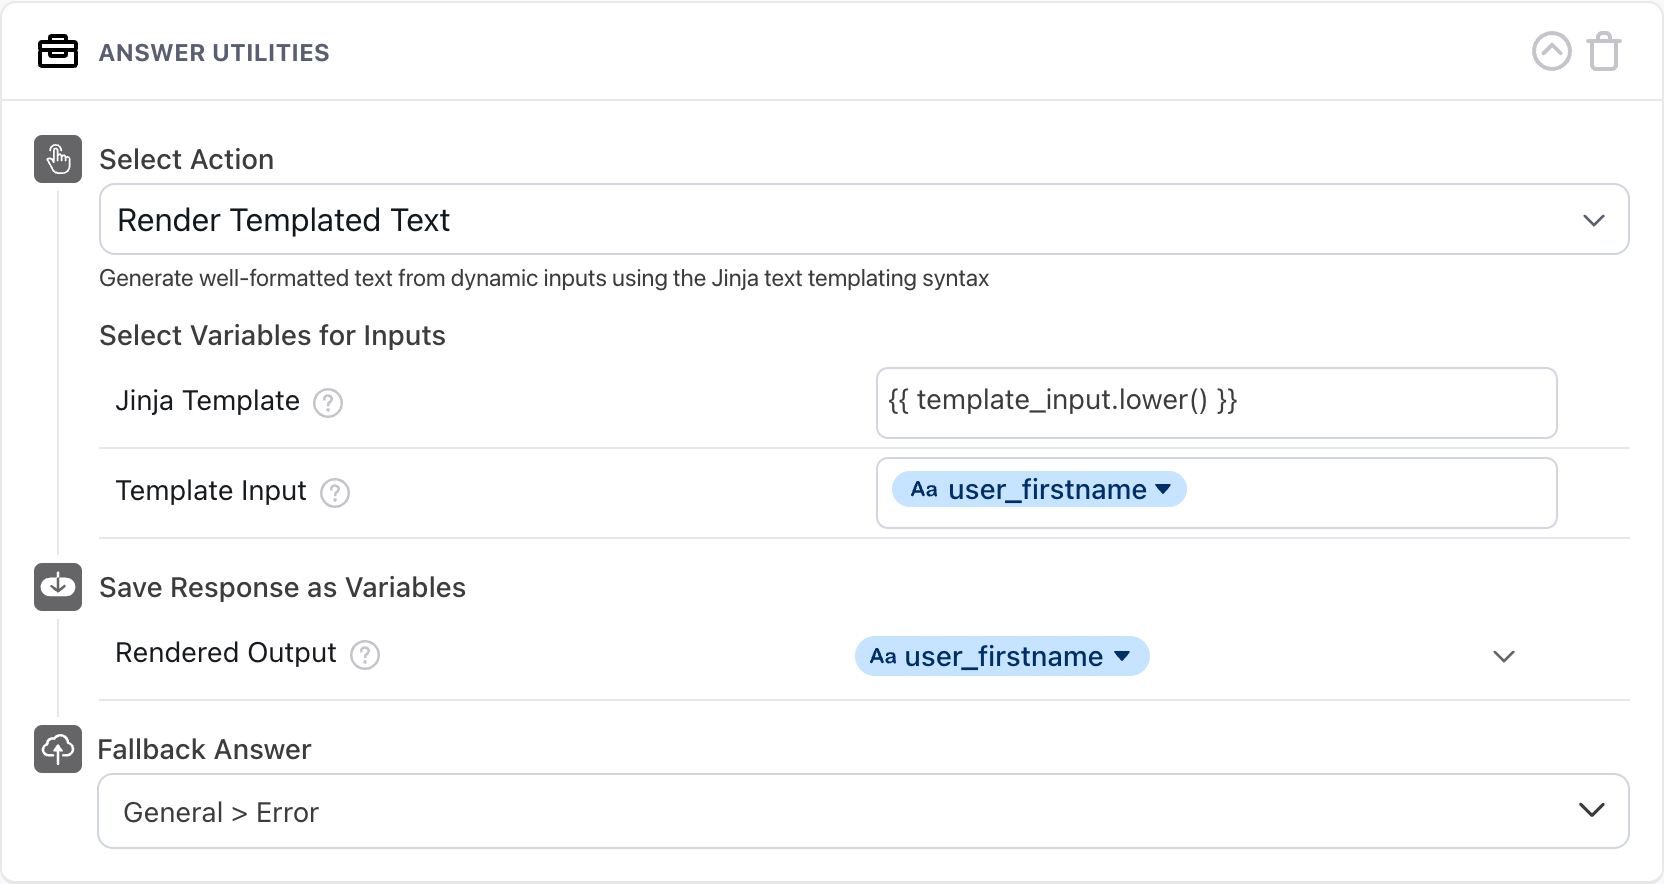
Here’s an example of a message the bot might send a user after the API call, which used their lowercase version of their name, is complete:

Use the Render Templated Text action in an Answer
-
On the Ada dashboard, go to Build > Answers, and open the Answer you want to manipulate text in.
-
From the block drawer, drag the Answer Utilities block into your Answer.
-
In the Answer Utilities block, in the Select Action list, select Render Templated Text.
-
Use the Jinja syntax to build a formatting template in the Jinja Template field.
-
Add a variable containing the information to be rendered into the Template Input field.
-
In the Save Response as Variables list, select Rendered Output.
-
In the Rendered Output field, assign a variable to save your template’s output in.
-
In the Fallback Answer list, select an Answer to use as a fallback if an error with your template occurs.
Learn Jinja template basics
In this section, you can learn how to build Jinja templates that meet your needs.
Delimiter quick reference
When using Jinja syntax, different symbols in your punctuation can indicate to your bot that you want to perform some different actions. These symbols are called delimiters. Here’s a quick reference:
{{ ... }} for
expressions
to print to the template output
{% ... %} for
statements
{# ... #} for
comments
that you want the template to ignore
Expressions
When working using the Render Templated Text action, you’re most likely
to use expressions. With expressions, you tell your bot to print content
into the template output. When you’re creating an expression, you put it
between double curly braces: {{ ... }}
For a very simple example, let’s say you just want your template to
repeat your input. In that case, you’ll just enter
{{ template_input }} into the Jinja Template field. If that’s your
expression, your bot prints the output as-is.
But let’s say you want to do something to your input string - for example, let’s say you want to put it in all capital letters. You can put more complicated actions into expressions to manipulate the content of your input. For more information on how to do that, keep reading, or skip directly to Use methods and filters to manipulate strings.
Statements
What happens if you want to repeat an action, or only perform a
condition under certain conditions? You can create a statement, like a
for-loop or an if statement, to dictate those actions, formatted like
{% ... %}.
Default Jinja formatting also allows for line statements with # ... ##
formatting. Because of some line manipulation on Ada’s part before
sending templates through Jinja, this formatting may not work in your
bot.
For example, let’s say you want to make a template that checks for the name of a country in your template, and if one matches, it prints the country code. That set of statements might look like this:
For more information on statements, including examples, see List of Control Structures in Jinja’s official documentation.
Comments
With comments, you can add additional information into your template
that Jinja ignores, so you can add additional information that won’t
affect the output. When you’re writing a comment, format it like this:
{# ... #}. For example, we could use comments to annotate the above
statement:
The above code block contains extra line breaks to make it more readable on this page. If you copy and paste it directly into your bot, you might notice extra line breaks appearing in your input. To fix this, remove the line breaks and/or the comments and try again.
Line breaks
If you want to put a line break in your output, insert @@ where you
want the line break. Depending on the structure of your template, your
bot may also recognize the line breaks in your template as line breaks
you want in your output.
Quotation marks
You can use either single ' ... ' or double " ... " quotation marks
in your template. Make sure that they’re straight quotation marks,
though. Templates don’t understand curly quotation marks like ‘ ... ’
or “ ... ”, and using those may result in errors.
For more information on quotation marks, including how to make templates ignore them with a technique called escaping, see Single or double quotes? on a tutorial site called Python Land.
Work with characters based on their positions in a string
You can think of your input as a string of characters, where each
character holds a position in the string. In Python, we start counting
at 0, instead of 1. So in the phrase Hello world!, the H is in
position 0, the e is in position 1, the first l is in position 2,
and so on, up until ! in position 11 (remember that the space also
occupies a position). In Python, each of these positions is called an
index, and you can target them to perform different actions to a
string, using the general format {{ template_input[...] }}.
What do you put in the square brackets? That depends on what you want to do:
-
To print a single character, put that character’s index into the square brackets.
-
To start counting from the end of the string, use negative numbers to indicate that you’re moving backwards. In this case, -0 doesn’t exist, so the last character is -1, the second last character is -2, and so on.
-
To insert a range of characters, use the
:character. The way ranges work can be a little counterintuitive:-
The character on left side of the
:character is the index of the first character you want to include in your string, and it is included in your string. If you don’t have a character on the left side of the:character, the output starts at the beginning of your string. -
The character on the right side of the
:character is the index after the last character you want to include in your string - that is, this character is not included in your string. If you don’t have a character on the right side of the:character, the output ends at the end of your string.
-
To learn more about how ranges work in Python, see Access List Items at W3Schools.
Use methods and filters to manipulate strings
Once you understand the basics of how Jinja templates are put together, you can start using methods and filters to perform more complex actions on your strings.
There are two ways you can manipulate string content with the Render Templated Text action:
-
Python methods, which start with the
.character (e.g.,{{ template_input.capitalize() }}) -
Jinja filters, which start with the
|character (e.g.,{{ template_input|capitalize() }})
There’s a fair amount of overlap between those two categories; for
example, as you can see above, capitalize() exists as both a method
and filter, so using it with either character does the same thing. But
if you’re trying to put together your own methods or filters, take care
that you’re using an existing method or filter using the resources
linked above, and that it starts with the correct character.
The following reference isn’t an exhaustive list of what you can do, but it provides some common examples of how you can use methods and filters to format or validate text. You can combine these methods and filters with each other; when you do that, the output of one is used for the input for the next.
Remove blank characters from a string
You can remove whitespace characters from the beginning and the end of a string.
Change capitalization in a string
The following filters demonstrate how to apply different capitalization rules to your string.
Replace characters in a string
You can replace all instances of one character in a string with another
character. In the replace() method and filter, what you put into the
first set of quotation marks is replaced with what you put in the second
set of quotation marks.
The format for this filter looks like
{{ template_input|replace("old_value","new_value",x) }}, where x is an
optional number you can enter, indicating the number of times you want
to perform the replacement. Otherwise, if you don’t include a number,
the template will replace all instances of your old value with your new
value.
If you’d rather delete the characters rather than replacing them with anything, you can leave the second set of quotation marks blank.
Validate a string’s content
You can validate that a string contains certain characters or is a certain length. This is useful in examples like account numbers that follow certain structures. You can use the Answer Utility Block’s output in a Conditional block to ask a chatter to enter their account number again if it doesn’t follow the structure you were expecting.
Format currency
Create a template to format currency. In this case, we’re using
{:,.2f} to tell the template two things:
-
:,indicates that we want to separate large numbers into groups of threes using a comma as a delimiter.Python only supports using commas or underscores as delimiters. If you want to use different characters for localization purposes, use the
replace()function above to replace the delimiter characters. -
.2findicates that we want to round the number to the nearest two decimal places.
Format numerical values
When applying the above rules to numerical values, there’s one extra step you need to take: in the Template Input field, you have to put the input in quotation marks. Otherwise, an error might occur, because Jinja might be trying to perform mathematical operations instead of text string operations. As a result, your bot might be unable to perform the actions you want to take.
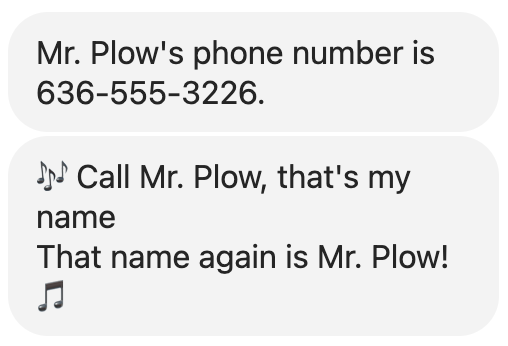
In this example, the input is a phone number: +1 636-555-3226. Even
with formatting symbols, Jinja will read it as a number string and read
the - symbols as subtraction signs if you don’t put it into quotation
marks.
The Jinja template {{ template_input[3:] }} takes off the first three
characters — +1 , including the space after the 1 — so only the
remaining 10-digit phone number, 636-555-3226, is saved in the
phone number - cleaned up variable and shown to chatters. As you can
see below, the phone number variable in the Template Input field
is in quotation marks.
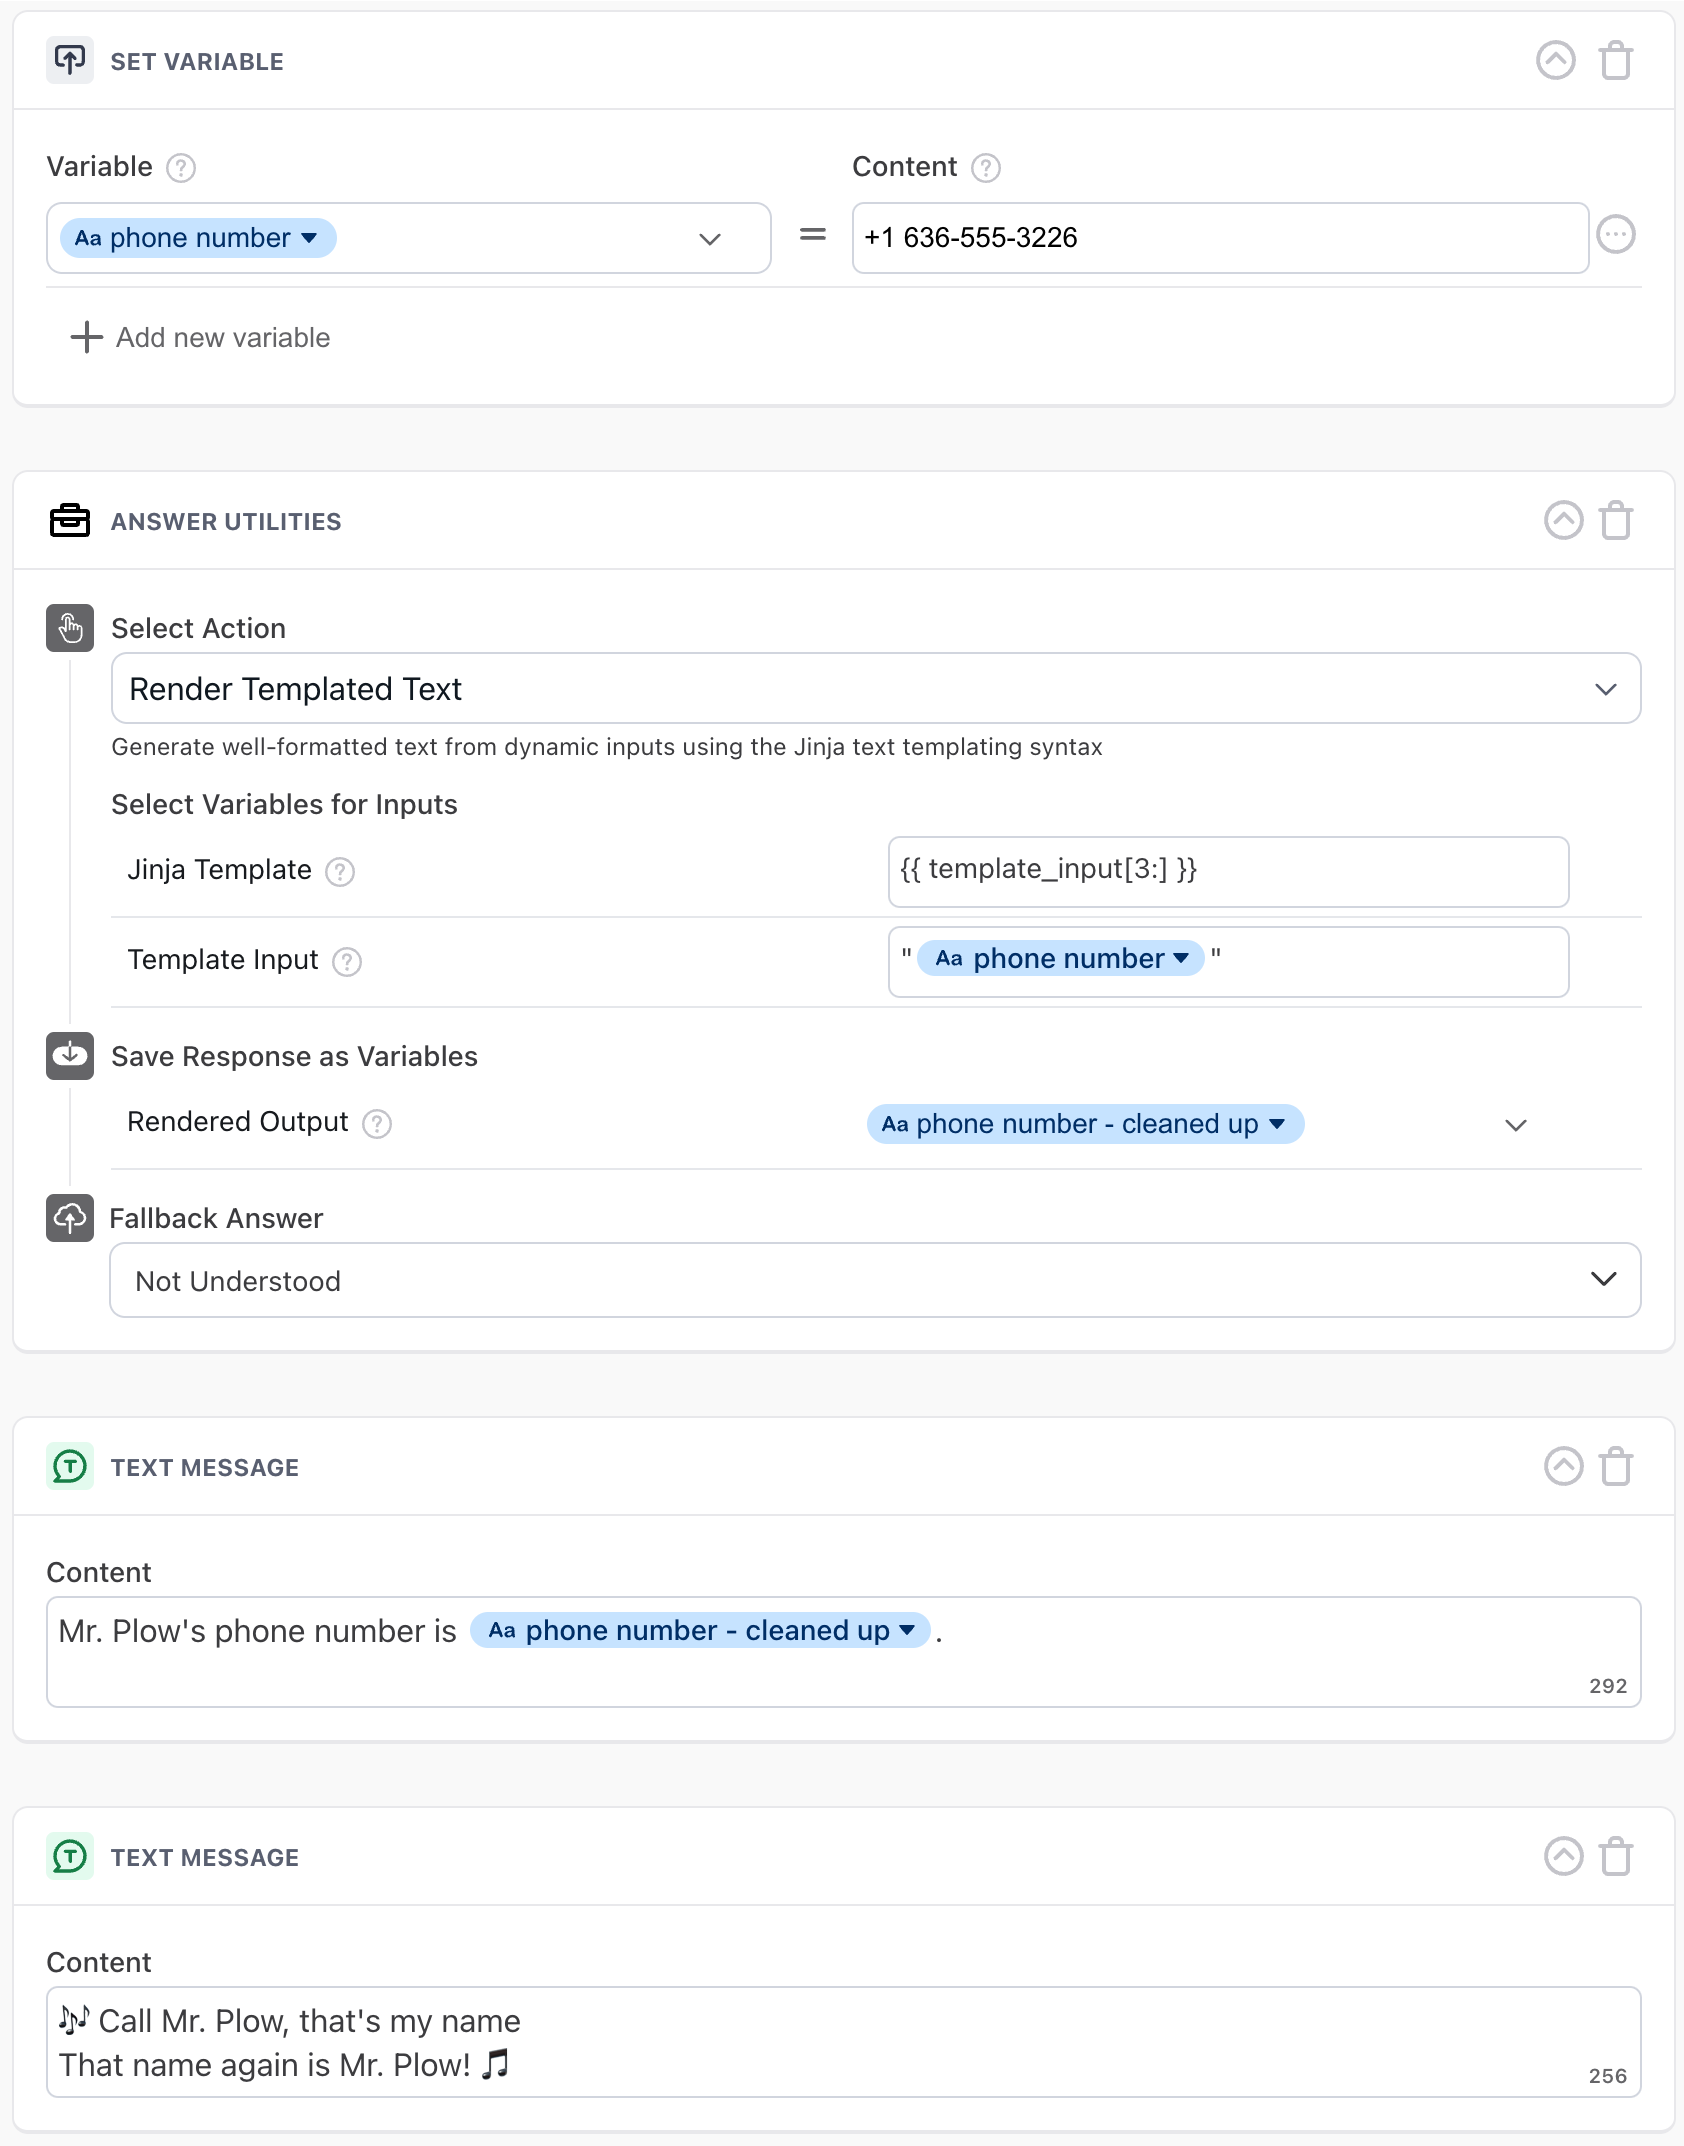
The above Answer looks like this in a chat: