Create scrollable menus using the Carousel block
Overview
Carousels are easy-to-use and attractive option menus you can add to an Answer. The options present as individual cards, complete with image, description, and interaction buttons. Chatters can scroll through the cards horizontally—like a carousel! Carousels are a great way to add visual interest and a more interactive feel to your bot.
You create carousels using the Carousel block. Everything you need to set up the cards is right in the block. Just add the block to an Answer, configure the card settings, and your carousel is ready to go.
This feature may not be included with your organization’s subscription package. For more information, see Ada’s Pricing page, or contact your Ada team.
Manual carousels
A manual carousel is one that you build directly in the block. You can use either the card configuration fields, or you can create a JSON blob to determine the content on each card.
Create a manual carousel using the card configuration fields
The easiest way to create a carousel is with the card configuration fields. Add a title, descriptive content, an image, and up to two buttons per card, and your carousel is ready to go.
The card creation fields accept either static text or variables. If you use variables, the card details can update automatically based on what those variables contain.
-
On the Ada dashboard, go to Build > Answers. Select or create an Answer, then drag and drop the Carousel block in the Answer editor.
-
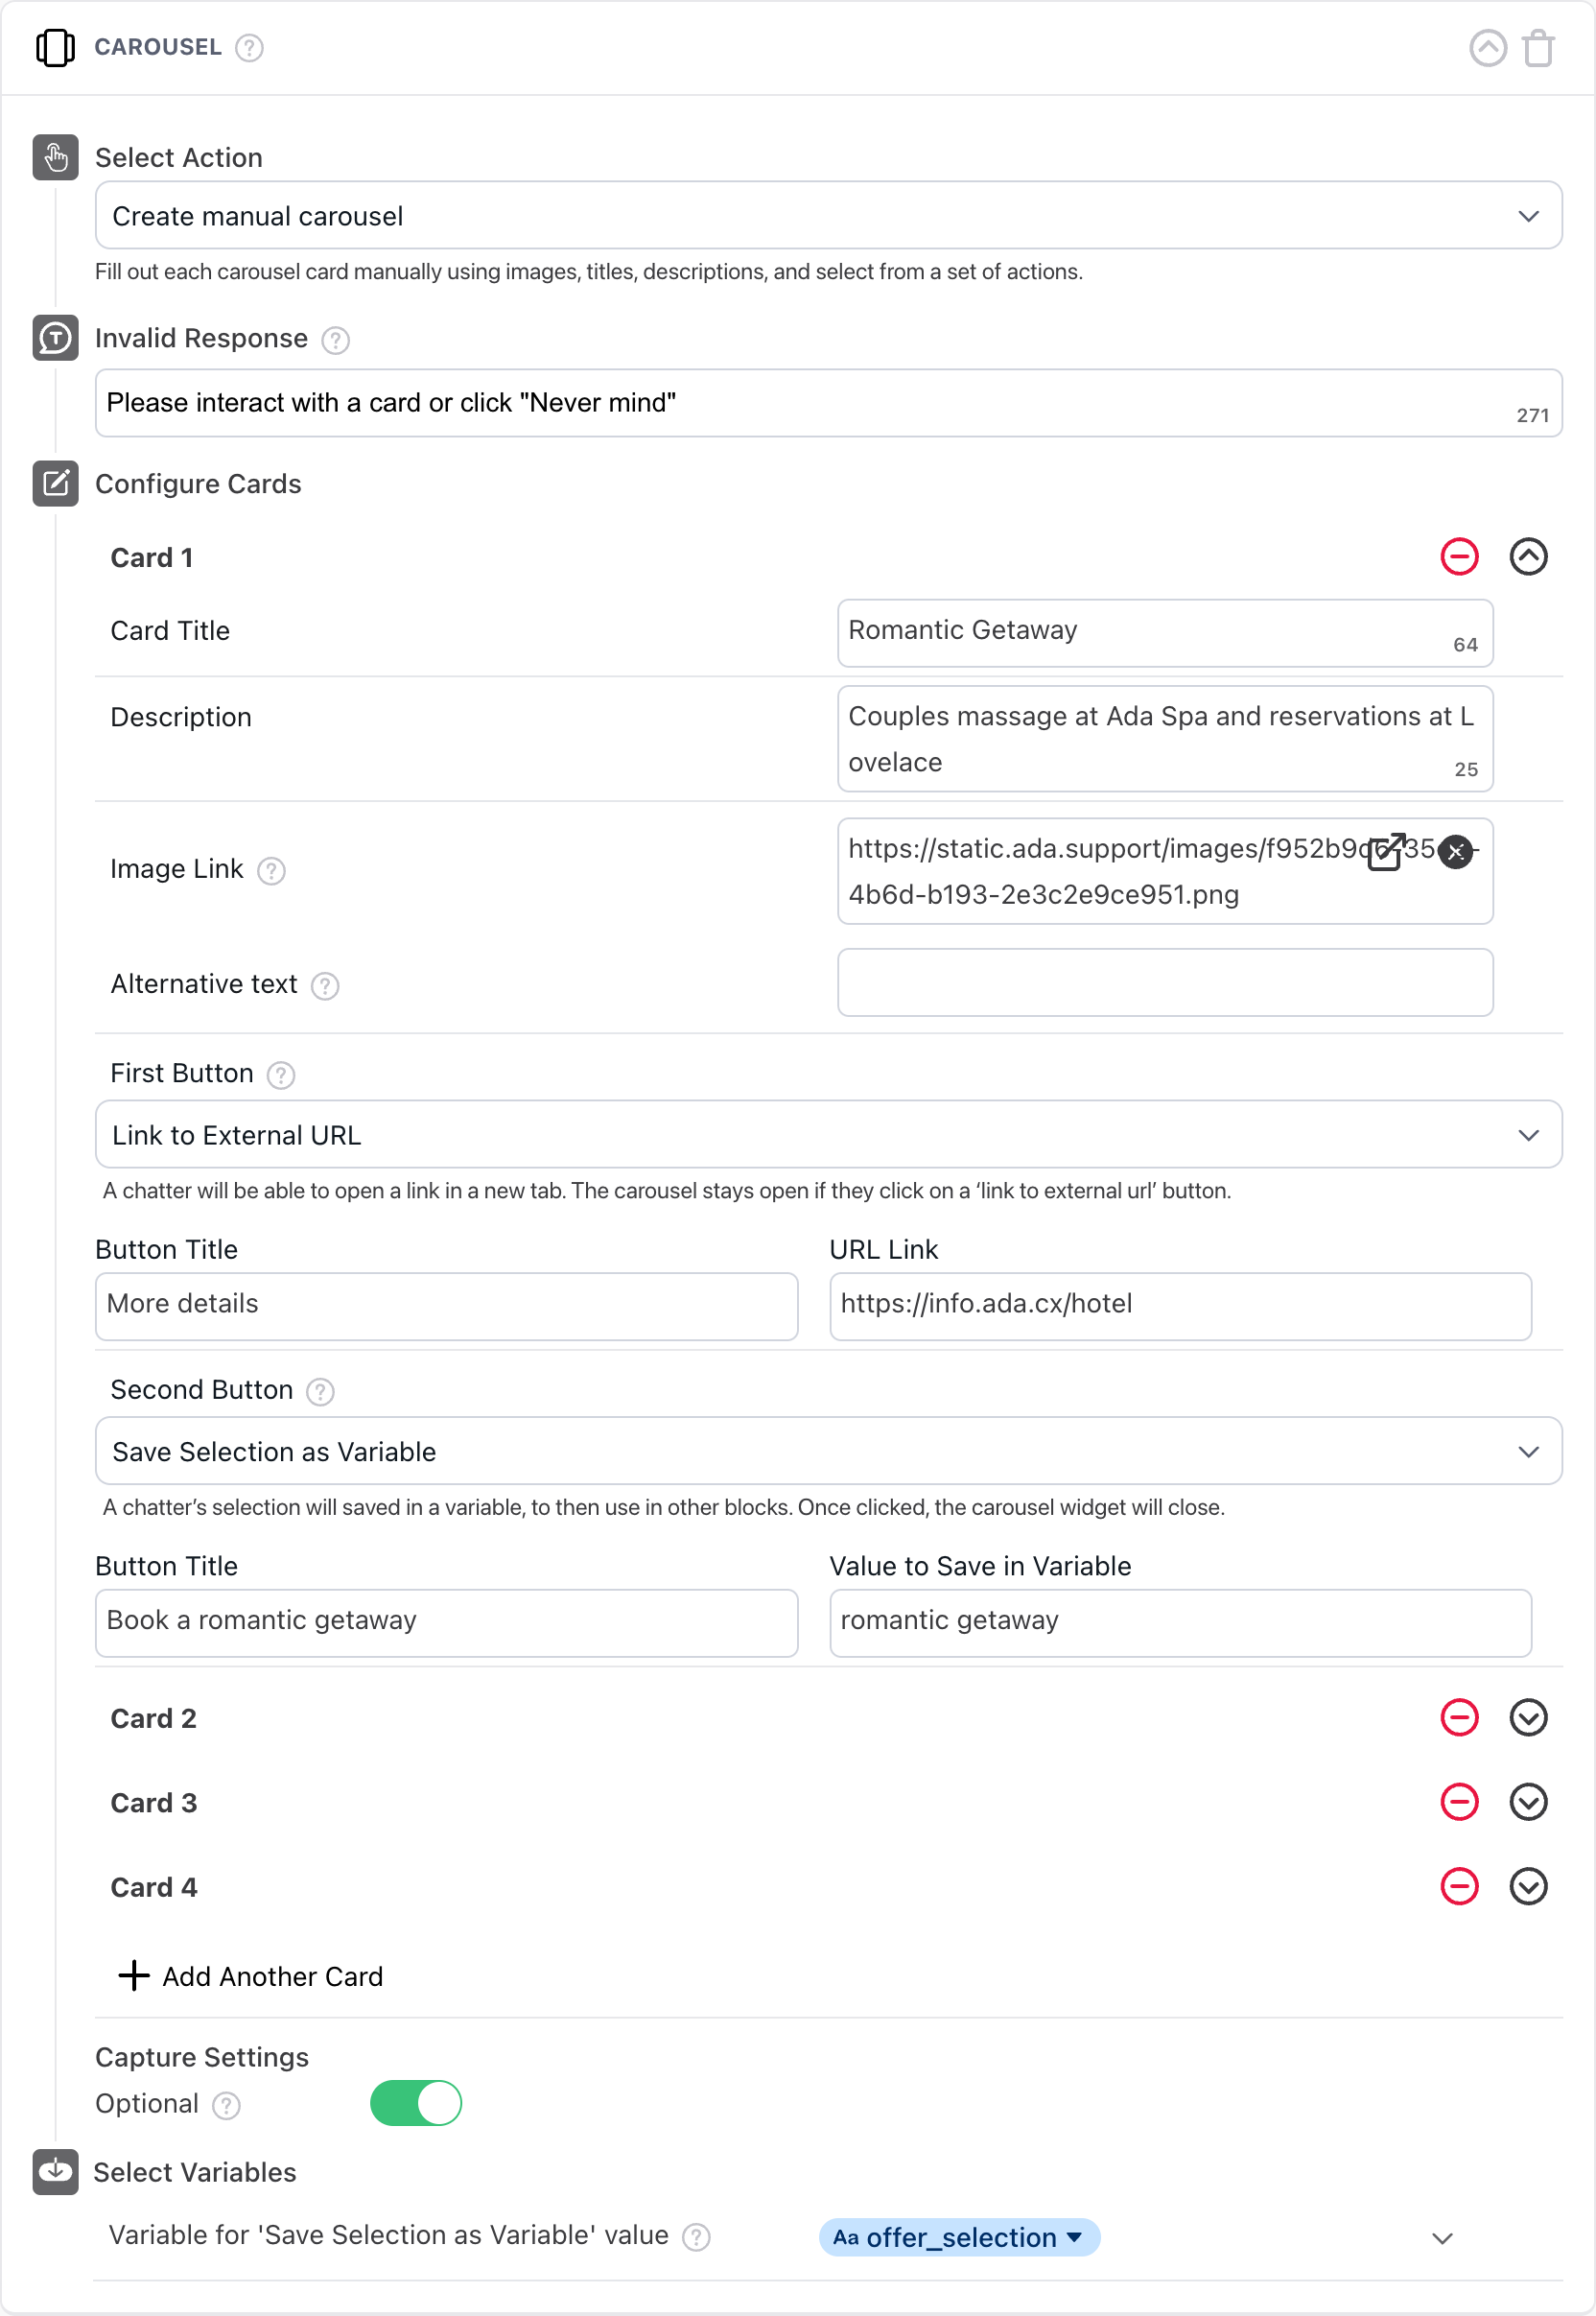
In the Carousel block under Select Action, click the Select an action drop-down menu, then click Create manual carousel from the list. The manual carousel configuration fields appear.
-
In the Invalid Response field, enter a prompt that chatters will see if they don’t interact with your carousel as expected. For example, if you require chatters to choose a carousel card before continuing, and a chatter tries to type a question, this message appears to prompt the chatter to either choose a card or exit the Answer flow.
The button that appears after the carousel has the Cancel Capture Answer’s button label as the text. To avoid confusing chatters, verify that the button text the prompt provides matches your Cancel Capture Answer’s button label.
-
Under Configure Cards, under Card 1, start building out your carousel content.
- In the Card Title field, enter a title for the carousel card.
- In the Description field, enter a basic description to appear under the card title.
- Beside Image Link, enter a link to an image, or click
Upload
 to add an image to the card from your computer.
 - Beside Alternative text, if the image is important to understand the content of the card, enter the information the chatter would get from seeing it.
- Each card can have up to two buttons Under First Button and Second Button, you can either hide or configure those buttons.
-
Link to External URL - Add a button below the card to a URL of your choice.
Add a Button Title, so chatters know what they’re clicking on, and a URL Link for the card to go to.
-
Save Selection as Variable - Save the chatter’s selection as a variable.
Add a Button Title to describe the chatter’s selection, and add a Value to Save in Variable.
If you select this option, you’ll have to select a variable to save these values in later in the process.
-
No Button - Don’t show the button at all.
The ideal aspect ratio for carousel images is 1.91:1.
That way, chatters who have visual impairments can have their screen readers read your description to them, so they can have an equivalent experience with your bot and not miss out on important information.
By default, both buttons are set to No Button. You can click that list and choose an option for that button:
-
As required, click Add Another Card to continue creating cards. For each card, repeat step 4 to add content and clickable options to it.
-
Under Capture Settings, turn the Optional toggle on or off. This toggle determines what happens if the chatter doesn’t want to interact with your carousel and clicks the Cancel Capture button.
-
By default, the toggle is set to Off. When the toggle is off, clicking the Cancel Capture button takes the chatter out of the current Answer flow and the bot prompts the chatter for a new question.
-
When the toggle is set to On, clicking the Cancel Capture button gets the chatter out of only the carousel. The bot then continues with the Answer flow, presenting any additional blocks in the current Answer.
-
-
If you set any of the buttons in your carousel to save values in a variable, choose the variable to save the values in.
- Under Select Variables, click the Select Optional Variables drop-down menu, then click Variable for ‘Save Selection as Variable’ value.
- Click the Choose a Variable drop-down menu, then choose an existing variable or create a new variable for storing the chatter’s selection.
-
Click Save.
Create a manual carousel using a JSON blob
Another way to create a manual carousel is with a JSON blob. Carousels created this way are static, but the format might make it easier for you to perform updates if you can’t create an endpoint to get it from instead.
-
On the Ada dashboard, go to Build > Answers. Select or create an Answer, then drag and drop the Carousel block in the Answer editor.
-
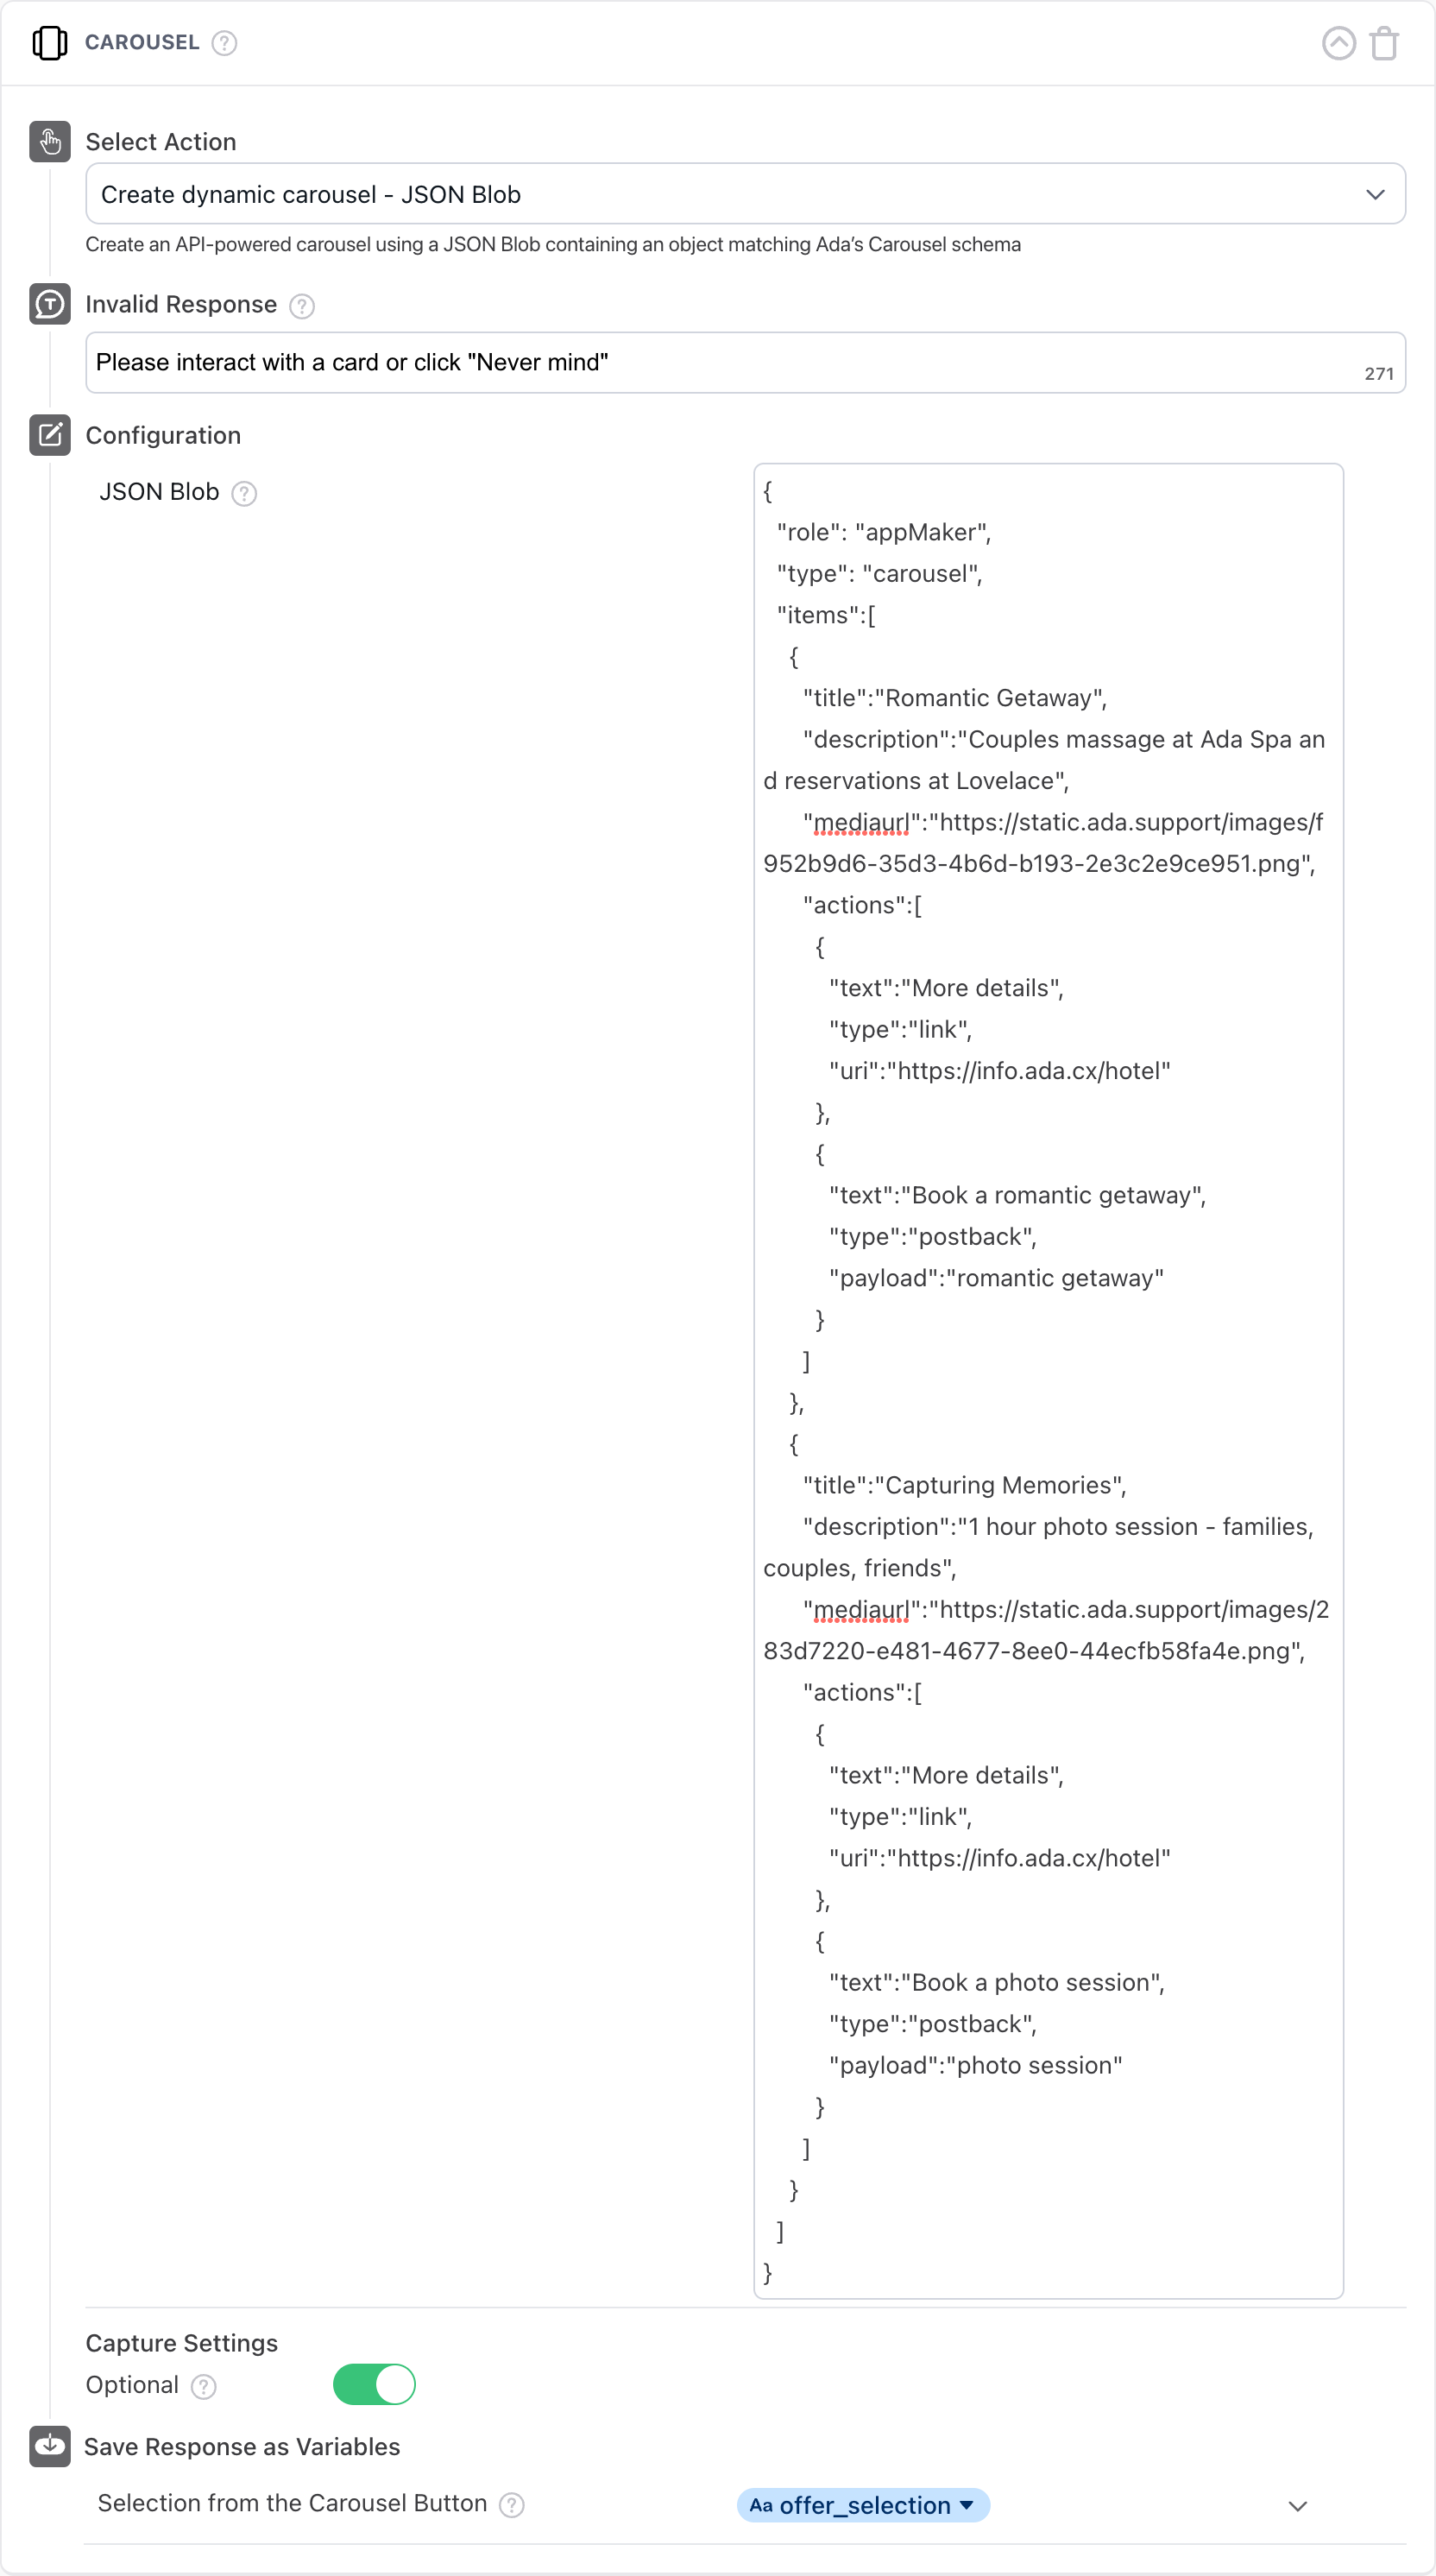
Under Select Action, click the Select an action drop-down menu, then click Create dynamic carousel - JSON Blob. The JSON Blob configuration options appear.
-
In the Invalid Response field, enter a prompt that chatters will see if they don’t interact with your carousel as expected. For example, if you require chatters to choose a carousel card before continuing, and a chatter tries to type a question, this message appears to prompt the chatter to either choose a card or exit the Answer flow.
The button that appears after the carousel has the Cancel Capture Answer’s button label as the text. To avoid confusing chatters, verify that the button text the prompt provides matches your Cancel Capture Answer’s button label.
-
Under Configuration, in the JSON Blob field, add your JSON blob.
Understand how to format your JSON blob
When creating a carousel using a JSON blob, you have to follow a specific structure for your data. The easiest way to create a JSON carousel is to copy a template and add in the information you want to see in your carousel.
JSON can be tricky. If you have two items on the same level (e.g., two cards), you have to separate them with commas, but you can’t have a comma after the last item. To make sure that your JSON is valid and free of these small errors, use a text editor or tool like JSON Lint to validate your code.
For each card, here are the keys you have to fill out values for, all nested inside the
itemsarray:-
"title"- The title of the card. -
"description"- Additional text to appear in the card. -
"mediaurl"- A URL for the image file to appear in the card. -
"actions"- An array that contains the buttons that should go below the card. There are two possible formats for the buttons, depending on what you want them to do:-
Link buttons
-
"text"- The text you want to appear in the button. -
"type"- Enter"link"as the type so your bot recognizes that the button should go to an external URL. -
"uri"- The address you want the button to go to.
-
-
Buttons that save values as variables
-
"text"- The text you want to appear in the button. -
"type"- Enter"postback"as the type so your bot recognizes that it should expect a value to save into your variable. -
"payload"- The value you want to save into your variable.
-
-
This example is for a carousel with two cards. Test it out in your own bot! You can also use it as a starting point to start putting together your JSON blob.
-
-
Under Capture Settings, turn the Optional toggle on or off. This toggle determines what happens if the chatter doesn’t want to interact with your carousel and clicks the Cancel Capture button.
-
By default, the toggle is set to Off. When the toggle is off, clicking the Cancel Capture button takes the chatter out of the current Answer flow and the bot prompts the chatter for a new question.
-
When the toggle is set to On, clicking the Cancel Capture button gets the chatter out of only the carousel. The bot then continues with the Answer flow, presenting any additional blocks in the current Answer.
-
-
If you set any of the buttons in your carousel to save values in a variable, choose the variable to save the values in.
- Under Save Response as Variables, click the Select Optional Variables drop-down menu, then click Selection from the Carousel Button.
- Click the Choose a Variable drop-down menu, then choose an existing variable or create a new variable to capture the postback response.
-
Click Save.
Dynamic carousels
A dynamic carousel is one whose cards update automatically. Where a manual carousel is a static structure with a fixed number of cards with fixed data, a dynamic carousel updates via an API each time the Carousel block triggers. When called, the API returns a JSON blob to the block from the endpoint URL you specify. This allows the carousel to change automatically based on the structure of the JSON blob at the time of the call.
Create a dynamic carousel using an endpoint URL
Use the following steps to connect the Carousel block to your endpoint. The JSON blob returned by the endpoint should be structured as described in the Understand how to format your JSON blob section of this topic.
-
On the Ada dashboard, go to Build > Answers. Select or create an Answer, then drag and drop the Carousel block in the Answer editor.
-
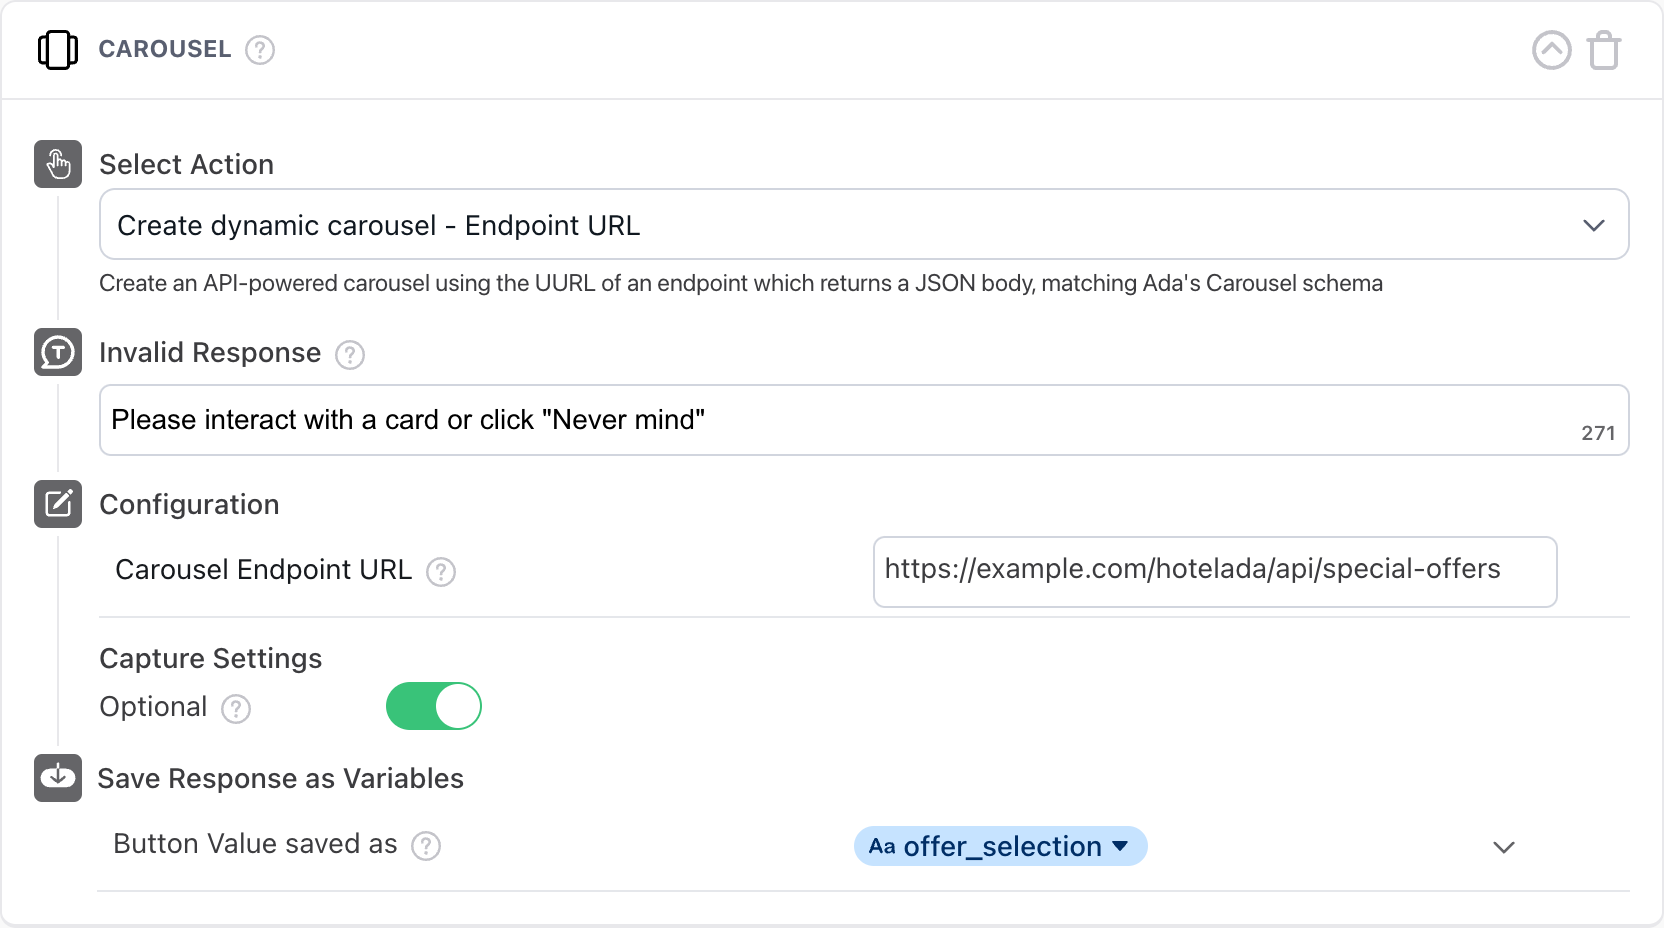
Under Select Action, click the Select an action drop-down menu, then click Create dynamic carousel - Endpoint URL. The Endpoint URL configuration options appear.
-
In the Invalid Response field, enter a prompt that chatters will see if they don’t interact with your carousel as expected. For example, if you require chatters to choose a carousel card before continuing, and a chatter tries to type a question, this message appears to prompt the chatter to either choose a card or exit the Answer flow.
The button that appears after the carousel has the Cancel Capture Answer’s button label as the text. To avoid confusing chatters, verify that the button text the prompt provides matches your Cancel Capture Answer’s button label.
-
Under Configuration, in the Carousel Endpoint URL field, add the URL for your endpoint.
-
Under Capture Settings, turn the Optional toggle on or off. This toggle determines what happens if the chatter doesn’t want to interact with your carousel and clicks the Cancel Capture button.
-
By default, the toggle is set to Off. When the toggle is off, clicking the Cancel Capture button takes the chatter out of the current Answer flow and the bot prompts the chatter for a new question.
-
When the toggle is set to On, clicking the Cancel Capture button gets the chatter out of only the carousel. The bot then continues with the Answer flow, presenting any additional blocks in the current Answer.
-
-
[Optional] If your JSON blob has a postback action, add a variable to save the returned data.
- Under Save Response as Variables, click the Select Optional Variables drop-down menu, then click Button Value saved as.
- Click the Choose a Variable drop-down menu, then choose an existing variable or create a new variable to capture the postback response.
-
Click Save.