Integrate your voice bot with your contact center technology
This section takes you through how to integrate your contact center platform with Ada Voice. If you don’t see your contact center platform listed here, you can contact your Ada team to determine the best way to integrate. Ada Voice can integrate with any contact center platform.
Integrate Voice with your SIP infrastructure
This section takes you through how to integrate Ada with your SIP infrastructure.
Setting up your Ada SIP domain
- If you are using your own Twilio account with Ada Voice, configure a Twilio SIP domain for your bot to use. For more information, see Set up your Twilio account in Get started with Voice at Ada’s Help Docs.
- If your Voice subscription package includes Twilio your Ada team will set up your SIP domain for you. You will need to provide them with the following information:
- The domain name for your SIP address: This will be used for the SIP domain that will be created for you, which will follow the format
<your_domain_name>.sip.twilio.com. This needs to be a unique domain name that is not currently being used in Twilio. - IP Addresses for your SIP domain’s Access Control List (ACL): An ACL is a security mechanism that enhances network security by allowing only specified IP addresses to access your SIP domain. In the context of SIP communications, this means defining trusted IP addresses—such as those associated with your SIP infrastructure—to ensure that only authorized signaling and media traffic is permitted to interact with your SIP domain.
- The domain name for your SIP address: This will be used for the SIP domain that will be created for you, which will follow the format
Integrating Ada in your SIP infrastructure
You must allow all of Twilio’s following IP address ranges and ports on your firewall for SIP signaling traffic. Please also note that these IP addresses are provided for firewall configuration purposes only and not all of these IP addresses will host active gateways at a given time. Customers should also avoid sending traffic directly to these IP addresses and instead use your SIP domain.
Global Media IP Gateway
The Public Connections Destination IP Ranges and Port Ranges are now identical across all locations:
Regional Signaling IP Gateways
Port
5061 (TLS)
North America Virginia Gateways
North America Oregon Gateways
Europe Ireland Gateways
Europe Frankfurt Gateways
Asia-Pacific Tokyo Gateways
Asia-Pacific Singapore Gateways
Asia-Pacific Sydney Gateways
South America São Paulo Gateways
Send data to Ada using SIP User-to-User (UUI) header
When sending SIP to Ada, you must send the end user’s phone number in the SIP UUI header:
- The UUI header information must be sent in Ascii encoding format.
- It must also follow the format Ada Voice expects:
You can send additional metadata to Ada Voice, such as name, language, account number — or any other information you choose — as key-value pairs using the SIP UUI header.
Any data sent will be available as a purple metavariable in Ada to help personalize the conversation.
Transferring calls from Ada to your SIP infrastructure
If an end user using your bot needs to escalate to a human agent, you can hand them off using a SIP REFER transfer to your SIP infrastructure.
- In your Ada bot handoff locked Answer use the Transfer Call block and select SIP address from the Transfer to drop down menu.
- In the SIP address field, enter the SIP address that you want to transfer the call to.
- Select the checkbox beside Include a User-to-User header when transferring to the SIP address.
- Click +Add another row.
- For Key, enter the key name
phone_number. - For Value, select the
phone_numbermetavariable. - Click +Add another row.
- Provide any additional key value pairs that you want sent via the UUI header.
Integrate Voice with Aircall
This section takes you through how to transfer calls between Ada and Aircall.
Get calls into Ada
To have your bot handle inbound calls originating in Aircall, configure an Aircall Smartflow that connects calls to your Ada Twilio Application:
- If you have not done so already, configure a Twilio Application for your bot to use. For more information, see Set up your Twilio account in Get started with Voice at Ada’s Help Docs.
- Set up the widget in an Aircall Smartflow to transfer the call to your Ada Twilio Application.
- In Aircall, open the Smartflow Editor for the phone number(s) you want to route to Ada.
- Drag and drop the Ada Voice smartflow widget into your flow where you want your Ada bot to engage with end users.
- Your Aircall team will need to enable this widget for you.
- Enter your Twilio Application details in Aircall.
- In the Ada Voice Smartflow widget’s settings, paste the Twilio Application ID for your bot. You can find this in Ada under Channels > Voice > Configuration after you create a Twilio Application for your bot to use.
- You will need an Application Key - you can obtain this from your Ada Team.
- Publish your Smartflow.
When a call reaches the Ada Voice Smartflow widget in your Aircall Smartflow, it’s automatically routed to your bot in Ada.
Escalate calls directly to agents using Aircall
If an end user using your bot needs to escalate to a human agent, you can transfer the call back to an Aircall team.
- In your Ada bot handoff locked Answer use the Transfer Call block and select Aircall as the transfer option in the Transfer to dropdown.
- For Destination type choose None, Number, Team, or User.
- If you selected None as the Destination type, you do not need to provide any additional information. When this Transfer Call block runs, Ada drops from the call, the call continues in Aircall, and the Aircall Smartflow will continue from where the Ada Voice Smartflow widget was used.
- If you selected Number as the Destination type, you will need to provide a line ID for a number in Aircall. You can find the line ID in the URL path of the Aircall number page, ex. dashboard.aircall.io/numbers/line_id/call-distribution. When this Transfer Call block runs, Ada drops from the call, the call continues in Aircall, and Aircall makes a ring to the number you specified in the Transfer Call block.
- If you selected Team as the Destination type, you will need to provide a team ID for a team in Aircall. You can find the team ID in the URL path of the Aircall team page, ex. dashboard.aircall.io/teams/team_id. When this Transfer Call block runs, Ada drops from the call, the call continues in Aircall, and Aircall makes a ring to the team you specified in the Transfer Call block.
- If you selected User as the Destination type, you will need to provide a user ID for a user in Aircall. You can find the user ID in the URL path of the Aircall user page, ex. dashboard.aircall.io/users/user_id/general. When this Transfer Call block runs, Ada drops from the call, the call continues in Aircall, and Aircall makes a ring to the user you specified in the Transfer Call block.
Integrate Voice with Amazon Connect
Get calls into Ada
You will continue to receive phone calls using an Amazon Connect provisioned phone number, and you will transfer phone calls from Amazon Connect to your Ada bot’s phone number using the Amazon Connect Transfer to phone number module.
-
If you have not done so already, configure a Twilio phone number for your bot to use. For more information, see Set up your Twilio account in Get started with Voice at Ada’s Help Docs.
-
Log into your Amazon Connect account.
-
Create a new flow in Amazon Connect for inbound phone calls that you want to transfer to Ada.
-
In order to track the end user across Amazon Connect and your Ada bot, you will need to create an AWS Lambda function in the AWS Instance associated with your Amazon Connect account. This function will retrieve an Ada Call UUID for the call from Ada prior to the call being transferred to Ada.
- Navigate to the Console Home of the AWS instance that is associated with your Amazon Connect account. It should look like this:
- Navigate to Lambda. (Note: You might need to use Search to find it if it isn’t listed under your Recently visited.)
- Click Create Function on your Lambda homepage.
- Enter the following property values under your Lambda’s Basic information:
- Function name: Ada-Get-Call-ID
- Runtime: Python 3.12
- Architecture: x86_64
- Click Create function.
- Once created, you will see an editor where you are able to create a new function. Enter the following — replace
bot-handlewith your bot’s handle: - Click the Deploy button.


-
After creating, allow your Amazon Connect instance to access the Lambda.
- Go to Amazon Connect on AWS dashboard
- Click on the instance
- Click “Flows” on the left sidebar
- Scroll down to “AWS Lambda” section
- Add function created above
-
Use the Invoke an AWS Lambda function block to call your newly created AWS Lambda function and to retrieve the
uuidfrom Ada for your call. Enter the following property values:- Function ARN: Use the function created above
- Timeout: 8
- Response validation: Set to JSON
-
Use the Transfer to phone number block to transfer the call to Ada. Enter the following property values:
- Transfer via: Select Phone number, select Set manually, and provide your bot’s phone number.
- Set timeout: Select Set manually 30.
- Set Resume flow after disconnect section to Yes.
- With this enabled, once the call is transferred to Ada, if Ada is unable to resolve a conversation and it needs to be escalated then Ada will disconnect from the call and the Amazon Connect flow will resume where it left off.
- Select Send DTMF:
- Select Set Dynamically
- Namespace: External
- Key: uuid
- Select Set Dynamically
Escalate calls directly to agents using Amazon Connect
If an end user using your bot needs to escalate to a human agent, Ada will disconnect from the call and your Amazon Connect flow will resume where you left off.
- In your Ada bot handoff locked Answer use the Transfer Call block and select Amazon Connect from the Transfer to drop down menu.
- In the Amazon Connect destination queue field enter the queue ID of the queue in Amazon Connect that you want to transfer the phone call to.

-
In Amazon Connect, after the Transfer to phone number block that you set-up in Step 9 of Get calls into Ada above, you will need to invoke another AWS Lambda function. This function will retrieve a
destinationQueuevalue for the call — you can use this to determine which queue in Amazon Connect to route the call to.- Navigate to the Console Home of the AWS instance that is associated with your Amazon Connect account. It should look like this:
- Navigate to Lambda. (Note: You might need to use Search to find it if it isn’t listed under your Recently visited.)
- Click Create Function on your Lambda homepage.
- Enter the following property values under your Lambda’s Basic information:
- Function name: Ada-Get-Destination-Queue
- Runtime: Python 3.12
- Architecture: x86_64
- Click Create function.
- Once created, you will see an editor where you are able to create a new function. Enter the following — replace
bot-handlewith your bot’s handle: - Click the Deploy button.


-
After creating, allow your Amazon Connect instance to access the Lambda:
- Go to Amazon Connect on AWS dashboard
- Click on the instance
- Click “Flows” on the left sidebar
- Scroll down to “AWS Lambda” section
- Add function created above
-
Use the Invoke an AWS lambda function block to call your newly created AWS Lambda function and to retrieve the
destinationQueuefrom Ada for your call. Enter the following property values:- Destination Key: uuid
- Value: Set dynamically
- Namespace: External
- Key: uuid
- Timeout: 3
- Response validation: JSON

-
Use the
destinationQueuevalue that is returned in this Lambda function to determine what queue to send the end user to.
Integrate Voice with Twilio Flex
Get calls into Ada
-
If you want your bot to answer all calls that are made to a phone number, the best option is to configure your bot to use that phone number. For more information, see Set up your Twilio account.
-
If you don’t want your bot to answer all calls that are made to a phone number, then you can choose to just forward certain calls from Twilio Flex to Ada using Twilio Studio and a SIP INVITE transfer:
- You will need to set-up a SIP domain for your bot to use. In order to do this, see Set up your Twilio account in Get started with Voice at Ada’s Help Docs.
- You will also need the following, which your Ada team can provide to you:
- Ada Voice SIP Proxy address
- Voice SIP Proxy secret key
- Sender name
- In Twilio Studio, in the UUI header, add a
phone_numberfield, and set the value to the end user’s phone number. - Go to Twilio > Services, and use the secret key and sender name you got from Ada to generate an authentication signature by defining a function:
- Use a Run Function widget to pass the output from the above to a linked Connect Call To widget.
- In the Connect Call To widget, you will need to set the SIP address using Ada Voice SIP Proxy address that your Ada Team provided to you.
Escalate calls directly to agents using Twilio Flex
If an end user using your bot needs to escalate to a human agent, you can hand them off using a SIP INVITE transfer to Twilio Flex. You can pass information about the end user and the conversation using the User-to-User header, such as the queue that you want to send the end user to or the language of the end user.
To do this, make sure you have the following:
- A SIP domain on Twilio.
- This is an additional SIP domain to the one you set up for your bot. When your bot is handing off a call, this is the SIP domain that your bot will transfer the call to. You will configure this SIP domain so that when a call is transferred to it a new Twilio Studio flow will initiate.
- An instance of Twilio Flex.
-
Set up a basic trigger in Twilio Studio
- Go to Studio > Flows > Create new flow, and give your flow a name, e.g.,
voice-twilio-flex-flow. - Create a simple branch off of incoming calls, and add a Say or Play block to it. Here’s an example, where incoming calls get the message “Transfer from Ada complete”:
- Configure your SIP domain to forward incoming calls to this flow.
- You can do this by going to your SIP domains configuration settings.
- Under Call Control Configuration, select Twilio Studio from the drop down menu located beside A CALL COMES IN.
- In the drop down menu beside that, select the name of your Twilio Studio flow.
- In your Ada bot handoff locked Answer use the Transfer Call block and select SIP address from the Transfer to drop down menu. Enter the SIP address you created for your new Twilio Studio Flow in the SIP address field.
- If the transfer is successful, you should hear the message you added; in our example, “Transfer from Ada complete.”


- Go to Studio > Flows > Create new flow, and give your flow a name, e.g.,
-
Pass information in the User-to-User (UUI) header.
- To pass data in the SIP User-to-User header in the Ada Transfer Call block select the checkbox beside Include a User-to-User header when transferring to the SIP address.
- Click +Add another row and provide a key value pair in the Key and Value fields.
- Repeat this for additional data fields you want to pass.
- In the flow you created, add a function to the Say/Play block, with the following attributes:
- Widget name: Add a name
- Service:
HEX-to-ASCII - Environment:
ui - Function:
/getUUIHeaders - Function URL:
https://hex-to-ascii-3794.twil.io/getUUIHeaders - Function Parameters: set
UUI_Headersto{{trigger.call.SipHeader_User-to-User}} - Go to Develop > Function sand Assets > Services.
- Define the service and implementation of the function. Here’s an example of a function that extracts the UUI headers, and decodes them from HEX if needed:
- Click Deploy All to deploy your changes, and turn on the Live logs on toggle.
- Try transferring a call again like you did earlier, but this time, include some data in the User-to-User header. You should see those extracted variables in your live logs.

Integrate Voice with Dixa
This section takes you through how to transfer calls between Ada and Dixa.
Get calls into Ada
- You will continue to receive phone calls using a Dixa provisioned phone number, and you will transfer phone calls from Dixa to your Ada bot’s phone number. For more information, see the Forward call section in Create a Phone Flow at Dixa’s documentation. You will also need to configure a Twilio phone number for your bot to use. For more information, see Set up your Twilio account in Get started with Voice at Ada’s Help Docs.
Escalate calls directly to agents using Dixa
If an end user using your bot needs to escalate to a human agent, you can hand them off using a SIP INVITE transfer to Dixa.
- Get the Ada IP address allowlist from your Ada team.
- Ask your Dixa Team to allowlist the Ada IPs, and ask them for your Dixa SIP domain.
- In your Dixa instance, go to Settings > Phone, and configure a DID number.
- In your Ada bot handoff locked Answer use the Transfer Call block and select SIP address from the Transfer to drop down menu.
- In the SIP address field, enter
<DID>@<DIXA_SIP_DOMAIN>, where:<DID>: The destination number in Dixa that is being reached, in E164 format with a leading+.<DIXA_SIP_DOMAIN>: Dixa’s SIP domain, which you got from the Dixa team.
- Select the checkbox beside Include a User-to-User header when transferring to the SIP address.
- Click +Add another row.
- For Key, enter the key name
phone_number. - For Value, select the
phone_numbermetavariable.
If required, you can assign different phone numbers to different departments. For example, you can configure one number for handoffs related to billing issues, and another one related to sales inquiries. To learn how to do this, see Buy a Phone Number at Dixa’s documentation.
Integrate Voice with Genesys Cloud
Get calls into Ada
You will continue to receive phone calls using a Genesys Cloud provisioned phone number, and you will transfer phone calls from Genesys Cloud to your Ada bot using a SIP INVITE made to your bot’s SIP domain.
-
If you have not done so already, configure a Twilio SIP domain for your bot to use. For more information, see Set up your Twilio account in Get started with Voice at Ada’s Help Docs.
-
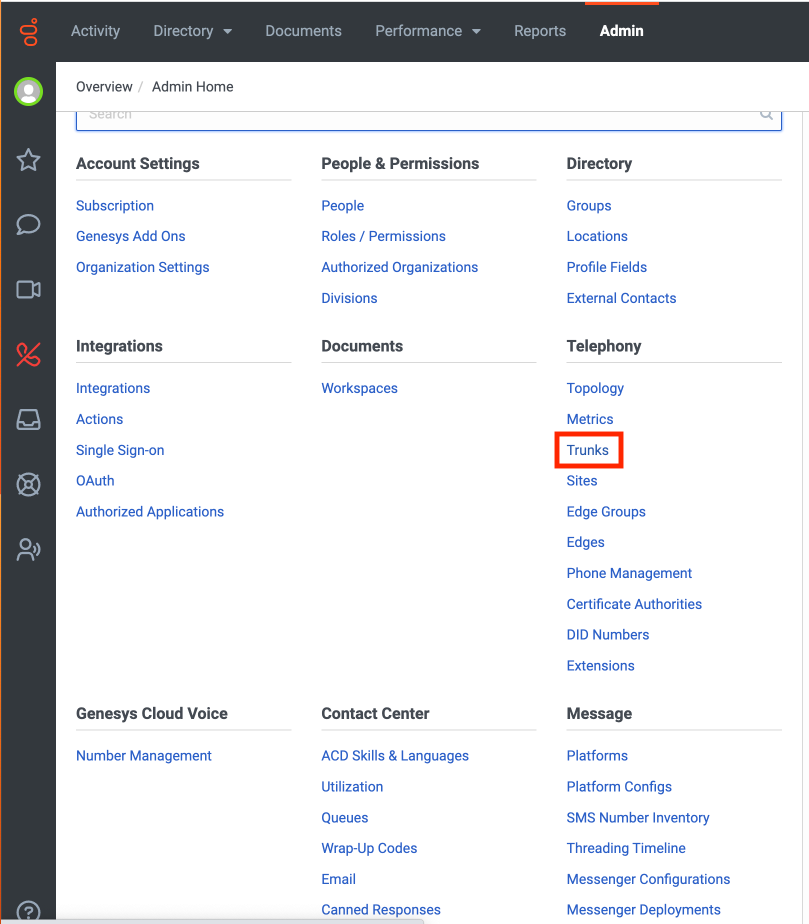
Log into your Genesys Cloud account, then go to the Admin tab.
-
Under Telephony, click Trunks.
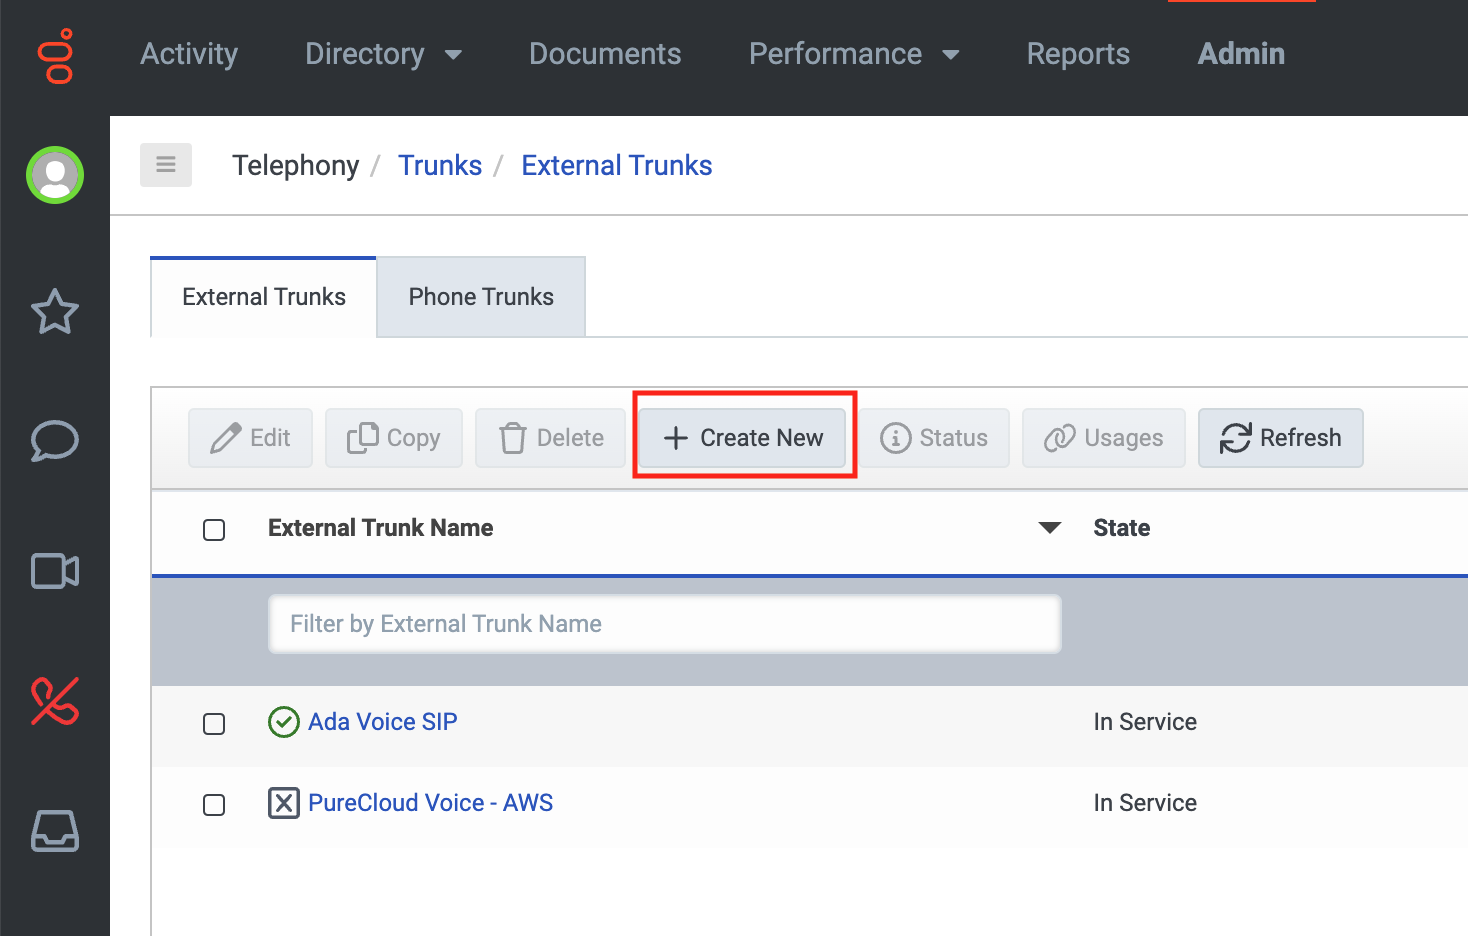
- On the External Trunks tab, click Create New. The Create External Trunk page opens.
-
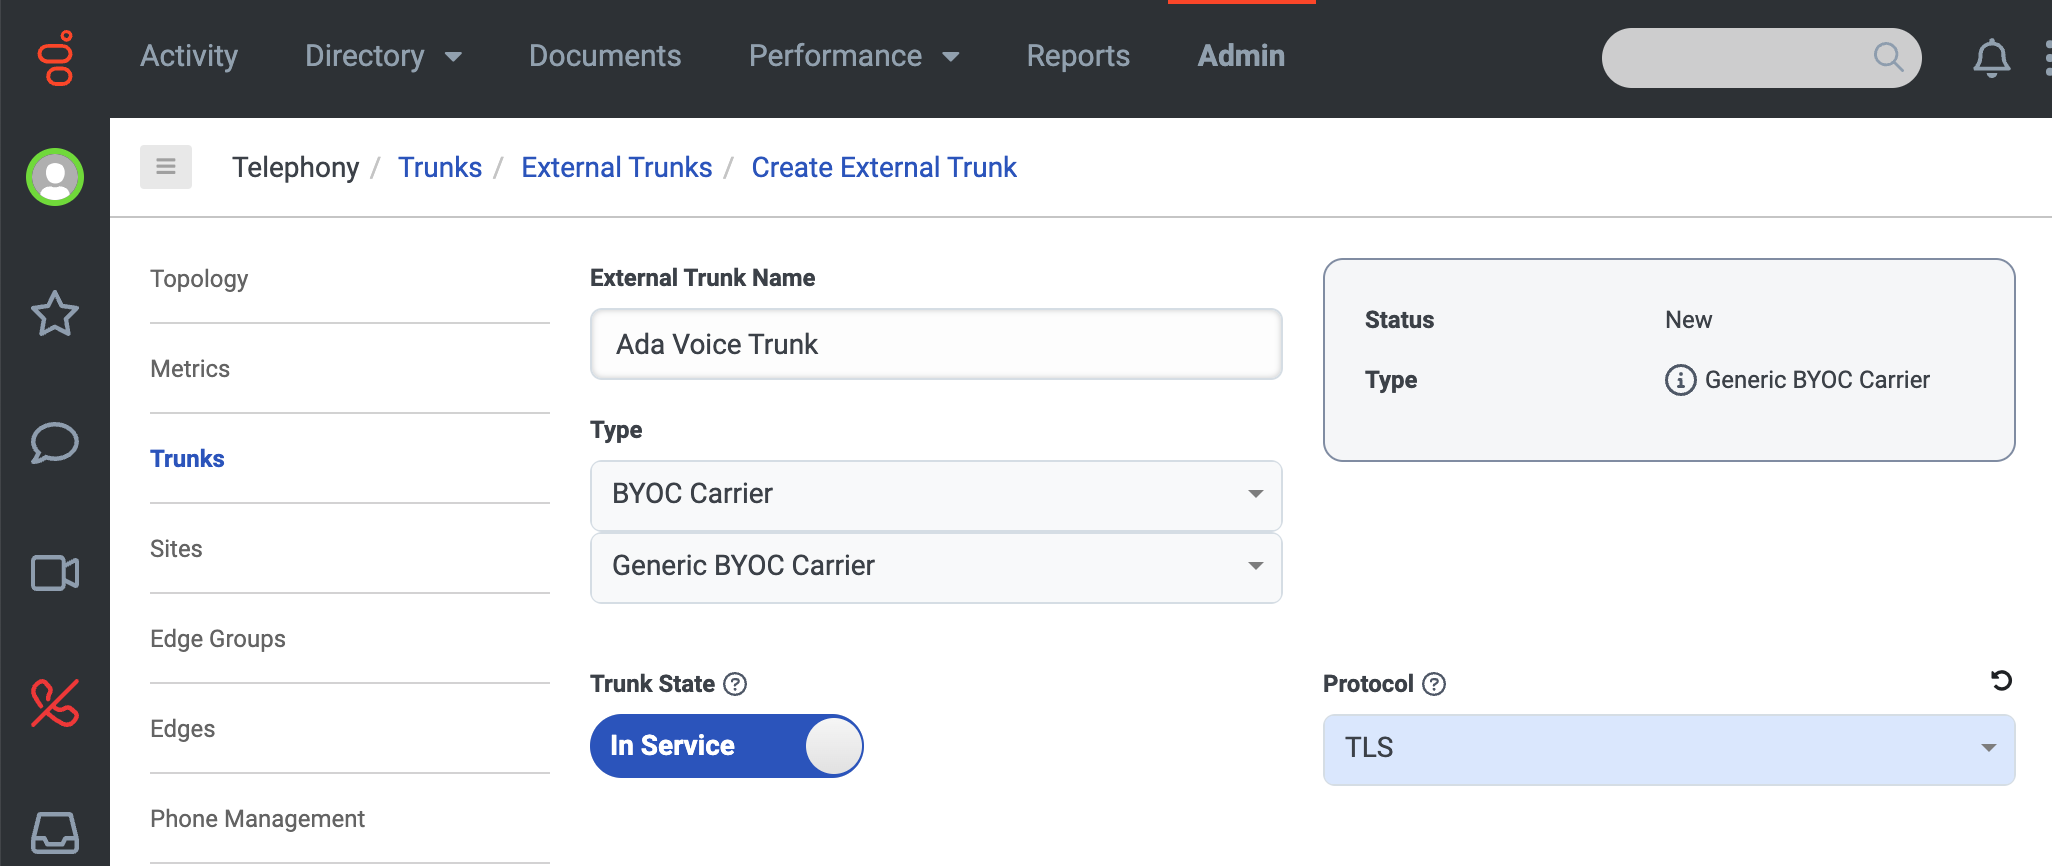
On the Create External Trunk page, fill in the following fields:
- Under External Trunk Name, enter a name (e.g.,
Ada Voice trunk). - Under Type, select BYOC Carrier and Generic BYOC Carrier.
- Under Protocol, select TLS.
- Under External Trunk Name, enter a name (e.g.,
-
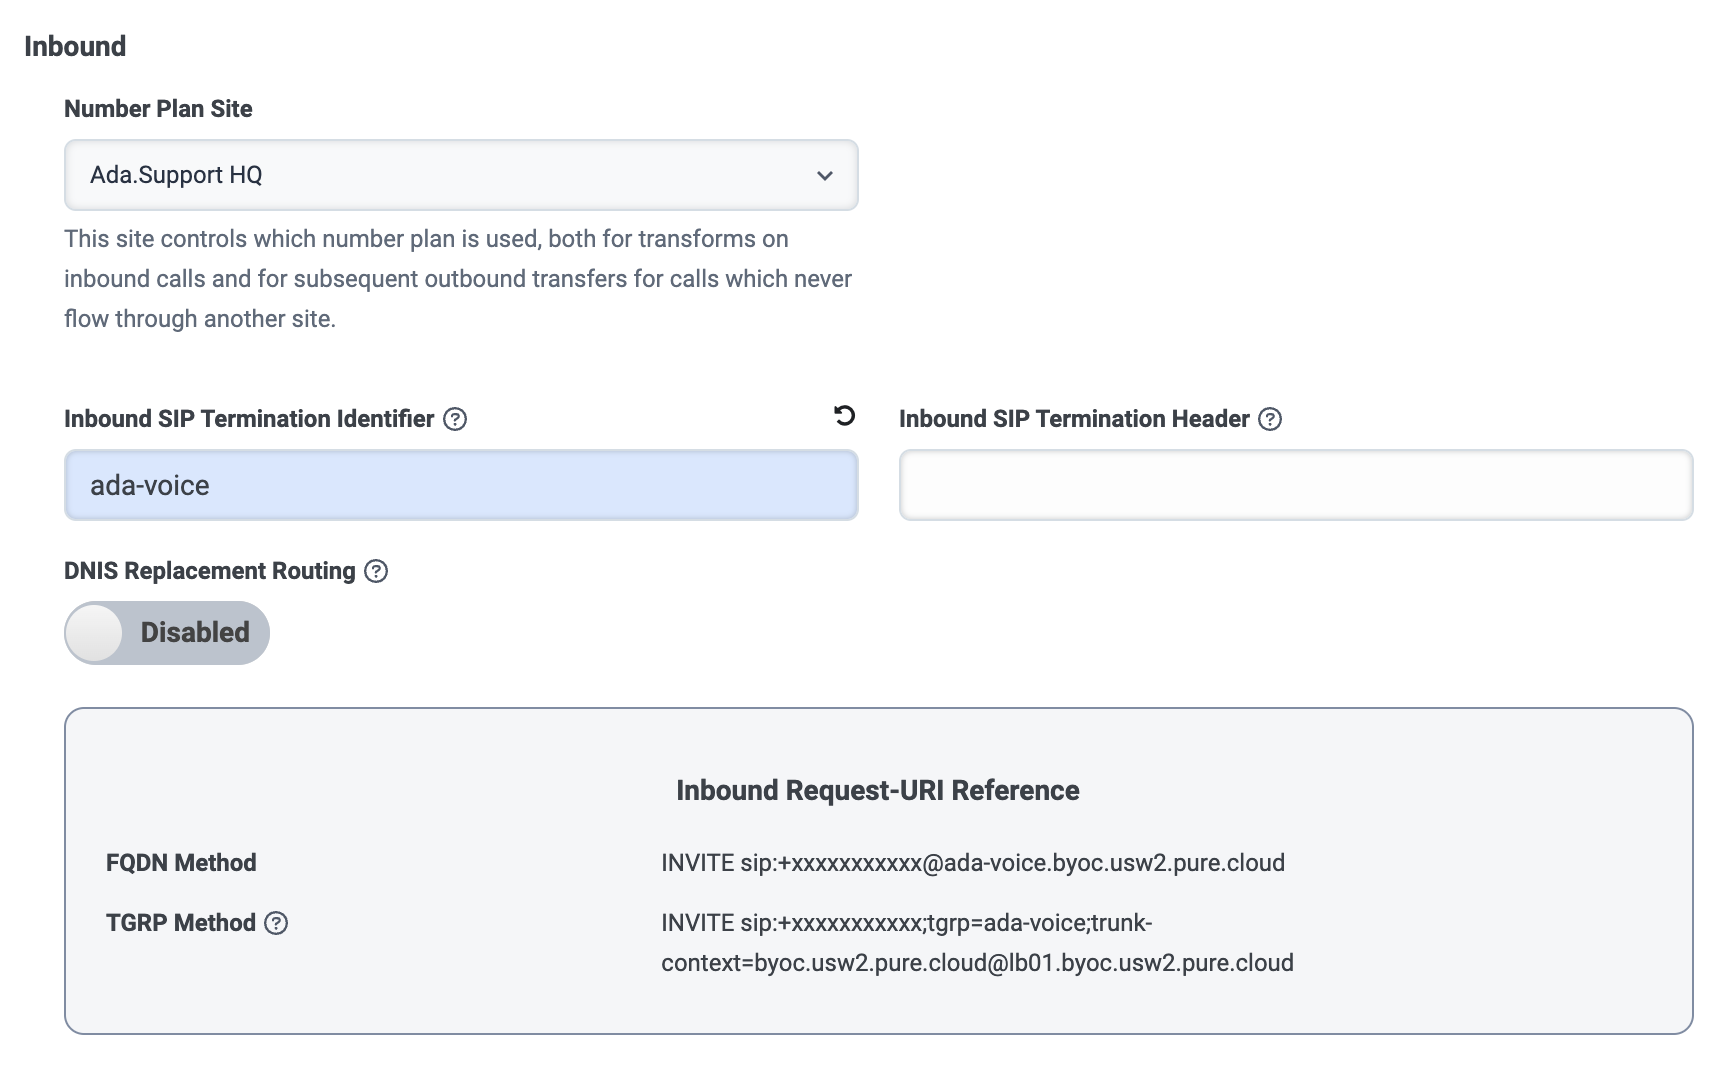
In the Inbound section, fill in the following fields:
- Under Number Plan Site, select your main Genesys site. For more information, see About sites at the Genesys Cloud Resource Center.
- Under Inbound SIP Termination Identifier, enter a name
(e.g.,
ada-voice). - You can leave the Inbound SIP Termination Header field blank.
-
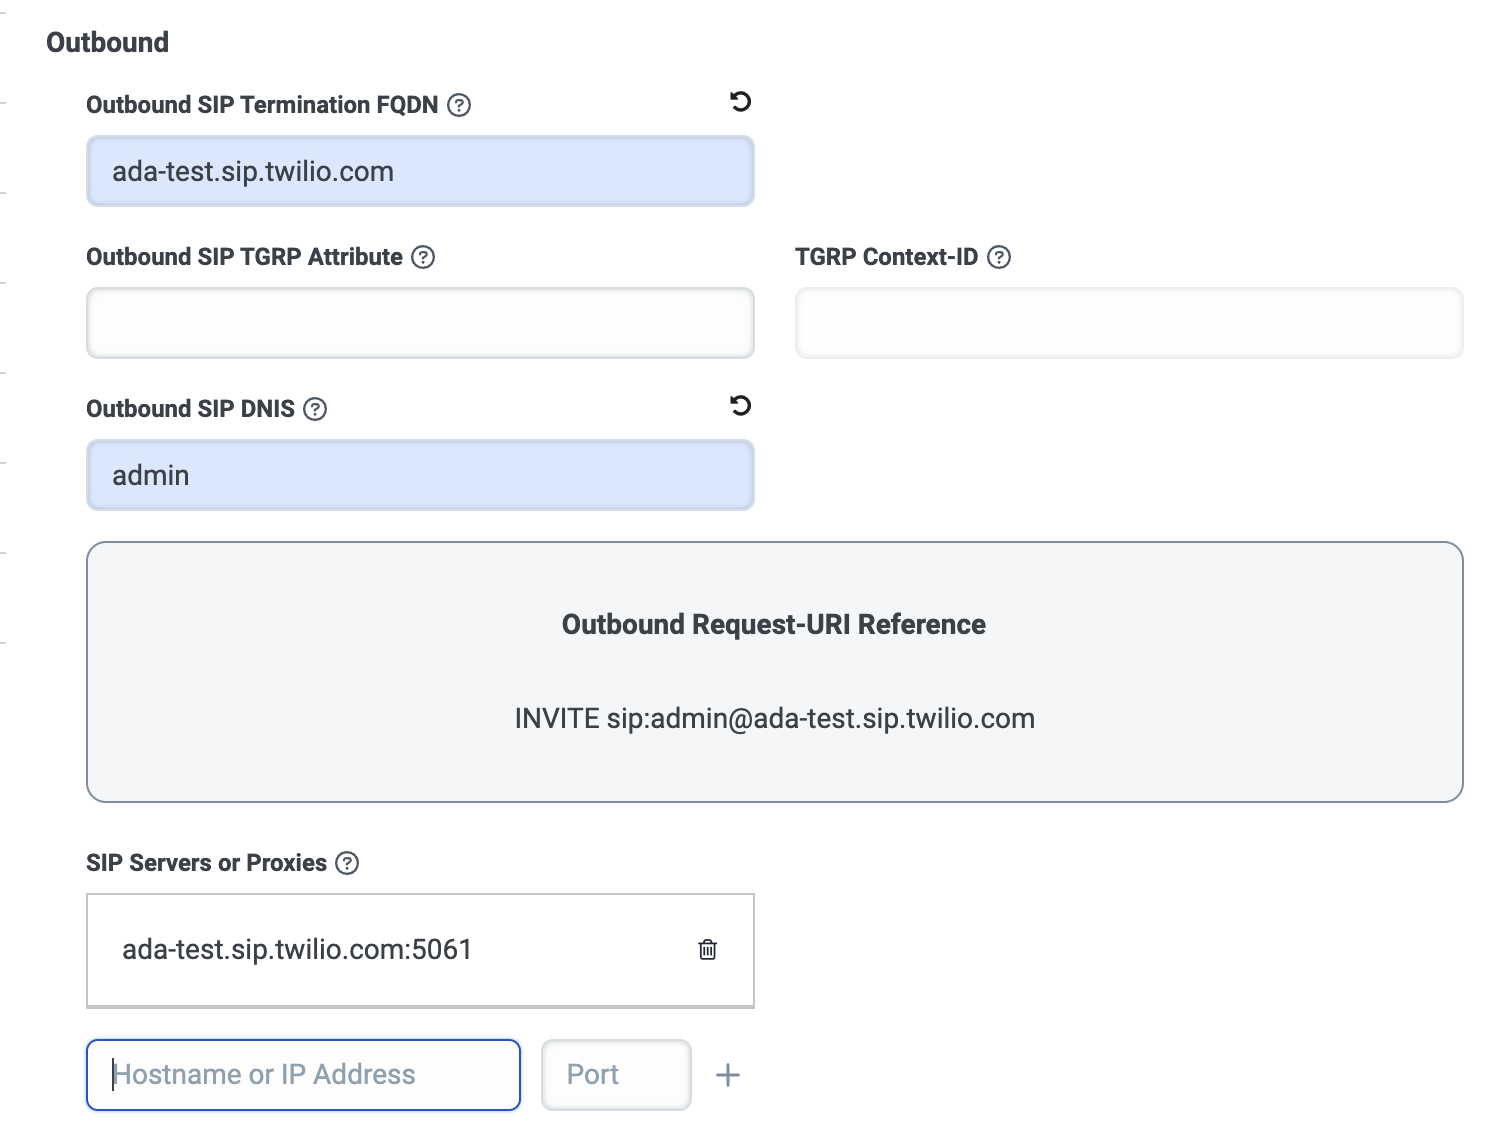
In the Outbound section, fill in the following fields:
- Under Outbound SIP Termination FQDN, enter the Twilio SIP domain that you created for your bot in Step 1.
- Under Outbound SIP DNIS, enter
admin. - Under SIP Servers or Proxies, in the Hostname or IP
Address field, enter your SIP domain, and in the Port
field, enter
5061. Then, click the + icon to add it.
-
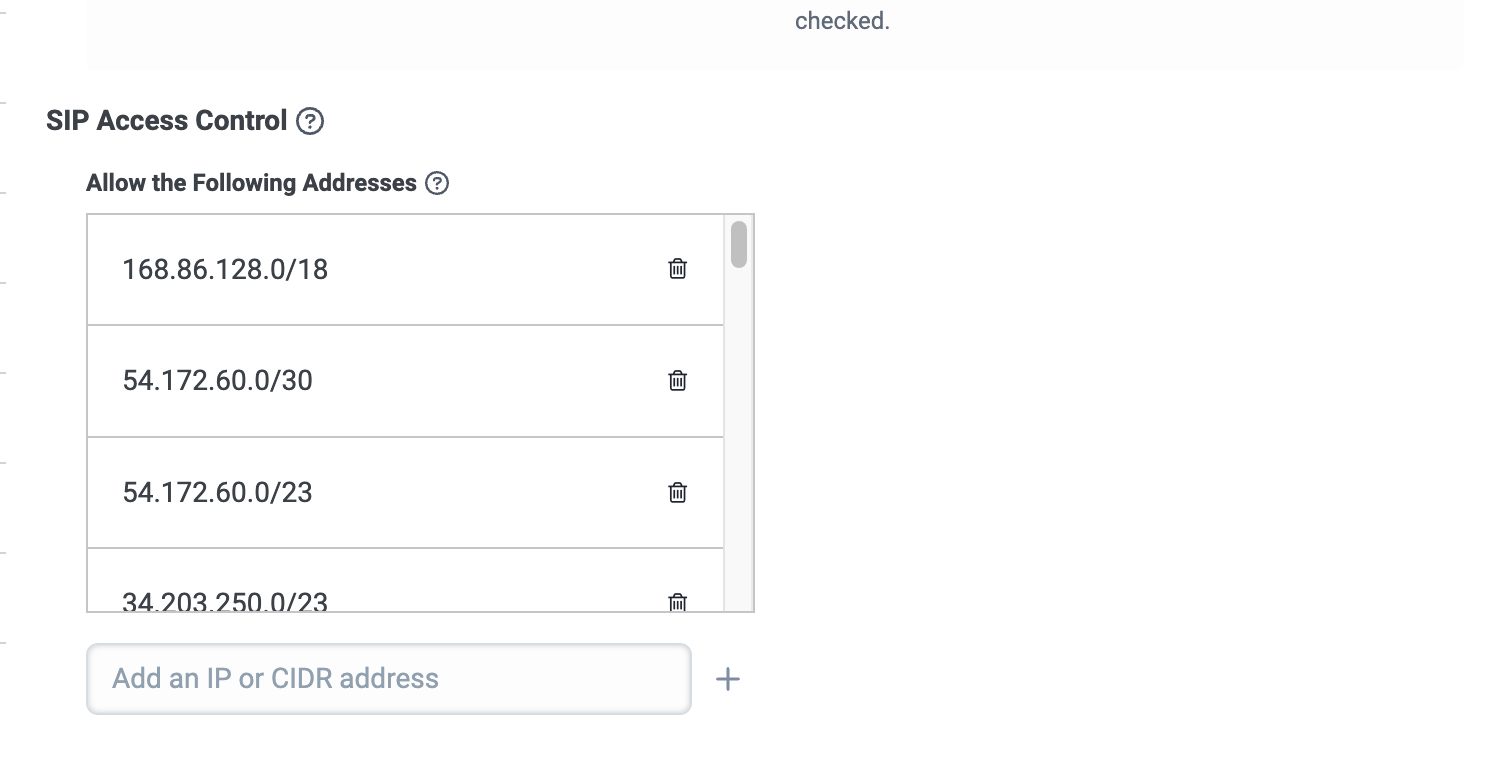
Under SIP Access Control, in the Add an IP or CIDR address field, enter each of the following CIDR addresses, one at a time, and click the + icon to add it.
These are all of Twilio’s SIP IP addresses. For more information, see IP Addresses for Elastic SIP Trunking Services at Twilio Docs.
-
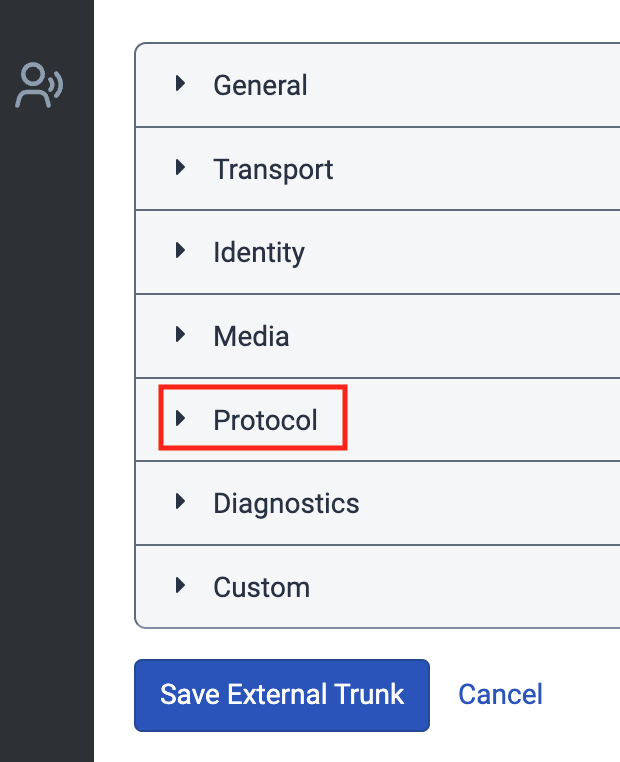
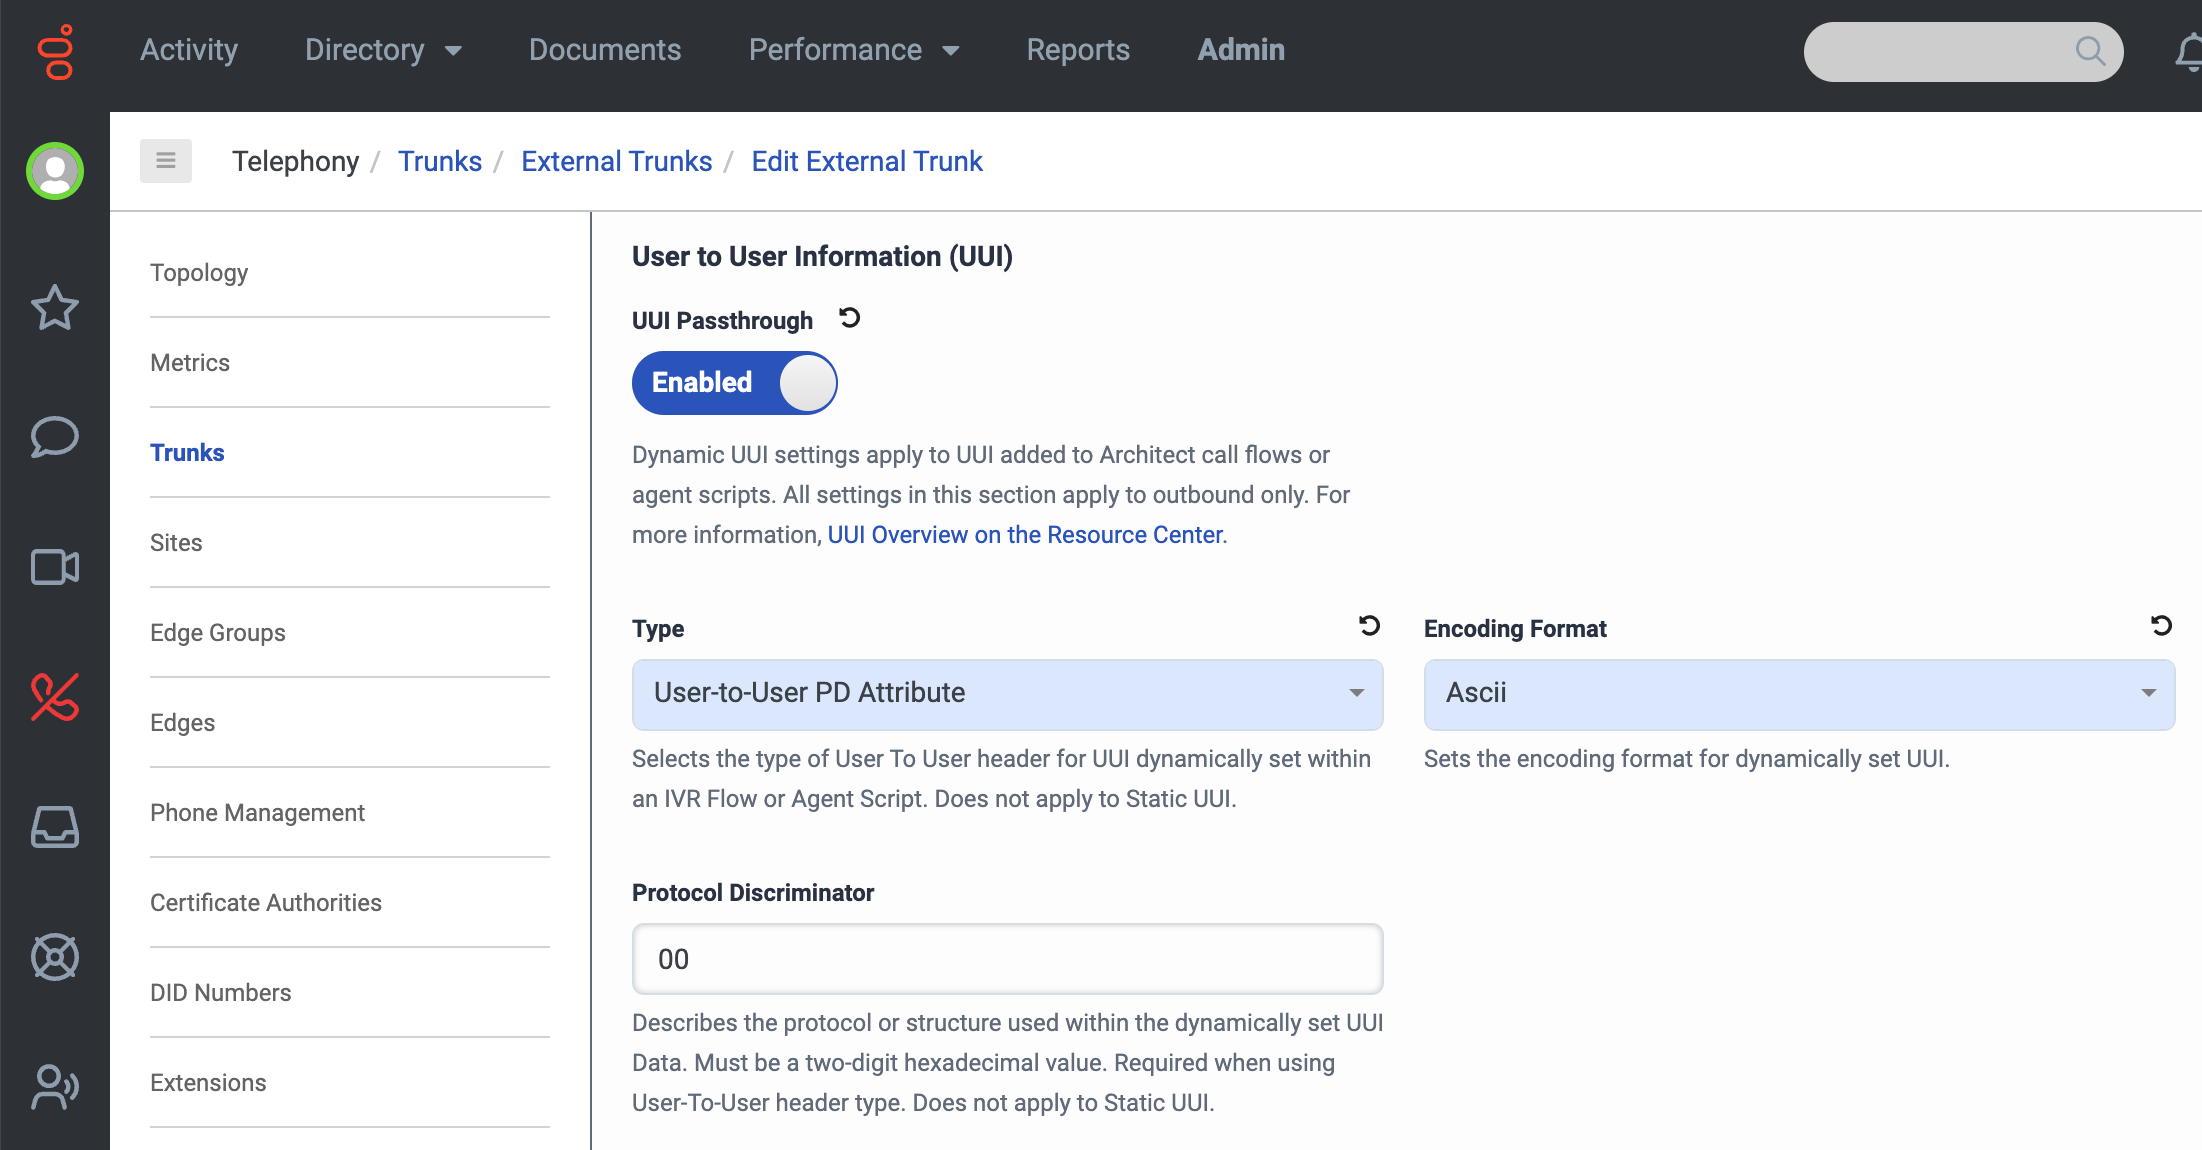
Click the Protocol section of the page to expand it. Then, under User to User Information (UUI), do the following:
- Click the UUI Passthrough toggle so it’s Enabled.
- Under Type, select User-to-User PD Attribute.
- Under Encoding Format, select Ascii.
-
Under Transfer, click the Take Back and Transfer and Release Link Transfer (RLT) toggles so they’re both Enabled.
-
Click Save External Trunk.
Connect your SIP trunk to a number plan
-
If you have not done so already, configure a Twilio SIP domain for your bot to use. For more information, see Set up your Twilio account in Get started with Voice at Ada’s Help Docs.
-
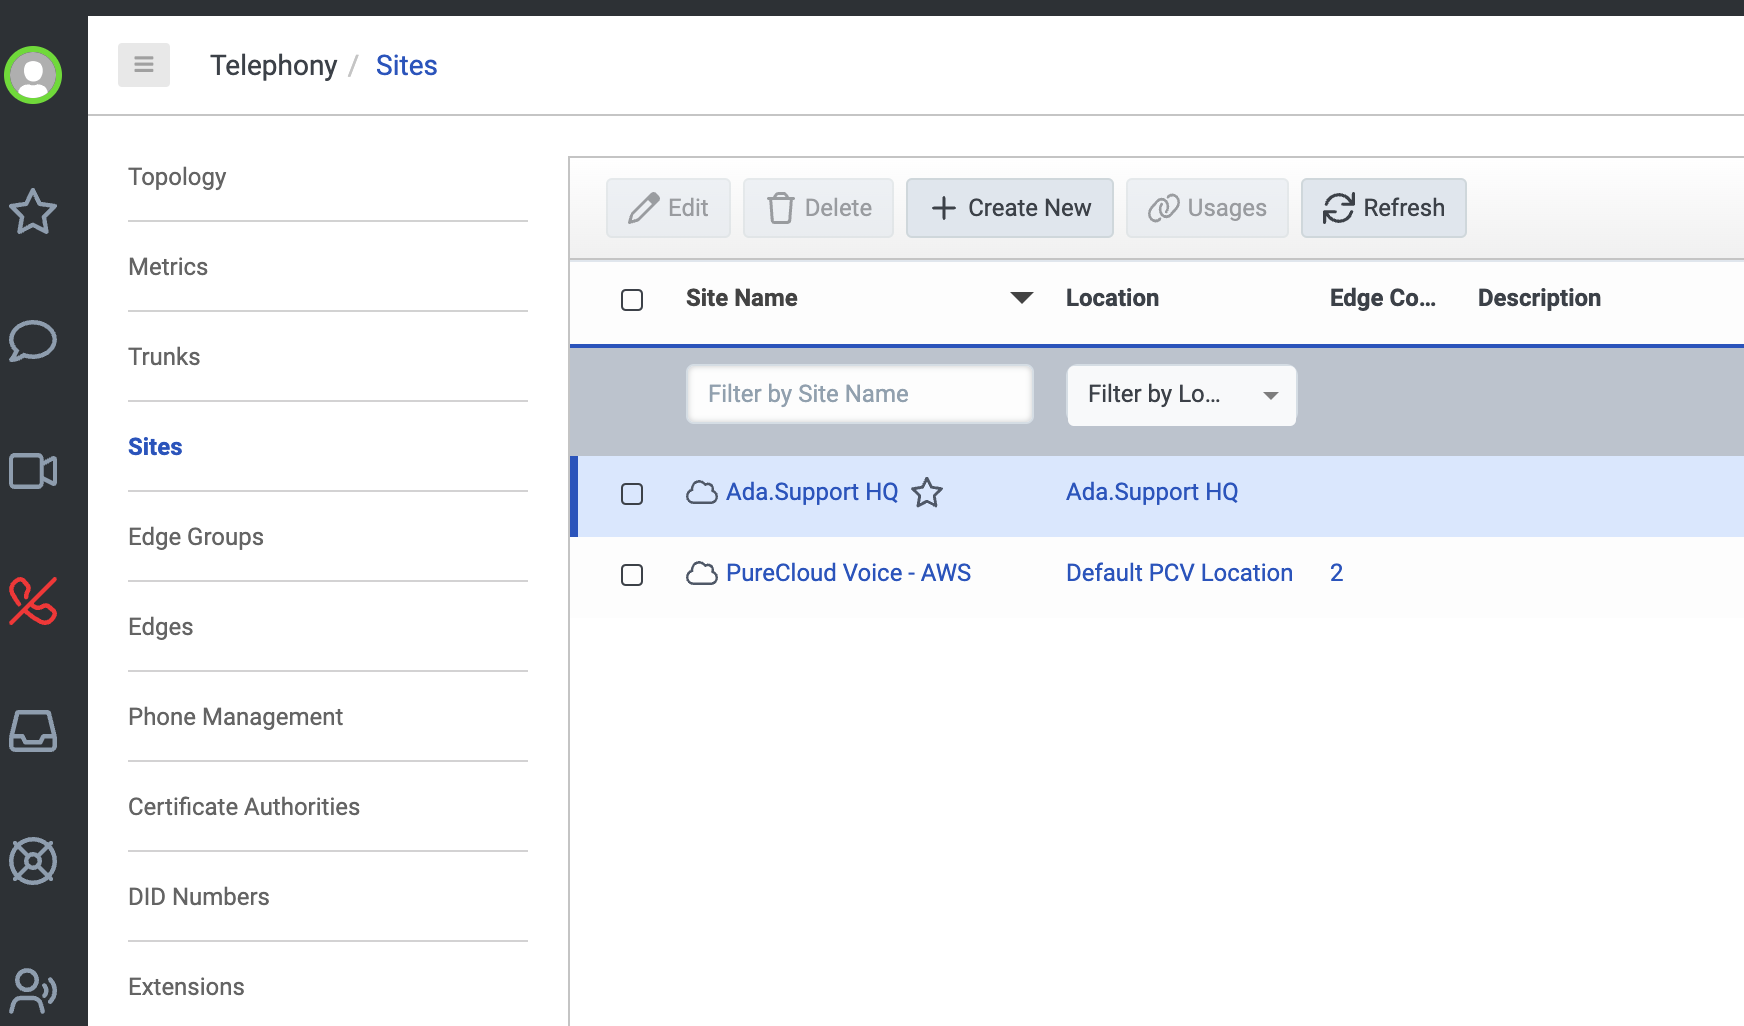
In Genesys Cloud, go to Telephony > Sites and select your main site. For more information, see About sites at the Genesys Cloud Resource Center.
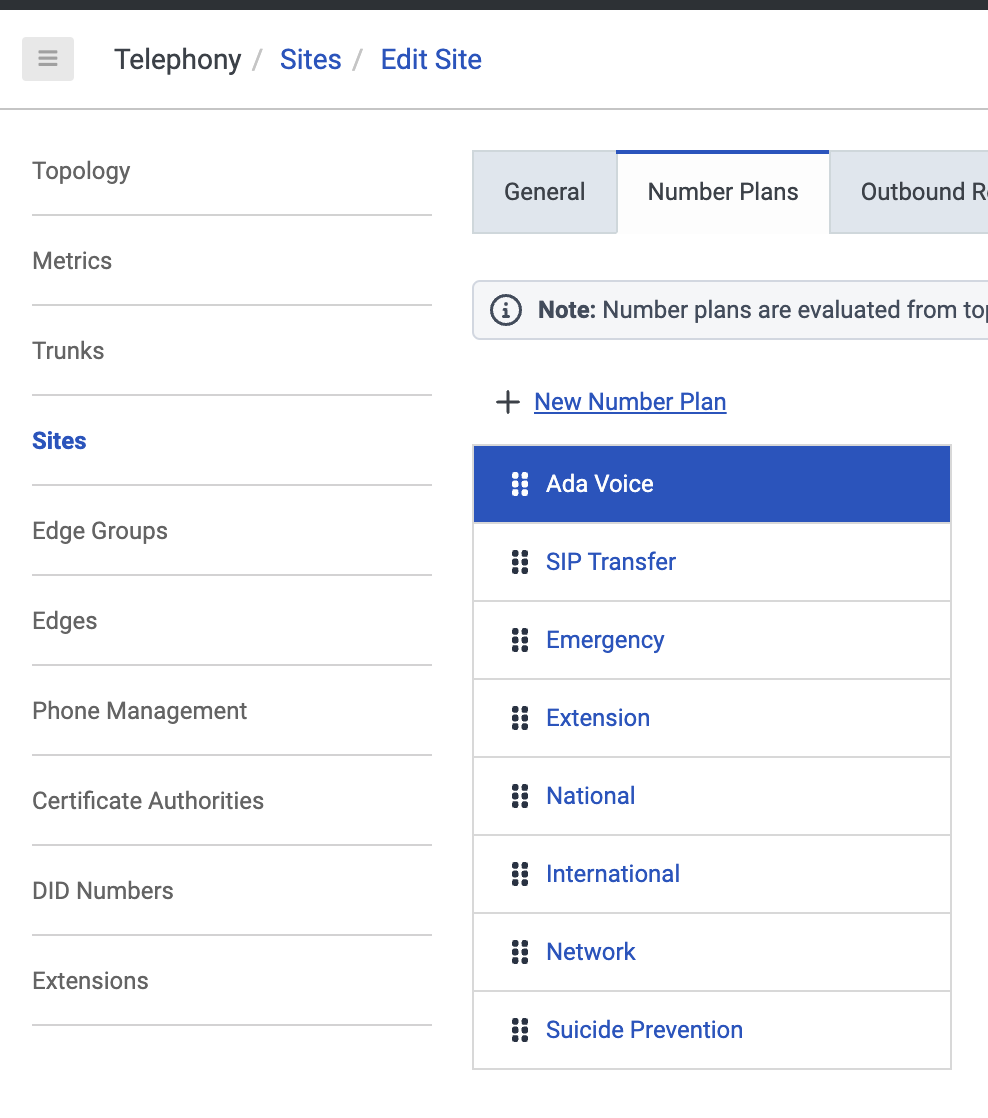
- On the Number Plans tab, click New Number Plan.
-
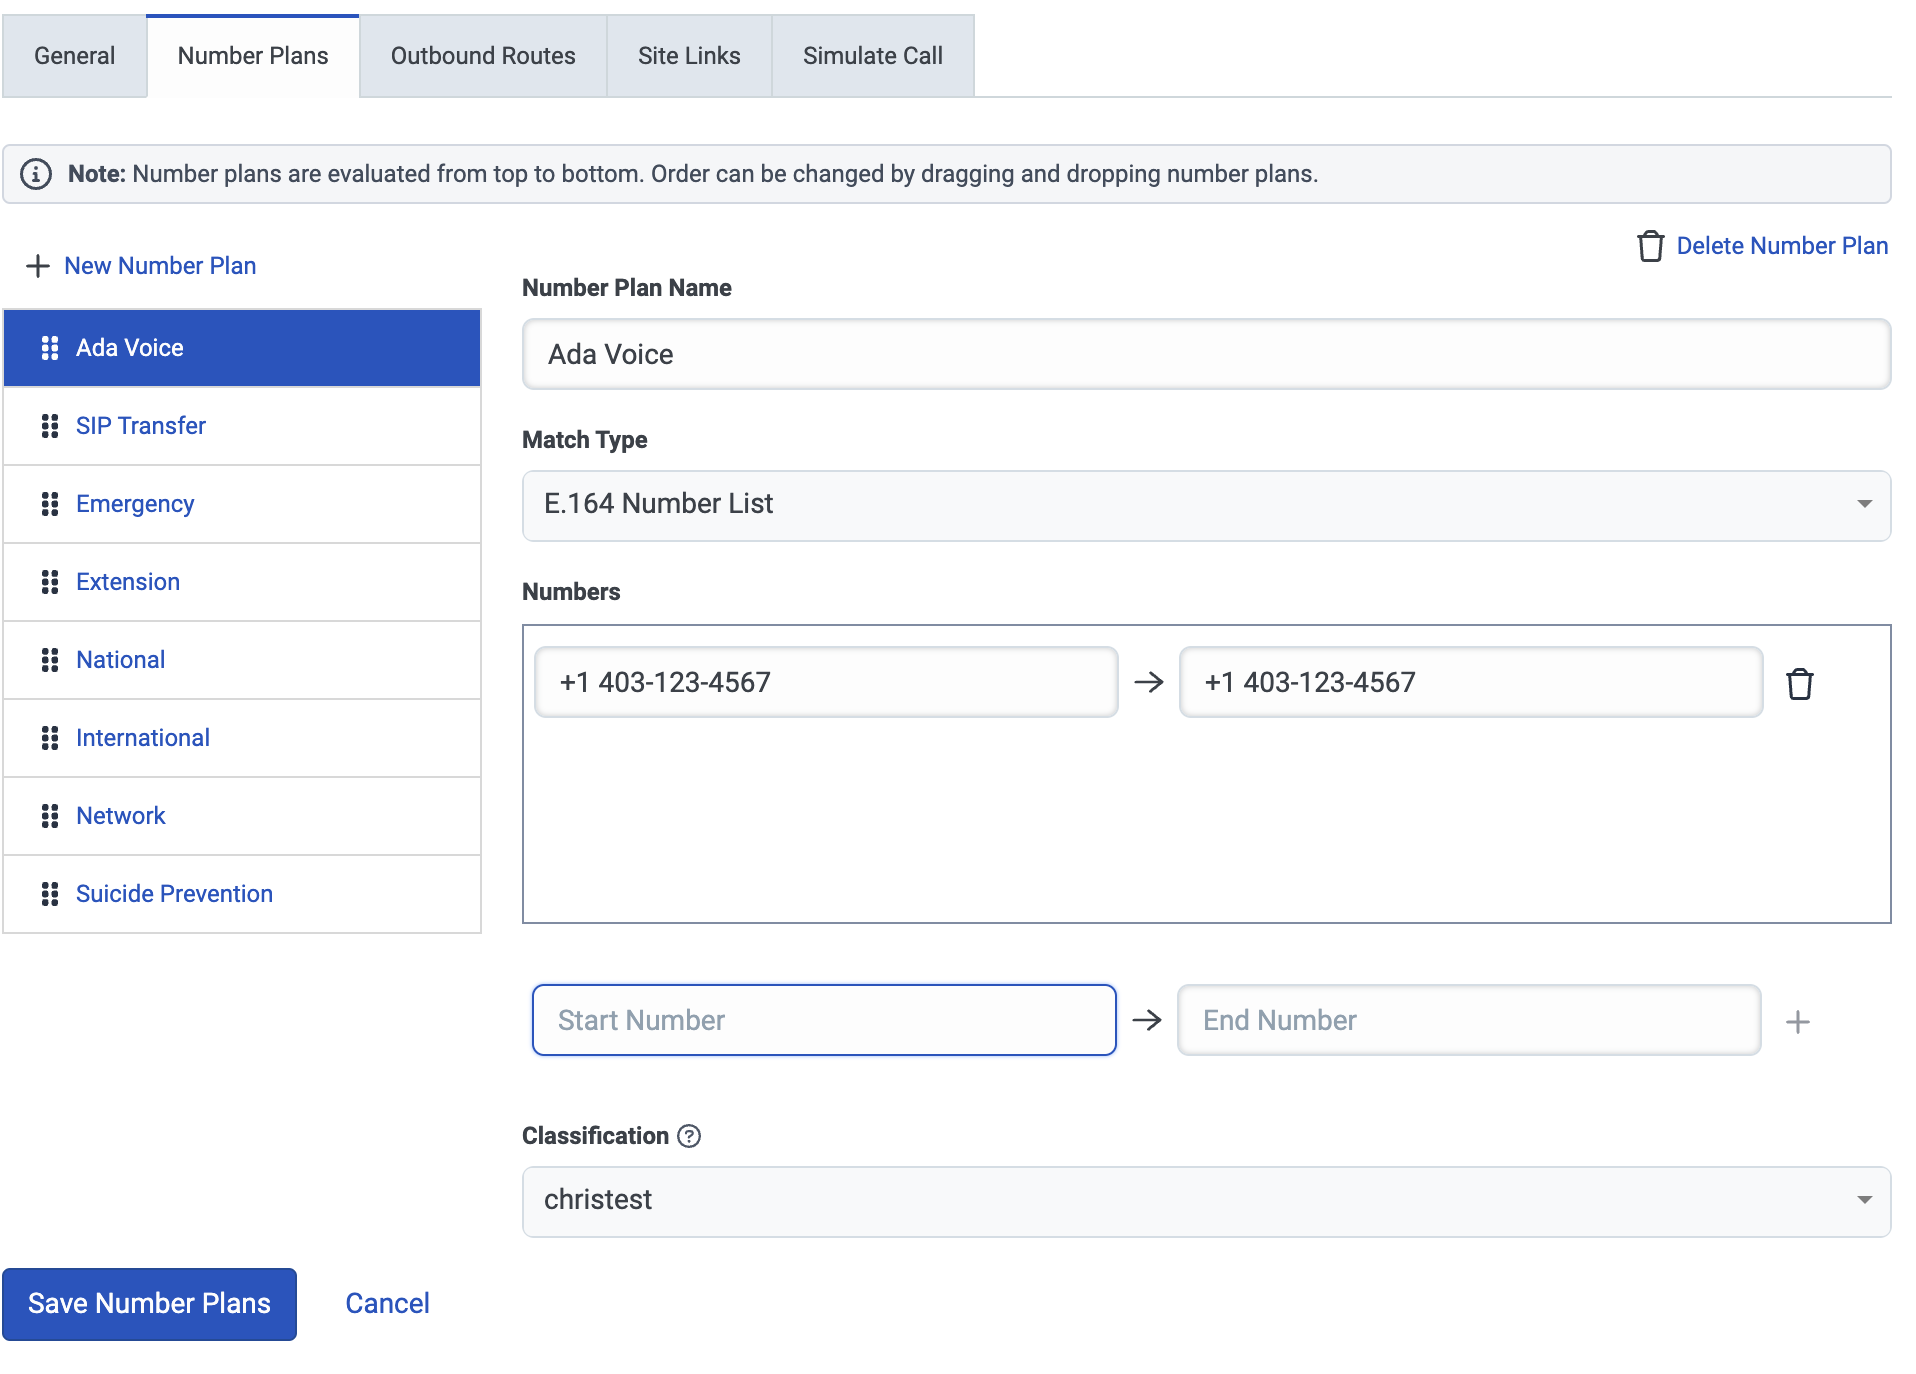
On the page that opens, fill in the following fields:
- Under Number Plan Name, enter a name.
- Under Match Type, select E.164 Number List.
- Under Numbers, enter the range of numbers that, when dialed from your system, will transfer to Ada Voice. These can be placeholders, and they can be the same number to indicate that the range only contains one phone number.
- Under Classification, choose a classification.
-
Click Save Number Plans.
-
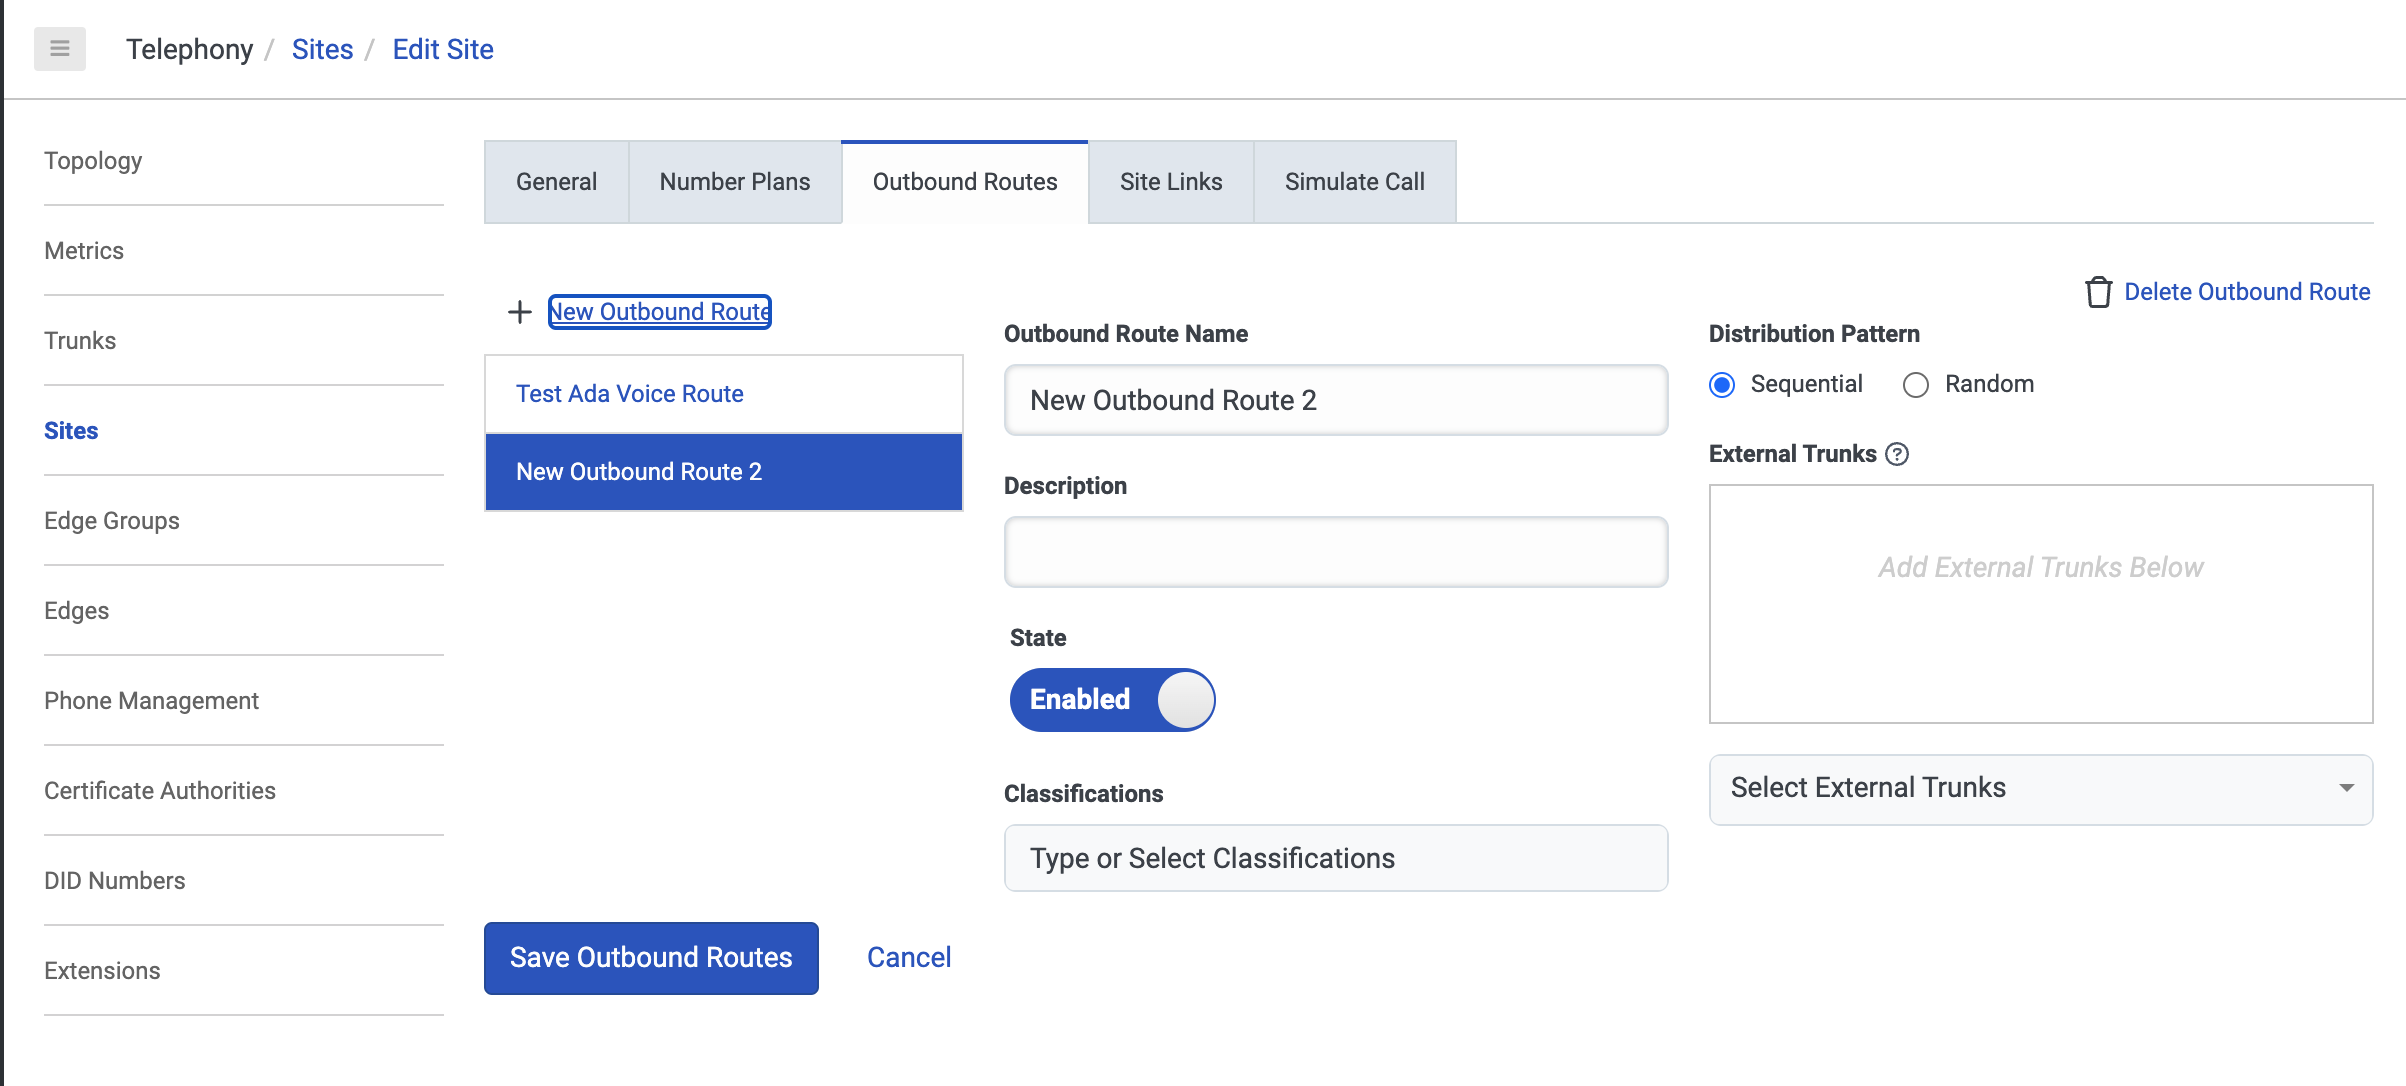
On the Outbound Routes tab, click New Outbound Route.
-
On the page that opens, fill in the following fields:
- Under Outbound Route Name, enter a name.
- Under Classifications, choose one or more classifications.
- Under External Trunks, click Select External Trunks and select the SIP trunk you created.
- Under Classifications, add a classification for your Outbound Route. This must match the Classification that you used for your Number Plan.
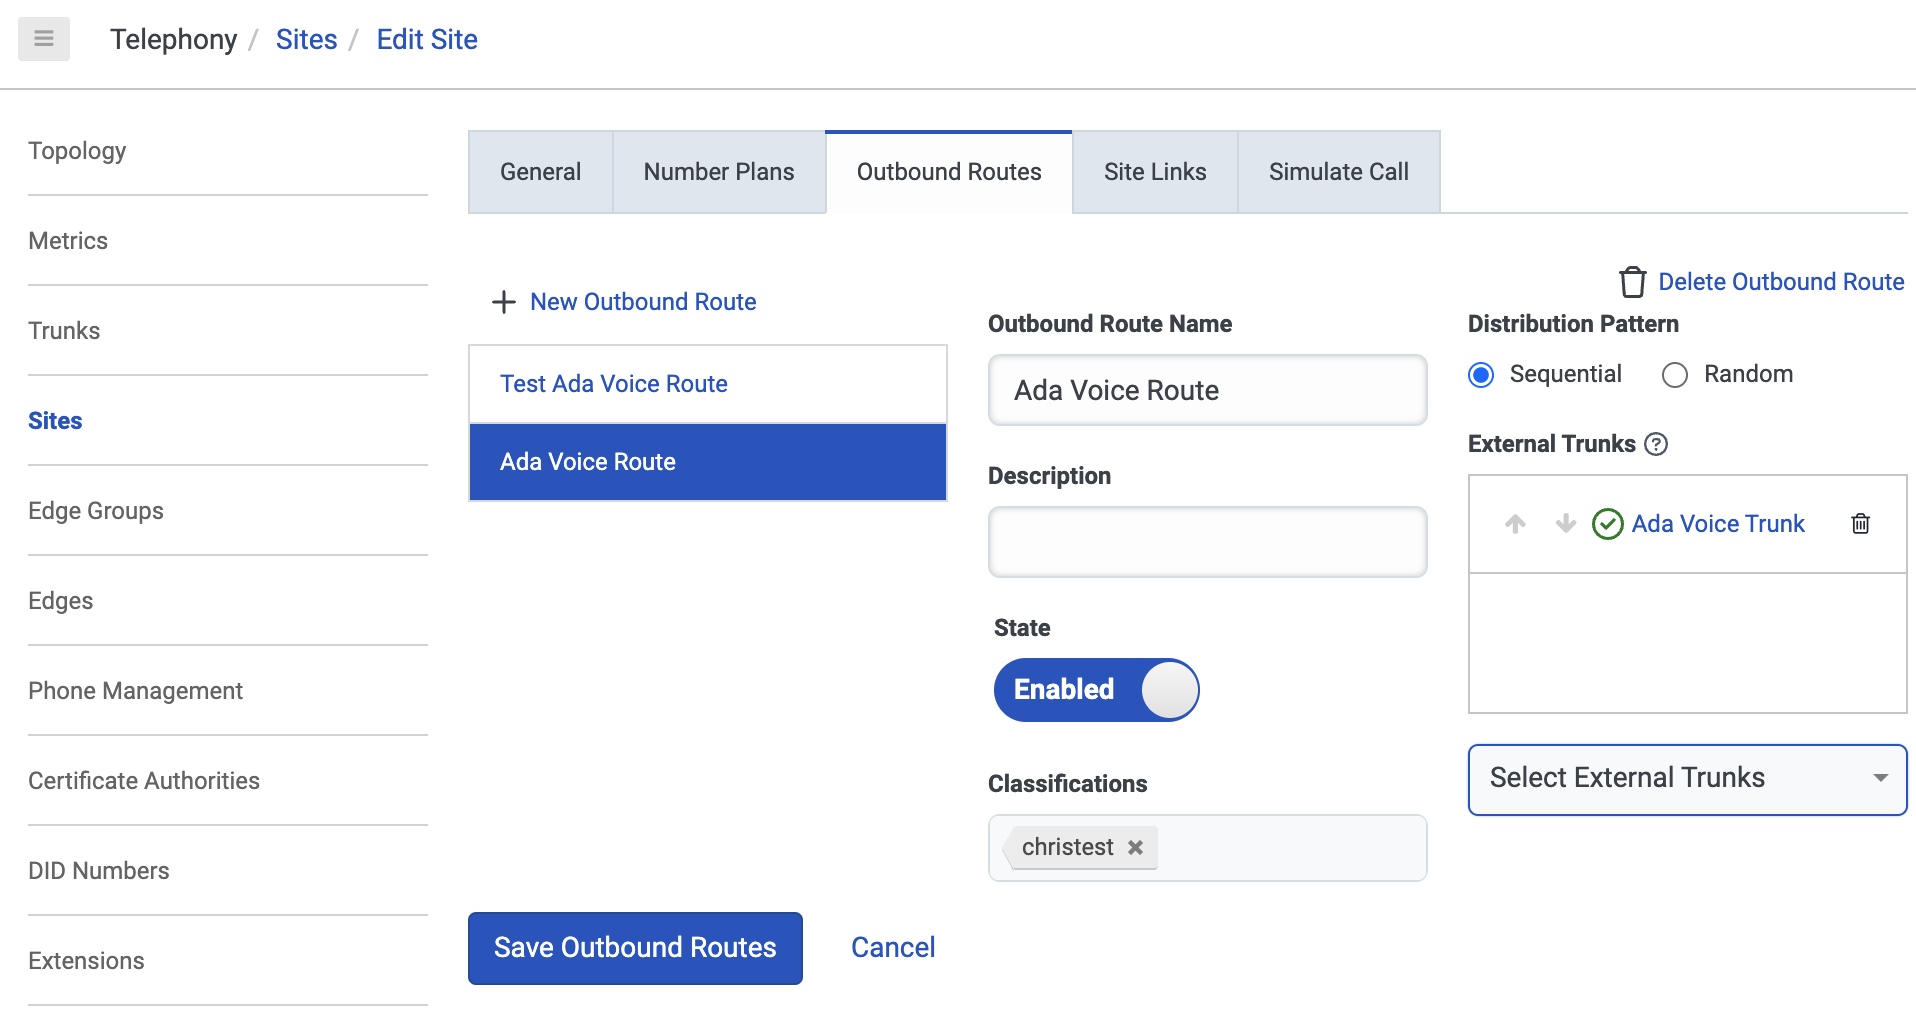
- Click Save Outbound Routes.
Create a call flow that transfers to Ada Voice
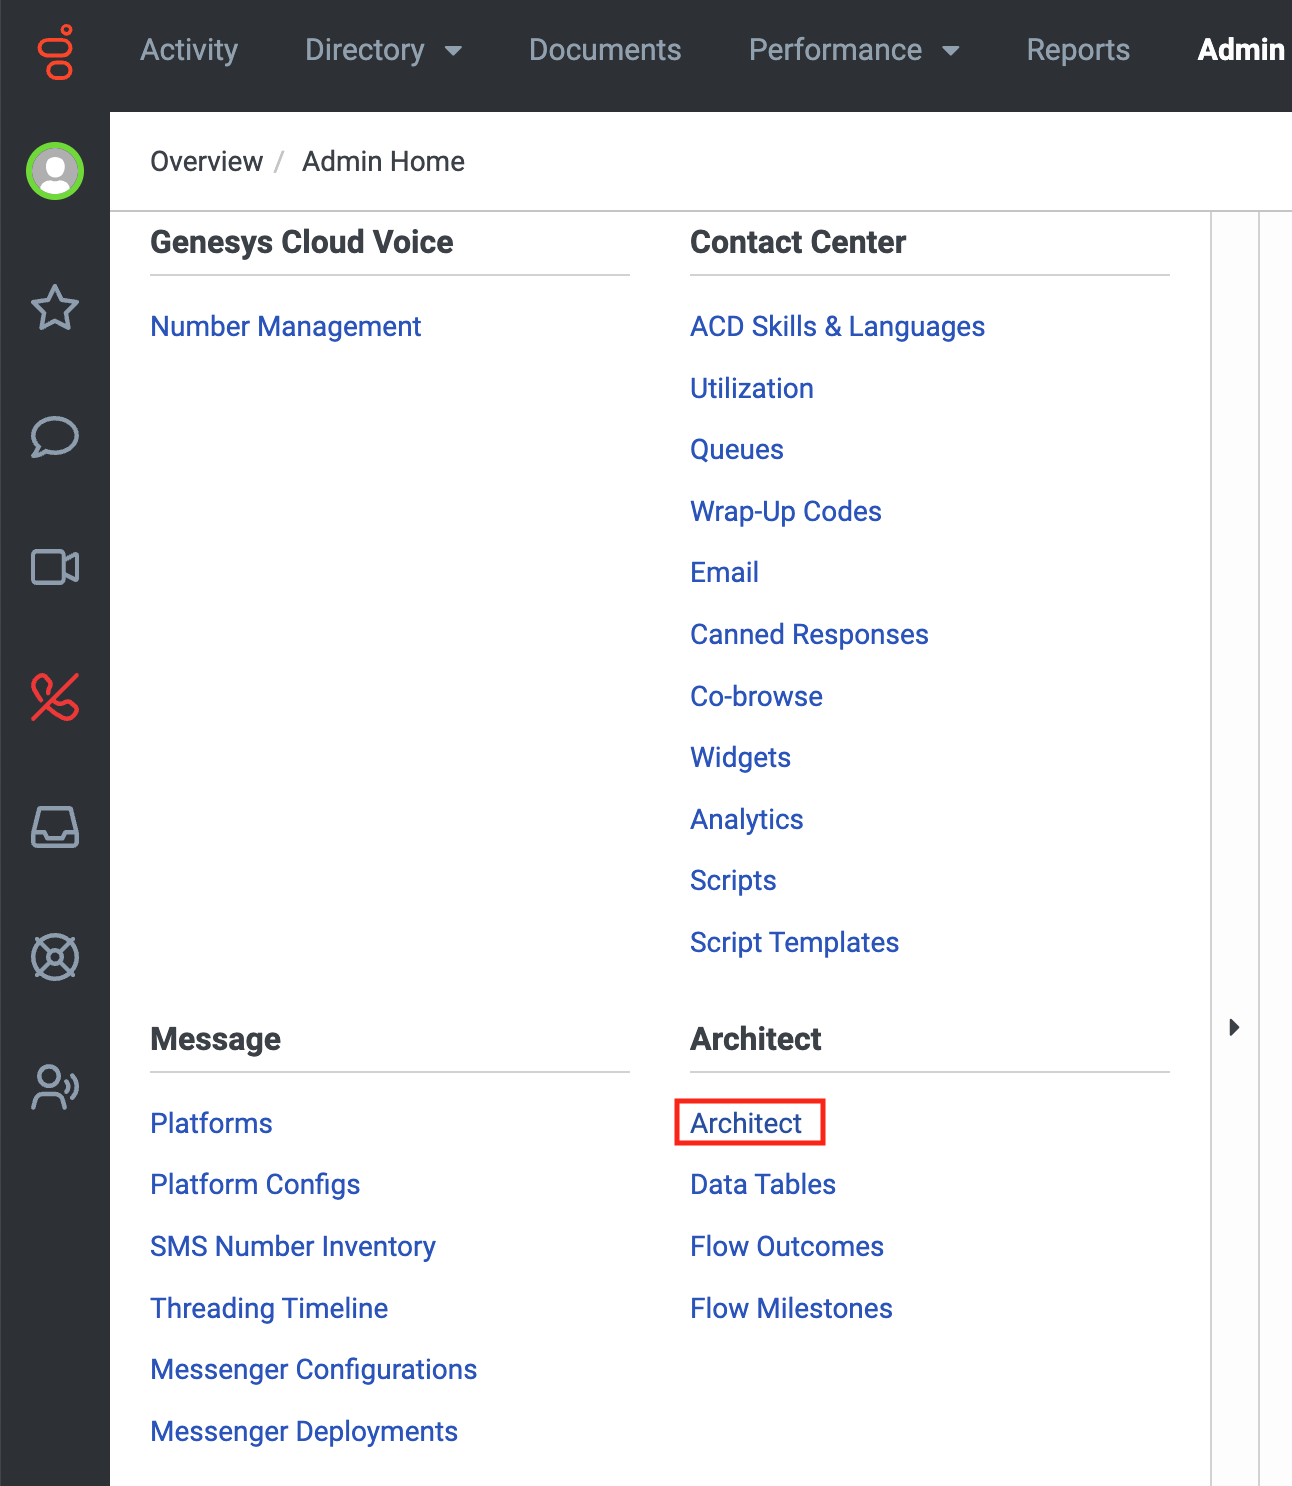
- In Genesys Cloud, on the Admin tab, click Architect.
-
Select the call flow you want to transfer to Ada Voice. The Inbound Call Flow page opens.
-
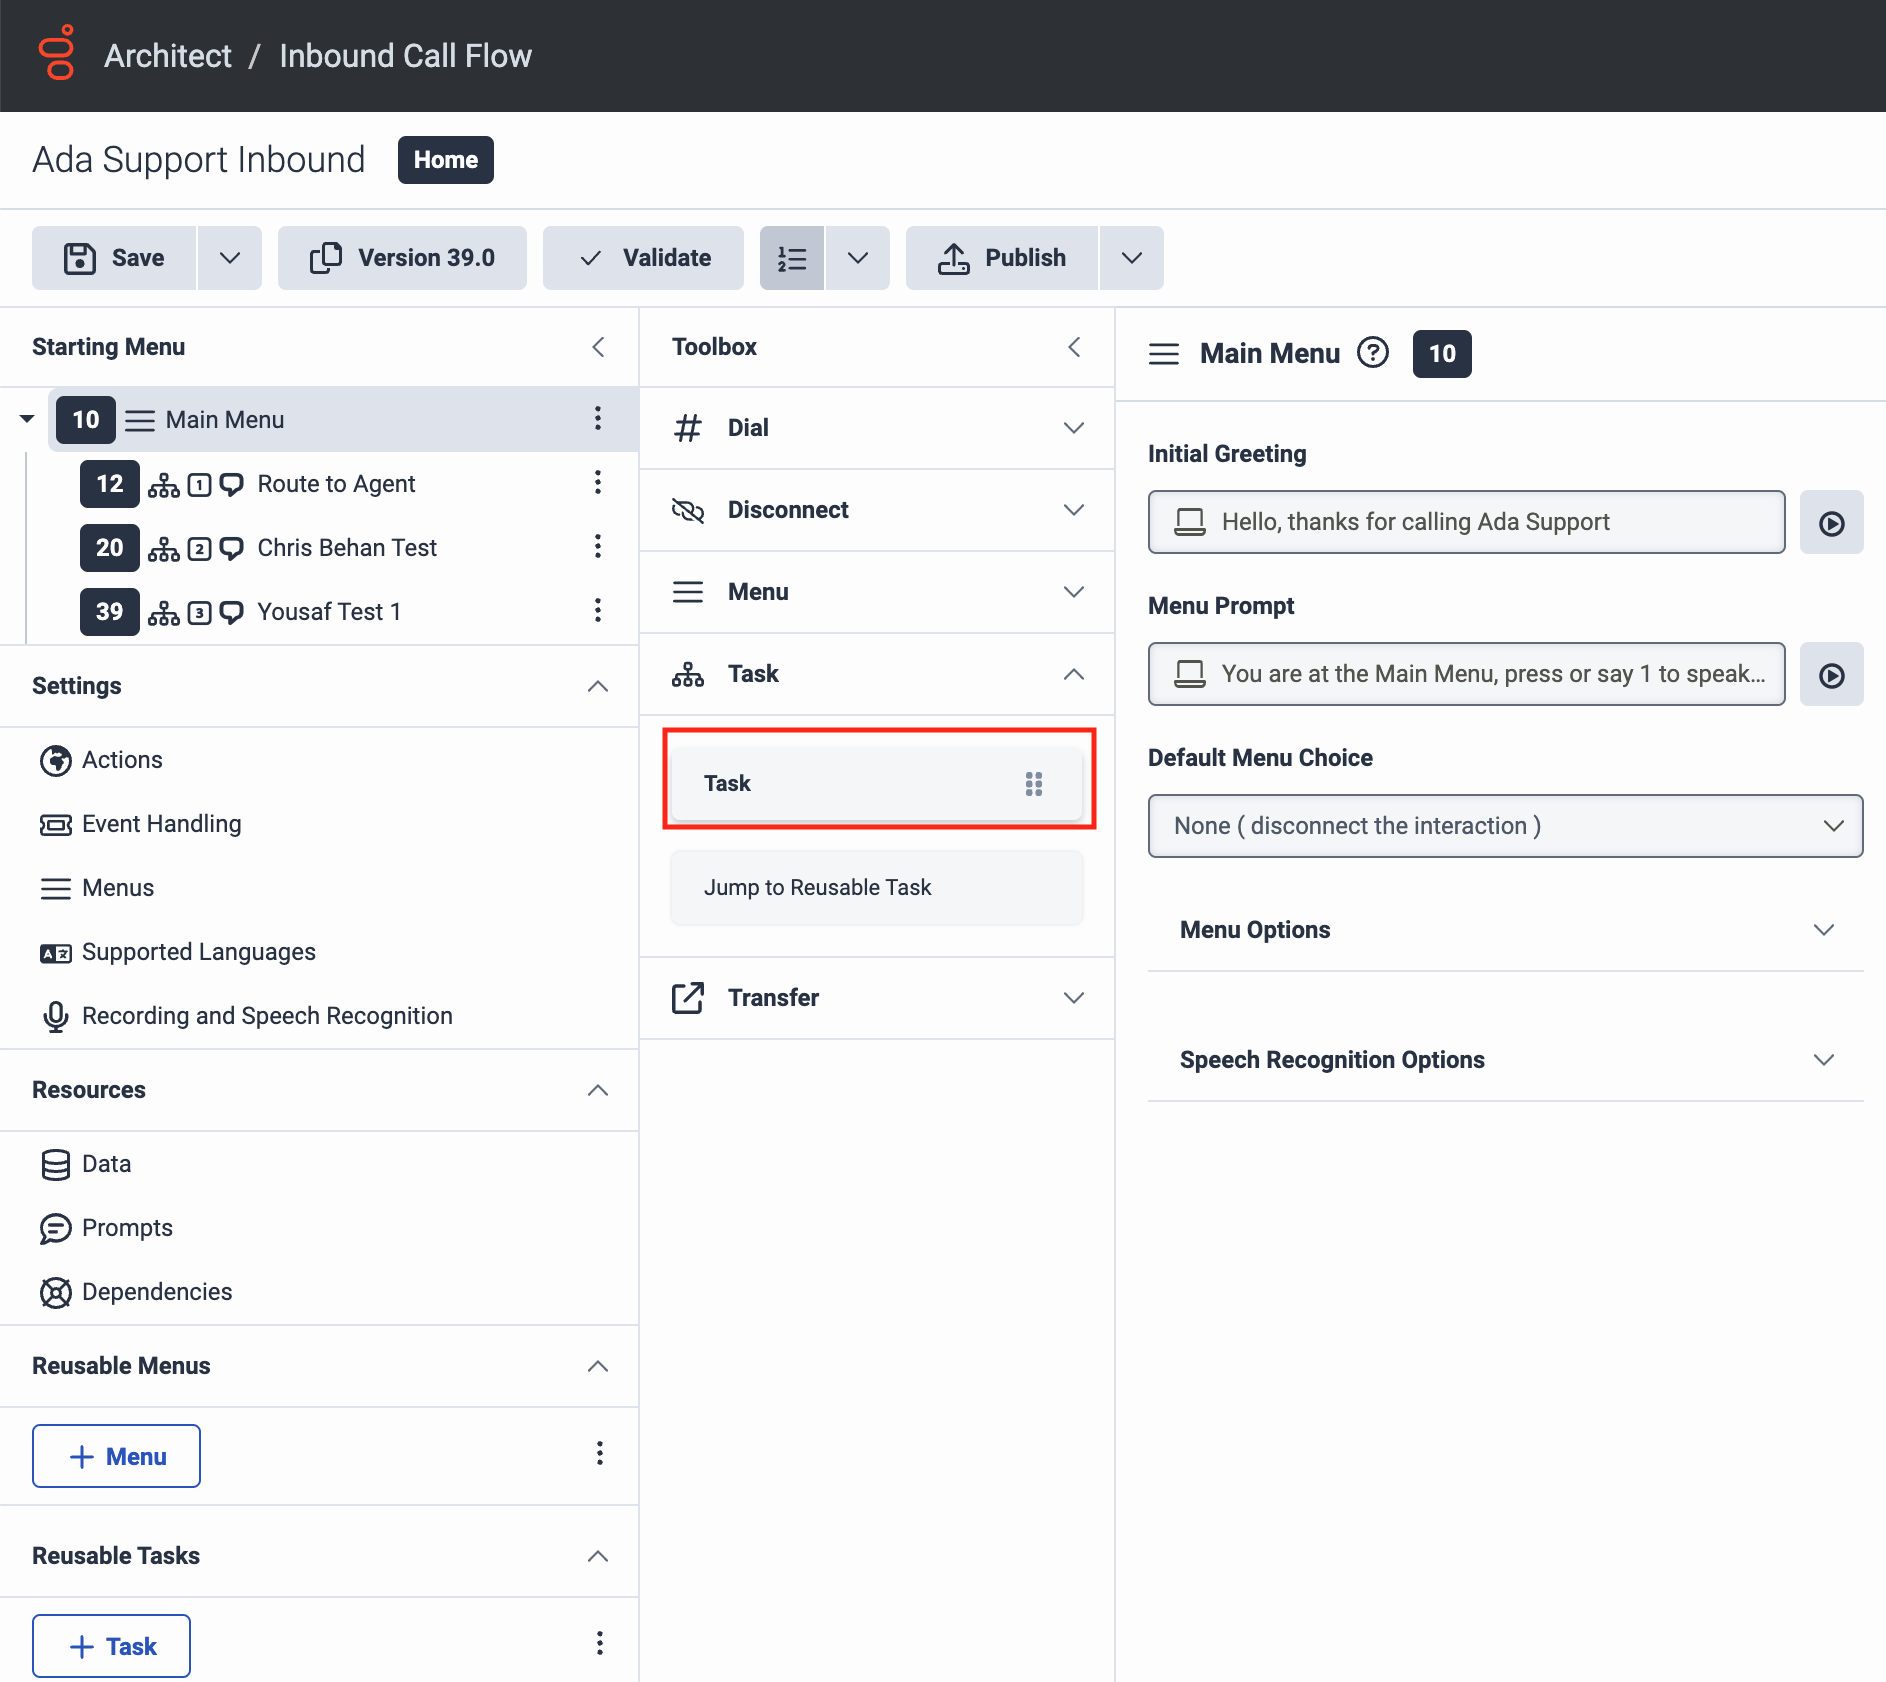
On the Inbound Call Flow page, under Toolbox, click Task to expand it, then drag the Task action into your Starting Menu. This creates the task we use to transfer end users to Ada Voice. The New Task pane opens.
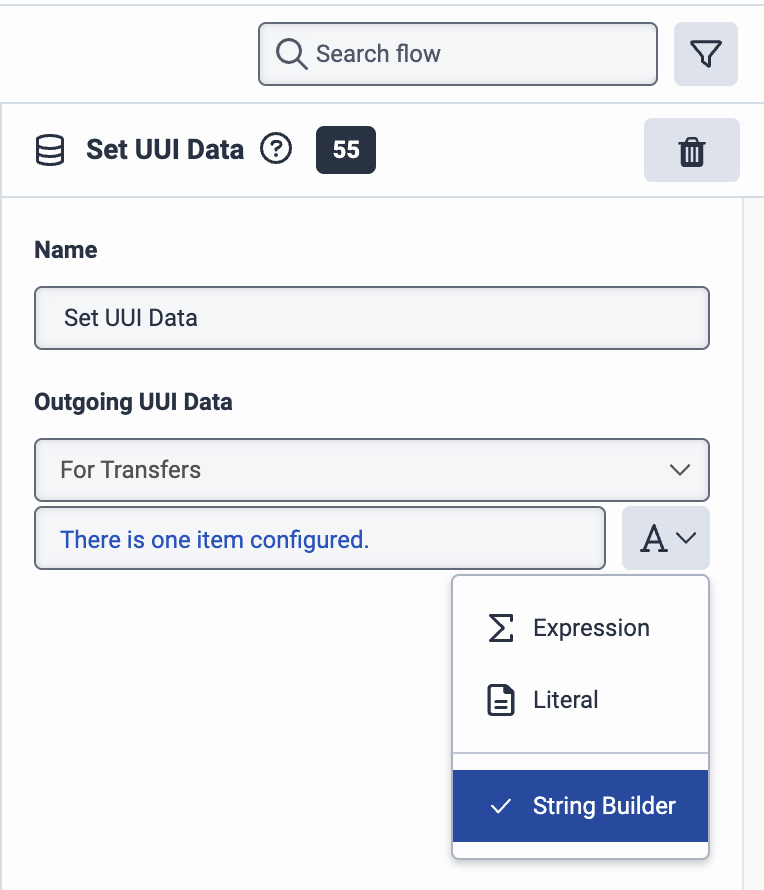
- Under Toolbox, click Data to expand it, then drag the Set UUI Data action into the New Task pane, into the Drag action here box. The Set UUI Data pane opens.
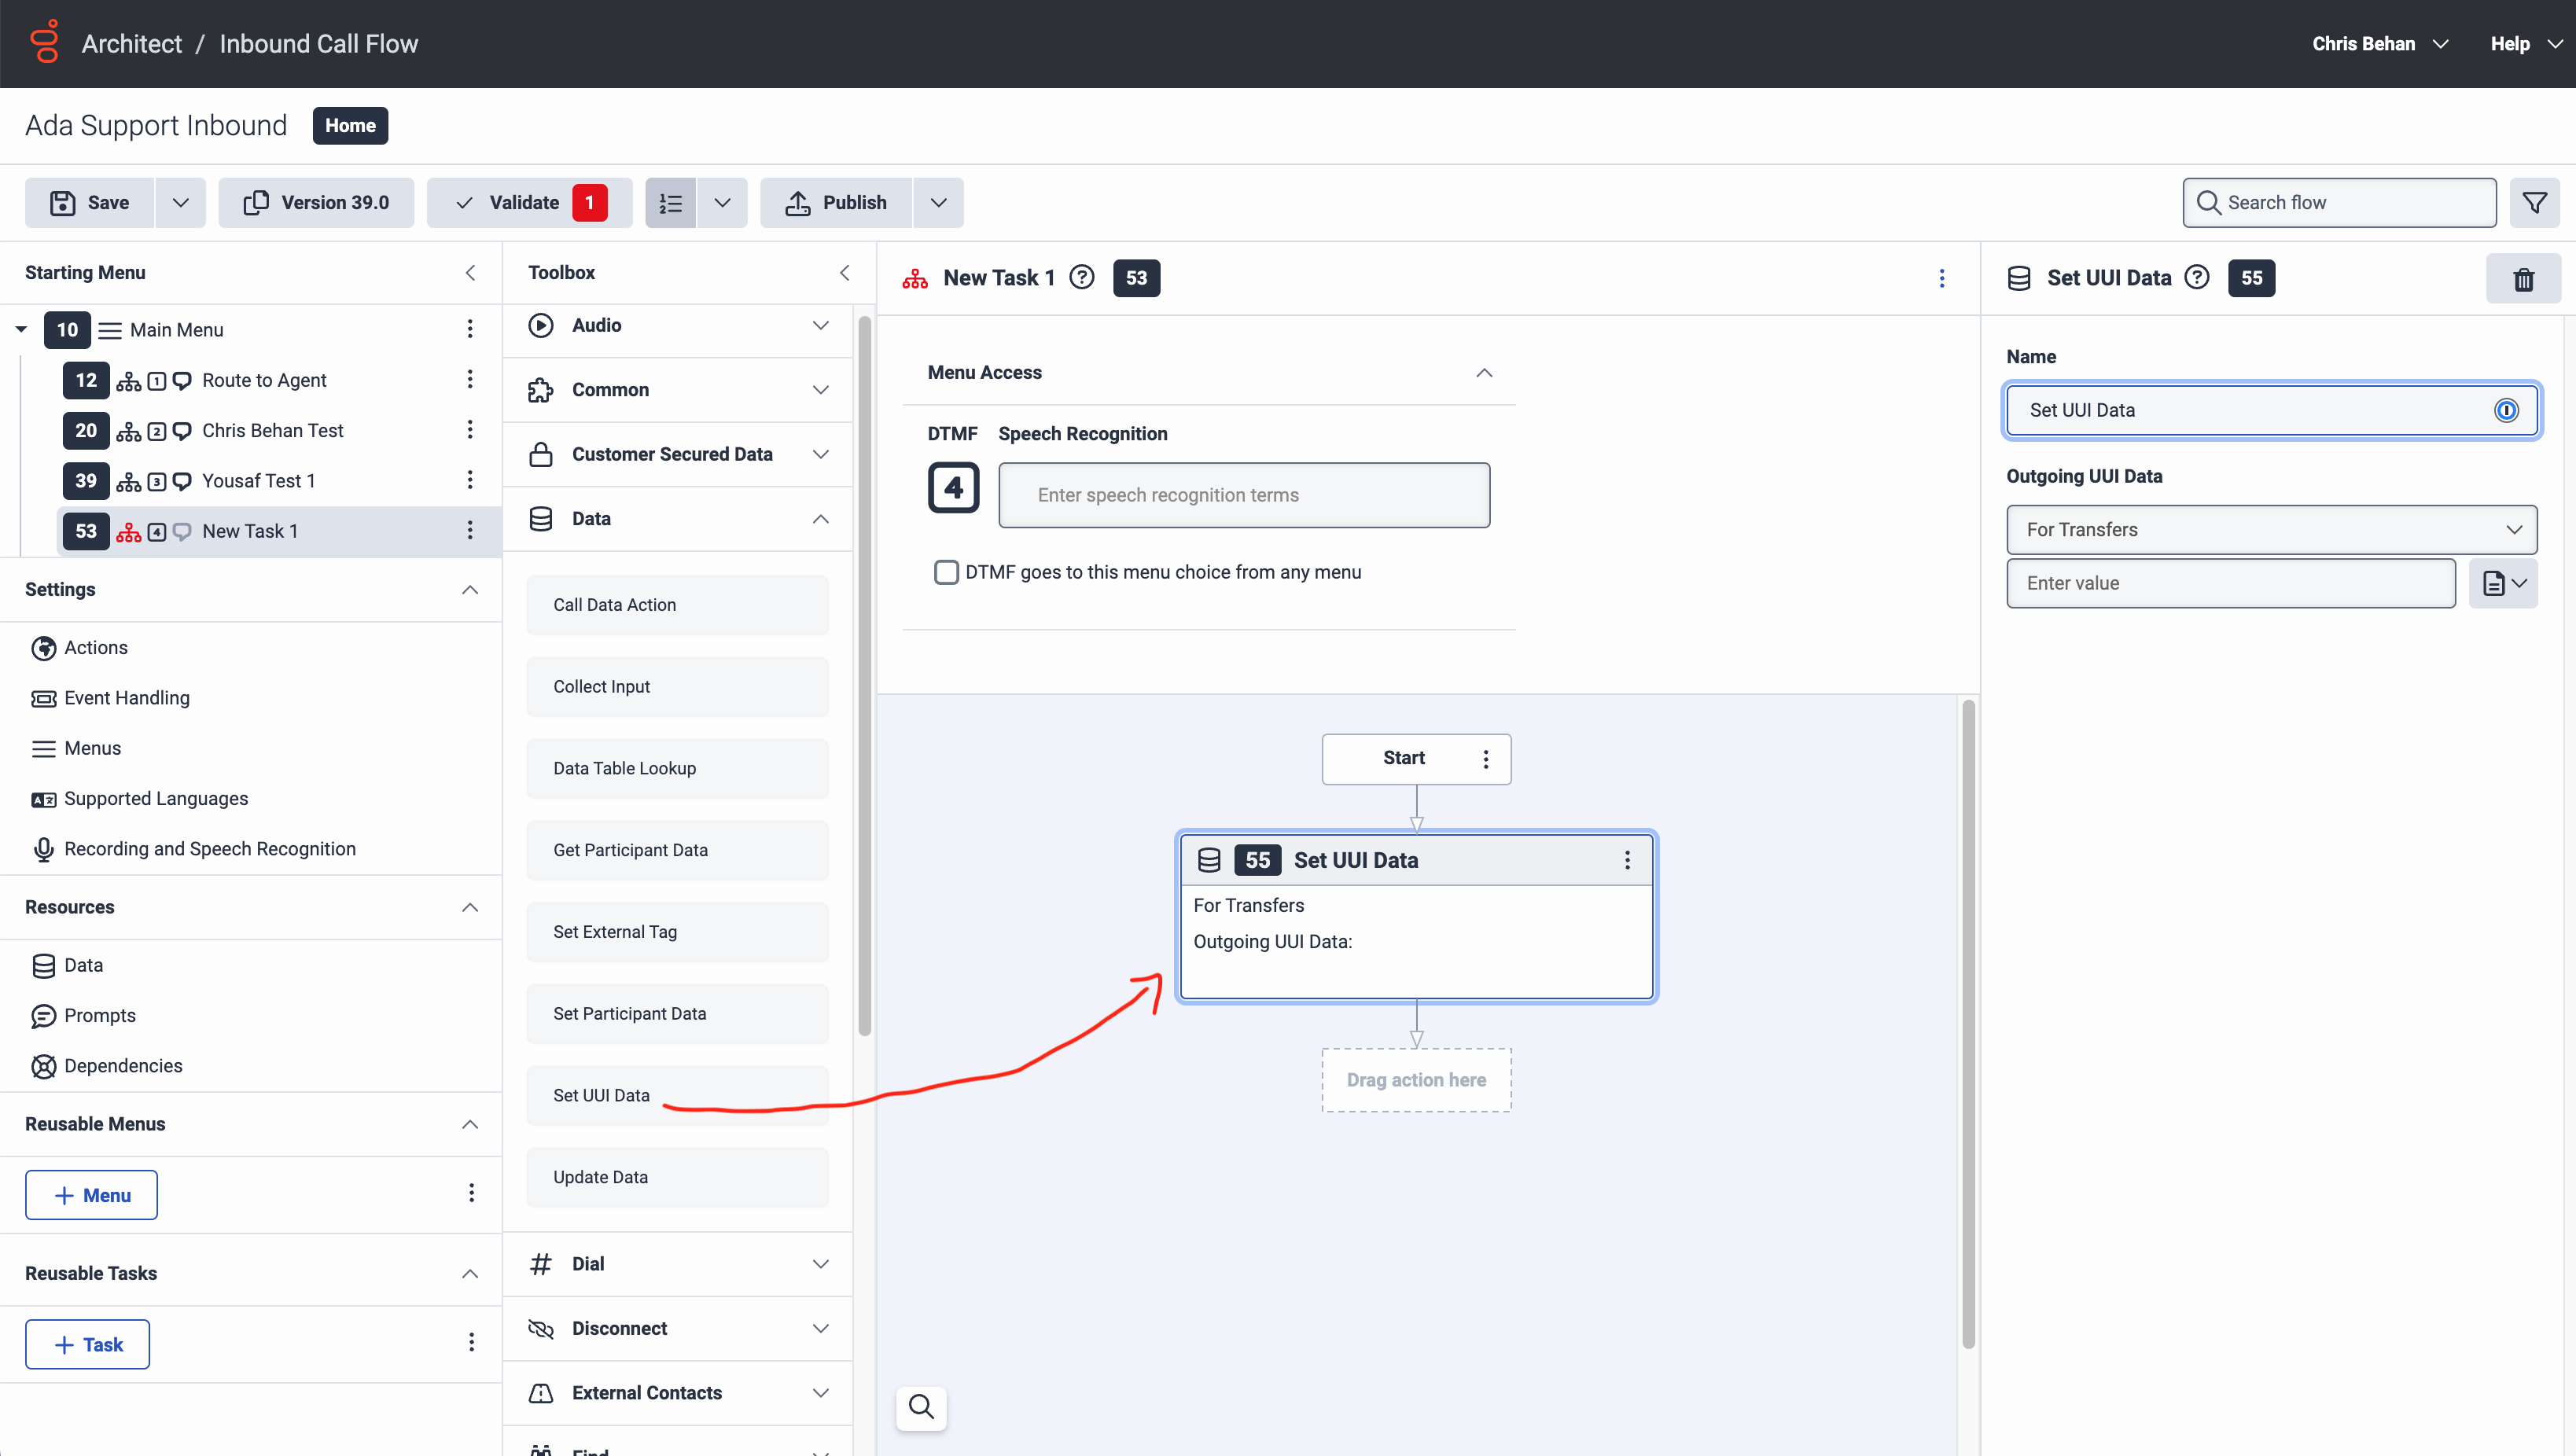
- In the Set UUI Data pane, under Outgoing UUI Data, beside the Enter value field, click the menu that has an icon of a document on it, and select String Builder.
-
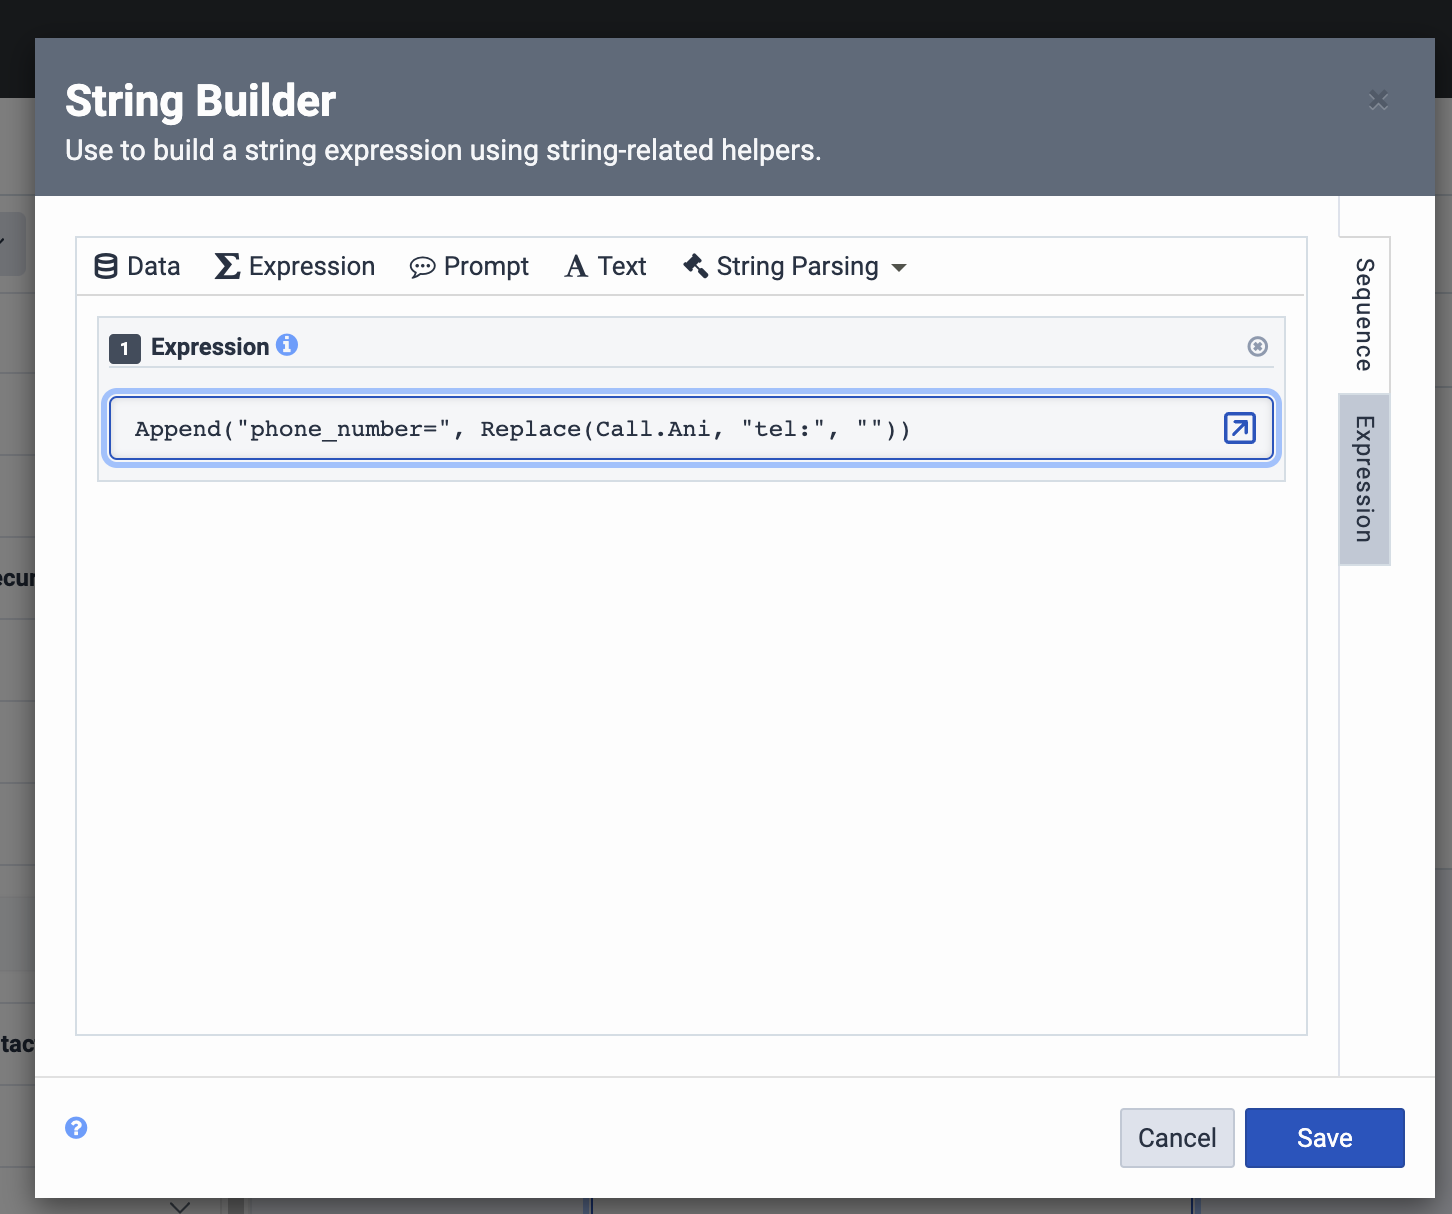
Click the same menu again and click Expression. The String Builder window opens. In the String Builder window, under Expression, enter this string:
This is a Genesys expression that extracts the end user’s number and adds it to the UUI header in the format Ada Voice expects (e.g.,
phone_number=+14035555555).
-
Click Save to save the string and close the String Builder window.
-
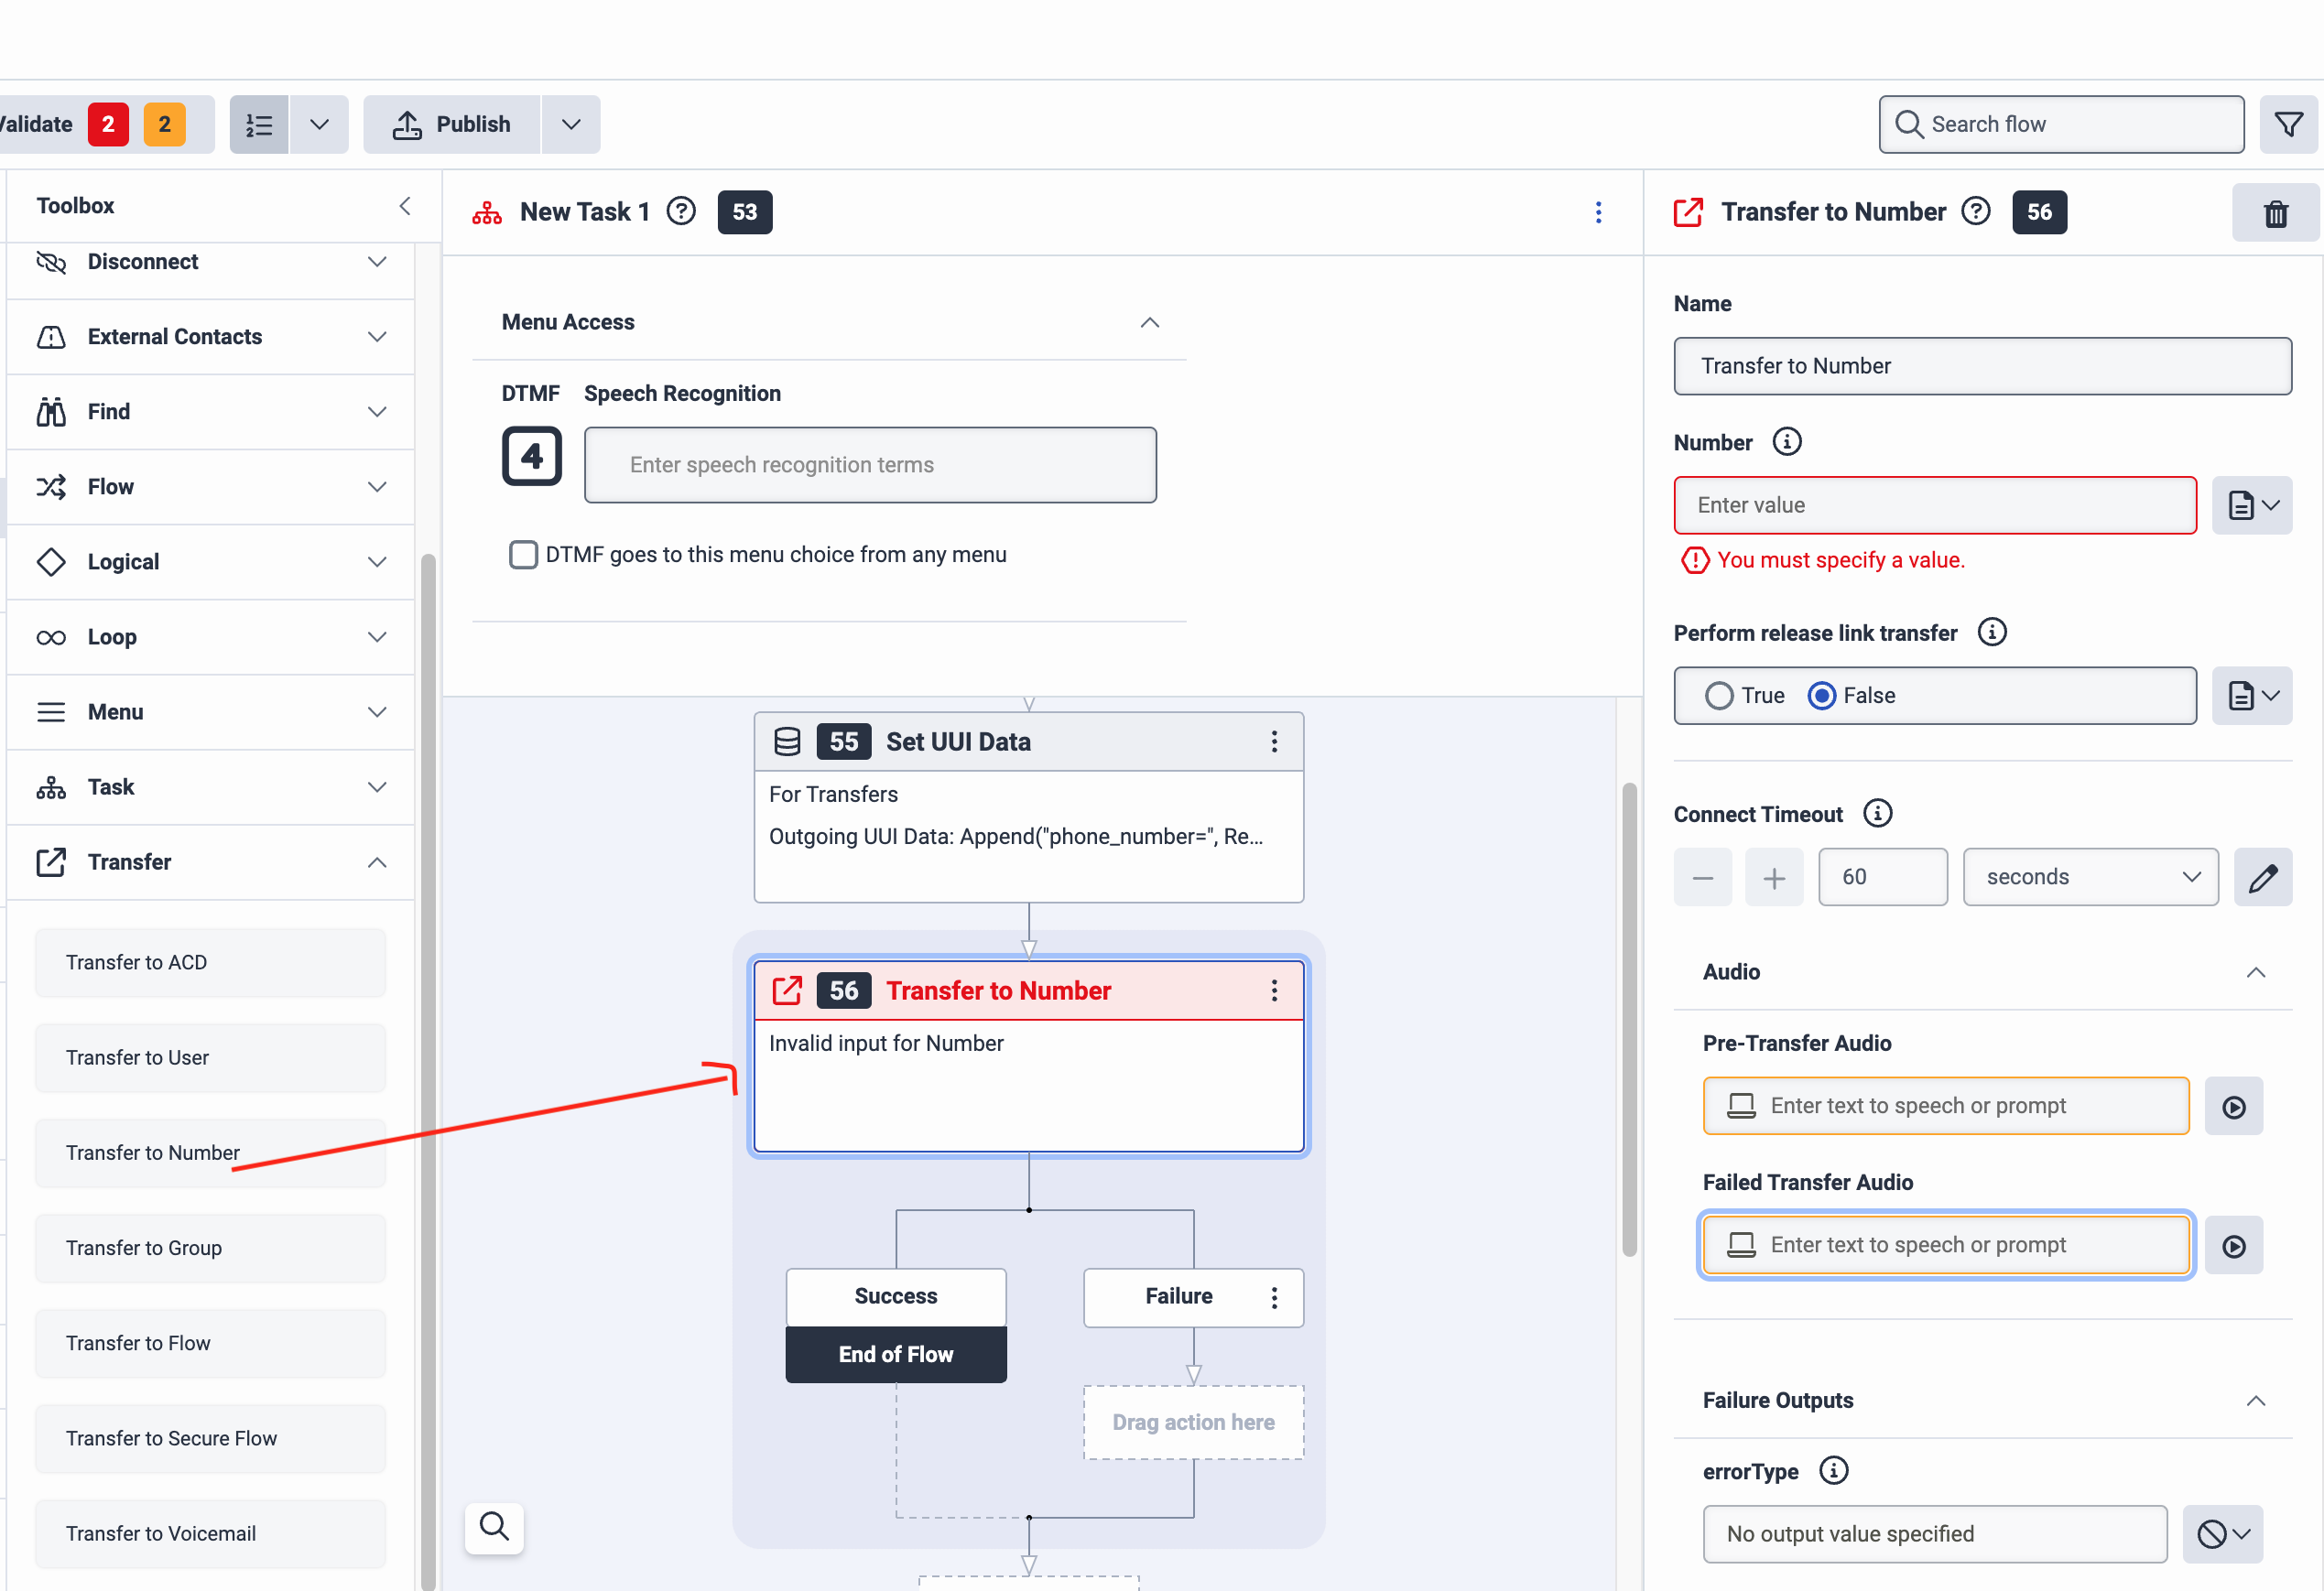
Under Toolbox, click Transfer to expand it, then drag the Transfer to Number action into the New Task pane, under the Set UUI Data action you just added. The Transfer to Number pane opens.
-
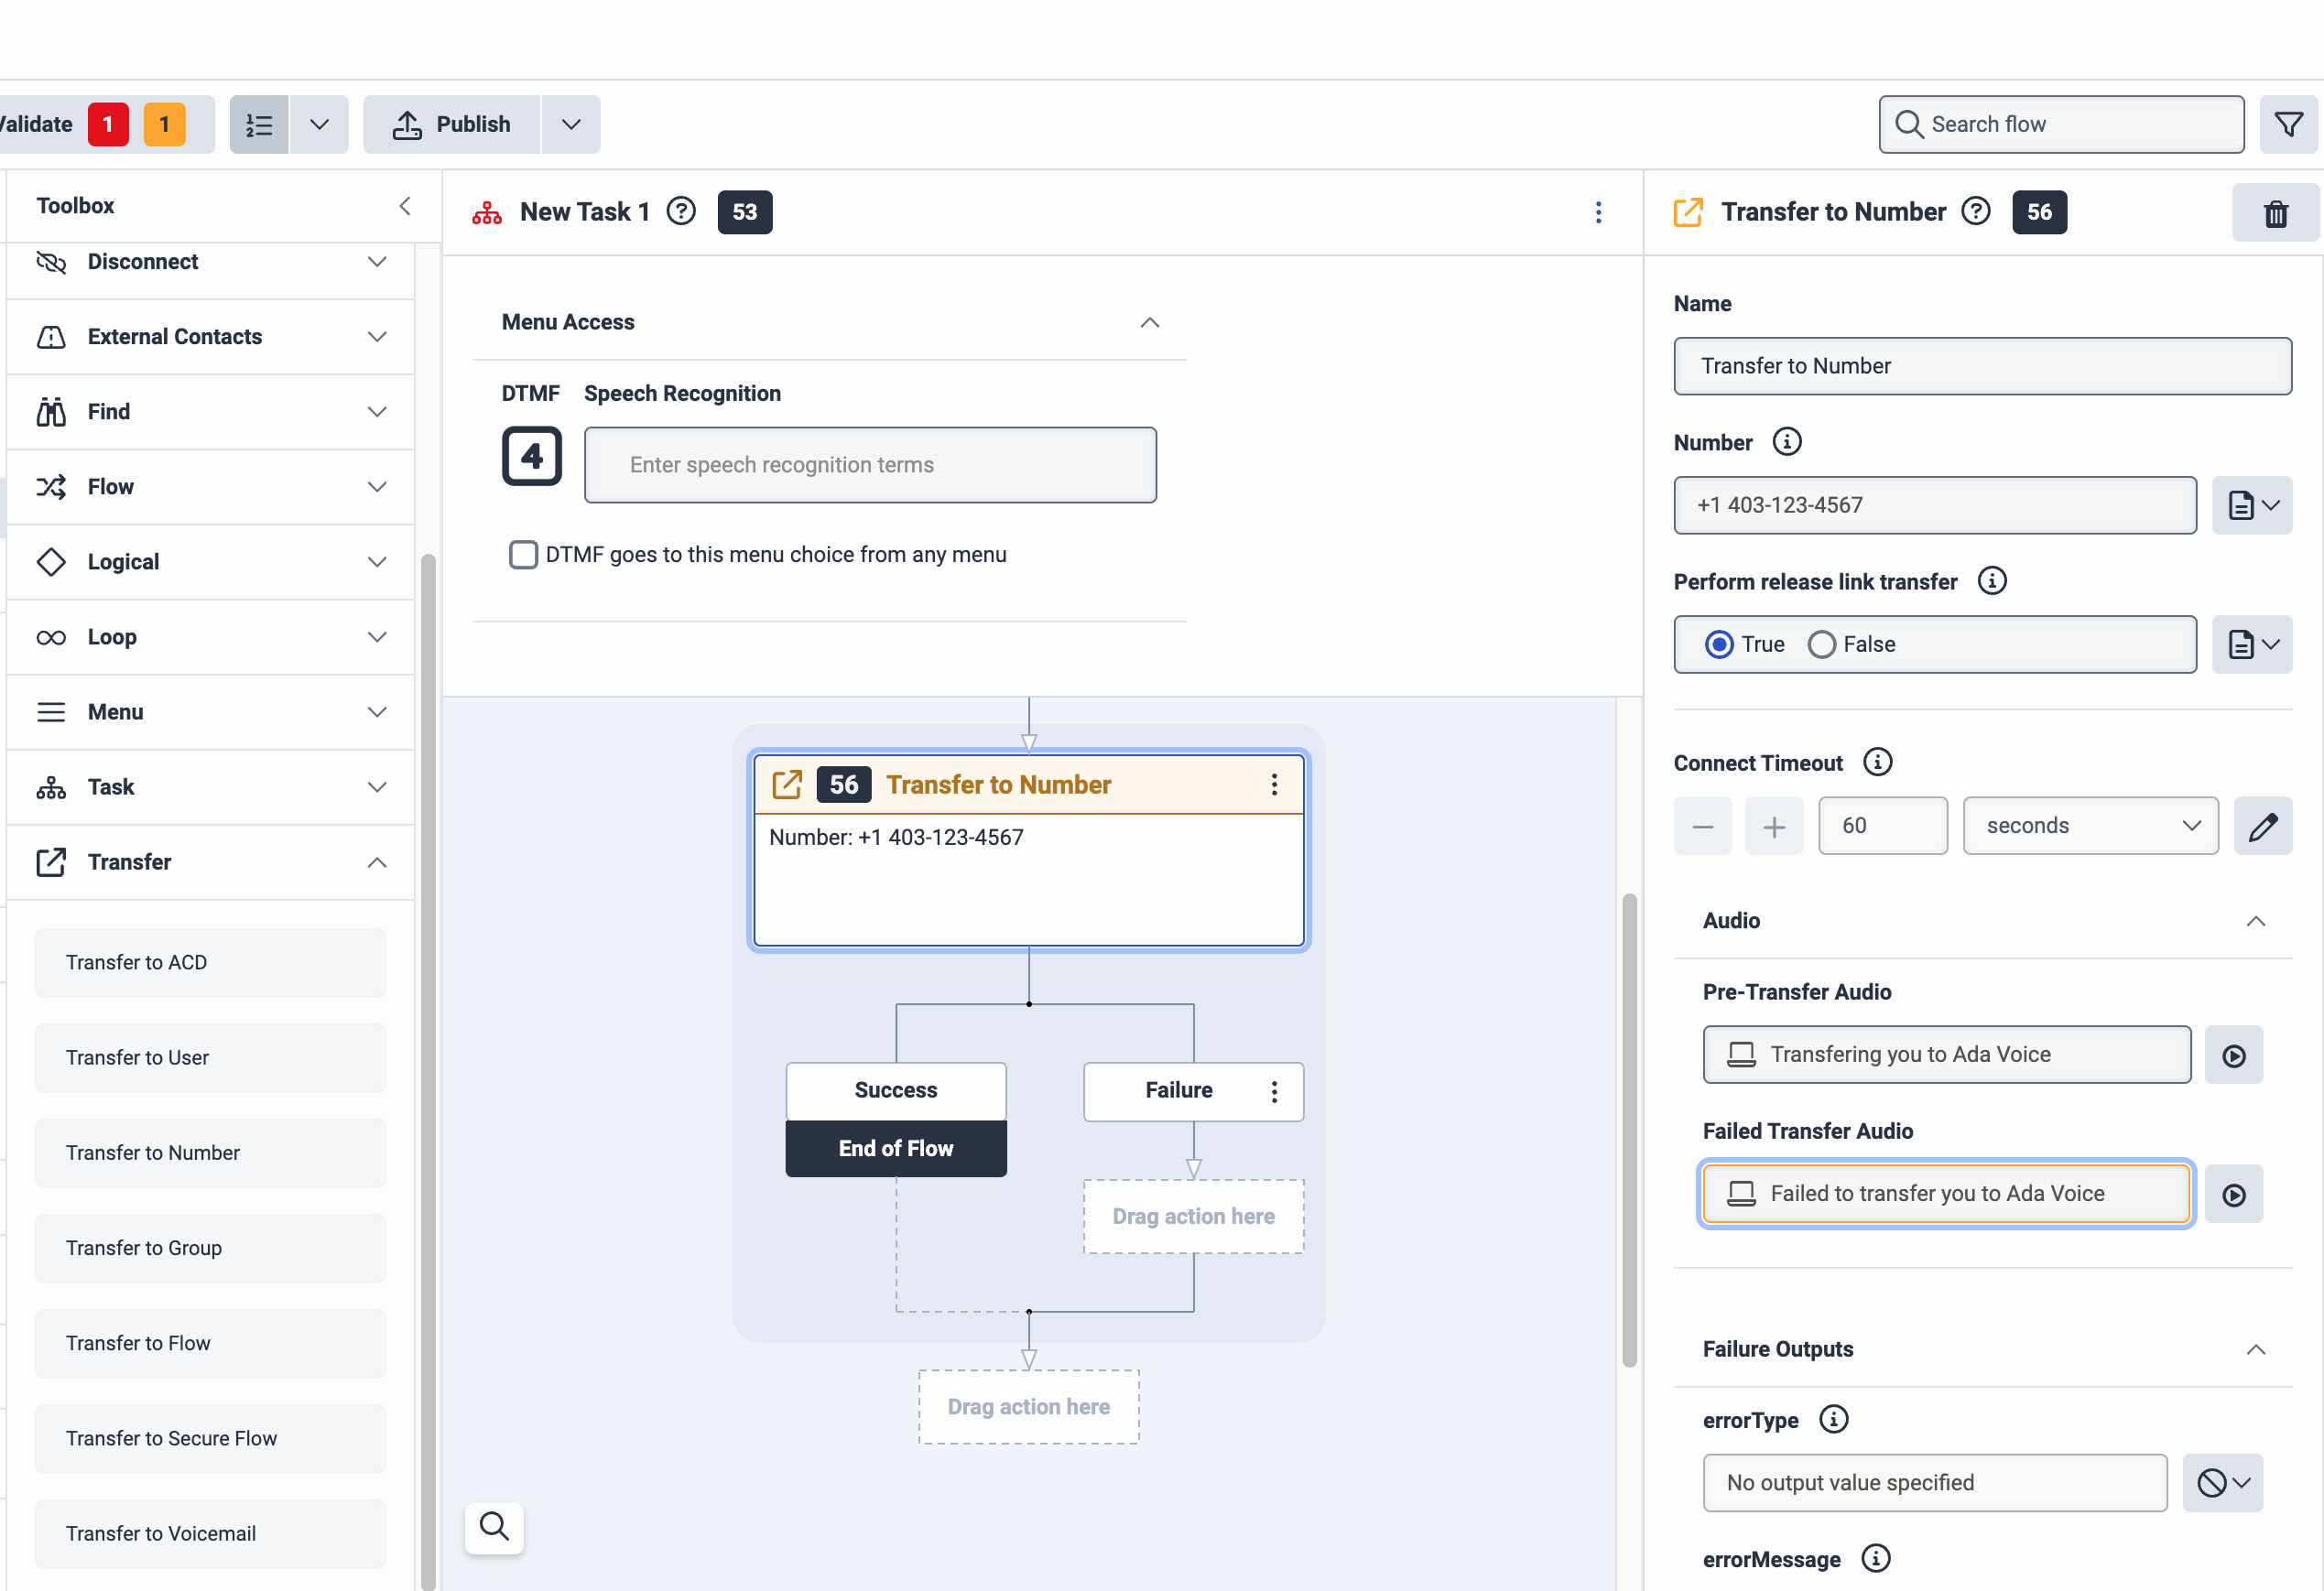
In the Transfer to Number pane, do the following:
- Under Number, enter the number you added in your number plan earlier.
- Under Perform release link transfer, select True.
-
Under Toolbox, click Disconnect to expand it, then drag the Disconnect action into the New Task pane, under the Transfer to Number action you just added.
-
Click Publish.
At this point, you should be able to call your Genesys Cloud IVR and be successfully transferred to Ada Voice.
Escalate calls directly to agents using Genesys Cloud
If an end user using your bot needs to escalate to a human agent, you can hand them off using a SIP REFER transfer to Genesys Cloud.
- In your Ada bot handoff locked Answer use the Transfer Call block and select SIP address from the Transfer to drop down menu.
- In the SIP address field, enter
<DID>@admin.byoc.usw2.pure.cloud, where<DID>is the destination number in Genesys Cloud that is being reached, in E164 format with a leading+. - Select the checkbox beside Include a User-to-User header when transferring to the SIP address.
- Click +Add another row.
- For Key, enter the key name
phone_number. - For Value, select the
phone_numbermetavariable. - Click +Add another row.
- Provide any additional key value pairs that you want sent to Genesys Cloud.
Integrate Voice with Zendesk Talk
This section takes you through how to transfer calls between Ada and Zendesk Talk. For more information about how to integrate a bot to Zendesk Talk, you can also reference the Connecting an external AI agent using a SIP-IN line article at Zendesk’s documentation.
Get calls into Ada
- You will continue to receive phone calls using a Zendesk Talk provisioned phone number, and you will transfer phone calls from Zendesk Talk to your Ada bot’s phone number.
- For more information, see the How can I forward calls to an external number from Zendesk Talk? article or the Routing incoming calls with IVR article at Zendesk’s documentation.
- You will also need to configure a Twilio phone number for your bot to use. For more information, see Set up your Twilio account in Get started with Voice at Ada’s Help Docs.
Escalate calls directly to agents using Zendesk Talk
If an end user using your bot needs to escalate to a human agent, you can hand them off using a SIP INVITE transfer to Zendesk Talk.
- Add a SIP-IN line in Zendesk Talk. For more information about how to do this, see the Adding a Talk SIP-IN line at Zendesk’s documentation.
- When you are creating your SIP-IN line in Zendesk, you will need to provide Ada’s source IP addresses for INVITE requests (”CIDR network addresses”). Please reach out to your Ada team to obtain these.
- You can create multiple SIP-IN lines for different skills or departments, and can route end users to the most appropriate department depending on the context of the conversation.
- In your Ada bot handoff locked Answer use the Transfer Call block and select SIP address from the Transfer to drop down menu.
- In the SIP address field, enter
<USERNAME>@<YOUR-UNIQUE-NAME-zendesk.sip.twilio.com>, where:<USERNAME>: A friendly username of your choice. We recommend using a unique username for Ada.<YOUR-UNIQUE-NAME-zendesk.sip.twilio.com>: The URI for your SIP-IN line.
- Optional: Pass a Zendesk Support ticket ID when making the transfer.
- Before transferring the call to the Zendesk SIP-IN line, your Ada bot can create a Zendesk Support ticket to log information about the conversation. Human agents will be shown the linked call tickets containing end user and SIP details when handling SIP-IN calls.
- When creating the ticket, use the via_id 34 (details here). This will help identify it as a voice incoming call ticket in Zendesk.
- Append the following to your SIP address as a query parameter:
X-Zendesk-Ticket-Id=<TICKET_NUMBER>where:<TICKET_NUMBER>- Is the number of the ticket you created.
- ex.
<USERNAME>@<YOUR-UNIQUE-NAME-zendesk.sip.twilio.com>?X-Zendesk-Ticket-Id=<TICKET_NUMBER>
Integrate Voice with Gladly
This section takes you through how to transfer calls between Ada and Gladly.
Get calls into Ada
- You will continue to receive phone calls using a Gladly provisioned phone number, and you will transfer phone calls from Gladly to your Ada bot’s phone number.
- For more information, see Configuration Options: Outbound calls, forwards via IVR, and transfers/conferences at Gladly’s documentation.
- You will also need to configure a Twilio phone number for your bot to use. For more information, see Set up your Twilio account in Get started with Voice at Ada’s Help Docs.
Escalate calls directly to agents using Gladly
If an end user using your bot needs to escalate to a human agent, you can hand them off using a SIP INVITE transfer to Gladly.
- Get the Ada IP address allowlist from your Ada team.
- Work with your Gladly team to set-up SIP forwarding. For more information, see Forward calls via SIP at Gladly’s documentation.
- You will use IP address allow list for authentication and will provide your Gladly team with the Ada IP addresses obtained in step 1 above.
- Ada uses G.711 mediacodec.
- You will need to provide Gladly with the list of phone numbers in Gladly that you will transfer calls from Ada to, and which will use SIP to receive the incoming call.
- For each phone number, Gladly will set up a corresponding SIP address following the format
<DID>@<GLADLY_SIP_DOMAIN>, where:<DID>: The destination number in Gladly that is being reached, in E164 format with a leading +.<GLADLY_SIP_DOMAIN>: A unique SIP domain created by Gladly.
- In your Ada bot handoff locked Answer use the Transfer Call block and select SIP address from the Transfer to drop down menu.
- In the SIP address field, enter your SIP address obtained from Gladly in step 2 following the format
<DID>@<GLADLY_SIP_DOMAIN>;transport=tls. - Append
X-Gladly-Caller-Id=<ANI>to your SIP address as a query parameter, where:<ANI>: The end user’s phone number in E164 format with a leading +. You should use thephone_numbermetavariable in Ada for this.- ex.
<DID>@<GLADLY_SIP_DOMAIN>;transport=tls?X-Gladly-Caller-Id=<ANI>
- Optional: If you want to route an end user to a specific queue, you can also pass a queue identifier when transferring a call.
- Append
X-Gladly-Routing-Selector=<topic>to your SIP address as a query parameter, where:<topic>: The specific queue that you want to send a call to. This is a free-form, alphanumeric string identifying the specific queue to send a call to.- ex.
<DID>@<GLADLY_SIP_DOMAIN>;transport=tls?X-Gladly-Caller-Id=<ANI>&X-Gladly-Routing-Selector=<topic>
- Append
Integrate Voice with your Cisco CUBE
This section takes you through how to integrate Ada Voice with a Cisco CUBE.
Setting up your Ada SIP domain
- If you are using your own Twilio account with Ada Voice, configure a Twilio SIP domain for your bot to use. For more information, see Set up your Twilio account in Get started with Voice at Ada’s Help Docs.
- If your Voice subscription package includes Twilio your Ada team will set up your SIP domain for you. You will need to provide them with the following information:
- The domain name for your SIP address: This will be used for the SIP domain that will be created for you, which will follow the format
<your_domain_name>.sip.twilio.com. This needs to be a unique domain name that is not currently being used in Twilio. - IP Addresses for your SIP domain’s Access Control List (ACL): An ACL is a security mechanism that enhances network security by allowing only specified IP addresses to access your SIP domain. In the context of SIP communications, this means defining trusted IP addresses—such as those associated with your SIP infrastructure—to ensure that only authorized signaling and media traffic is permitted to interact with your SIP domain.
- The domain name for your SIP address: This will be used for the SIP domain that will be created for you, which will follow the format
Integrating Ada in your SIP infrastructure
You must allow all of Twilio’s following IP address ranges and ports on your firewall for SIP signaling traffic. Please also note that these IP addresses are provided for firewall configuration purposes only and not all of these IP addresses will host active gateways at a given time. Customers should also avoid sending traffic directly to these IP addresses and instead use your SIP domain.
Global Media IP Gateway
The Public Connections Destination IP Ranges and Port Ranges are now identical across all locations:
Regional Signaling IP Gateways
Port
5061 (TLS)
North America Virginia Gateways
North America Oregon Gateways
Europe Ireland Gateways
Europe Frankfurt Gateways
Asia-Pacific Tokyo Gateways
Asia-Pacific Singapore Gateways
Asia-Pacific Sydney Gateways
South America São Paulo Gateways
Routing Calls to Ada
In order to route calls to Ada, you must make a SIP INVITE to Ada.
- The SIP INVITE
TOSIP address should be<DID>@<YOUR_ADA_SIP_DOMAIN>, where:<DID>: The phone number that you used to receive the call.<YOUR_ADA_SIP_DOMAIN>: The Ada SIP domain for your Ada bot.
- The
FROMSIP address should be<ANI>@<YOUR_IP_ADDRESS>where:<ANI>: The end user’s phone number.<YOUR_IP_ADDRESS>: The IP addresses of your SIP infrastructure.
Transferring Calls from Ada to your Cisco CUBE
If a caller using your bot needs to escalate to a human agent, you can hand them off using a SIP REFER transfer to your SIP infrastructure.
- In your Ada bot handoff locked Answer use the Transfer Call block and select SIP address from the Transfer to drop down menu.
- In the SIP address field, enter the SIP address that you want to transfer the call to. This will generally be
<DID>@<YOUR_IP_ADDRESS>, where:<DID>: The line or extension that you want to transfer the call to.<YOUR_ADA_SIP_DOMAIN>: The IP addresses of your SIP infrastructure.
- Select the checkbox beside Include a User-to-User header when transferring to the SIP address.
- Click +Add another row.
- For Key, enter the key name phone_number.
- For Value, select the phone_number metavariable.
- Click +Add another row.
- Provide any additional key value pairs that you want sent via the UUI header.